Overview
A snapshot is a complete picture of the files and folders in your file system at a specific point in time. Snapshots include new data or data that has changed since the last snapshot. Snapshots offer data protection by enabling you to recover files deleted in error or to restore an entire file system. After a snapshot has been taken and is sent to cloud storage, it is not possible to modify that snapshot.
By default, all snapshots are retained. However, for compliance purposes or your own best practices, you can specify to delete older snapshots from cloud storage.
The snapshot retention process runs on the volume-owning Edge Appliance only. (With version 9.15/24.1 or later, you can also arrange for the snapshot retention process to run in the cloud. See SRaaS (Snapshot Retention as a Service).) The snapshot retention process can potentially affect user activity performance on the appliance, so this process has a lower priority than other Nasuni Edge Appliance processes. For this reason, the execution of the snapshot retention policy can be potentially slowed.
Important: Read this document carefully to ensure that the behavior of the Snapshot Retention feature is understood. In particular, note the following points:
If you select a 30-day retention policy (for example), this does not mean that no data older than 30 days is retained. It actually means that data older than 30 days becomes eligible for the snapshot retention process, but this might take up to double the retention policy timeframe.
No data is removed unless the customer deletes the data from their system first, regardless of how old the data is.
Tip: Snapshot Retention can remove previous snapshots only if snapshots are currently occurring regularly.
Important: Data in the active file system is only deleted when the customer deletes data.
Important: Removal of any snapshot reference to the data deleted by a user occurs when the last snapshot containing any reference to the deleted data is removed via a triggered snapshot retention policy.
Caution: For security purposes, when a snapshot is removed, it is permanently deleted from cloud storage and cannot be recovered.
Snapshot Retention details
You can specify to delete older snapshots from cloud storage, based on a configured policy for a specific volume.
Snapshot Retention policies are configured on the volume level. Snapshot Retention policies based on the number of snapshots only work on local volumes. Time-based Snapshot Retention policies work on local or shared volumes.
Changes to the Snapshot Retention setting go into effect when the next snapshot occurs. It is normal to temporarily see more snapshots than the Snapshot Retention setting would suggest.
Tip: Set a shorter Snapshot Retention policy for any volumes used for backup data only.
Important: As long as a file is included in any snapshot within your snapshot retention policy, the file can still be restored. However, if you delete a file, and none of the retained snapshots includes that file, the file’s backup is gone.
How Snapshot Retention works
This section describes in a general way how Snapshot Retention works. In this description, certain snapshots are designated as “boundaries” to separate groups of snapshots.
Tip: Snapshot Retention can remove previous snapshots only if snapshots are currently occurring regularly.
For a set number of snapshots
The customer can choose to keep a certain number of snapshots in the cloud. Suppose that a customer chooses to keep the latest 10 snapshots. A boundary is going to be designated every ((X/2) +1) snapshots. For 10 snapshots, a boundary is designated every 6 (= 10/2+1) snapshots.
Note: The snapshot retention process only occurs on the Edge Appliance that owns the volume. Also, the snapshot retention process can only run on one volume at a time. If there are multiple volumes owned on an Edge Appliance, the process runs sequentially on each volume with a set snapshot retention policy. Also, the process of removing older versions is not instantaneous.
Important: Every Edge Appliance connected to a volume must be online and synced before the snapshot retention process can run. Otherwise, data might be removed that other Edge Appliances connected to that volume might need.
Suppose that we create a snapshot retention policy when the volume already has 45 snapshot versions.
Version 46 is immediately designated as a boundary.
Version 52 is 6 versions (= 10/2 + 1) after the previous boundary, so version 52 is designated as a boundary. No versions are removed.
Version 56 is the 10th version after version 46. Snapshots versions are removed up to, but not including version 46; namely, versions 1-45 are discarded. Versions 46-56 are retained.
Version 58 is 6 versions after the previous boundary, so version 58 is designated as a boundary. No versions are removed.
Version 62 is the 10th version after version 52. Snapshot versions are removed up to, but not including, version 52; namely, versions 46-51 are discarded. Versions 52-62 are retained.
Note that this new snapshot retention process would only occur if the previous operation (of versions 1-45) has completed.Version 64 is 6 versions after the previous boundary, so version 64 is designated as a boundary. No versions are removed.
Version 68 is the 10th version after version 58. Snapshot versions are removed up to, but not including, 58; namely, versions 52-57 are discarded. Versions 58-68 are retained.
The pattern continues from there.
For snapshots within a given time (or within a range)
The customer can choose to keep snapshots in the cloud newer than a given time.
Important: For the purposes of time-based snapshot retention: • One year is defined as 31,556,926 seconds. • One month is defined as 2,629,743 seconds. • One day is defined as 86,400 seconds.
Suppose that a customer chooses to keep the snapshots for one year.
If there is no previous boundary, create a boundary. If the time delta is more than one year, designate the latest snapshot version as a boundary.
Note: A boundary is also created at least every 6 months, regardless of whether the retention period is longer.
Subsequent boundaries are determined in a similar way. Calculate the time delta between the end-time of the previous boundary and the current time. If the time delta is more than one year, then designate the latest snapshot version as a boundary.
The snapshot retention process occurs when the end-time of a boundary’s snapshot is more than one year. All snapshots up to, but not including that boundary, are eligible for pruning.
Note: The snapshot retention process only occurs on the Edge Appliance that owns the volume. Also, the snapshot retention process can only run on one volume at a time. If there are multiple volumes owned on an Edge Appliance, the process runs sequentially on each volume with a set snapshot retention policy. Also, the process of removing older versions is not instantaneous.
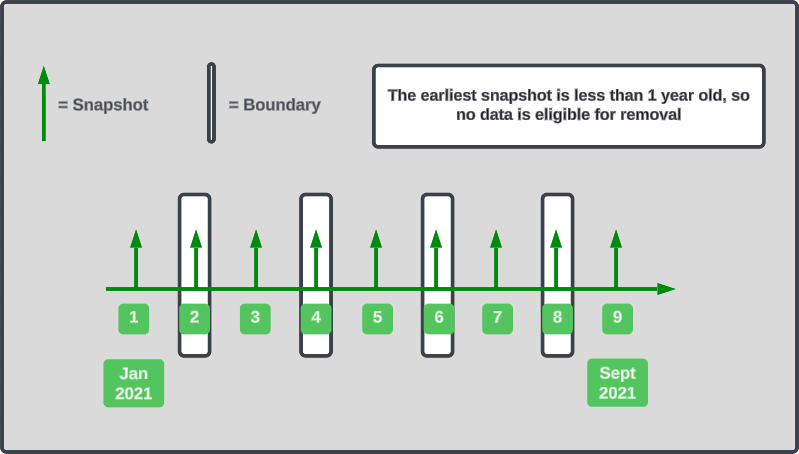
Example 1
In this example, Snapshot Retention was enabled on January 1, 2021, with a retention interval of 1 year. This means that no data is eligible for removal until 1 year after January 1, 2021.
A time boundary was created on February 1, 2021. It is now September 1, 2021 (8 months later). Since Snapshot Retention has only been enabled for 8 months, no data is eligible for removal.
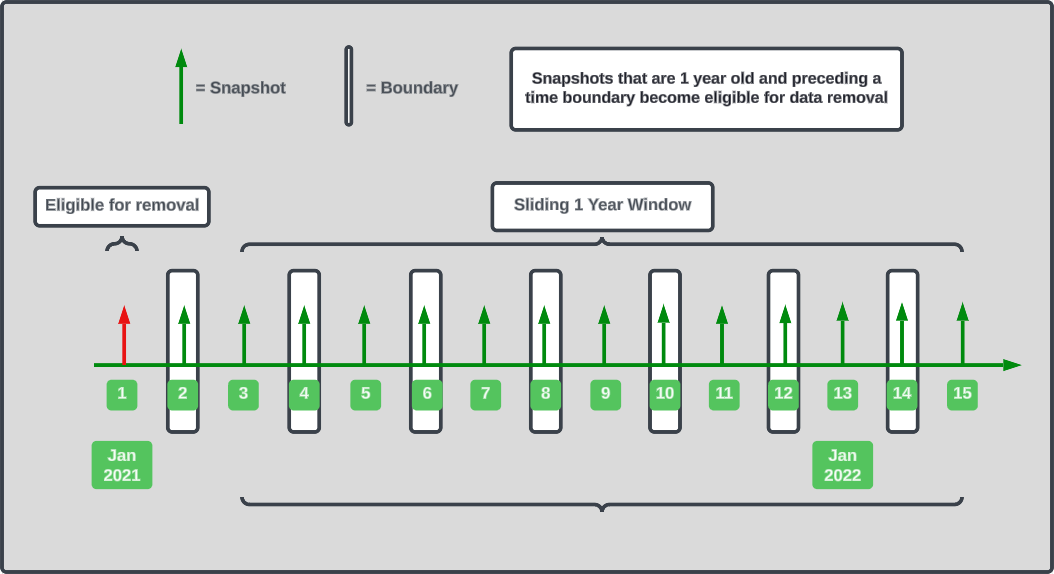
Example 2
In this example, Snapshot Retention was enabled on February 1, 2021, with a retention interval of 1 year. It is now March 1, 2022, and the organization has met the conditions for their deleted data to be eligible for data removal.
In order for deleted data to be eligible for removal, the following two conditions occurred:
Snapshot Retention was enabled for at least 1 year.
There is a time boundary older than the 1 year Snapshot Retention window.
Once these two conditions were met, data preceding the time boundary before the 1 year Snapshot Retention window became eligible for removal.
In this scenario, snapshot #3 begins the 1 year retention interval. Snapshot #2 is a time boundary before snapshot #3. Therefore, snapshot #1 is now eligible for removal.
Note: Conditions such as shared volumes and your retention timeframe impact the frequency at which your company's data is eligible for removal.
Time boundary frequency
The default configuration is for the period between time boundaries to be a specified fraction of the snapshot retention time that you specified on the Snapshot Retention page.
The advantage of a shorter period between time boundaries is that you do not have to wait so long for unwanted data to first become eligible for deletion.
The pros and cons of more frequent time boundaries can be summarized as follows:
Pros
You do not have to wait so long for unwanted data to first become eligible for deletion.
This reduces the amount of data under protection, which reduces costs.
Cons
Should you need to restore data, in certain situations, if the data to be restored is behind a time boundary, it might be necessary to remove the time boundary before performing a fast restore.
Configuring Snapshot Retention
You can create a Snapshot Retention policy using the Edge Appliance user interface, for a local “owned” volume. You can also create a Snapshot Retention policy using the NMC. With version 9.15/24.1 or later, you can also arrange for the snapshot retention process to run in the cloud. See SRaaS (Snapshot Retention as a Service).
Tip: Snapshot Retention can remove previous snapshots only if snapshots are currently occurring regularly.
When configuring Snapshot Retention, the following options are available:
Volume: You select the local “owned” volume that you want to define Snapshot Retention for.
Snapshots to retain: You select which snapshots to retain, from the following options:
All snapshots: (This is the default setting.) Retains all snapshots indefinitely. If you require deleting older snapshots for compliance or other reasons, do not select this option.
A set number of snapshots: (This option is not available if the selected volume has Remote Access enabled.) You specify the number of the most recent snapshots to retain, from 1 to 1 billion (1,000,000,000).
For example, if you choose to keep 100 snapshots, then the 100 most recent snapshots are retained, and the rest are deleted automatically.Snapshots within a given time: Enter the number of Years, Months, or Days for which you want to retain snapshots.
For example, if you choose to keep two months’ worth of snapshots, then snapshots that were taken before they are deleted automatically.
Important: For the purposes of time-based snapshot retention: • One year is defined as 31,556,926 seconds. • One month is defined as 2,629,743 seconds. • One day is defined as 86,400 seconds.
Changing Snapshot Retention time interval
Changing from longer interval to shorter interval
When changing from a longer retention time interval (such as 1 year) to a shorter retention time interval (such as 1 month), snapshots that are between 1 month and 1 year become eligible for removal after 1 month.
Changing from shorter interval to longer interval
Similarly, when changing from a shorter retention time interval (such as 1 month) to a longer retention time interval (such as 1 year), snapshots that are between 1 month and 1 year become eligible for removal when the first boundary after that change becomes older than 1 year.
Examples of Snapshot Retention scenarios
Important: For the purposes of time-based snapshot retention: • One year is defined as 31,556,926 seconds. • One month is defined as 2,629,743 seconds. • One day is defined as 86,400 seconds.
How long is data retained?
Scenario details
Retention interval: 30 days.
Snapshot Retention is implemented on January 1.
How long is data retained?
Answer
A boundary is created when Snapshot Retention is implemented on January 1.
Another boundary is created 30 days after Snapshot Retention is implemented, on January 31. At this point, it is possible to remove files from before the previous boundary on January 1.
The next boundary is created 30 days after the previous boundary, on March 2. At this point, it is possible to remove files from before the previous boundary on January 31.
The next boundary is created 30 days after the previous boundary, on April 1. At this point, it is possible to remove files from before the previous boundary on March 2.
This pattern continues: each time a boundary is created (every 30 days), it becomes possible to remove data up to the previous boundary.
Note that this means that files are retained for up to twice the retention interval. For example, on March 31 (the day before the next boundary is created), files can be from before January 31. This represents just less than two 30-day retention intervals of retained data.
Restoring deleted file
Scenario details
Retention interval: 1 year + 1 day.
File is created on 1-Jan-20 and never changed afterwards.
The customer deletes this file on 5-Jan-21.
Can this file be restored?
Answer
Every snapshot is a complete picture of all files and folders in the file system. This means that every snapshot up until 5-Jan-21 (when the customer deletes the file from the file system) contains the file.
Whether the file can be restored also depends on when the boundaries occurred.
If, for example, 5-Jan-21 is the boundary, and the file is deleted 4-Jan-21, then data removal does not occur until the 5-Jan-21 boundary is at least a year and a day old, namely 6-Jan-22.
If, in contrast, 5-Jan-21 is the boundary, and the file is deleted 6-Jan-21, then the data removal does not occur until 7-Jan-23, two years and two days after the 5-Jan-21 boundary.
Also, the snapshot retention process is not an instantaneous process.
How data deletion works within Snapshot Retention
Snapshot retention runs in several phases.
1. In the first phase, the snapshot retention process scans all the versions that are being retained, based on the snapshot retention policy, and builds a list of all objects to keep. This is known as the “keep list”. After building this “keep list”, the process hides all versions that are set to be removed.
2. In the second phase, the snapshot retention process scans all of these hidden versions and deletes from the cloud object store any objects that are not on the ”keep list”.
3. Finally, the hidden versions are removed from the system.
Using the “keep” list
When the snapshot retention process begins, it creates a “keep” list, based on your configuration for snapshot retention. For example, if you have specified to retain a certain number of the most recent snapshots, the cloud objects comprising that snapshot would be part of the “keep” list. Similarly, if you have specified to retain snapshots more recent than a specified date, those cloud objects would also be part of the “keep” list. The “keep” list is made of all the cloud objects belonging to the snapshots that need to be retained.
Building the “keep” list requires bringing the metadata objects for all versions being kept into the cache of the Edge that owns the volume. This should use very little bandwidth due to the small size of the metadata objects.
Next, the snapshot retention process starts going through the snapshot versions eligible for removal. For example, these items might include older versions of files that have been updated, or files that have been deleted from the current filesystem and are no longer in any versions set to be retained. The snapshot retention process compares the objects in the older snapshots to the “keep” list. If an object is on the “keep” list, it is not a candidate for deletion.
Deletion process
After the snapshot retention process establishes a candidate object for deletion, it begins the deletion process. For each candidate object, the snapshot retention process makes API calls to your cloud storage provider, directing the cloud storage provider to delete the specified object.
When the snapshot retention process receives a success response from your cloud storage provider that the specified object has been successfully deleted, the snapshot retention process records that object as deleted.
If the snapshot retention process receives an indication that your cloud storage provider did not successfully delete the specified object, it considers the deletion process to have failed. A notification is created in your NMC.
Note that, depending on how many versions need to be reviewed in each phase, and the number of objects in each version, the snapshot retention process can take a long time.
“Soft delete” policies
If you have enabled a “soft delete” policy with your cloud storage provider, then the cloud objects deleted by snapshot retention are not actually deleted immediately. These objects continue to exist in the object store marked for deletion for the amount of time that you have configured in your soft delete policy (typically, 30 days).
Nasuni highly recommends that customers do enable a “soft delete” policy in order to guard against inadvertent or malicious data deletion directly from the object store bucket or container.
However, from Nasuni’s point of view, this data that has been deleted through our snapshot retention process no longer exists and cannot be recovered.
SRaaS (Snapshot Retention as a Service)
SRaaS (Snapshot Retention as a Service) is a set of cloud services, deployed within your tenant (including Microsoft Azure and Amazon Web Services (AWS)), that implement your Snapshot Retention (SR) policy for a volume.
Benefits
The benefits of using SRaaS include the following:
Moves resource-intensive portions of the Snapshot Retention processing off the Edge Appliance.
SRaaS frees up resources for user access.
SRaaS removes any scenario-specific requirements for a dedicated appliance.
SRaaS leverages the scale of cloud services to increase Snapshot Retention performance.
SRaaS enables running Snapshot Retention jobs on multiple volumes simultaneously. Currently, you can run one job on the Edge Appliance and one job in the cloud.
SRaaS runs within your tenant, including Microsoft Azure and Amazon Web Services (AWS). You gain the scalability, availability, and management advantages of “platform as a service” (PaaS), without providing Nasuni access to your data.
Components
The specific cloud services used are the following:
For Azure Services:
Container Apps
CosmosDB
Service Bus
Event Hubs
Stream Analytics
Blob Storage
For AWS Services:
API Gateway
Lambda
SQS
Kinesis
DynamoDB
S3
SRaaS details
Considerations for SRaaS include the following:
All rules for Snapshot Retention processing also apply to SRaaS.
SRaaS jobs run independently of the volume owner appliance. The appliance can restart without affecting running jobs. SRaaS is not affected by the appliance rebooting, updating to a new version, or experiencing downtime.
The volume owner appliance polls SRaaS for processing status.
Nasuni best practices recommend that the Azure soft-delete policy or the equivalent AWS lifecycle policy should be in place so that objects are recoverable within the specified time period (suggest 30 days). Also see Deletion Security.
SRaaS terms
Here is a list of terms pertaining to SRaaS:
Snapshot Retention (SR): The process of removing unneeded versions of data, based on a time or quantity policy defined by the administrator.
Stack: A collection of cloud services and resources used to implement SRaaS. One stack can be used with multiple volumes.
Time Boundary: A special snapshot across which objects cannot be borrowed.
Handle: An identifier for a UniFS object.
Table of Contents (ToC): The root manifest for a UniFS volume; essentially a version.
Deploying SRaaS
Important aspects of deploying SRaaS include the following:
SRaaS uses the cloud provider’s stack management tools to deploy the required components. These include AWS CloudFormation and Azure Deployment Stacks.
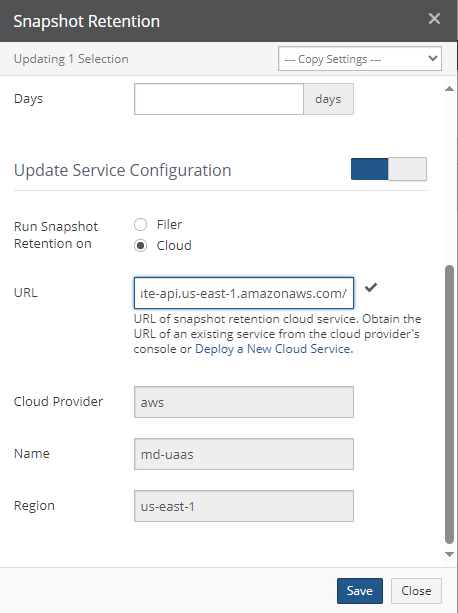
You start and configure SRaaS through the “Deploy Cloud Service” button on the “Volume Snapshot Retention” page in the NMC. See Nasuni Management Console (NMC) Guide.
You can also copy the AWS or Azure template to incorporate into your own deployment tools.You should deploy the stack in the same region as the volume. The NMC issues warnings if there is a mismatch between regions.
You can deploy multiple stacks, either within the same region or in different regions.
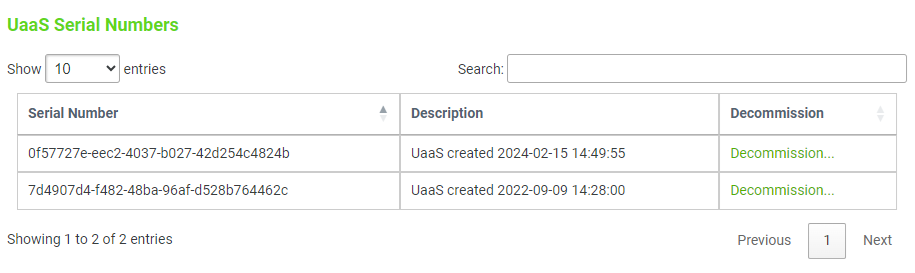
To deploy SRaaS, you must provide a Serial Number. You can obtain a Serial Number from the NOC at account.nasuni.com.
The following parameters are required to install on AWS:
Stack name: A human-friendly identifier for the stack.
APIProductKey: Nasuni serial number, obtained from the NOC at account.nasuni.com.
SubnetIds (optional): A customer-supplied list of subnets.
VpcId (optional): VPC into which the Lambda resources are to be deployed.
In addition, these parameters can be left at their default values:
APIWorkerLimit: The number of concurrent workers for the API.
LogLevel: Detail for events sent to CloudWatch.
WorkerLimit: The number of concurrent workers for prune operations.
The following parameters are required to install on Azure:
Subscription: The Azure subscription in which resources are to be deployed.
Resource Group: The container that holds related resources for an Azure solution.
Region: The region into which the majority of the resources are deployed.
Secondary Location: This is required for serial number validation; can be different from Region.
Product Key: Nasuni serial number, obtained from the NOC at account.nasuni.com.
Resource Group Tags (optional): Identification tags for tracking purposes.
In addition, these parameters can be left at their default values:
Docker Image Tag: The version being deployed.
Default Location: Uses the same value as Region by default.
Log Level: Detail for events sent to Log Analytics.
Provisioned Inv Rus: CosmosDB resource units provisioned for the inventory container.
Provisioned Inv Meta Rus: CosmosDB resource units provisioned for the inventory metadata container.
Provisioned Stats Rus: CosmosDB resource units provisioned for the stats container.
You start and configure SRaaS through the “Deploy Cloud Service” button on the “Volume Snapshot Retention” page in the NMC. See Nasuni Management Console (NMC) Guide.
SRaaS behavior on transition
Here is how SRaaS behaves during various “transition” situations:
Disabling Snapshot Retention: Any in-progress jobs continue until completion.
Changing from an appliance to SRaaS: Any in-progress jobs stop.
Changing from SRaaS to an appliance: Any in-progress jobs continue.
Deleting a volume: First, unregister the volume with UaaS. Then proceed with normal volume deletion.
Monitoring SRaaS
You can monitor the progress of SRaaS jobs on account.nasuni.com.
Decommissioning SRaaS stack on Nasuni
To decommission an SRaaS stack on Nasuni, perform the following steps:
Change all volumes to use appliance-based snapshot retention.
Delete the corresponding stack from AWS or Azure.
Log in to account.nasuni.com and decommission the stack.
Copyright © 2010-2024 Nasuni Corporation. All rights reserved.