Introduction
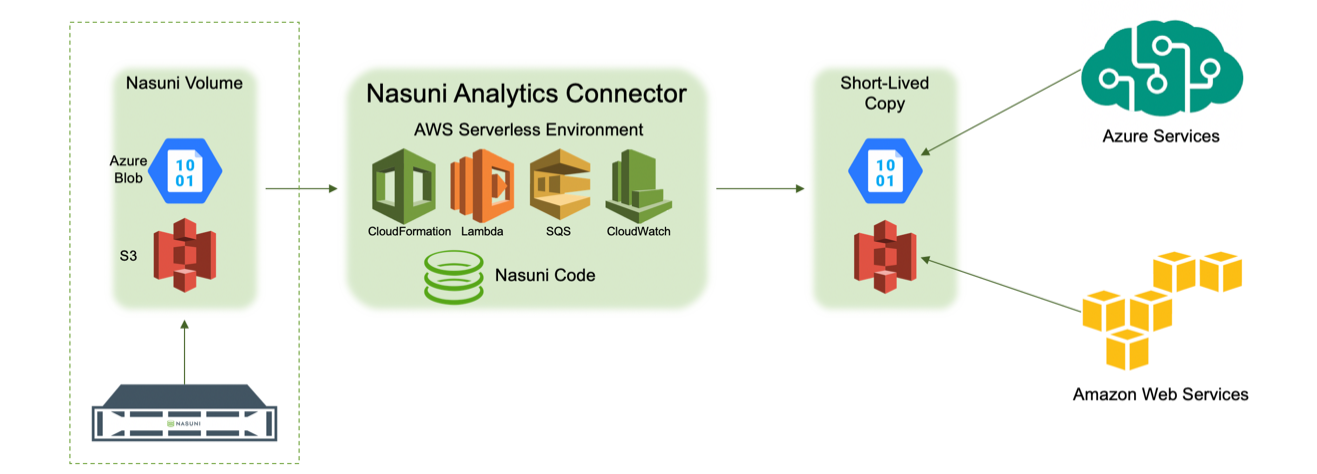
Enterprises are looking for ways to use the increasing number of cloud-native Business Intelligence, Search, and Analytics tools provided by AWS, Azure, and Google Cloud on the images, videos, documents, and other files they have stored with Nasuni in their third-party cloud storage. The Nasuni Analytics Connector enables customers to extract more value out of their unstructured and semi-structured data by using these third-party cloud services.
The Nasuni Analytics Connector creates a temporary copy of file data in native object format in your preferred cloud storage account, which these cloud-based business intelligence and analytical tools can operate on. The Nasuni Analytics Connector is capable of either copying an entire version (snapshot) of a volume or performing a delta export (differences between versions).
The benefits of the Analytics Connector include the following:
Flexibility: The Analytics Connector can read UniFS®-formatted volumes hosted on Amazon Simple Storage Service (Amazon S3) and Microsoft Azure Blob Storage, and write files in native object format to Amazon S3 or Azure Blob Storage accounts.
Speed: Since the Analytics Connector works directly on file data already in cloud storage, the process is scalable and fast, capable of exporting up to 16 TBs of data per hour.
Control: Customers are able to specify file types, specific paths, delta exports (version differences), and more to refine the selection of data for analysis.
Secure: The Analytics Connector runs entirely in the customer’s AWS account, using customer keys stored securely in AWS Parameter Store.
Predictable Costs: Nasuni provides a cost estimator tool to help customers project the cloud provider costs associated with running the Analytics Connector.
The Analytics Connector enables an enterprise to leverage their existing cloud services tools for applications such as the following:
Compliance: Compliance officers tasked with CCPA/GDPR governance can use a service such as Amazon Macie – which uses machine learning to automatically discover, classify, and protect sensitive data – to identify Personally Identifiable Information (PII) and Intellectual Property (IP) in their existing file data stored by Nasuni in cloud storage. Understanding whether existing files contain protected data enables companies to address compliance issues quickly and systematically.
Search: Media indexing and search services can analyze files exported by the Analytics Connector, and automatically identify objects, people, text, scenes, and activities in images and video. Content managers can search on the people, locations, and other information in their files.
Analytics: Using data subsets prepared by the Analytics Connector, query services such as Amazon Athena and Azure Data Lake can analyze data in object stores using standard SQL, without first loading the data into a database. Business analysts can run queries against semi-structured (CSV, IoT) data stored by Nasuni in cloud storage.
Important: Access to data for the purposes of exporting from the Nasuni platform to a native format requires appropriate levels of security, authentication, and encryption keys. After data has been exported to native object format, data access and security rules applicable to the new format must also be enforced.
How the Analytics Connector works
Any Nasuni volume backed by Amazon S3 or Microsoft Azure Blob Storage is available to the Analytics Connector. To initiate an operation, a customer needs their encryption keys, a few pieces of information available from the Nasuni Management Console (NMC), and an AWS account. The Analytics Connector is invoked by instantiating an AWS CloudFormation stack, which can be done through the AWS console, by scripting from the AWS command line, or by calling the CloudFormation API directly. All necessary resources are automatically created. An AWS CloudWatch Dashboard displays the progress and status of the operation. After the Analytics Connector has transformed and saved the data to the specified target, the data is available to cloud-based business intelligence and analytics services.
The Analytics Connector copies data from a specified Nasuni volume, and provides a temporary copy of that data to a destination that cloud-based services can access.
Constraints on the current version of the Analytics Connector
The following constraints apply to the current version of the Analytics Connector:
Maximum file size: The maximum size for a file is 500 GB. Files larger than 500 GB are skipped.
Maximum path length: The maximum length of a full path is 1,024 characters. This is a limitation of Amazon S3 and Azure Blob. Files and directories with full paths longer than 1,024 characters are skipped.
Symbolic links (soft links) are not supported.
Cloud Platform: Operation is limited to AWS and Azure only.
The source Nasuni volume must be an Amazon S3 bucket or Microsoft Azure Blob Storage container.
The target of an export must be an Amazon S3 bucket or Microsoft Azure Blob Storage container.
The Analytics Connector runs on AWS.
A snapshot to export must have been created by a Nasuni Edge Appliance running version 5.5 or later.
Maximum number of concurrent Lambda invocations: The maximum number of concurrent Lambda invocations that can be used by the Analytics Connector is 1000. This is also the default service limit enforced by AWS on a per-region basis.
Delta exports: When a previous snapshot handle is provided, only newly created and modified files are exported. If a file has been exported previously, and then either renamed, moved, or deleted in a new snapshot, the cleanup of the existing file in a destination bucket or container is not supported. For details, see “Q: What are the special cases when performing a delta export?”.
Prerequisites for using the Analytics Connector
The following are prerequisites for using the Analytics Connector:
Enabled in customer license: The Analytics Connector must be enabled in the customer license. To enable the Analytics Connector, contact Nasuni Sales or Support, or your reseller. When enabled in the customer license, the Analytics Connector license key becomes available at https://www.nasuni.com/account/nac/.
AWS account: You must have an AWS account, and the Analytics Connector must be made visible to this AWS account. Before your first use, enter your 12-digit AWS account ID here: https://www.nasuni.com/account/nac/
Alternatively, provide your 12-digit AWS account ID to Nasuni Sales or Nasuni Support.Volume Encryption Key: You must have the encryption key for the volume whose data you want to access. If you are using encryption keys generated internally by the Nasuni Edge Appliance, you can export (download) your encryption keys with the Nasuni Edge Appliance. For details, see the Nasuni Edge Appliance Administration Guide.
If you have escrowed your key with Nasuni and do not have it in your possession, contact Nasuni Support.Volume Encryption Key Passphrase: If your Volume Encryption Key has been configured with a passphrase, make note of it for use in the setup wizard. If you are using encryption keys generated internally by the Nasuni Edge Appliance, no passphrase is configured.
Credentials for AWS Parameter Store: During the setup wizard of the Analytics Connector, you are asked to securely store the Volume Encryption Key in the AWS Parameter Store, if you have not done so already. AWS security best-practices highly recommend using least-privilege credentials for this operation. While you can use Secret and Access keys with more privileges, we recommend creating a new IAM (Identity and Access Management) user with programmatic access only and the following policy attached:
{
"Version": "2012-10-17",
"Statement": [
{
"Effect": "Allow",
"Action": "ssm:PutParameter",
"Resource": "arn:aws:ssm:*:*:parameter/nasuni/*"
}
]
}
After this is done, record the Access and Secret key for the setup wizard.
Target Amazon S3 bucket or Microsoft Azure Blob Storage container and credentials: The Analytics Connector writes your file data stored by Nasuni in your third-party cloud storage to the destination Amazon S3 bucket or Microsoft Azure Blob Storage container that you specify in the setup wizard. If you do not already have a bucket, or storage account and container, to use, create one before running the Analytics Connector.
If you are using AWS as the destination cloud provider, and if you need to create the destination bucket, use the default security settings that block all public access. We recommend creating the destination bucket in the same region as the source, because this reduces AWS transfer costs. The main reason for choosing a different region than the source bucket would be if the business intelligence or analytics services that you want to use on your exported files are not available in the source bucket’s region. You can see a full list of all AWS services, and the regions where they are available, here: https://aws.amazon.com/about-aws/global-infrastructure/regional-product-services/.
If you are using AWS as the destination cloud provider, the setup wizard also prompts for an Access and Secret key, which allows the Analytics Connector to write to this bucket. While you can leave these fields blank and let Analytics Connector use the privileges of the user account initiating the export, AWS best practices recommend that you provide least-privilege credentials for this operation. We recommend creating a new IAM user with programmatic access only and the following policy attached:
{
"Version": "2012-10-17",
"Statement": [
{
"Effect": "Allow",
"Action": "s3:PutObject",
"Resource": "arn:aws:s3:::<bucket-name>/*"
},
{
"Effect": "Allow",
"Action": "s3:AbortMultipartUpload",
"Resource": "arn:aws:s3:::<bucket-name>/*"
},
{
"Effect": "Allow",
"Action": "s3:ListBucketMultipartUploads",
"Resource": "arn:aws:s3:::<bucket-name>"
}
]
}
Note: Substitute your actual destination bucket name for <bucket-name>.
After this is done, record the Access and Secret key for use in the setup wizard.
If you are using Azure as a destination cloud provider, and if you need to create the destination container, we recommend using the default security settings that block all anonymous access. To help reduce latency and, potentially, cost, we also recommend creating the container in the same (or geographically close) region as the source and executing region.
If you are using Azure as a destination cloud provider, the Analytics Connector setup wizard prompts for a Blob service SAS URL, which allows the Analytics Connector to write to the specified container. The SAS URL can be generated from the Azure Portal, and should be created with least privileges in mind. Instructions for generating this SAS URL, and required privileges, are available in the Appendix: Generating Microsoft Azure Blob Storage SAS URL.
Amazon S3 bucket or Microsoft Azure Blob Storage container of source volume and read-only credentials: The Analytics Connector setup wizard prompts for the source S3 bucket or the Azure blob storage container that holds your files. If you are running version 8.7 or later of the NMC, you can obtain the Bucket or Container name from the File System Browser of the NMC. For details, see Obtaining volume information below. Otherwise, you can obtain the bucket from Nasuni Customer Support or Nasuni Professional Services.
When using AWS as the source cloud provider, the Analytics Connector setup wizard also prompts for an Access and Secret key for reading from this source bucket. While you can leave these fields blank and let Analytics Connector use the privileges of the user account initiating the export, AWS best practices recommend that you provide least-privilege credentials for this operation. We recommend creating a new IAM user with programmatic access only and the following policy attached:
{
"Version": "2012-10-17",
"Statement": [
{
"Effect": "Allow",
"Action": [
"s3:GetObject",
"s3:ListBucket"
],
"Resource": [
"arn:aws:s3:::<bucket-name>",
"arn:aws:s3:::<bucket-name>/*"
]
}
]
}
Note: Substitute your actual source bucket name for <bucket-name>.
After this is done, record the Access and Secret key for use in the setup wizard.
When using Azure as a source cloud provider, the Analytics Connector setup wizard prompts for a Blob service SAS URL to provide the required permissions for the blob storage container that holds the source volume being exported. The SAS URL can be generated from the Azure Portal, and should be created with least privileges in mind. Instructions for generating this SAS URL, and required privileges, are available in the Appendix: Generating Microsoft Azure Blob Storage SAS URL.
If you are a Nasuni Integrated storage customer and need assistance with associated AWS S3 credentials or Azure Blob Storage SAS URL, contact Nasuni Support.
Snapshot Handles: The Analytics Connector operates on a Nasuni snapshot, and optionally also on a previous snapshot to perform a delta export. A snapshot handle represents a point in time when a snapshot was completed. If you are running version 8.7 or later of the NMC, you can obtain the snapshot handles from the File System Browser of the NMC. Otherwise, you can obtain the snapshot handles from Nasuni Customer Support or Nasuni Professional Services. For details, see Obtaining volume information below.
Operator Credentials: The Analytics Connector is initiated by an AWS IAM user using either the AWS console, the AWS command line, or by calling the CloudFormation API directly. AWS best practices recommend that you provide least-privilege credentials for this operation. We recommend creating a new IAM user with console or programmatic access as necessary, and the policy attached as listed in the Appendix: Policy.
Considerations
AWS Service Limits: You must ensure that your AWS Service Limits are sufficient to allow the Analytics Connector to run.
In particular, AWS has set the default limit on the number of simultaneous Lambda invocations within a single region to be 1000, and the default number of concurrent Lambda invocations used by the Analytics Connector is 900. (If you are using the “AWS Free Tier”, the limit is 50 Lambda invocations.) (This limit is adjustable in the setup wizard.) Allowing the Analytics Connector to use all or the majority of these simultaneous Lambda invocations results in the highest throughput and the quickest export. However, you might have other applications or services that also use Lambda. If you are already near the service limit of concurrent Lambda executions for the region where you plan on running the Analytics Connector, we recommend that you open an AWS Support case and request that the Service Limit be increased by 1000 for that region.Azure Storage Account Limits: You must ensure that your Azure storage account limits are sufficient to allow the Analytics Connector to run. For Azure storage limits, see Azure subscription and service limits, quotas, and constraints.
The Azure storage account egress limit (50 Gbps) refers to all data that is received from an Azure storage account. When using Azure as the export source, the Nasuni Edge Appliance also uses the storage account, so the Nasuni Edge Appliance and the Analytics Connector both share the egress limit.
For a sample 1 TB export with default settings (Max Lambda Invocations = 900), the observed export peak egress throughput can reach 26.8 Gbps. To help prevent potential throttling or performance impact on the Edge Appliance, it is strongly recommended to run only one export at a time for the same source volume, so that the overall egress throughput stays under the 50 Gbps limit for each Azure storage account.
Similarly, the Azure storage account ingress limit (25 Gbps) refers to all data that is sent to an Azure storage account.
When using Azure as both the export source and the destination, it is strongly recommended to create a new Azure storage account as the destination. A separate destination storage account helps you to avoid not only potential ingress throttling, but also any impact on the source volume due to it being used by the Edge Appliance.Costs: You must ensure that the projected costs for the Analytics Connector operations are practical.
Obtaining volume information
To obtain the necessary information about the volume for the Analytics Connector, you use the File System Browser page on the NMC, as follows:
On the Volumes page of the NMC, click File Browser. The File System Browser page appears.
From the Volume drop-down list, select a volume name.
From the Filer drop-down list, select an Edge Appliance name.
Tip: The NMC and the selected Edge Appliance must be running version 8.7 or later.
From the Version drop-down list, select the desired version of the selected volume. This represents the Nasuni snapshot taken at a specific time. The Analytics Connector exports files that were snapshotted at that point in time.
The properties of the selected volume are displayed.
Record the Handle of the volume. This is an object in cloud storage that represents a Nasuni snapshot for the specified volume.
Record the Bucket or Container of the volume. This is the S3 bucket or Microsoft Azure Blob Storage container that stores the Nasuni volume.
(Optional) If performing a delta export, you also need the Handle of the previous snapshot in order to compare any changes. Repeat steps 4-6 and select the desired previous version from the same target volume. There is no need to record the bucket or container again.
Using the Analytics Connector to export data
The Analytics Connector is implemented using AWS serverless services, all initiated by a CloudFormation template. All necessary resources are created automatically and can just as easily be cleaned up. The main steps for running the Analytics Connector are the following:
In a web browser, go to https://nac.cs.nasuni.com.
Supported browsers include the latest versions of:Chrome
Firefox
Safari
Edge
Follow the steps of the wizard, logging in to your AWS account if you are not signed in already.
Fill out the form fields in the CloudFormation launch page.
Click Create Stack.
Tip: You can export logs to assist with troubleshooting. For details, see Appendix: Analytics Connector Logs below.
Setup Wizard Details
To use the Analytics Connector to export data from a Nasuni volume, follow these steps:
In a web browser, go to https://nac.cs.nasuni.com.
The Nasuni Analytics Connector page appears. Click Get Started to launch the setup wizard.

Select the AWS region where the Nasuni Analytics Connector is to run. This is the region where the Lambda code executes, and the supporting AWS resources are created.
It is important to consider AWS transfer costs at this point. If the source and destination S3 buckets are in the same region, the cheapest option is to choose the matching region in this step. If the source and destination S3 buckets are in different regions, the cheapest option is to choose the region of either the source or the destination buckets. Choosing any other region than that of the source or destination S3 buckets incurs additional and potentially needless cross-regional transfer costs.Additionally, if using Azure as a source, it is recommended to choose an AWS region that is geographically close to your Azure storage container, in order to limit the latency in the communications between AWS and Azure.
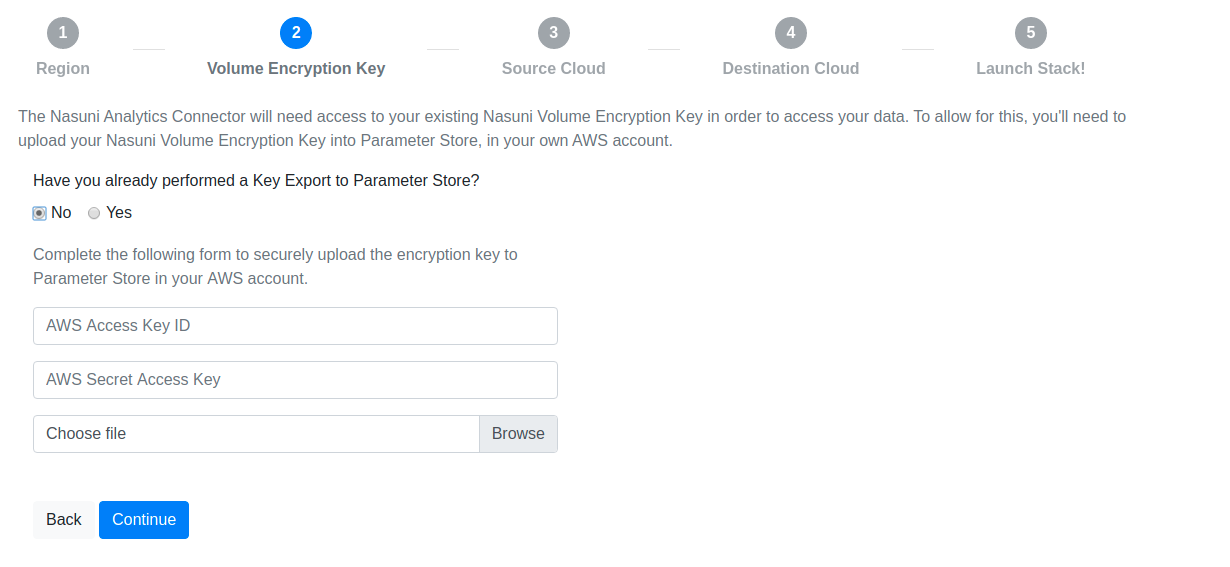
The next step is to upload your Volume Encryption Key on the Nasuni Volume Encryption Key Export page.
Tip: If you have already uploaded your Volume Encryption Key in a prior run of the Analytics Connector, you can skip this step. However, pay close attention to what region you are running the Analytics Connector in and what region you have previously uploaded the Volume Encryption Key to. The Analytics Connector needs the key to be in the same region it is running in, so, if you have not uploaded the key to the specific region where you plan to run it, you must upload it again.Important: If this volume has multiple encryption keys, create a multiple-key file as described in Appendix: Exporting a Volume with Multiple Encryption Keys.
If you must upload a Volume Encryption Key, provide the following information:
- From the Select Region drop-down list, select the region where you plan to run the Analytics Connector.
- Enter the AWS Access Key ID and the AWS Secret Access Key that allow write access to the AWS Parameter Store.
- Select the file that contains the Volume Encryption Key.
This securely stores your Volume Encryption Key in your AWS account and makes it available to the Analytics Connector.
After you submit the form, you are presented with the value to use for the Nasuni Volume Encryption Key Parameter Name in an upcoming step.

Note: The value presented looks like:
/nasuni/<filename-timestamp>
Use this value for the Nasuni Volume Encryption Key Parameter Name when filling out the CloudFormation launch stack form. If you look in the AWS Parameter Store, there might be several items stored there of the form /nasuni/<filename-timestamp>/0, /nasuni/<filename-timestamp>/1, and so forth. This is because the maximum size of a value stored in the AWS Parameter Store is 4K, and the Volume Encryption Key is generally larger than that. The key upload code cuts the Volume Encryption Key into 4K chunks, and the Analytics Connector knows how to reassemble them, given the prefix /nasuni/<filename-timestamp>.
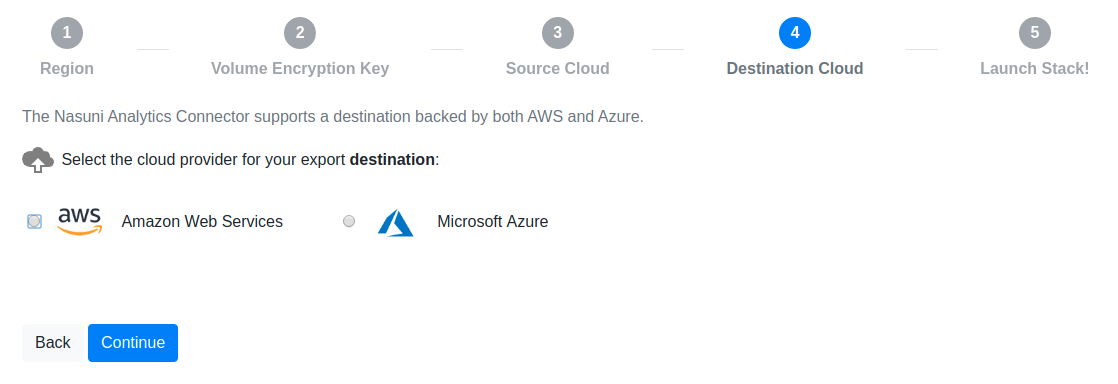
Choose the cloud provider for your source Nasuni volume. The Analytics Connector currently supports reading volumes backed by either AWS S3 or Microsoft Azure Blob Storage.

Choose the cloud provider for your export destination. The Analytics Connector currently supports writing to AWS S3 or Microsoft Azure Blob Storage.
Validate that all the provided information is correct, and click “Launch Stack” to proceed with the execution of the Analytics Connector. If you find any of the values to be incorrect, click “Back” to go back and adjust any of the inputs before proceeding.
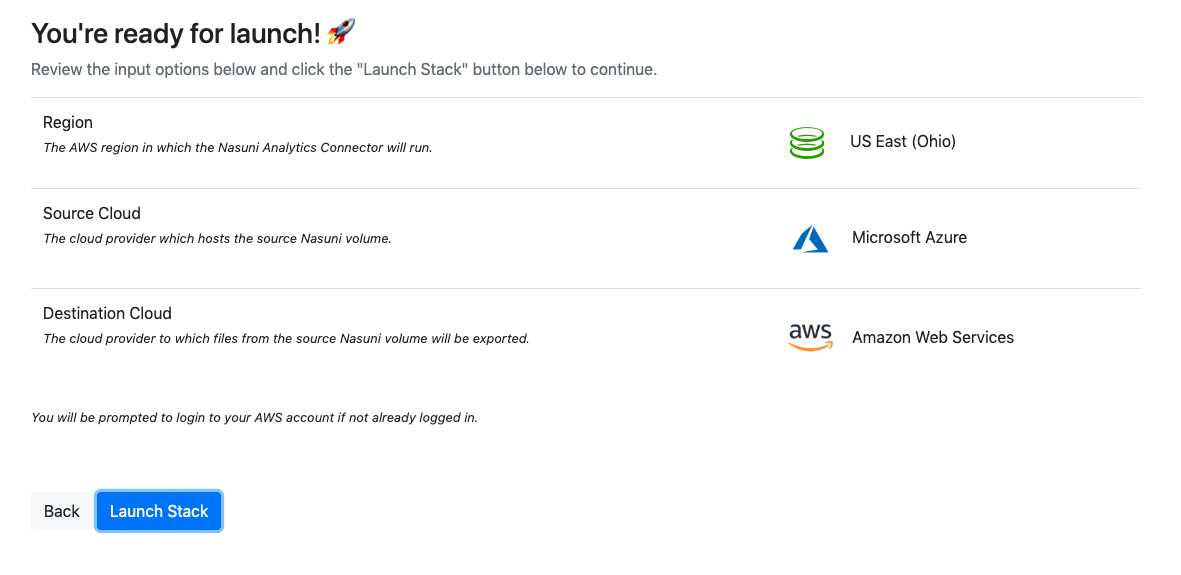
After clicking “Launch Stack”, the CloudFormation “Quick create stack” page in your AWS account appears. If you are not already logged in to your AWS account, you are prompted by AWS to log in.
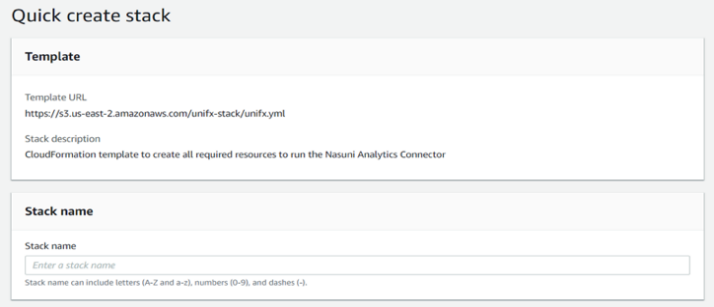
In the “Stack name” text box, enter a name for the AWS CloudFormation stack. The name can include uppercase and lowercase letters, numbers, and dashes, but must be different than other CloudFormation stack names currently in the same AWS region in your account.
In the “Nasuni Analytics Connector License Key” text box, enter the license key for the Nasuni Analytics Connector. You can obtain this from the account section of nasuni.com at https://www.nasuni.com/account/nac/.
Enter the following information about the source of the data.
Note: Figures show information for Amazon S3 for illustration purposes only.
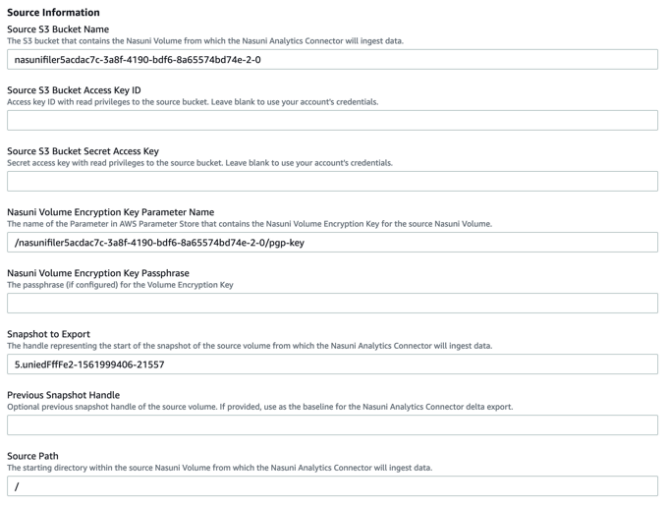

Source S3 Bucket Name: If using AWS as the source cloud provider, you are prompted for the name of the bucket containing the volume from which the Analytics Connector obtains the data. You obtain this from the File System Browser page of the NMC, with the Bucket field.
Source S3 Bucket Access and Secret Key IDs: If using AWS as the source cloud provider, you are prompted for the Access and Secret Keys to use when reading from the source bucket. As mentioned in the Prerequisites section, we recommend creating an IAM user with least-privilege credentials for this. However, you can leave these fields blank instead, in which case the Analytics Connector uses the credentials of the user account that initiates the run.
Source Azure Container Name: If using Azure as the source cloud provider, you are prompted for the name of the blob storage container hosting the volume from which the Analytics Connector obtains the data. You obtain this from the File System Browser page of the NMC, with the Container field.
Source Azure Container – Blob service SAS URL: If using Azure as the source cloud provider, you are prompted for a Blob service SAS URL with permissions to the source Azure blob container. As mentioned in the Prerequisites section, we recommend creating this SAS URL with least-privilege permissions for this. Instructions for doing this are provided in the Appendix: Generating Microsoft Azure Blob Storage SAS URL.
Enter the following information about the Nasuni volume.
Nasuni Volume Encryption Key Parameter Name: The name of the parameter in the AWS Parameter Store that contains the Nasuni volume encryption key for the source Nasuni volume.
Nasuni Volume Encryption Key Passphrase: The passphrase associated with your Volume Encryption Key (if one has been configured).
Snapshot to Export: The handle for the start of the snapshot of the source Nasuni volume from which the Analytics Connector obtains the data. You obtain this from the File System Browser page of the NMC, with the Handle field.
Previous Snapshot Handle (Optional): The handle of the previous snapshot of the source volume. If provided, it is used as the baseline for the Analytics Connector to perform a delta export (exporting only the changes between the two provided snapshots). You obtain this from the File System Browser page of the NMC, with the Handle field for a previous volume version.
Enter the following details about which portion of the source data you want to export.
Source Path: The starting directory within the source Nasuni volume from which the Analytics Connector obtains files. This path is the root of a volume, and not an access point, such as for a share or NFS export. To specify starting at the root of the filesystem, use a slash.
Note: Use Unix-style forward slashes when specifying the path, not Windows-style backslashes.Include Filter Pattern: A pattern in glob, list of comma-separated globs, or regex format for which file names to export from the source volumes. The default “*” (without quotes) is to export all files.
Include Filter Type: From the drop-down list, indicate if the “Include Filter Pattern” is a glob, list of globs, or regex pattern.
Exclude Filter Pattern: An optional pattern in glob, list of comma-separated globs, or regex format for which file names to exclude from the export. The default (empty) pattern value is to skip Exclude Filter and only use Include Filter.
Note: If a file matches both the Include Filter Pattern and the Exclude Filter Pattern, the file is excluded from the export.
Exclude Filter Type: From the drop-down list, indicate if the “Exclude Filter Pattern” is a glob, list of globs, or regex pattern.
Min File Size Filter: The minimum file size to export. Use a decimal number and an optional unit symbol (b, kb, mb, or gb), such as 1000b. The default unit is “b”. The default minimum file size is 0b.
Max File Size Filter: The maximum file size to export. Use a decimal number and an optional unit symbol (b, kb, mb, or gb), such as 1000mb. The default unit is “b”. The default maximum file size is 500gb.
Enter the following information about the destination of the data.
Note: Figures show information for Amazon S3 for illustration purposes only.
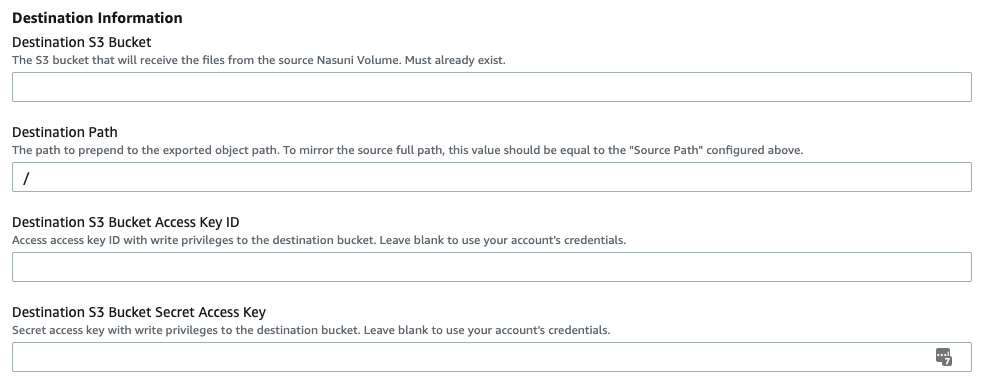
Destination S3 Bucket: If using AWS as the destination cloud, this is the S3 bucket that is the destination for the exported data.
Destination S3 Bucket Access and Secret Key IDs: If using AWS as the destination, this is the Access and Secret Keys to use when writing to the destination bucket. As mentioned in the Prerequisites section, we recommend creating an IAM user with least-privilege credentials for this. However, you can leave these fields blank instead, in which case the Analytics Connector uses the credentials of the user account that initiates the run.
Destination Azure Container Name: If using Azure as the destination cloud provider, this is the name of the blob storage container that is the destination for the exported data.
Destination Azure Container – Blob service SAS URL: If using Azure as the destination cloud provider, you are prompted for a Blob service SAS URL with permissions to the destination Azure blob container. As mentioned in the Prerequisites section, we recommend creating this SAS URL with least-privilege permissions for this. Instructions for doing this are provided in the Appendix: Generating Microsoft Azure Blob Storage SAS URL.
Destination Path: A path to prepend to the object keys created in the Destination S3 Bucket.
This is useful to export files into a “subdirectory” in the destination bucket.
Additionally, this can be useful if your Source Nasuni Volume (defined in previous section) has a very deep path. S3 has a limitation of 1024 bytes for the object key in an S3 bucket. In order to get around this limitation, you can provide a Source Path (as in step 12a above) that is a deep path, while keeping the Destination Path a more shallow path.Note: To maintain the same exact directory structure in your Destination S3 Bucket as exists in your Source Nasuni Volume, the Destination Path and the Source Path should be the same.
The following advanced settings might not need to be changed.
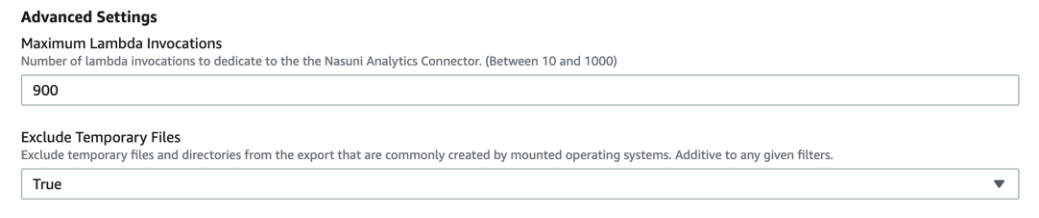
Maximum Lambda Invocations: The maximum number of lambda invocations to dedicate to the Analytics Connector. See Service Limits under the Consideration section to help you decide if you should change the default. Any numeric value between 10 and 1000 is supported.
Exclude Temporary Files: Indicates whether the Analytics Connector excludes temporary files and directories from the export. From the drop-down list, select True or False. This setting is enabled by default, which is recommended for most use cases.
For details on what is excluded, see Q: What is excluded when the “Exclude Temporary Files” setting is used?.
In order to perform the Analytics Connector exports, AWS IAM entities are automatically created and granted permissions to access necessary AWS resources in your account. To permit this access, select “I acknowledge that AWS CloudFormation might create IAM resources.” For more information on the implications of this, see https://docs.aws.amazon.com/AWSCloudFormation/latest/UserGuide/using-iam-template.html?icmpid=docs_cfn_console
Click “Create stack”. This initiates the creation of the CloudFormation stack, which starts the export process.
Monitoring the Analytics Connector – Stack Creation
The CloudFormation stack creation takes about 2 minutes to complete. As the necessary AWS resources are created, CloudFormation logs events in the UI. To see updates on progress more often, you can refresh the page by clicking Refresh.
A successful stack creation ends with the message CREATE_COMPLETE for the “Stack Name” resource. Note the top-most event in the following example, in which “NasuniAnalyticsConnector-kin-1” was used for the Stack Name: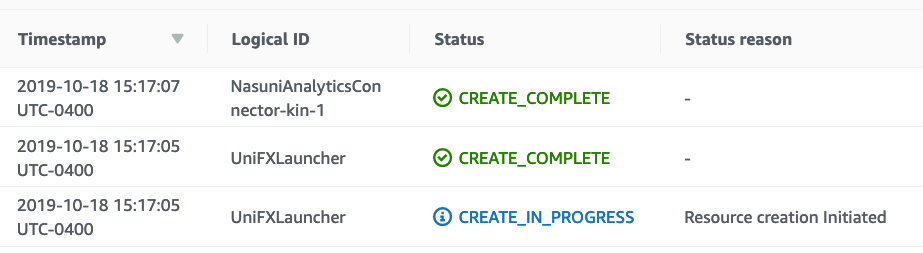
During the stack creation phase, many of the input parameters are validated. If any of these validations fail, a CREATE_FAILED event is logged, and stack creation does not continue. Here is an example of such an error from when an invalid product license key was provided: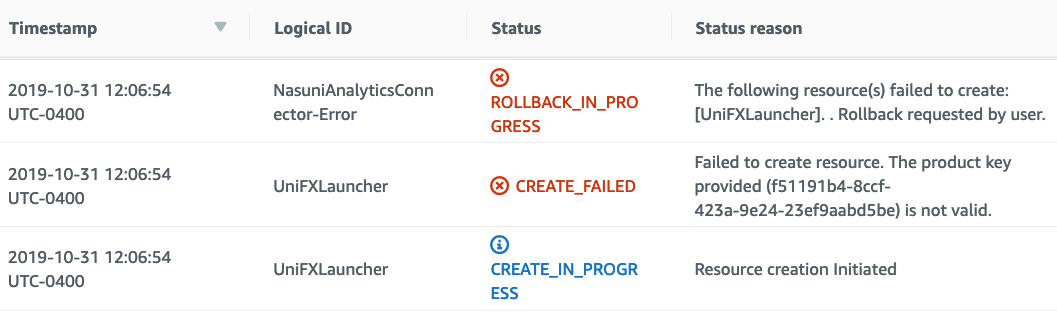
In the case of a stack creation error, it is not possible to fix the input parameters on the same stack and retry. You must delete the stack and start the wizard again.
The following is a table of errors and suggestions for remediation:
Exception Message | Remediation |
|---|---|
An unexpected error occurred when validating the product key ({key}). The key could not be validated. Contact Nasuni Support. | Occurs when an error is raised while communicating with the NOC trying to validate the key. Contact Nasuni support. |
Product key provided ({key}) is not valid. | Confirm that the license key you are using is correct. The license key is available at https://www.nasuni.com/account/nac/ |
Filter Pattern provided is blank. | You must specify a filter pattern. When using a filter type of glob, use * to match all files. |
Filter Pattern provided is not valid: {pattern} | The filter type is regex and the provided pattern does not conform to a valid regular expression. Check the syntax and try again. |
Export source bucket or container named '{name}' doesn't appear to exist. Verify the export configuration and bucket or container permissions. | Confirm that the source bucket or container name was entered correctly. Also, confirm that you have proper permissions. |
Export destination bucket or container named '{name}' doesn't appear to exist. Verify the export configuration and bucket or container permissions. | Confirm that the destination bucket or container name was entered correctly. Also, confirm that you have proper permissions. |
Export service cannot read from source bucket or container named '{name}'. Please verify the export configuration and bucket or container permissions. . | Either the permissions provided do not allow read access to the source bucket or container, or the source bucket or container has a policy preventing reads. Check these two items and try again. See Prerequisites for using the Analytics Connector. |
Export service lacks write permissions to destination bucket or container named '{name}'. Please verify the export configuration and bucket or container permissions. | Either the permissions provided do not allow write access to the destination bucket or container, or the destination bucket or container has a policy preventing writes. Check these two items and try again. See Prerequisites for using the Analytics Connector. |
Credentials provided for source bucket or container named '{name}' appear to be invalid. Please verify the provided source credentials are valid. | The permissions provided do not allow read access to the source bucket or container. Check and try again. See Prerequisites for using the Analytics Connector. |
Credentials provided for destination bucket or container named '{name}' appear to be invalid. Please verify the provided destination credentials are valid. | The permissions provided do not allow write access to the destination bucket or container. Check and try again. See Prerequisites for using the Analytics Connector. |
Could not fetch Snapshot Handle: '{handle}'. Verify that your export configuration is correct. | The snapshot handle was not found in the source bucket. Check the NMC and confirm the snapshot handle for the snapshot you are attempting to export. |
Could not decrypt the provided Snapshot Handle: '{handle}'. Verify that the correct snapshot handle, volume encryption key, and volume encryption key passphrase were provided. | The snapshot handle was found, but the Analytics Connector was unable to decrypt it. Check that the right Volume Encryption Key / Passphrase is being used. See Prerequisites for using the Analytics Connector. |
Could not read Snapshot Handle: '{handle}'. Verify that your export configuration is correct. Otherwise, contact Nasuni Support. | Contact Support for further analysis. |
The Previous Snapshot Handle ({handle}) must be older than the Snapshot to Export ({handle}). | The previous snapshot provided is not older than current snapshot. Check the NMC and confirm the snapshot handle for the selected previous volume version. |
Monitoring the Analytics Connector – Export Operation
After stack creation finishes, the actual export process begins. The Analytics Connector provides a dashboard for you to monitor the progress of the export.
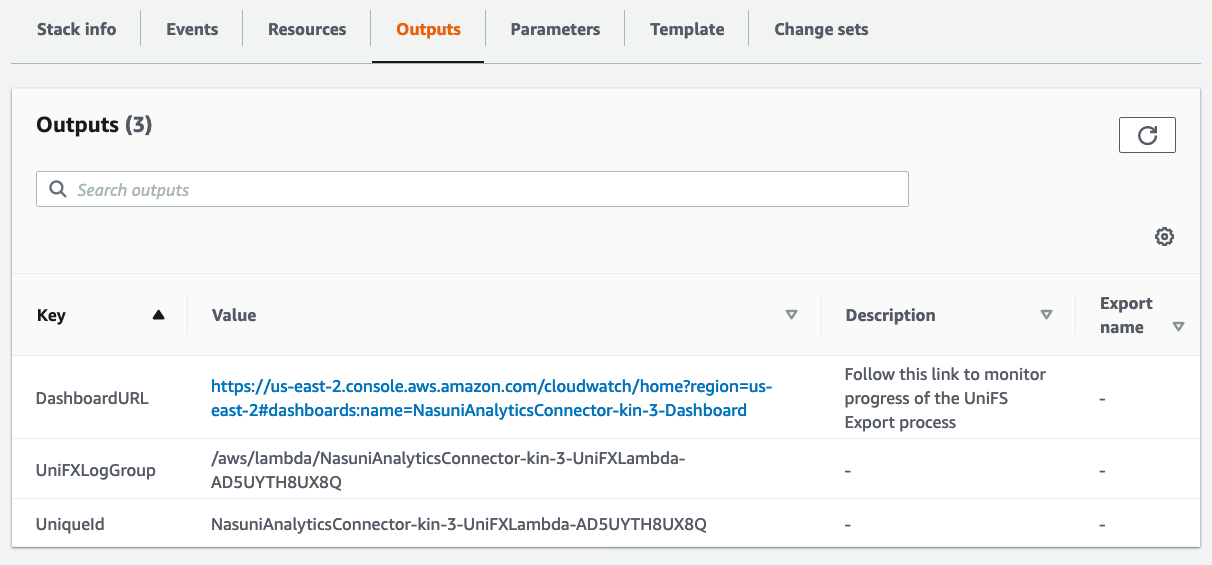
To access this dashboard, click the Outputs tab for the CloudFormation stack. In the list of Outputs, click the DashboardURL output key. This opens the CloudWatch Dashboard.
The following is an example of the Nasuni Analytics Connector CloudWatch Dashboard:
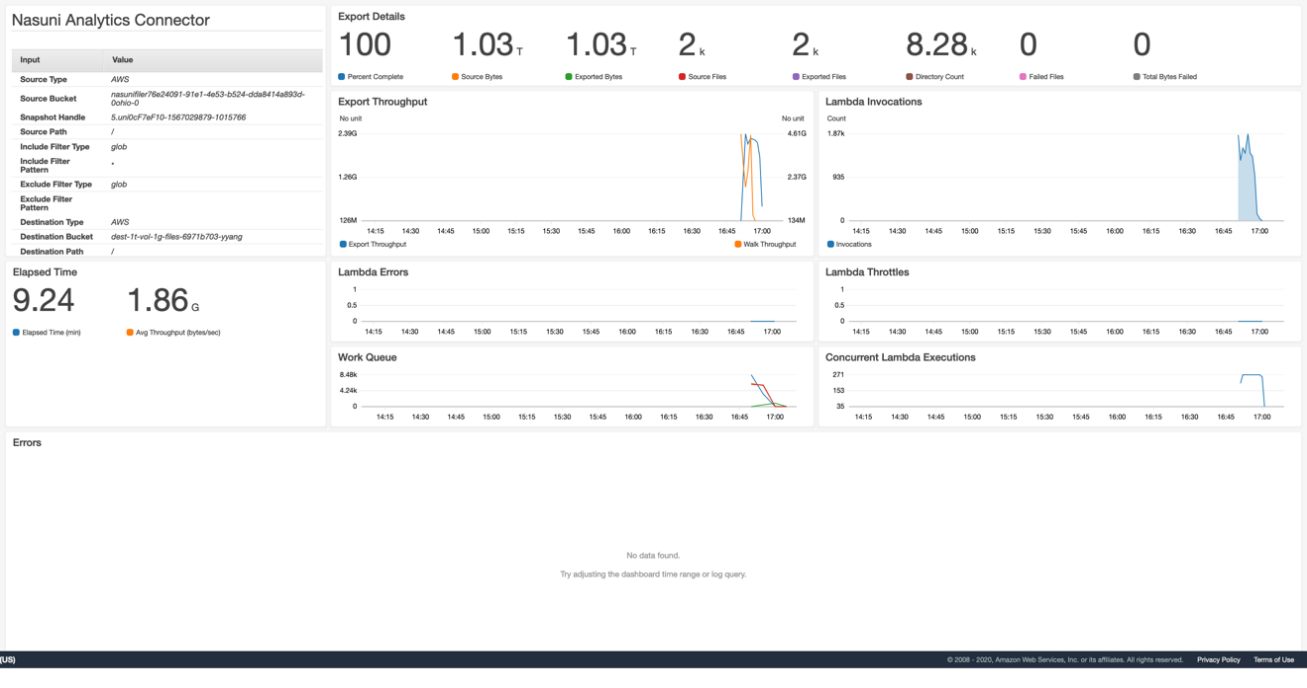
There are several key metrics to watch as your export process progresses:
Source Bytes: The Analytics Connector traverses the UniFS filesystem, looking for items that match the export criteria and adds these items to a work queue. The Source Bytes metric is a running total of the file sizes that are exported. This metric increases as the Analytics Connector discovers more files that need to be exported.
Exported Bytes: At the same time that the Analytics Connector is traversing the UniFS filesystem, it is also exporting files to the destination bucket. The Exported Bytes metric is a running total of the sizes of all the files that have actually been written to the destination. This metric trails the Source Bytes metric, because the traversal starts first.
Bytes in Flight: The running total of all data processed by the Analytics Connector. Large files are being exported by Analytics Connector using multipart upload for better performance. The Bytes in Flight metric displays the export progress before complete files are fully committed and written to destination.
Percent Complete: This metric is based on the ratio of Exported Bytes and Source Bytes. After all files have been exported, Exported Bytes and Source Bytes are equal, and this metric shows 100%.
Source Files: The number of files that the Analytics Connector has found in the source bucket that match the criteria to export. This number increases as UniFS is traversed by the Analytics Connector.
Exported Files: The number of files that the Analytics Connector has exported to the destination.
Elapsed Time: The time the export has taken, starting from when the CloudFormation stack finished creating to when the Percent Complete reaches 100%.
Note: To more easily track the progress of the Analytics Connector, you can enable auto-refresh on the CloudWatch Dashboard page. In the upper right portion of the page, click the drop-down arrow next to the refresh icon, then select “Auto refresh” and set a refresh interval of your preference, say 10 seconds.
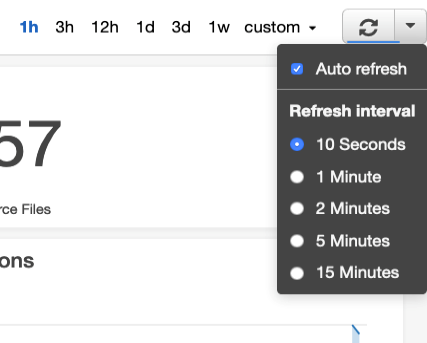
Also, by default, CloudWatch Dashboard shows the last 3 hours of metrics. Early in an export, there are only a few minutes of data, so a 1-hour range would show better granularity on the graphs. Click the range selector of “1h” to the left of the Refresh button.
Aborting the Analytics Connector – Export Operation
You can abort a run of the Analytics Connector at any time. To abort a running export operation, simply “Delete” the created CloudFormation stack through the AWS console, command line, or by calling the CloudFormation API directly.
Depending on how far the Analytics Connector got before aborting, you might also need to clean up files in the destination bucket. See the “S3 Bucket” section under Cleaning up after running the Analytics Connector below.
After running the Analytics Connector - Analysis
After the Percent Complete metric reaches 100%, your export is done. All files from the export are in the destination bucket. At this point, you can run any Business Intelligence or Analytics tools on your data.
For example, you might point AWS Macie at your destination bucket to have it scan for Personally Identifiable Information, or point a media service such as Rekognition if your output contains images that you would like to analyze.
Cleaning up after running the Analytics Connector
CloudFormation: After the Analytics Connector completes its export you are free to delete the CloudFormation stack. There is no reason to keep these resources around, and since there is a limit on the number of CloudFormation stacks you can have in a single region at any given point in time, it is better to clean these up. Note that deleting the CloudFormation stack does not delete the data you have exported to your destination bucket.
Parameter Store: Your Volume Encryption Keys are stored securely in AWS Parameter Store. If you plan on running the Nasuni Analytics Connector again for the same volume, you can consider leaving the keys in Parameter Store for use in upcoming runs. If you do not plan on using the Analytics Connector again on this volume for a while, then you can delete the keys from Parameter Store.
To delete the Volume Encryption Keys from Parameter Store, navigate to Systems Manager in the AWS console and then choose Parameter Store on the bottom of the left-hand column. Make sure you are in the region where you stored the key. While the Volume Encryption Key parameter you used in the CloudFormation stack was of the form /nasuni/<filename-timestamp>, the actual parameters stored in Parameter Store are of the form: /nasuni/<filename-timestamp>/0, /nasuni/<filename-timestamp>/1, and so forth. Delete all items that match your Volume Encryption Key parameter.
S3 Bucket: After you have finished any analysis on your files, you can choose to clean up the second temporary copy of your data. There are many ways to delete S3 bucket contents, including using the AWS console, command-line tools, and API. The easiest way by far is using the AWS console where you have the option of emptying or deleting a bucket.
Azure Container: After you have finished any analysis on your files, you can choose to clean up the second temporary copy of your data. There are many ways to delete Azure container contents, including using the Azure console, command-line tools, and API. The easiest by far is using the Azure console, where you can delete the container completely.
WARNING: Emptying or deleting an S3 bucket or Azure container is not recoverable. Make sure you are operating on the right bucket before actually initiating this action.
Getting Help
If you need help with the Nasuni Analytics Connector, use the resources available at https://www.nasuni.com/customer-success/ to contact Support.
You can share log data by following the steps in Appendix: Analytics Connector Logs.
Appendix: Policy
For operator credentials, we recommend creating a new IAM user with console and/or programmatic access as necessary, and the following policy attached:
{
"Version": "2012-10-17",
"Statement": [
{
"Action": [
"cloudwatch:DescribeAlarms",
"cloudwatch:PutMetricAlarm",
"cloudwatch:DeleteAlarms",
"cloudwatch:GetDashboard",
"cloudwatch:PutDashboard",
"cloudwatch:ListDashboards",
"cloudwatch:DeleteDashboards",
"cloudwatch:GetMetricData",
"logs:DescribeLogGroups",
"logs:CreateLogGroup",
"logs:DeleteLogGroup",
"logs:DescribeMetricFilters",
"logs:PutMetricFilter",
"logs:PutRetentionPolicy",
"logs:DeleteMetricFilter",
"logs:FilterLogEvents"
],
"Resource": "*",
"Effect": "Allow"
},
{
"Condition": {
"StringEquals": {
"iam:PassedToService": "lambda.amazonaws.com"
}
},
"Action": [
"iam:PassRole"
],
"Resource": "*",
"Effect": "Allow"
},
{
"Action": [
"iam:CreateRole",
"iam:PutRolePolicy",
"iam:GetRolePolicy",
"iam:GetRole",
"iam:AttachRolePolicy",
"iam:DeleteRolePolicy",
"iam:DeleteRole"
],
"Resource": "*",
"Effect": "Allow"
},
{
"Action": [
"lambda:AddPermission",
"lambda:CreateFunction",
"lambda:UpdateFunctionCode",
"lambda:UpdateFunctionConfiguration",
"lambda:GetFunctionConfiguration",
"lambda:GetFunction",
"lambda:DeleteFunction",
"lambda:RemovePermission",
"lambda:PutFunctionConcurrency",
"lambda:InvokeFunction"
],
"Resource": "*",
"Effect": "Allow"
},
{
"Action": [
"s3:GetObject"
],
"Resource": [
"arn:aws:s3:::unifx-stack/*",
"arn:aws:s3:::unifx-lambda-us-east-2/*",
"arn:aws:s3:::unifx-lambda-us-east-2/*",
"arn:aws:s3:::unifx-lambda-us-east-1/*",
"arn:aws:s3:::unifx-lambda-us-west-1/*",
"arn:aws:s3:::unifx-lambda-us-west-2/*",
"arn:aws:s3:::unifx-lambda-ap-south-1/*",
"arn:aws:s3:::unifx-lambda-eu-west-1/*",
"arn:aws:s3:::unifx-lambda-eu-west-2/*",
"arn:aws:s3:::unifx-lambda-eu-west-3/*",
"arn:aws:s3:::unifx-lambda-eu-north-1/*",
"arn:aws:s3:::unifx-lambda-ap-northeast-1/*",
"arn:aws:s3:::unifx-lambda-ap-northeast-2/*",
"arn:aws:s3:::unifx-lambda-sa-east-1/*",
"arn:aws:s3:::unifx-lambda-ca-central-1/*",
"arn:aws:s3:::unifx-lambda-ap-southeast-1/*",
"arn:aws:s3:::unifx-lambda-ap-southeast-2/*",
"arn:aws:s3:::unifx-lambda-eu-central-1/*"
],
"Effect": "Allow"
},
{
"Action": [
"secretsmanager:CreateSecret",
"secretsmanager:DeleteSecret",
"secretsmanager:TagResource"
],
"Resource": "*",
"Effect": "Allow"
},
{
"Action": [
"sqs:CreateQueue",
"sqs:DeleteQueue",
"sqs:GetQueueAttributes"
],
"Resource": "*",
"Effect": "Allow"
},
{
"Action": [
"cloudformation:List*",
"cloudformation:Describe*",
"cloudformation:GetTemplateSummary",
"cloudformation:CreateStack",
"cloudformation:UpdateStack",
"cloudformation:DeleteStack"
],
"Resource": "*",
"Effect": "Allow"
},
{
"Action": [
"events:PutRule",
"events:DescribeRule",
"events:DeleteRule",
"events:RemoveTargets",
"events:PutTargets"
],
"Resource": "*",
"Effect": "Allow"
}
]
Appendix: Analytics Connector Logs
To assist Support in troubleshooting issues, Nasuni recommends sharing Analytics Connector logs.
To share Analytics Connector logs, grant the current IAM user the necessary permissions that are required by the Amazon CloudWatch User Guide and follow these steps:
Log in to the AWS CloudFormation console at https://console.aws.amazon.com/cloudformation/.
Select the Analytics Connector stack, using the same stack name specified in the setup wizard.
Click the Resources tab.
Copy and save the value for the UniFXLogs resource with the “AWS::Logs::LogGroup” resource type.
Open the AWS CloudWatch console at https://console.aws.amazon.com/cloudwatch/.
In the navigation pane, select “Log Groups”.
For the Filter, use the UniFXLogs value that you saved in step 3 above.
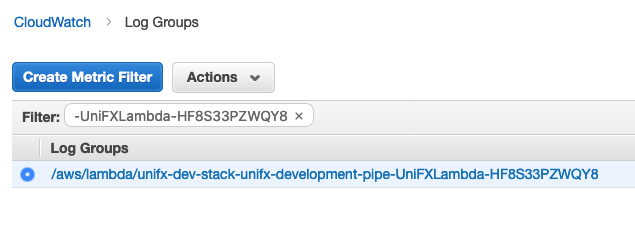
On the Log Groups screen, select the log group from the list.
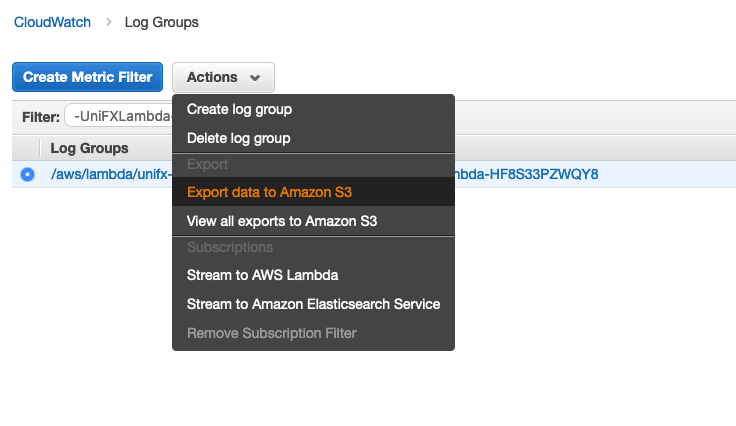
From the Actions drop-down menu, select “Export data to Amazon S3”.
On the “Export Data to Amazon S3” screen, set the time range to include all Analytics Connector log data.
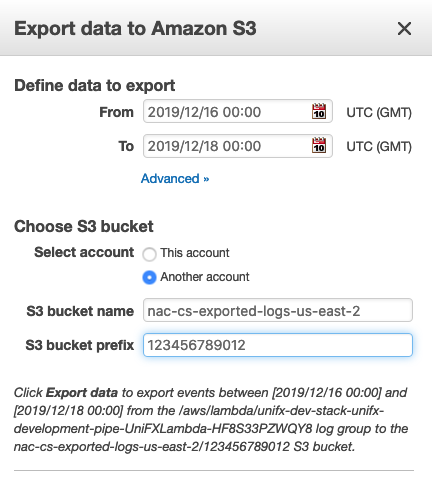
Click Advanced. Under “Choose S3 bucket”, select “Another account”.
Set “S3 bucket name” to one of the pre-defined Nasuni exported logs buckets from the following table. Use the bucket that is in the same AWS Region as the selected Analytics Connector log group in AWS CloudWatch.
AWS Region | Destination Bucket for Exported Logs |
|---|---|
ap-northeast-1 | nac-cs-exported-logs-ap-northeast-1 |
ap-northeast-2 | nac-cs-exported-logs-ap-northeast-2 |
ap-south-1 | nac-cs-exported-logs-ap-south-1 |
ap-southeast-1 | nac-cs-exported-logs-ap-southeast-1 |
ap-southeast-2 | nac-cs-exported-logs-ap-southeast-2 |
ca-central-1 | nac-cs-exported-logs-ca-central-1 |
eu-central-1 | nac-cs-exported-logs-eu-central-1 |
eu-north-1 | nac-cs-exported-logs-eu-north-1 |
eu-west-1 | nac-cs-exported-logs-eu-west-1 |
eu-west-2 | nac-cs-exported-logs-eu-west-2 |
eu-west-3 | nac-cs-exported-logs-eu-west-3 |
sa-east-1 | nac-cs-exported-logs-sa-east-1 |
us-east-1 | nac-cs-exported-logs-us-east-1 |
us-east-2 | nac-cs-exported-logs-us-east-2 |
us-west-1 | nac-cs-exported-logs-us-west-1 |
us-west-2 | nac-cs-exported-logs-us-west-2 |
Set “S3 bucket prefix” to the 12-digit AWS account ID used to run the Analytics Connector. Depending on the permissions on your account, you can find your account number on one of these pages:
Note all entries on this screen to share with Support.
To export and share Analytics Connector logs with Support, click “Export data”.
Provide Nasuni Support with the following information from the “Export data to Amazon S3” screen. Nasuni Support can use the exported Analytics Connector log data to help troubleshooting.
Export “From” time
Export “To” time
S3 bucket name
S3 bucket prefix
Note: AWS CloudWatch is transitioning from the original interface to a new interface. If the user is using the new CloudWatch interface, the "Export data to Amazon S3" option has been moved from the log groups listing page to the specific log group's details page. Click the UniFXLogs log group to find the option under that log group's Actions dropdown menu. 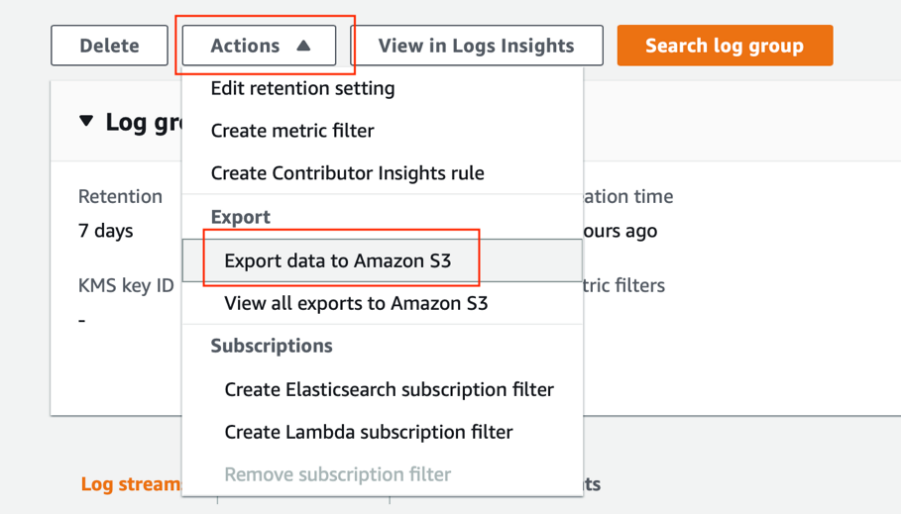
Appendix: Generating Microsoft Azure Blob Storage SAS URL
This is the procedure for generating a SAS URL with permissions to a Nasuni volume or destination container backed by Microsoft Azure Blob Storage.
From the Azure Portal, navigate to “Storage accounts” and select the storage account containing the source Nasuni volume storage or destination container.
From the “Security + networking” section in the left-hand navigation pane, select “Shared access signature”.
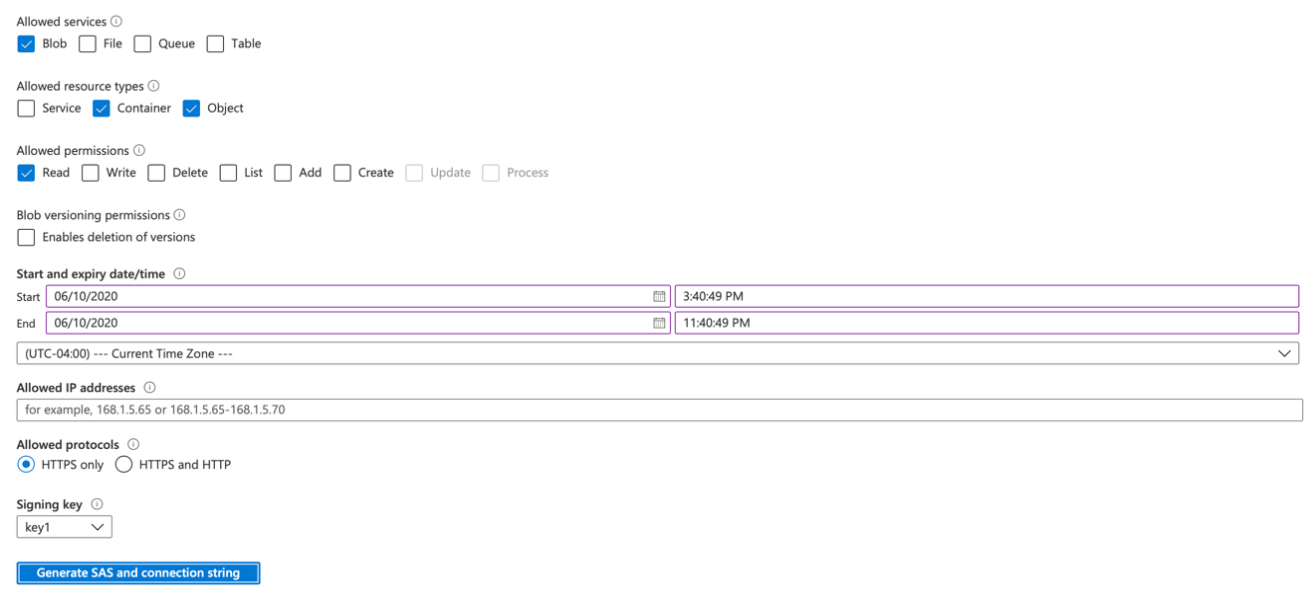
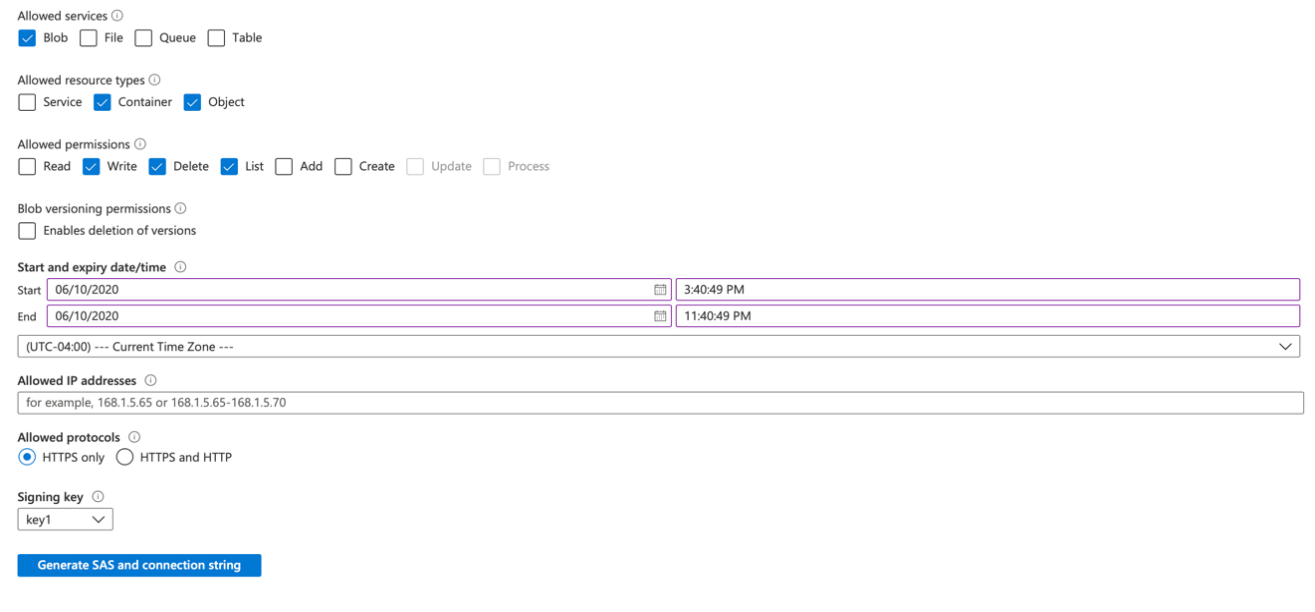
To generate a new SAS URL for source volume access or destination container, select the minimum amount of permissions required to read data from the source volume or write data to the destination container. Specifically, this is “Blob” for allowed services, “Container” and “Object” for allowed resource types. When configuring for a source volume, only apply “Read” for permissions. When configuring for a destination container, apply “Write”, "List", and “Delete” permissions.
Note: “Delete” permissions are only required for a destination container to clean up blobs in the unlikely event of an issue exporting a file.
In addition, you are prompted to provide a “Start and expiry date/time”. This is Azure’s mechanism for limiting access to a generated shared access signature, because, after it is generated, it cannot be revoked without revoking the signing key that was used (which could have negative unintended consequences). Make sure that the End time configured here is far enough in the future to perform the execution of the Analytics Connector. This defaults to 8 hours in the future from the time of generation, which is sufficient for most runs on the Analytics Connector. If you are planning on multiple subsequent executions of the Analytics Connector, consider increasing this value.
Below is an example of all required services, resource types, and permissions required to use the Analytics Connector with a source volume backed by Microsoft Azure Blob Storage.
Below is an example of all required services, resource types, and permissions required to use the Analytics Connector with a destination container in Microsoft Azure Blob Storage.
After all required permissions and the start and end date are defined, click “Generate SAS and connection string”. Several fields appear with generated strings containing various different versions of the shared access signature.
Retrieve the value from the field labeled “Blob service SAS URL” for use with the Analytics Connector.

Use the value retrieved here to provide as input to the Analytics Connector.
Appendix: Automating Analytics Connector
In order to streamline the execution of the Analytics Connector, or to integrate it into another workflow, you might find it useful to automate the CloudFormation stack creation process and export process.
Below are some simple examples of how this can be done using the AWS CLI. In order to use these examples, you must first have the AWS CLI installed and configured. AWS CLI version 1.18 or higher is required to execute the examples.
Each example shown is meant to be used with the bash shell, or any bash-compatible shell. If another shell is being used (such as PowerShell), some modifications might need to be made to the syntax, specifically around how environment variables are both defined and accessed.
Provide General Stack Inputs
All of the documented input parameters described in the Setup Wizard Detail section above are also required when automating the execution of the Analytics Connector.
Collect all values for the required input parameters, and set them as environment variables, as in the following:
export STACK_NAME='<desired name of cloudformation stack>'
export PRODUCT_KEY='<analytics connector product key>'
export SNAPSHOT_HANDLE='<snapshot to export>'
export PREV_SNAPSHOT_HANDLE='<previous snapshot handle>'
export VOLUME_KEY_PARAM='<volume encryption key param name>'
export VOLUME_KEY_PASSPHRASE='<volume encryption key passphrase>'
export STARTING_PATH='/'
export INCLUDE_FILTER_PATTERN='*'
export INCLUDE_FILTER_TYPE='glob'
export EXCLUDE_FILTER_PATTERN=''
export EXCLUDE_FILTER_TYPE='glob'
export MIN_FILE_SIZE_FILTER='0b'
export MAX_FILE_SIZE_FILTER='500gb'
export DEST_PATH='/'
export MAX_INVOCATIONS='900'
Note: Replace the <placeholder text> with the actual input values you collected.
Selecting the right template
Depending on the source and destination cloud types you want to use, you need to select the proper template URL. The following table maps which template to use, based on your desired combination:
Source Cloud | Destination Cloud | Template URL |
AWS | AWS | https://s3.us-east-2.amazonaws.com/unifx-stack/unifx_s3_s3.yml |
AWS | Azure | https://s3.us-east-2.amazonaws.com/unifx-stack/unifx_s3_azure.yml |
Azure | Azure | https://s3.us-east-2.amazonaws.com/unifx-stack/unifx_azure_azure.yml |
Azure | AWS | https://s3.us-east-2.amazonaws.com/unifx-stack/unifx_azure_s3.yml |
Provide Cloud-Specific Inputs
There are different CloudFormation templates used for different combinations of source and destination cloud providers. With each of these templates, slightly different inputs are required, depending on the source and destination cloud providers.
Source Cloud Inputs
If your source volume is backed by Amazon S3, set the following environment variables for the CloudFormation template:
export SOURCE_BUCKET='<source bucket name>'
export SOURCE_ACCESS_KEY_ID='<source access key id>'
export SOURCE_SECRET_ACCESS_KEY='<source secret access key>'
Note: Replace the <placeholder text> with the actual input values you collected.
If your source volume is backed by Azure Blob Storage, set the following environment variables for the Azure version of the CloudFormation template:
export SOURCE_CONTAINER='<source container name>'
export SOURCE_SAS_URL='<source sas url>'
Note: Replace the <placeholder text> with the actual input values you collected.
Destination Cloud Inputs
If your destination is Amazon S3, set the following environment variables for the CloudFormation template:
export DEST_BUCKET='<destination bucket name>'
export DEST_ACCESS_KEY_ID='<destination access key id>'
export DEST_SECRET_ACCESS_KEY='<destination secret access key>'
Note: Replace the <placeholder text> with the actual input values you collected.
If your destination is Azure Blob Storage, set the following environment variables for the CloudFormation template:
export DEST_CONTAINER='<destination container name>'
export DEST_SAS_URL='<destination sas url>'
Note: Replace the <placeholder text> with the actual input values you collected.
Launching the Stack
With the required input parameters saved as environment variables, you can proceed to launching the stack, using the AWS CLI.
If your source volume is backed by Amazon S3 and you are exporting to AWS S3, use the following command to launch the stack:
aws cloudformation create-stack --stack-name $STACK_NAME \
--template-url https://s3.us-east-2.amazonaws.com/unifx-stack/unifx_s3_s3.yml \
--parameters ParameterKey=ProductKey,ParameterValue=$PRODUCT_KEY \
ParameterKey=SourceBucket,ParameterValue=$SOURCE_BUCKET \
ParameterKey=SourceBucketAccessKeyID,ParameterValue=$SOURCE_ACCESS_KEY_ID \
ParameterKey=SourceBucketSecretAccessKey,ParameterValue=$SOURCE_SECRET_ACCESS_KEY \
ParameterKey=StartingPoint,ParameterValue="$STARTING_PATH" \
ParameterKey=IncludeFilterPattern,ParameterValue="$INCLUDE_FILTER_PATTERN" \
ParameterKey=IncludeFilterType,ParameterValue=$INCLUDE_FILTER_TYPE \
ParameterKey=ExcludeFilterPattern,ParameterValue="$EXCLUDE_FILTER_PATTERN" \
ParameterKey=ExcludeFilterType,ParameterValue=$EXCLUDE_FILTER_TYPE \
ParameterKey=MinFileSizeFilter,ParameterValue=$MIN_FILE_SIZE_FILTER \
ParameterKey=MaxFileSizeFilter,ParameterValue=$MAX_FILE_SIZE_FILTER \
ParameterKey=UniFSTOCHandle,ParameterValue=$SNAPSHOT_HANDLE \
ParameterKey=PrevUniFSTOCHandle,ParameterValue=$PREV_SNAPSHOT_HANDLE \
ParameterKey=VolumeKeyParameter,ParameterValue=$VOLUME_KEY_PARAM \
ParameterKey=VolumeKeyPassphrase,ParameterValue=$VOLUME_KEY_PASSPHRASE \
ParameterKey=DestinationBucket,ParameterValue=$DEST_BUCKET \
ParameterKey=DestinationBucketAccessKeyID,ParameterValue=$DEST_ACCESS_KEY_ID \
ParameterKey=DestinationBucketSecretAccessKey, ParameterValue=$DEST_SECRET_ACCESS_KEY \
ParameterKey=DestinationPrefix,ParameterValue=$DEST_PATH \
ParameterKey=MaxInvocations,ParameterValue=$MAX_INVOCATIONS \
--capabilities CAPABILITY_IAM
If your source volume is backed by Amazon S3 and you are exporting to Azure Blob Storage, use the following command to launch the stack:
aws cloudformation create-stack --stack-name $STACK_NAME \
--template-url https://s3.us-east-2.amazonaws.com/unifx-stack/unifx_s3_azure.yml \
--parameters ParameterKey=ProductKey,ParameterValue=$PRODUCT_KEY \
ParameterKey=SourceBucket,ParameterValue=$SOURCE_BUCKET \
ParameterKey=SourceBucketAccessKeyID,ParameterValue=$SOURCE_ACCESS_KEY_ID \
ParameterKey=SourceBucketSecretAccessKey,ParameterValue=$SOURCE_SECRET_ACCESS_KEY \
ParameterKey=StartingPoint,ParameterValue="$STARTING_PATH" \
ParameterKey=IncludeFilterPattern,ParameterValue="$INCLUDE_FILTER_PATTERN" \
ParameterKey=IncludeFilterType,ParameterValue=$INCLUDE_FILTER_TYPE \
ParameterKey=ExcludeFilterPattern,ParameterValue="$EXCLUDE_FILTER_PATTERN" \
ParameterKey=ExcludeFilterType,ParameterValue=$EXCLUDE_FILTER_TYPE \
ParameterKey=MinFileSizeFilter,ParameterValue=$MIN_FILE_SIZE_FILTER \
ParameterKey=MaxFileSizeFilter,ParameterValue=$MAX_FILE_SIZE_FILTER \
ParameterKey=UniFSTOCHandle,ParameterValue=$SNAPSHOT_HANDLE \
ParameterKey=PrevUniFSTOCHandle,ParameterValue=$PREV_SNAPSHOT_HANDLE \
ParameterKey=VolumeKeyParameter,ParameterValue=$VOLUME_KEY_PARAM \
ParameterKey=VolumeKeyPassphrase,ParameterValue=$VOLUME_KEY_PASSPHRASE \
ParameterKey=DestinationContainer,ParameterValue=$DEST_CONTAINER \
ParameterKey=DestinationContainerSASURL,ParameterValue=$DEST_SAS_URL \
ParameterKey=DestinationPrefix,ParameterValue=$DEST_PATH \
ParameterKey=MaxInvocations,ParameterValue=$MAX_INVOCATIONS \
--capabilities CAPABILITY_IAM
If your source volume is backed by Azure Blob Storage and you are exporting to Azure Blob Storage, use the following command to launch the stack:
aws cloudformation create-stack --stack-name $STACK_NAME \
--template-url https://s3.us-east-2.amazonaws.com/unifx-stack/unifx_azure_azure.yml \
--parameters ParameterKey=ProductKey,ParameterValue=$PRODUCT_KEY \
ParameterKey=SourceContainer,ParameterValue=$SOURCE_CONTAINER \
ParameterKey=SourceContainerSASURL,ParameterValue=$SOURCE_SAS_URL \
ParameterKey=StartingPoint,ParameterValue="$STARTING_PATH" \
ParameterKey=IncludeFilterPattern,ParameterValue="$INCLUDE_FILTER_PATTERN" \
ParameterKey=IncludeFilterType,ParameterValue=$INCLUDE_FILTER_TYPE \
ParameterKey=ExcludeFilterPattern,ParameterValue="$EXCLUDE_FILTER_PATTERN" \
ParameterKey=ExcludeFilterType,ParameterValue=$EXCLUDE_FILTER_TYPE \
ParameterKey=MinFileSizeFilter,ParameterValue=$MIN_FILE_SIZE_FILTER \
ParameterKey=MaxFileSizeFilter,ParameterValue=$MAX_FILE_SIZE_FILTER \
ParameterKey=UniFSTOCHandle,ParameterValue=$SNAPSHOT_HANDLE \
ParameterKey=PrevUniFSTOCHandle,ParameterValue=$PREV_SNAPSHOT_HANDLE \
ParameterKey=VolumeKeyParameter,ParameterValue=$VOLUME_KEY_PARAM \
ParameterKey=VolumeKeyPassphrase,ParameterValue=$VOLUME_KEY_PASSPHRASE \
ParameterKey=DestinationContainer,ParameterValue=$DEST_CONTAINER \
ParameterKey=DestinationContainerSASURL,ParameterValue=$DEST_SAS_URL \
ParameterKey=DestinationPrefix,ParameterValue=$DEST_PATH \
ParameterKey=MaxInvocations,ParameterValue=$MAX_INVOCATIONS \
--capabilities CAPABILITY_IAM
If your source volume is backed by Azure Blob Storage and you are exporting to AWS S3, use the following command to launch the stack:
aws cloudformation create-stack --stack-name $STACK_NAME \
--template-url https://s3.us-east-2.amazonaws.com/unifx-stack/unifx_azure_s3.yml \
--parameters ParameterKey=ProductKey,ParameterValue=$PRODUCT_KEY \
ParameterKey=SourceContainer,ParameterValue=$SOURCE_CONTAINER \
ParameterKey=SourceContainerSASURL,ParameterValue=$SOURCE_SAS_URL \
ParameterKey=StartingPoint,ParameterValue="$STARTING_PATH" \
ParameterKey=IncludeFilterPattern,ParameterValue="$INCLUDE_FILTER_PATTERN" \
ParameterKey=IncludeFilterType,ParameterValue=$INCLUDE_FILTER_TYPE \
ParameterKey=ExcludeFilterPattern,ParameterValue="$EXCLUDE_FILTER_PATTERN" \
ParameterKey=ExcludeFilterType,ParameterValue=$EXCLUDE_FILTER_TYPE \
ParameterKey=MinFileSizeFilter,ParameterValue=$MIN_FILE_SIZE_FILTER \
ParameterKey=MaxFileSizeFilter,ParameterValue=$MAX_FILE_SIZE_FILTER \
ParameterKey=UniFSTOCHandle,ParameterValue=$SNAPSHOT_HANDLE \
ParameterKey=PrevUniFSTOCHandle,ParameterValue=$PREV_SNAPSHOT_HANDLE \
ParameterKey=VolumeKeyParameter,ParameterValue=$VOLUME_KEY_PARAM \
ParameterKey=VolumeKeyPassphrase,ParameterValue=$VOLUME_KEY_PASSPHRASE \
ParameterKey=DestinationBucket,ParameterValue=$DEST_BUCKET \
ParameterKey=DestinationBucketAccessKeyID,ParameterValue=$DEST_ACCESS_KEY_ID \
ParameterKey=DestinationBucketSecretAccessKey, ParameterValue=$DEST_SECRET_ACCESS_KEY \
ParameterKey=DestinationPrefix,ParameterValue=$DEST_PATH \
ParameterKey=MaxInvocations,ParameterValue=$MAX_INVOCATIONS \
--capabilities CAPABILITY_IAM
Wait for Stack Creation to Complete
The above command returns immediately after being issued, even though the stack creation process is still in progress. In order to be able to know when the stack creation process has completed, run the following command:
aws cloudformation wait stack-create-complete --stack-name $STACK_NAME
This command exits cleanly after the stack has gotten to the state “CREATE_COMPLETE”. If an error occurs during the stack creation, this command exits with an exit code greater than 0.
Get CloudFormation Outputs
After the previous command completes successfully, indicating that the stack is now created, you can run the following command in order to obtain the outputs of the CloudFormation stack. These outputs contain the URL to the CloudWatch Dashboard, which can be used to monitor the progress of the Analytics Connector.
aws cloudformation describe-stacks --stack-name $STACK_NAME --output text | grep DashboardURL
This outputs a single line containing the Analytics Connector dashboard URL. Use this dashboard to monitor progress.
Cleanup
After the export is complete, it is safe to tear-down all Analytics Connector resources. To do this, run the following command:
aws cloudformation delete-stack --stack-name $STACK_NAME
Appendix: Exporting a Volume with Multiple Encryption Keys
This is the procedure for using multiple encryption keys for export. If your volume has had more than one encryption keys applied to it over time, you must condense all of those keys into a single file. Follow the steps in the following procedure to create a single file containing all of your volume’s encryption keys.
On the Nasuni Management Console (NMC), check whether multiple encryption keys have been added to the source volume. On the Volumes page, click on the volume name in the Volumes List.
For example, this source volume has 3 encryption keys: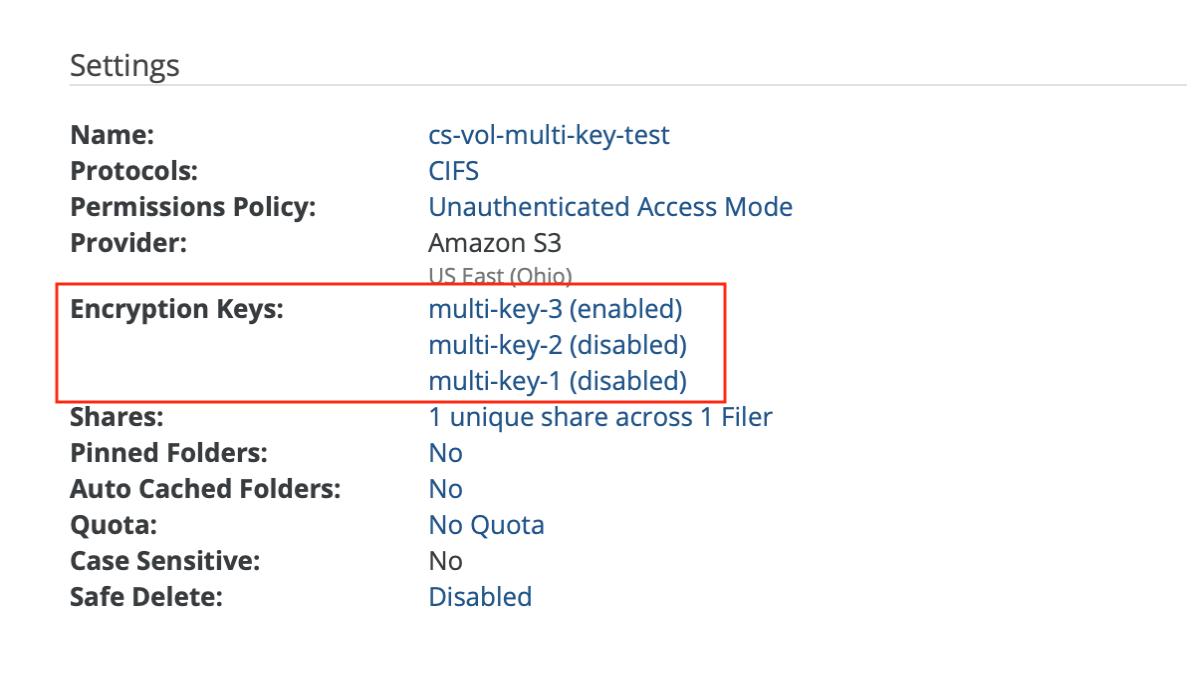
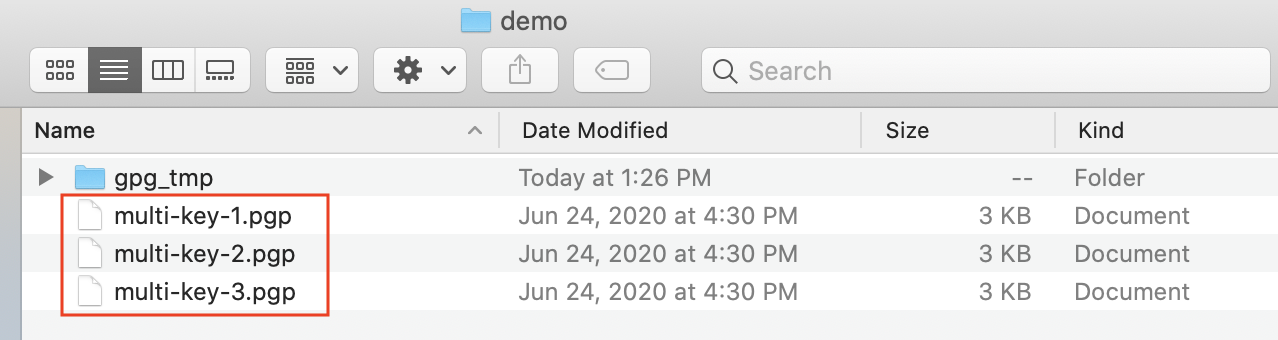
Create a new local temporary directory (such as "gpg_tmp") as the home directory for "gpg" commands. Limit the permission of this temporary home directory to owner only, by running commands such as the following:
mkdir gpg_tmp
chmod 700 gpg_tmpLocate and copy all encryption keys associated with the source volume. If any encryption keys are protected by passphrases, note all passphrase values.
Verify that the encryption key list is empty based on that temporary home directory, by running this command:
gpg --homedir gpg_tmp --list-keys
where gpg_tmp is the temporary directory created in step 2.
Use the following command to import the encryption key into the temporary home directory. If prompted, also input the passphrase for the encryption key.
gpg --homedir gpg_tmp --import multi-key-1.pgp
where gpg_tmp is the temporary directory created in step 2, and multi-key-1.pgp is an encryption key file.
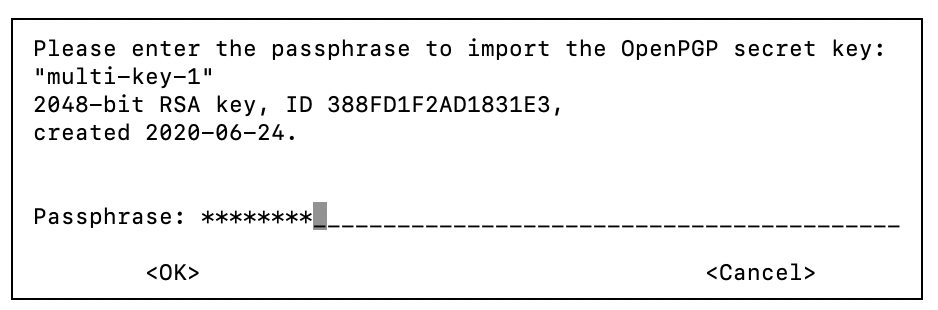
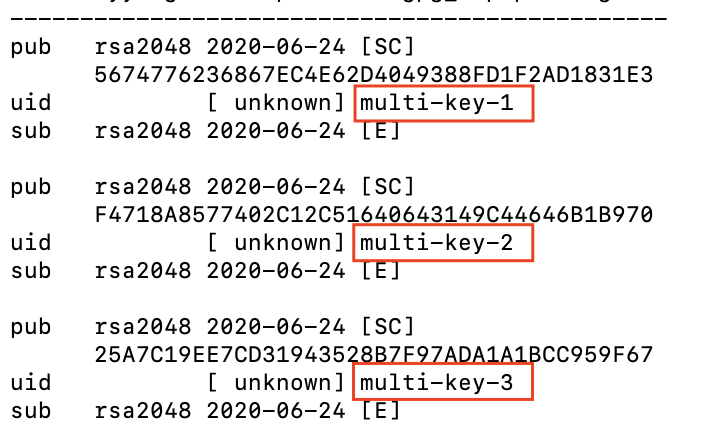
Repeat this step to import all encryption keys.Verify that the encryption key list displays the imported encryption keys correctly by running this command:
gpg --homedir gpg_tmp --list-keys
where gpg_tmp is the temporary directory created in step 2.
If the encryption keys are protected by passphrases that do not match, edit them so that all use the same passphrase.
Edit the imported key by name by running this command:
gpg --homedir gpg_tmp --edit-key “multi-key-1”
where gpg_tmp is the temporary directory created in step 2 and multi-key-1 is an encryption key.
On the gpg command line, change the passphrase by entering the following command:
passwd
Enter the original passphrase.
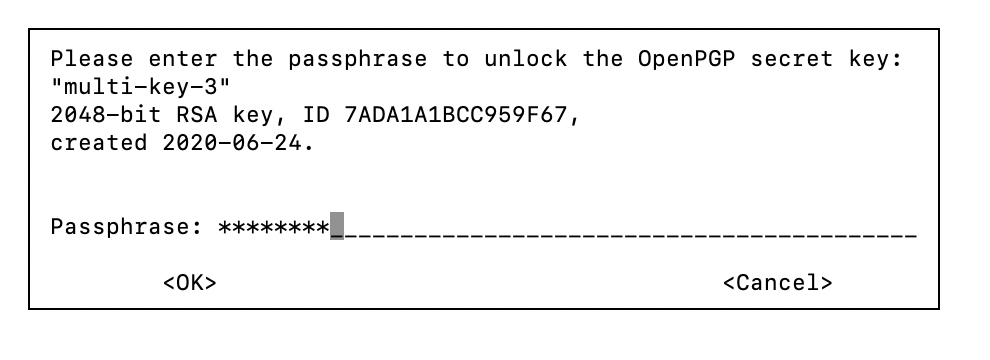
Enter the new passphrase.
Save and exit the gpg command line by using the following command:
save
Repeat the above steps for all encryption keys, and set all passphrases to the same value.
Export all encryptions into one output pgp file, by using the following command:
gpg --homedir gpg_tmp -–output multi-keys-file.pgp –-export-secret-key
where gpg_tmp is the temporary directory created in step 2.
Refer to Setup Wizard Details and use the exported multiple-key pgp file and the same passphrase to launch the Analytics Connector.
FAQs
The following Frequently Asked Questions might be helpful in understanding and using Analytics Connector.
Q: Why do no exports appear in the dashboard outcome?
While the Exclude filter is optional, if the Exclude pattern is not blank, it takes precedence. If the Exclude pattern matches all files (such as “*” with glob type), the export is still successful, but no files are exported, because all the files have been excluded due to filtering.
This sample output shows the result of such an export. The solution is to re-run the export with the correct filters.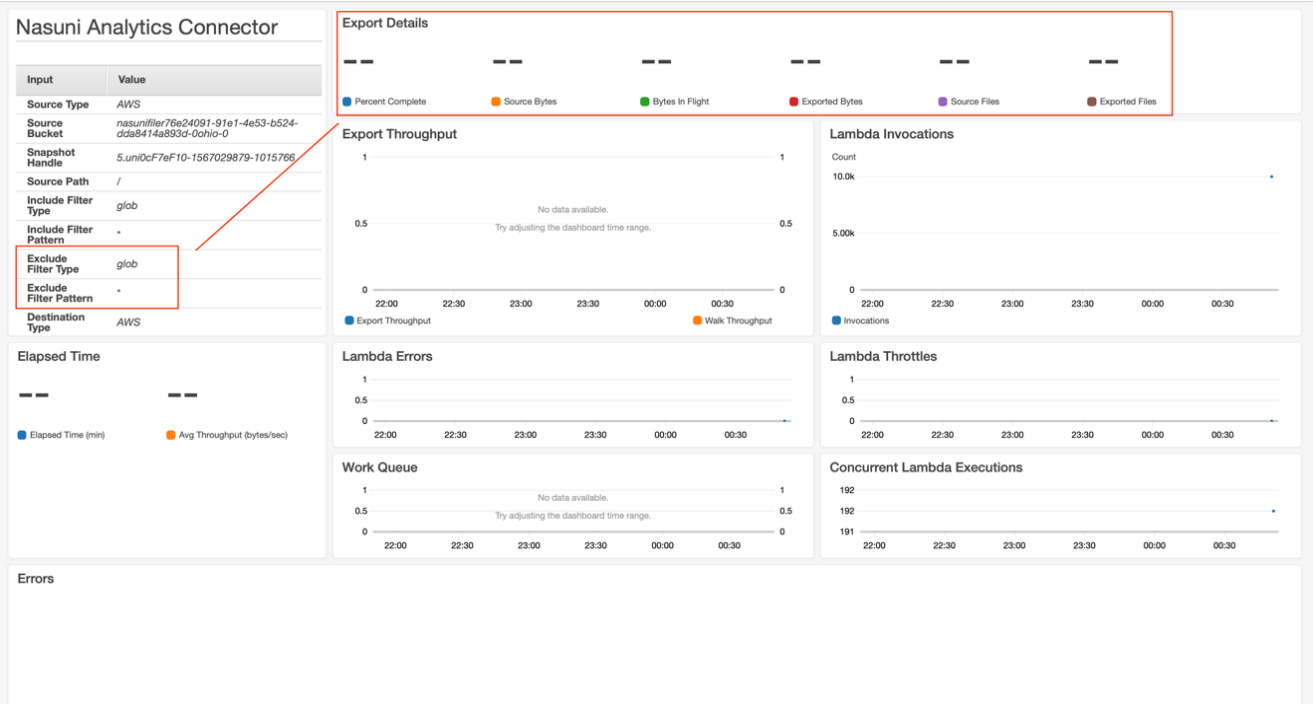
When performing a delta export, if there is nothing changed between snapshots, it is possible that nothing is exported in the dashboard.
Q: Why is “Launch Stack” giving a permissions error?
One of the Prerequisites for using the Analytics Connector is to make sure that your AWS Account ID is registered in the Nasuni account dashboard.
If the AWS Account ID for the AWS account that you are using to run the Analytics Connector has not been registered first, you might see the following errors in the AWS CloudFormation Console after clicking on the “Launch Stack” button.

If you see these errors, follow the instructions for registering your AWS Account ID described in Prerequisites for using the Analytics Connector.
Q: What are the special cases when performing a delta export?
Exporting changes between two snapshots is based on Nasuni volume snapshot versioning. Reference the special cases in the following list.
Description | Special Cases When Exporting Changes |
Nasuni Cloud Migrator |
|
Basic Filesystem Operations |
|
Conflicts between Local and Remote Volumes |
|
Restores |
|
Q: What is excluded when the “Exclude Temporary Files” setting is used?
When this setting is enabled, the following files and directories are excluded from the export. This list was compiled from temporary and hidden items commonly created by operating systems or applications.
Excluded Directories | Source |
.etc/ | Created by Unix systems |
lost+found/ | |
~snapshot/ | |
.TemporaryItems/ | Created by MacOS |
.Trashes/ | |
AppData/ | Created by Windows |
System Volume Information/ | |
$RECYCLE.BIN |
The following excluded files are given in glob pattern:
Excluded Files | Source |
*.tmp | Various operating systems and applications |
*.apdisk | Created by MacOS |
.DS_Store | |
._.* | |
Thumbs.db | Created by Windows |
autorun.inf | |
desktop.ini | |
All files beginning with ~ | Created by Microsoft Office |