Overview
Ransomware
“Ransomware” is computer malware that executes a cryptographic denial-of-access attack against the victim’s data. Specifically, ransomware encrypts the victim’s files, thus making access unavailable, and demands a ransom payment to decrypt the victim’s files.
Nasuni Ransomware Protection is a licensed add-on service of the Nasuni File Data Platform that provides additional features to help mitigate ransomware attacks. Using up-to-date intelligence on the latest threats, Nasuni Ransomware Protection helps you recover file data smarter and faster.
Nasuni provides unmatched recovery capabilities, such as unlimited immutable snapshots and snapshot intervals as often as every minute, as part of its base platform to help you recover from ransomware attacks. Nasuni Ransomware Protection extends these built-in capabilities by identifying ransomware attacks across your Nasuni environment and alerting you before they can cause significant damage. This enables you to identify the impacted files and culpable users to recover faster without paying a ransom.
Nasuni Ransomware Protection provides an additional layer of security on Nasuni Edge Appliances by immediately identifying known ransomware file extensions and notifying you of their presence.
To further bolster your cyber resiliency strategy, Nasuni also offers the following tools and services:
Incident Management: A dashboard that tabulates information such as incident count by volume, detected confidence level, signature, and Edge Appliance.
Blocked Sources: When enabled, Nasuni blocks the attacking IP address or user from connecting with an Edge Appliance.
Targeted Restore: Precisely restore only the impacted files to their original location using the most recent viable snapshot version.
Antivirus Services: Problem files are flagged and displayed on the Violations page when a violation occurs. Review this page and decide which flagged files are acceptable to include on the snapshot and cloud protection.
Note: Ransomware Detection Confidence Levels are available only for Edge Appliances running version 9.14 or later and NMC running version 23.3 or later.
For more information on all the capabilities of the Nasuni Ransomware Protection add-on, see Ransomware Protection.
Using Nasuni to Recover from Ransomware
Nasuni includes an immutable, Write-Once Read-Many (WORM) file system called UniFS® for all data, metadata, and versions. UniFS resides in your cloud object storage, and its immutability means that ransomware cannot change, modify, or delete any file data that a Nasuni Edge Appliance has written to cloud object storage. During a ransomware scenario, a Nasuni Edge Appliance might write ransomware-infected file data or new metadata to its local cache, but any known, good previous version of the file data that is uninfected might be restored quickly from cloud object storage.
When you restore data with Nasuni, the platform always tries to restore only the metadata at the top level of the directory structure. Any required data or metadata is brought into the cache only when accessed after the restoration. With this methodology, Nasuni can restore multiple TBs of data quickly.
Note: Ransomware Mitigation is only available for SMB volumes, not NFS volumes.
Recovering from a Ransomware Attack
In the event of a ransomware attack, Nasuni offers two ways to restore encrypted data.
The ransomware recovery procedure might differ depending on the available restore methods and on how widespread the ransomware attack is. It is important to note all volumes, shares, or exports and Edge Appliances (sites) affected by ransomware.
1. Communicate with your users that a cyber-attack has occurred
It is advisable to communicate to all users that a cyber attack has occurred. All users should stop working on any files on the impacted volume.
2. Contain the attack
It is crucial to identify and isolate any source that has been infected with ransomware and is encrypting files, before proceeding with the restoration of encrypted files.
Detected Ransomware Attacks
On NMC 22.3 or later versions, information on detected ransomware attack details is listed on the Cyber Resilience-Incident Management page. Customers using the Ransomware Protection Add-on can find a detailed report on when the attack started, the source of the attack, and the number of encrypted files, along with other details.
Note: Customers can find a list of impacted files and directories in the ransomware log files in the .nasuni/ransomware_violations/ folder at the root of the volume.
Mitigated Ransomware Attacks: If ransomware mitigation has blocked sources to stop them from encrypting more files, do not unblock these sources unless the malware is removed from the source or the source has been taken completely offline.
Unmitigated Ransomware Attacks: The Detected Sources Status table in the Incident Reports lists all the sources involved in the attack. If incident reports are unavailable, source client IP addresses or user names are logged in the .nasuni/ransomware_violations/ log files.
Note: Ransomware mitigation and incident reports are available with the Ransomware Protection add-on.
Important: If you utilize technologies that allow clients to use multiple NEAs (such as DFS or NetScaler) to access a share for geolocation or redundancy purposes, the client might be blocked by the mitigation policy on one appliance and then connect to another appliance hosting the share. Note that ransomware activity on the new appliance might cause the client to be blocked there, also.
Undetected Ransomware Attacks
If Auditing is enabled, to track which client machine IP addresses might be encrypting data, refer to the Nasuni audit logs. To track file system behavior related to ransomware, Nasuni recommends enabling the following auditing events:
Create
Update
Rename
Delete
See “File System Auditing” in the Volumes chapter of the Nasuni Management Console (NMC) Guide.
For undetected or unmitigated attacks, follow one of the following steps to contain the attack:
If any clients contain ransomware-encrypted files, or if ransomware is actively encrypting files on the Nasuni Edge Appliances, shut down the clients to stop the spread of the ransomware.
Isolate the clients from the network, or use NMC APIs (such as with Block a client IP address on a Filer) to block clients from connecting to Edge Appliances.
3. Set volumes, shares, and exports to read-only
Set volumes, shares, and exports to read-only to prevent encryption of additional files. Note that there are two kinds of Nasuni volumes:
Local / Shared Volume – A volume created and owned by a given Edge Appliance.
Local volume has remote access disabled.
Shared volume has remote access enabled.
Remote Volume – A volume remotely connected to a given Edge Appliance in a mode determined by the remote access permissions set on the owning Edge Appliance.
Note: Local or Shared volumes on the owning Nasuni Edge Appliance cannot be placed into “Read Only” mode. Only shares and exports for the volume can be placed into “Read-Only.”
Local, Shared, and Remote Volumes can be distinguished from each other by using the Nasuni Management Console’s Volume List. In the example below, there is one Local volume (Build Data) that is not “Remotely Accessible,” one Shared volume (Nasuni Files on the KIN Edge Appliance) that is “Remotely Accessible,” and two Remote volumes that are set to “Read/Write.”
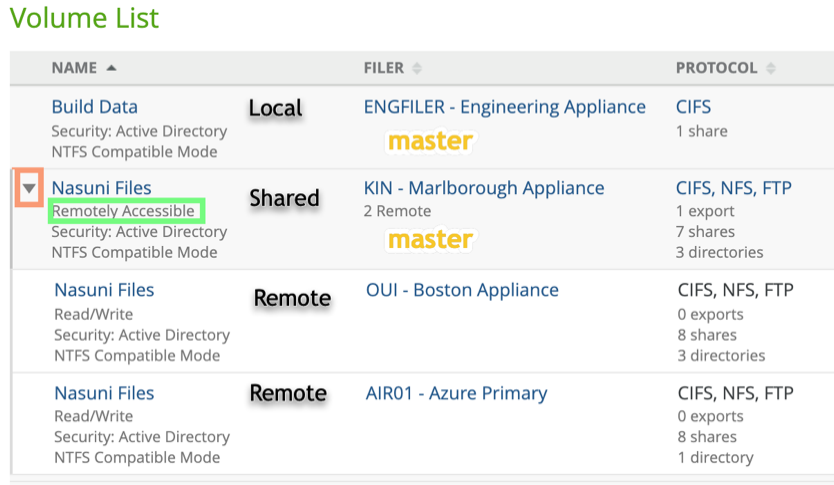
Setting shares and exports for Local or Shared Volumes to “Read Only.”
Setting shares and exports to “Read Only” ensures that ransomware does not spread to more files within the volume.
Note: On Local or Shared volumes, only shares and exports for the volume can be placed into “Read-Only.”
To automatically block the attacking client’s IP address or user name when an incident is detected, see the “Cyber Resiliency” section of the Nasuni Management Console (NMC) Guide.
3.1 On the Nasuni Management Console, navigate to Volumes → Shares.

3.2 To edit the shares for the ransomware-encrypted volumes, click Edit .png) . For this example, we use the volume “volume1”, which is owned by the Edge Appliance “Filer1”.
. For this example, we use the volume “volume1”, which is owned by the Edge Appliance “Filer1”.

3.3 The Edit Share dialog box appears.
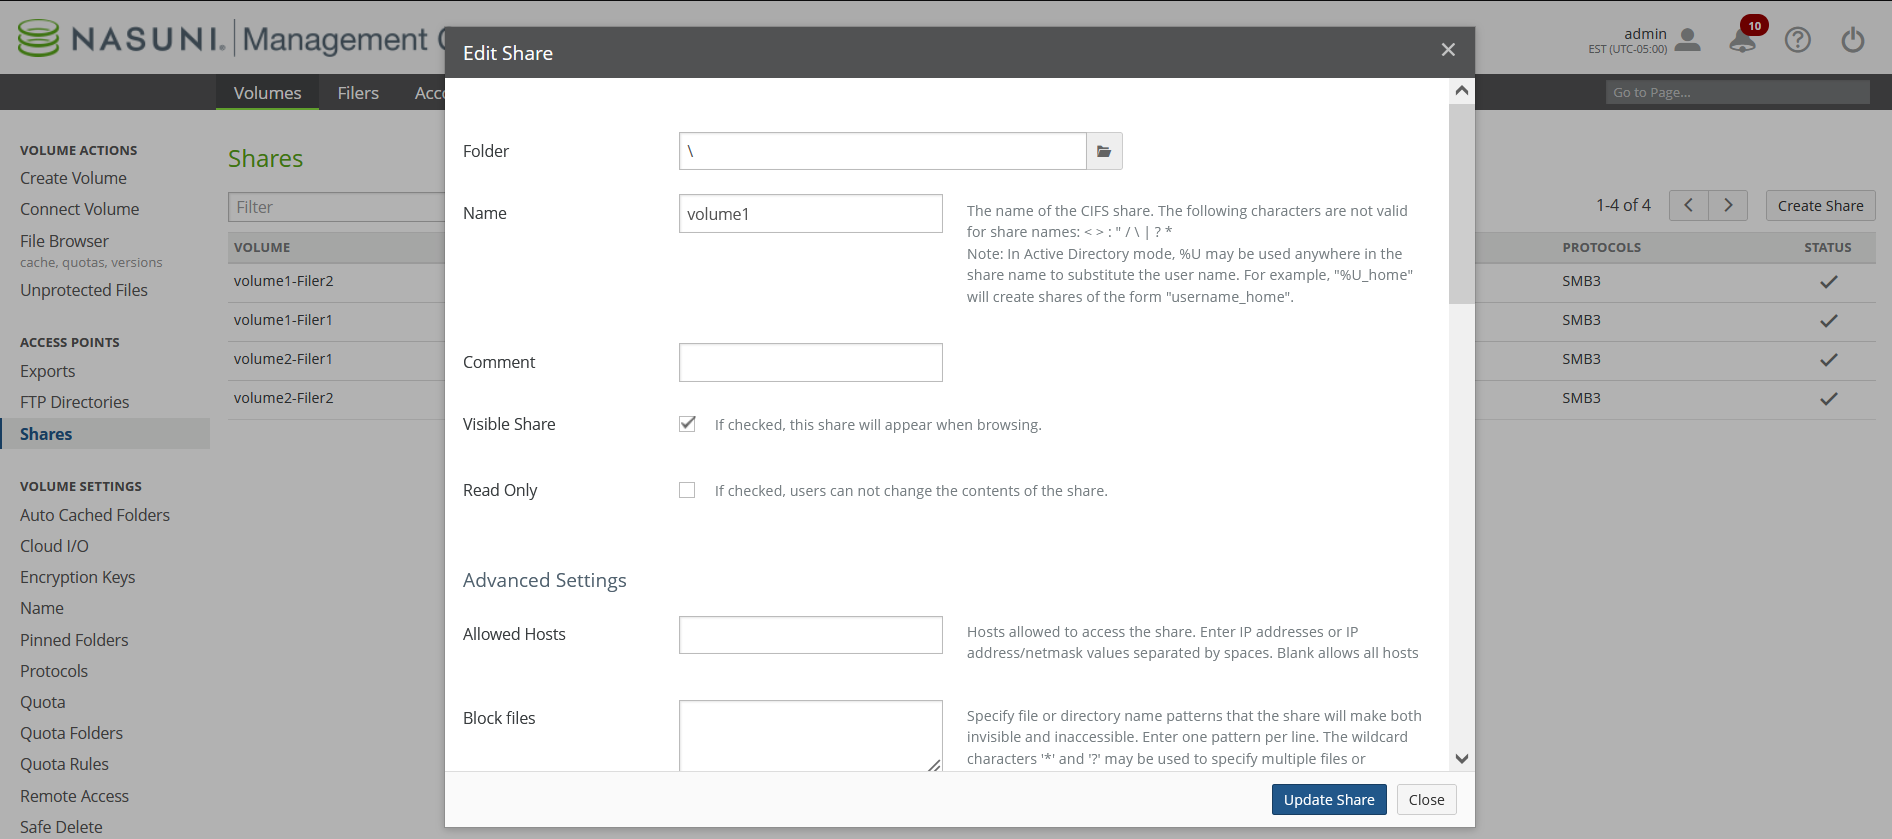
3.4 To place the share into “Read Only", select the Read Only checkbox.
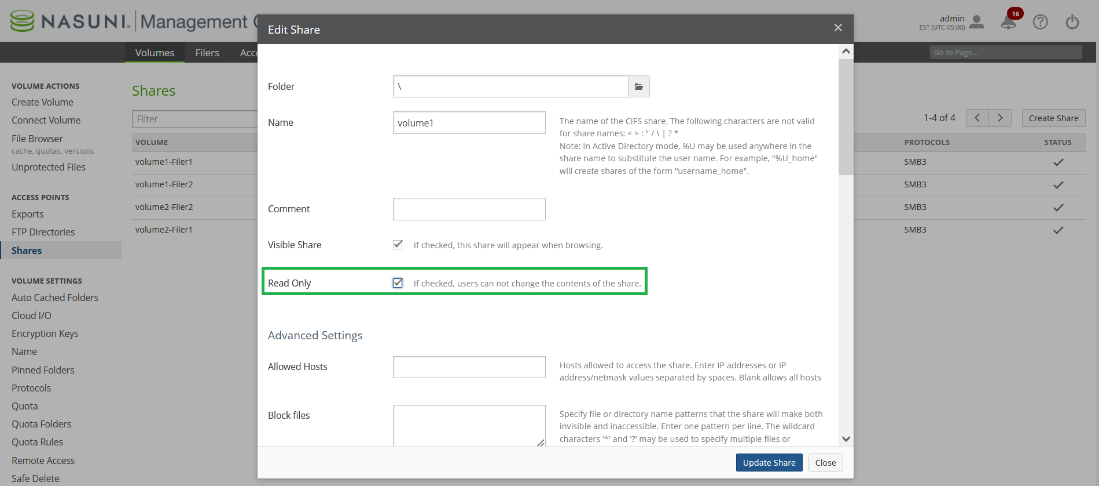
Tip: You can optionally set the share to be non-visible to users by deselecting the Visible Share checkbox. Note that the share is still accessible but not browsable within Windows File Explorer.
Note: It is recommended to leave a single, root share set to “Read Only,” for all Windows users except a single Windows Domain Administrator. This step is necessary for restoring encrypted data, as noted in step 9 “Before restoring, prepare the encrypted directory trees for restore”.
3.5 To allow the Windows Administrator to create the “OLD” directory used for the restore process, set the share permissions for one Windows Domain Administrator to "Read-Write". This step is necessary when preparing the affected share for recovery noted in step 9 “Before restoring, prepare the encrypted directory trees for restore”.
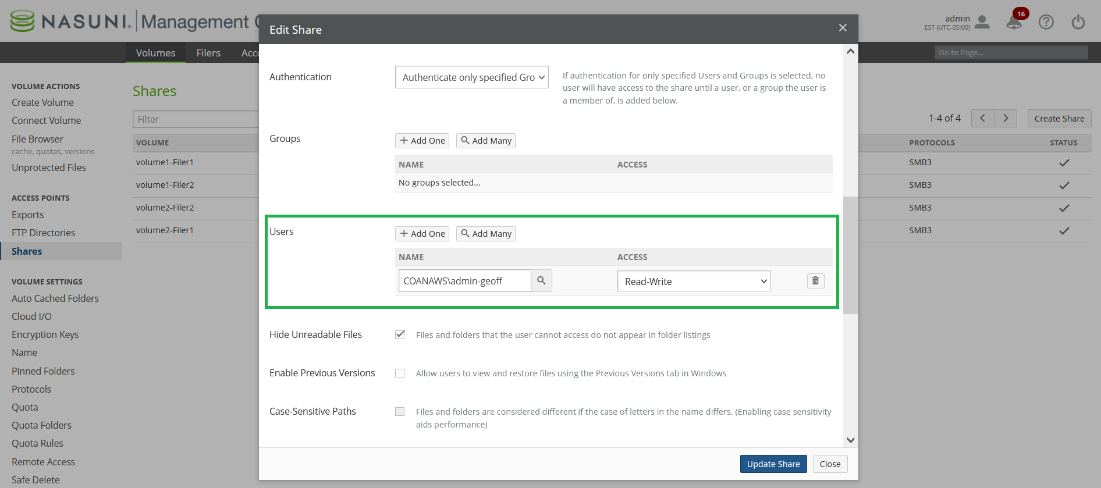
3.6 To update the share settings, click Update Share.
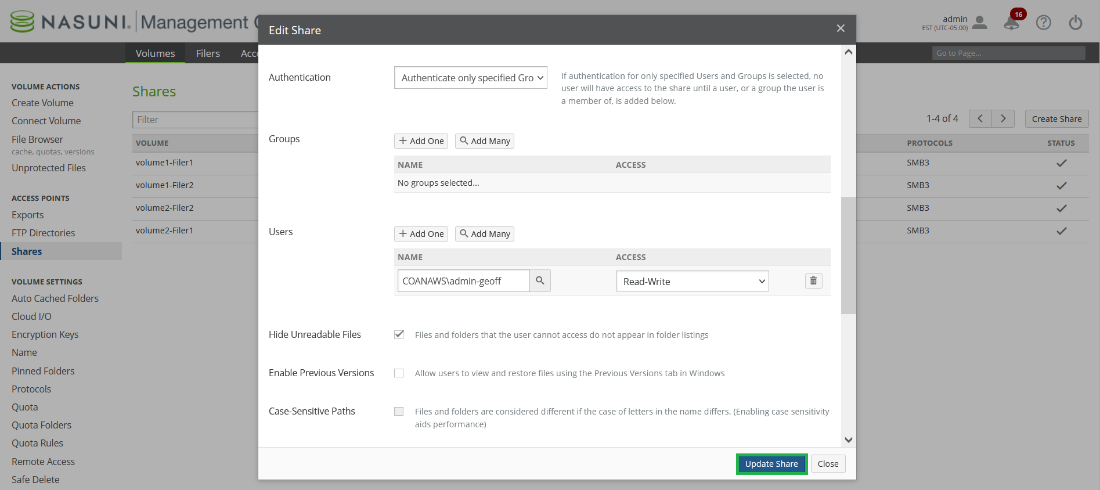
3.7 To stop the spread of ransomware, it is recommended to repeat steps 3.1 to 3.4 to set all affected shares and exports to “Read Only.”
Tip: Refer to https://docs.api.nasuni.com/ for setting multiple Shares and Exports to “Read Only” via the NMC API (Application Programmer Interface).
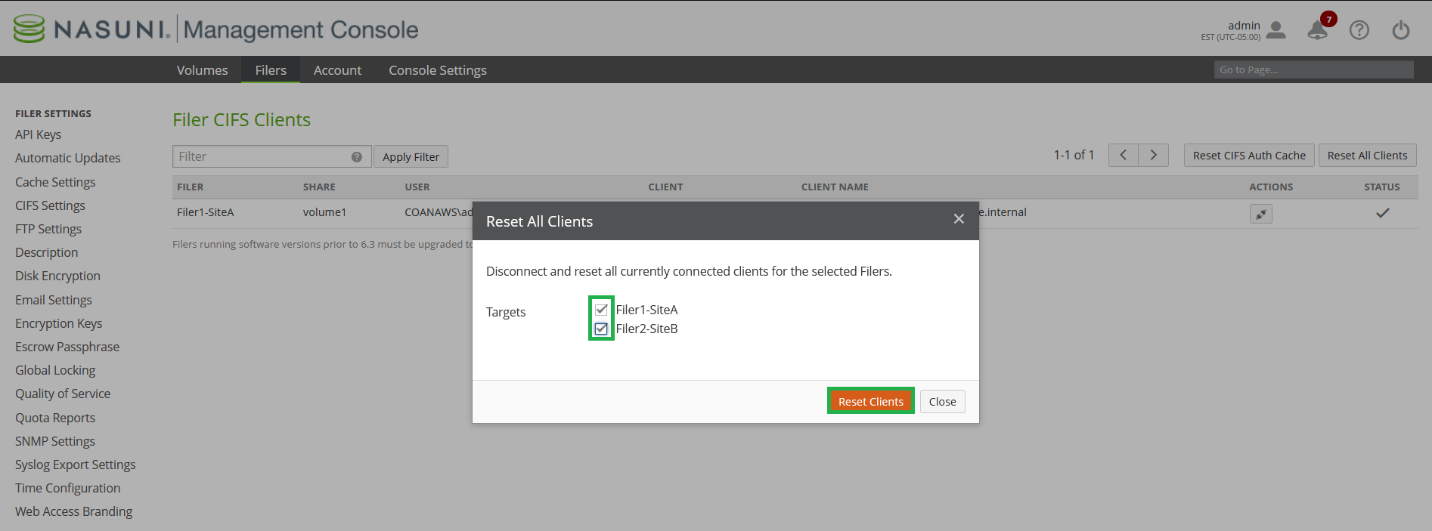
3.8 Reset all SMB (CIFS) connections. To do this, navigate to Filer CIFS Clients, and click Reset All Connections.
3.9 Select the Edge Appliances containing shares set to “Read Only” and click Reset Clients.
Setting exports to read-only
Note: If the volume uses NFS, including a multiple protocol volume of an export, navigate to Volumes → Exports, then click Edit. In the Edit Export dialog box, set the export to “Read Only” by selecting the Read Only checkbox.
4. Disable Sync Schedule
If Remote Access is enabled for volumes affected by ransomware, it is important to disable the Volume Sync Schedule. Disabling the Volume Sync Schedule prevents other Edge Appliances from propagating ransomware-encrypted files.
Important: If Global File Acceleration (GFA) is enabled on a volume, GFA overrides the snapshot and sync schedule. It is recommended to configure GFA enablement windows to stop GFA from making snapshot and sync recommendations while restoring encrypted data. Step 6 shows how to disable GFA from the Snapshot Schedule page.
Note: Because GFA accelerates data protection and propagation, encrypted files might have been already protected in the cloud and synced to connected Edge Appliances.
4.1 On the Nasuni Management Console, navigate to Volume Sync Schedule.

4.2 Select the affected volumes and click Edit Volumes.
4.3 The Volume Sync Schedule dialog box appears.
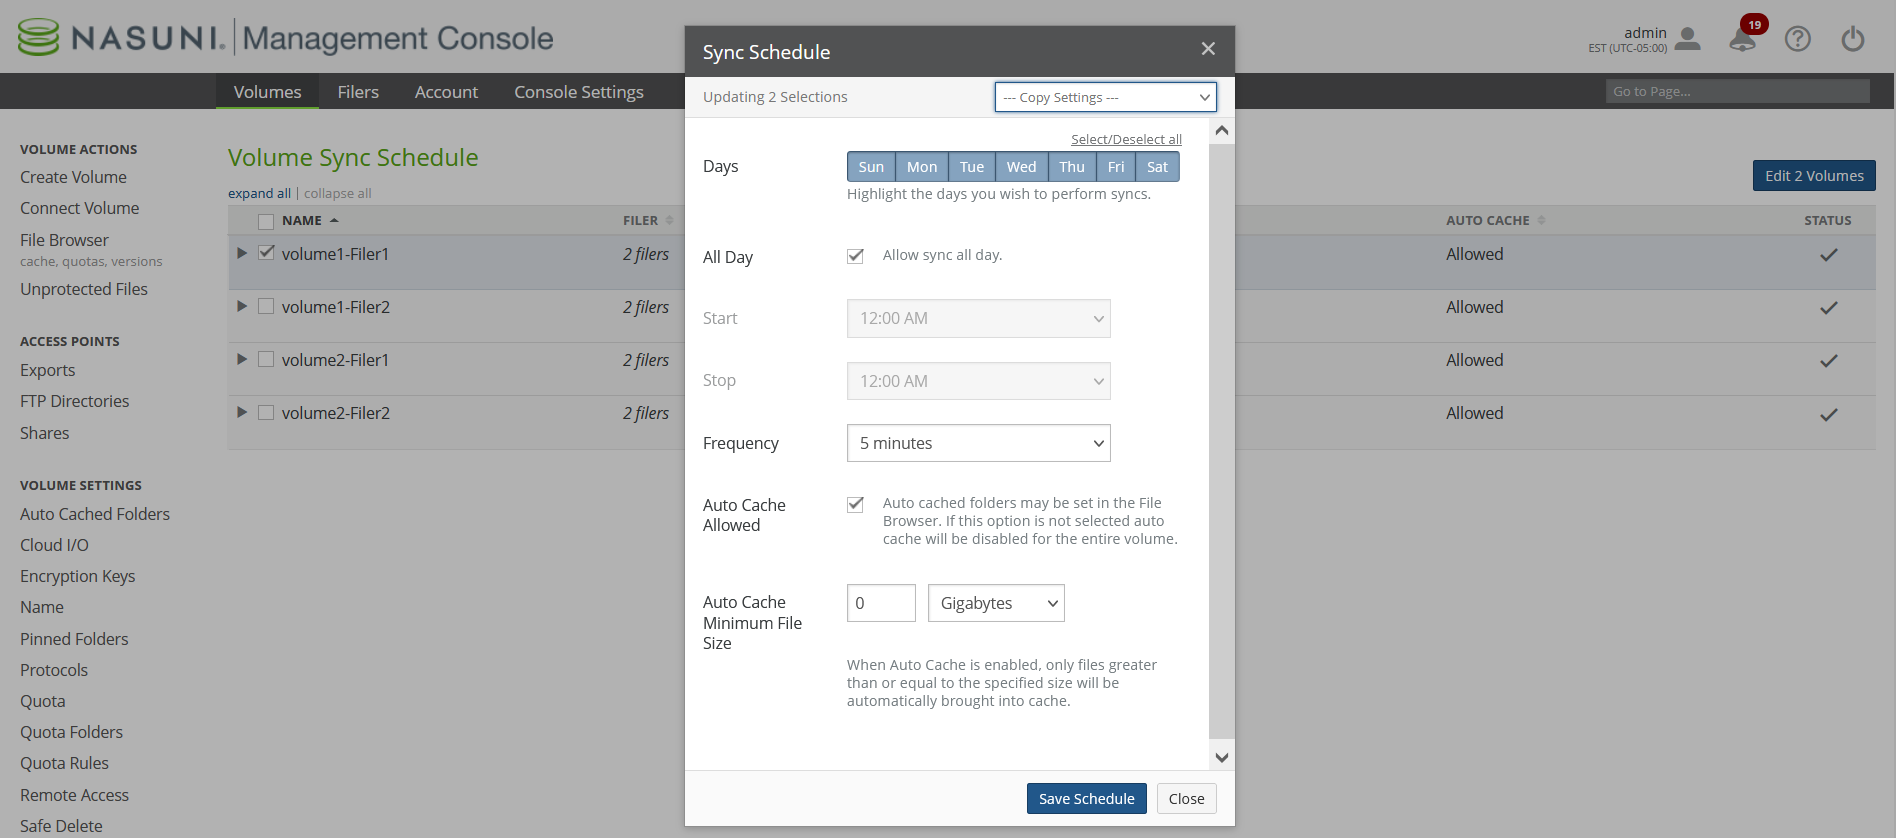
4.4 Deselect all days by clicking “Select/Deselect all” within Sync Schedule and click Save Schedule.
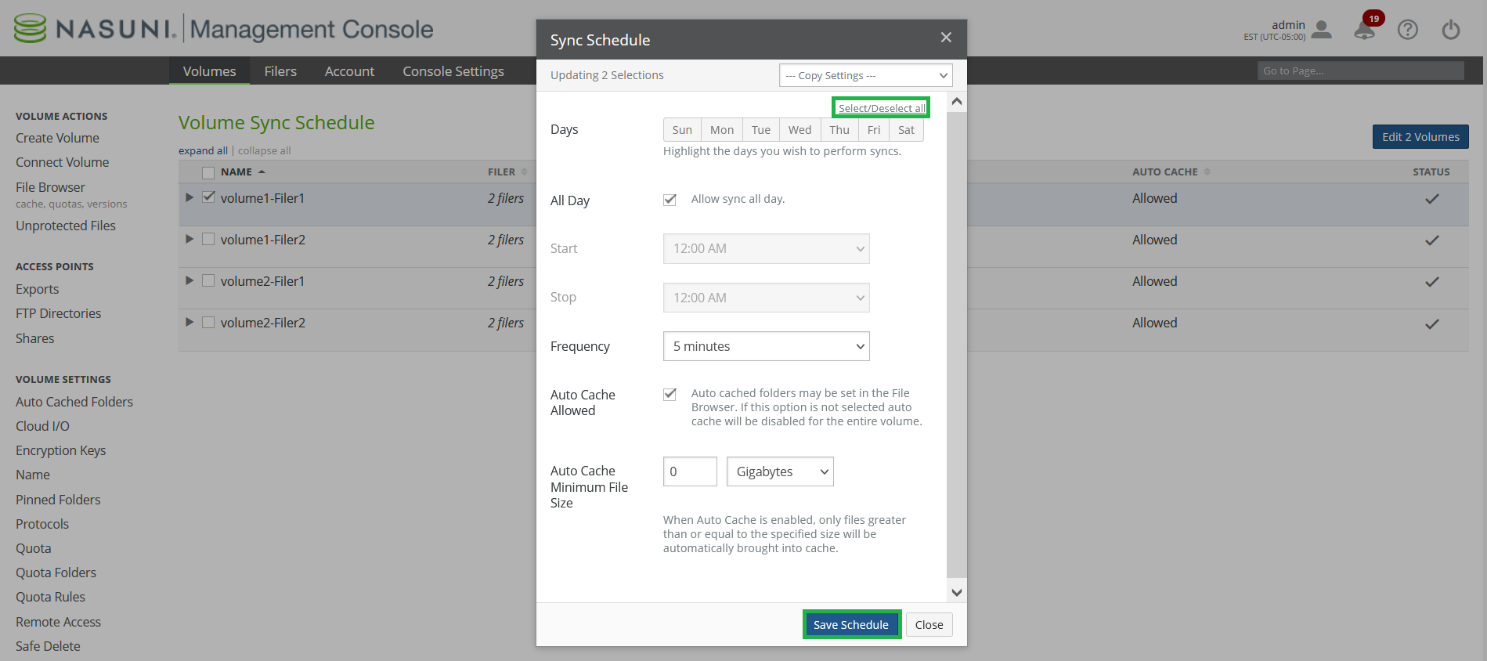
Note: After disabling the Sync Schedule, the Schedule for volumes is displayed as “Disabled.”

5. Disable snapshots for impacted volumes
To prevent additional encrypted files from being sent to cloud object storage, disable snapshots for impacted volumes. This applies whether the ransomware attack is ongoing or has ceased.
Important: It is strongly recommended to engage Nasuni Support to set the Edge Appliances to disallow snapshots not initiated by the user. This applies to all volumes on Edge Appliances.
5.1 On the Nasuni Management Console, navigate to Volume Snapshot → Schedule.

5.2 Select the affected volumes and click Edit Volumes.
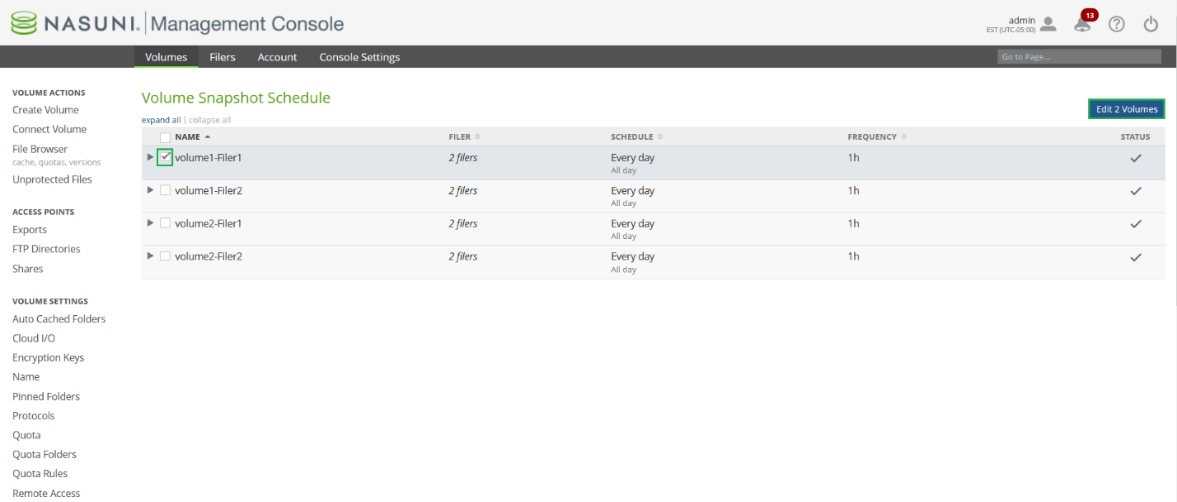
5.3 The Snapshot Schedule appears as follows.
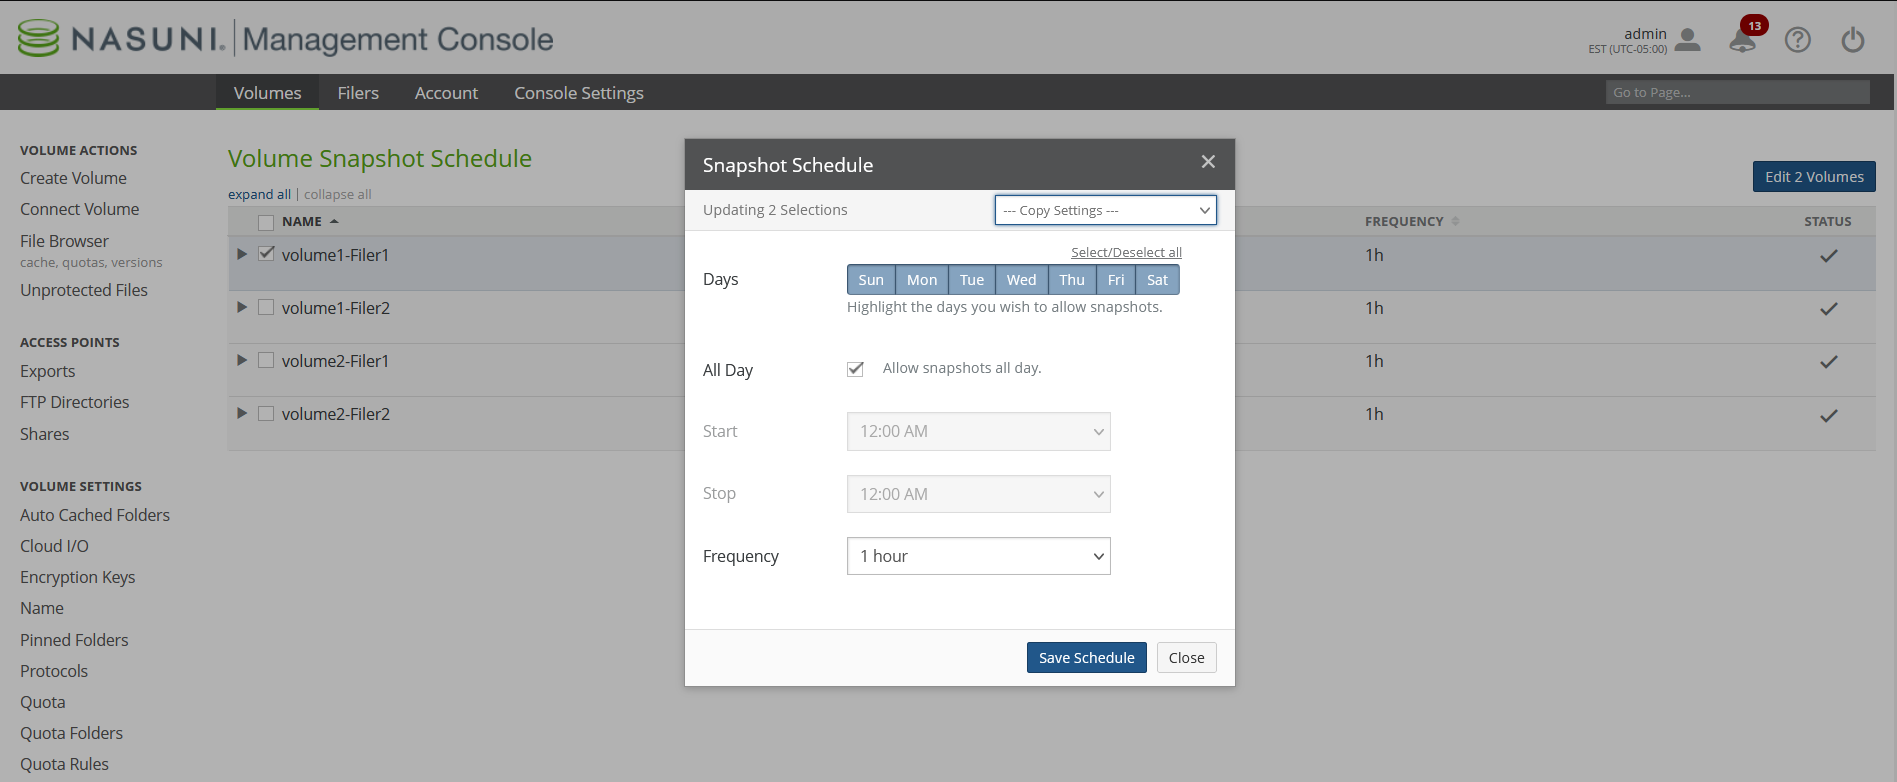
5.4 Disable Global File Acceleration if enabled on the volume.
Note: Because GFA accelerates data protection and propagation, encrypted files might have been already protected in the cloud and synced to connected Edge Appliances.
Note: Global File Acceleration is an NMC-only feature and cannot be configured using the Edge Appliance UI. GFA will continue making snapshot and sync recommendations for unmanaged Edge Appliances with a GFA-enabled volume.
5.5 Deselect all days by clicking ”Select/Deselect all” within Snapshot Schedule and click Save Schedule.
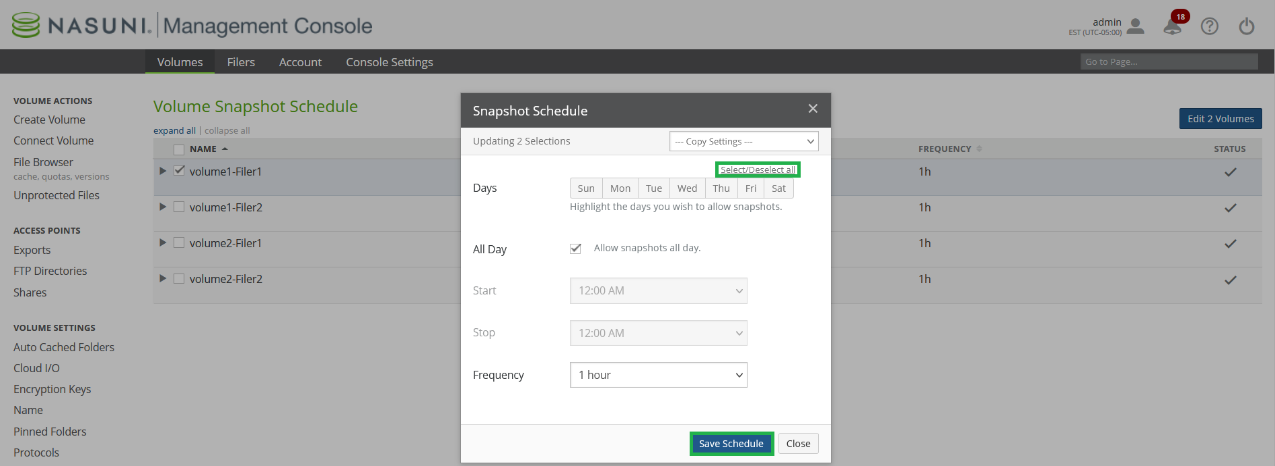
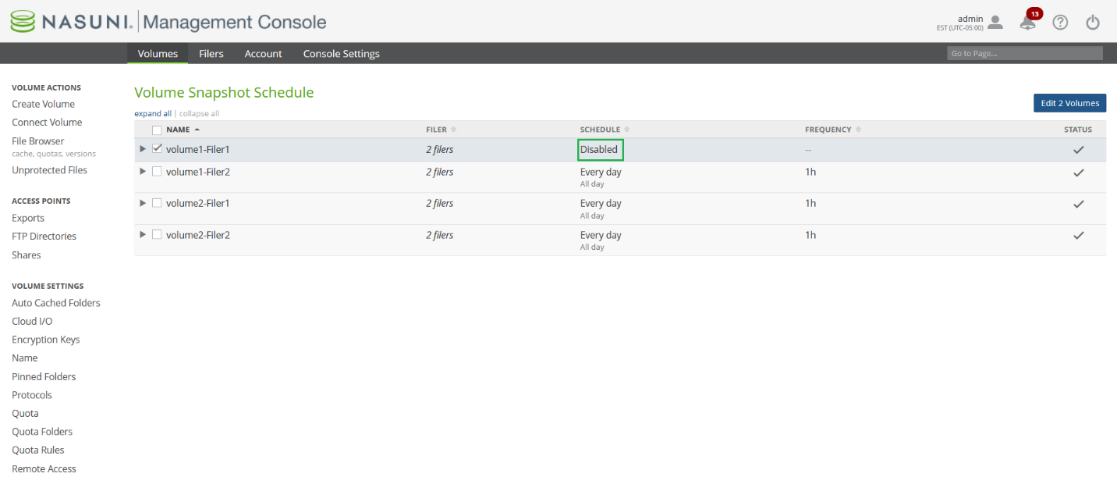
Note: After disabling the Snapshot Schedule, the Schedule for volumes is displayed as “Disabled.”
6. Using Targeted Ransomware Restore vs. Using File Browser Restore
Based on the available restore methods and the nature of the attack, determine the best way to restore your encrypted files.
Targeted Ransomware Restore
For attacks detected on 9.12 or later versions of Edge Appliances, Targeted Restore is available on 23.2 or later versions of the NMC.
Mitigated ransomware attack: If an attack was mitigated, only a few hundred files must be restored. Targeted restore is recommended to reduce the total time of recovery.
Unmitigated ransomware attack: If an attack was unmitigated, gauge the total number of impacted files from the incident report or from the ransomware log files in the .nasuni/ransomware_violations/ folder. If the attack’s extent is large, such as tens of thousands of files, restoring data using the File Browser is recommended to reduce the total recovery time.
Alternatively, targeted ransomware restore can be used to restore only the impacted files.
Note: Targeted ransomware restore might be unable to perform a metadata-only restore if Global Locking and/or Snapshot Retention service is enabled on the volume. If restoring data takes longer than expected, engage Nasuni Support to facilitate a metadata-only restore.
Note: You can enable and disable Global File Lock using the NMC API. For details, see Nasuni Labs.
Undetected ransomware restore
Undetected ransomware attacks can be restored only by using the File Browser.
6.1 Ransomware: Targeted Restore
Targeted Restore only restores files that are affected by the ransomware attack. This can save significant time in recovery and get back the files that users need much more quickly.
Tip: Targeted Restore requires the “Nasuni Ransomware Protection Add-on”.
Note: It is not always possible to restore all files automatically. If this happens, you can manually restore the remaining files.
Note: Without disabling snapshots and sync, encrypted files are protected in the cloud and propagated to connected Edge Appliances. In case of an unmitigated attack, it is advised to disable snapshots and sync because it can impact your cloud object storage cost. See Disable Sync Schedule on page 17 to disable sync. See Disable snapshots for impacted volumes on page 19 to disable snapshots.
Note: If restoration of data is deferred, for forensic purposes or other reasons, Nasuni recommends temporarily disabling snapshot retention on the volume to ensure that the unencrypted files can be restored after the analysis is complete.
To perform a Targeted Restore after a ransomware attack, follow these steps:
6.1.1 Ensure the attack is contained and all client activity has ceased.
Note: Restoring files to their original location while files are actively worked up can result in merge conflicts and require further cleanup. To ensure all I/O operations are stopped, see Set volumes, shares, and exports to read-only to set the volume and shares as read-only.
6.1.2 Click Cyber Resilience, then click Incident Management. The Incident Management page appears.

6.1.3 For the incident that you want to perform a Targeted Restore on, click Targeted Restore .png) . The Targeted Ransomware Restore dialog box appears.
. The Targeted Ransomware Restore dialog box appears.
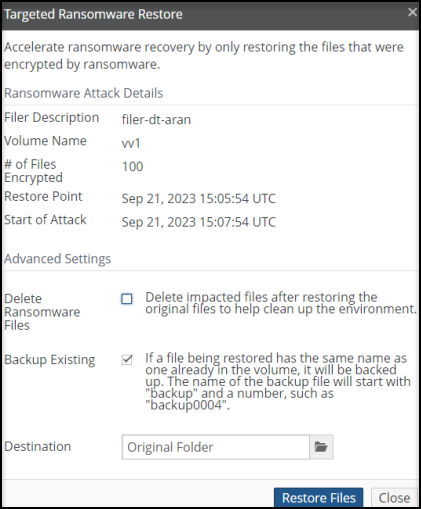
The Ransomware Attack Details include the following information:
Filer Description: The name (or Description) of the Edge Appliance involved in the ransomware attack.
Volume Name: Name of the volume involved in the ransomware attack.
# of Files Encrypted: The number of files encrypted during the ransomware attack.
Restore Point: Date and time of the most recent snapshot before the ransomware attack.
Start of Attack: Date and time of the ransomware attack.
6.1.4 Review the Ransomware Attack Details to ensure they are correct for this Targeted Restore session. For example, if these are not the correct volume and Edge Appliance, click Close and select the correct volume and Edge Appliance.
6.1.5 After restoring the original files, the encrypted versions of the files can be deleted. Select Delete Ransomware Files.
6.1.6 If a file being restored would have the same name as a file already in the volume, the file already in the volume can be backed up first. Select Backup Existing. This is the default. The name of the backup file would start with the word "backup" and a number, such as "backup0004”.
6.1.7 To change the destination directory of the restored file, click the Destination box and navigate to the desired destination directory.
6.1.8 To proceed with the Targeted Restore, click Restore Files. Alternatively, click Close.
6.1.9 If you clicked Restore Files, the Confirm Targeted Ransomware Restore dialog box appears.
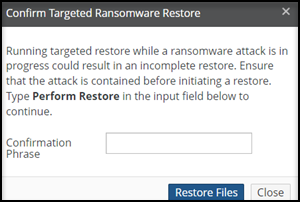 6.1.10 To proceed with the Targeted Restore, type “Perform Restore” in the Confirmation Phrase text box, then click Restore Files.
The Targeted Restore proceeds. The Incident Management page displays the percentage of the process complete.

Tip: To cancel the Target Restore, click the Cancel Restore button .png) . A prompt appears for you to confirm canceling the Target Restore.
. A prompt appears for you to confirm canceling the Target Restore.
Note: If there are any issues with the Targeted Restore, messages appear in Notifications.
The affected files are restored from cloud object storage. The Incident Management page indicates when the process completes.

Tip: A log of the restore operation is available in the restore_results directory located in the .nasuni directory at the root of the volume. This log includes a list of files that were recovered, as well as details about any errors that were encountered during the restore operation.
To learn more about Targeted Restore, see Ransomware Protection.
6.2 Ransomware: File Browser Restore
Before restoring your encrypted data, assess which shares, volumes, and Edge Appliances (sites) are affected, and determine which volumes, data, and versions need to be restored. It is also important to determine whether the volumes are local, shared, or remote volumes because affected remote volumes might need to be disconnected.
7. Disable Snapshot Retention on the Ransomware-encrypted volumes
A snapshot is a complete picture of the files and folders in your file system at a specific point in time. Snapshots include new data or data that has changed since the last snapshot. Snapshots offer data protection by enabling you to recover files deleted in error or to restore an entire file system. After a snapshot has been taken and is sent to cloud storage, it is not possible to modify that snapshot.
By default, all snapshots are retained; however, for compliance purposes, you can specify to delete older snapshots from cloud object storage.
Warning: For security purposes, when a snapshot is removed, it is permanently deleted from cloud object storage and cannot be recovered.
Older snapshots can be deleted from cloud object storage based on the configured policy for the volume. Note that Snapshot Retention policies are configured at the volume level.
Important: If a file is included in any snapshot within the Snapshot Retention Policy, that file is not removed from the object store. If you delete a file and none of the retained snapshots include the deleted file, the file is removed from cloud object storage.
For this reason, during a ransomware attack, it is important to disable the snapshot schedule to prevent additional ransomware-encrypted files from being sent to cloud object storage.
Note: Disabling snapshot retention ensures that the last good version before the ransomware attack can be used for restoring data.
After Snapshot Retention is disabled, older time boundaries or “firewalls” used for Snapshot Retention must be manually removed by Nasuni Support on the Edge Appliance that owns the volume.
7.1 To disable Snapshot Retention, on the Nasuni Management Console, navigate to Volume Snapshot Retention.

7.2 Select the affected volumes and click Edit Volumes.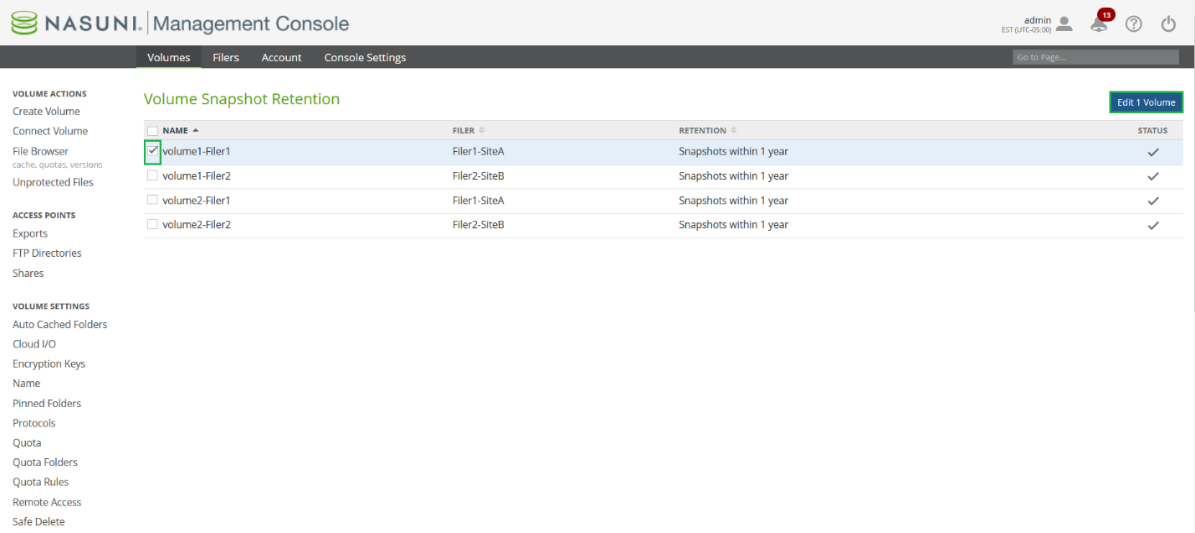
7.3 From the Retain dropdown list, select All Snapshots, and click Save Retention to disable Snapshot Retention on all volumes.
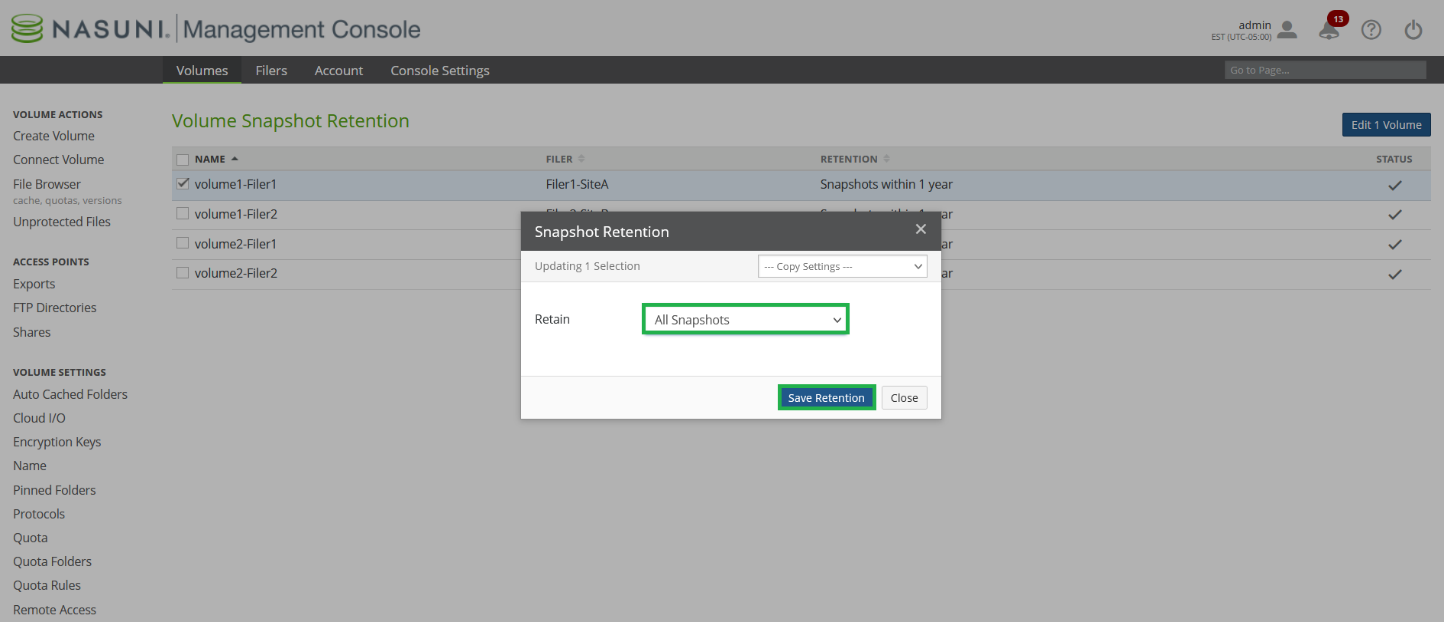
Tip: If All Snapshots are selected, no change is required to volume Snapshot Retention.
7.4 The “Retention” column for the volume in Snapshot Retention is updated with the new Retention policy “All Snapshots”.
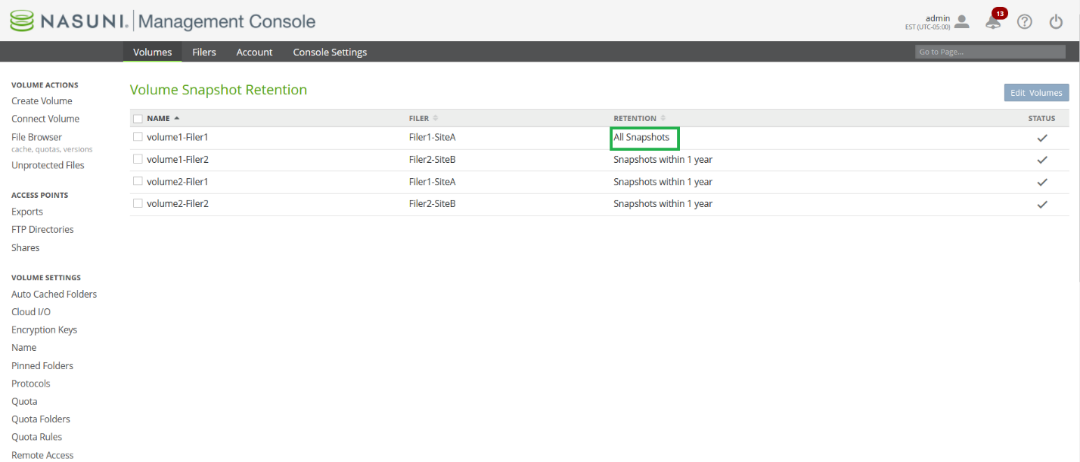
7.5 Engage Nasuni Support to check if Snapshot Retention time boundaries are present on volumes.
Nasuni Support must confirm if Snapshot Retention time boundaries are present and remove time boundaries before restoring encrypted data.
Warning: If Snapshot Retention time boundaries are not removed, restoration of data might take significantly longer than expected.

8. Disconnect Remote Volumes from Nasuni Edge Appliances
As mentioned in the Overview section, depending on the extent of the ransomware attack, disconnection of volumes might or might not be needed. If only a few files on a volume were impacted due to ransomware, use the “File Restore” option as outlined in the “Tip” on step 9.4 for more details on restoring files.
Warning: Do not proceed with this step unless you understand that unprotected data in the cache will be lost when the volume is disconnected.
8.1 On the Nasuni Management Console, click Volumes. The Volume List appears as follows.
8.2 If a volume has Remote Volumes, a gray arrow appears next to the volume name. Click the arrow icons to the left of each volume name to expand the Volume List, revealing the Remote Volumes for each Nasuni Edge Appliance.
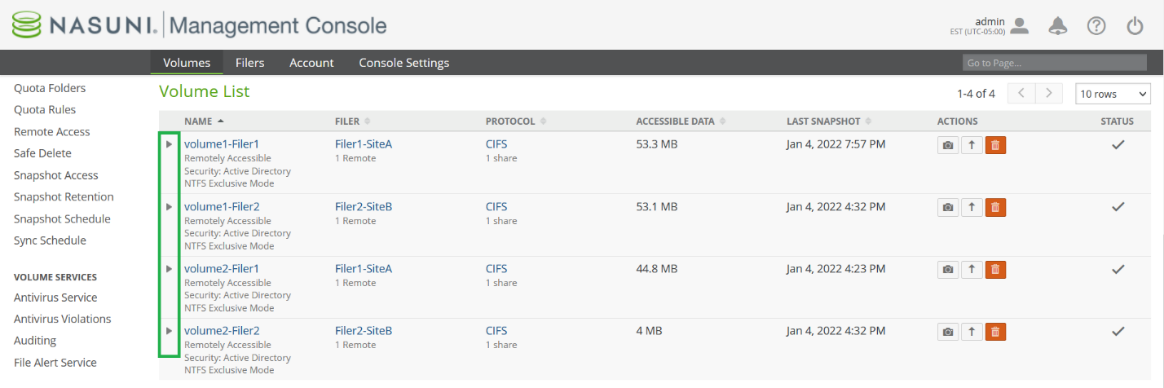
For this example, there are four Remote Volumes present: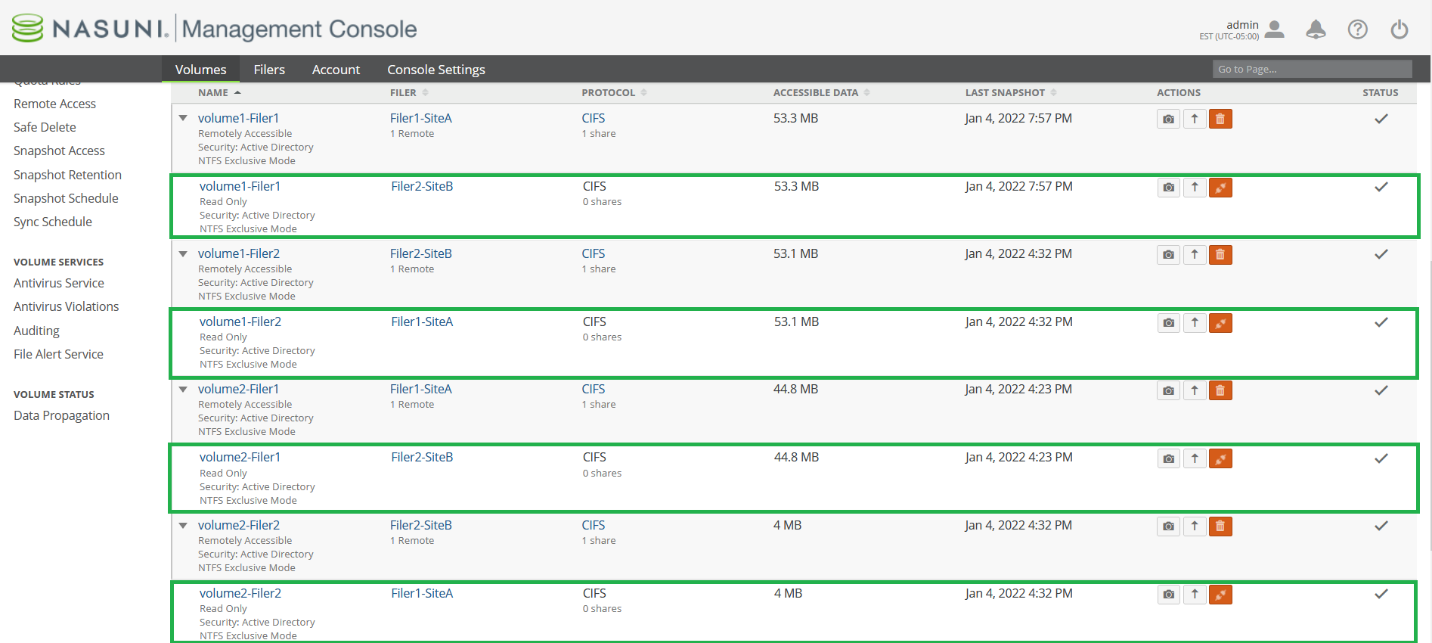
8.3 Click Disconnect .png) to disconnect each affected Remote Volume.
to disconnect each affected Remote Volume.
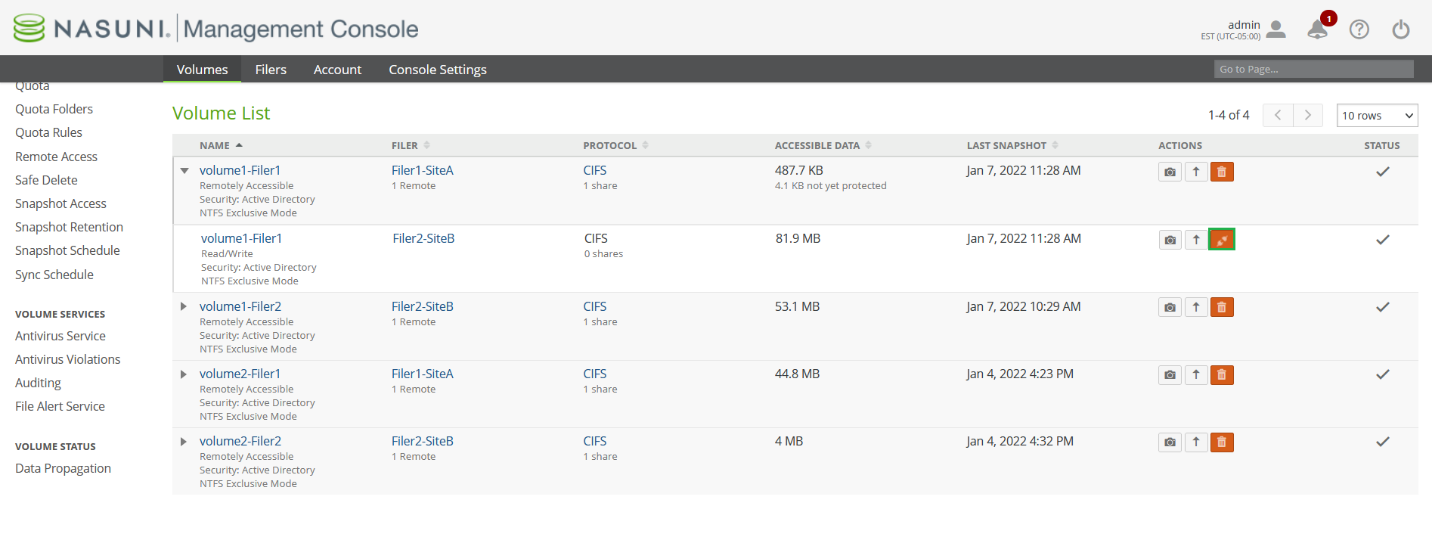
Note: After clicking Disconnect, a dialog box appears, warning the user that disconnecting the Remote Volume removes all data in the cache for that volume.
The Disconnect Volume dialog box appears.
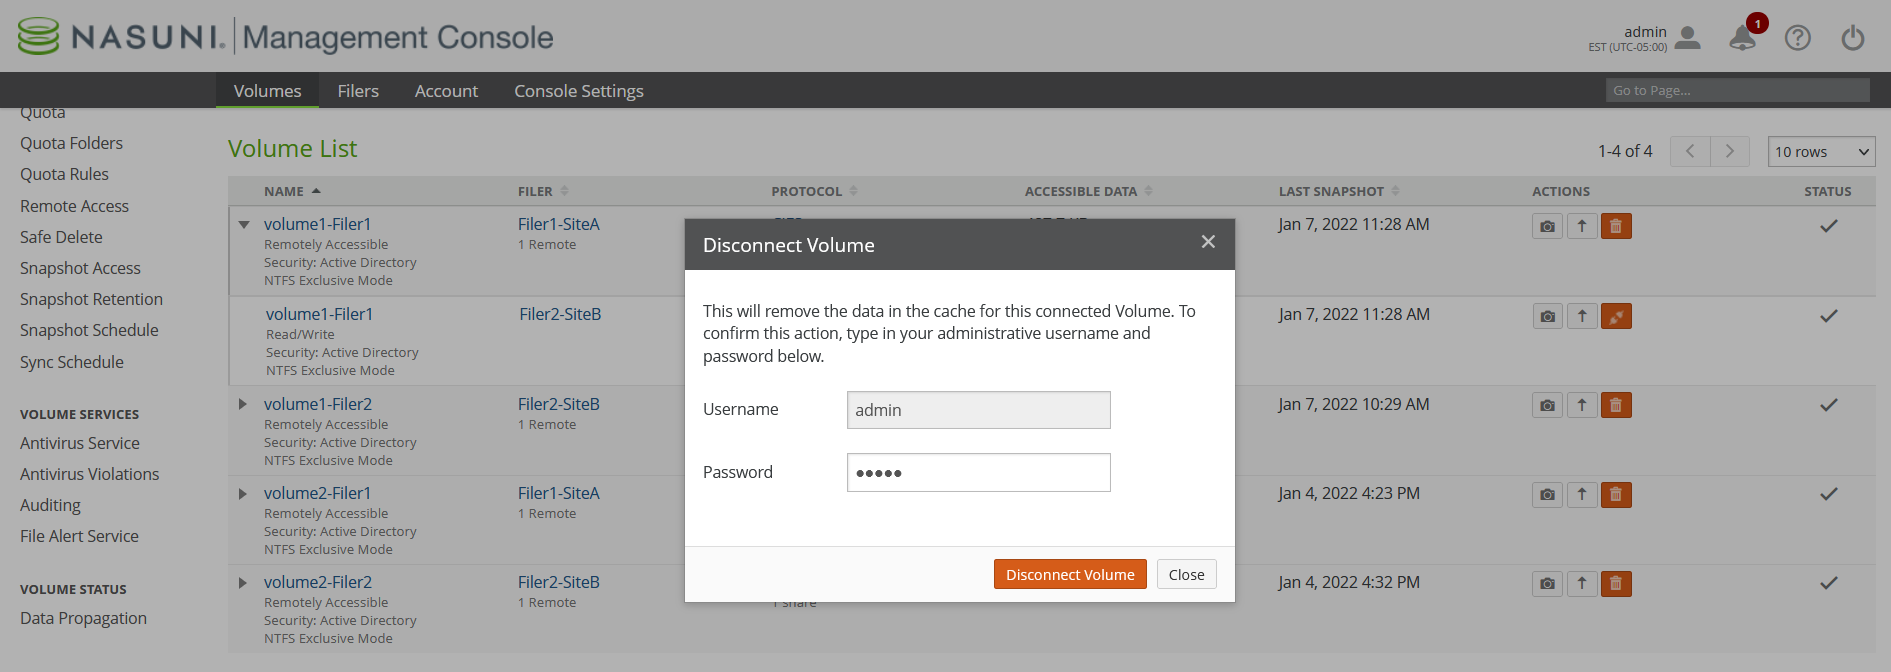
8.4 Click Disconnect Volume to disconnect the Remote Volume.
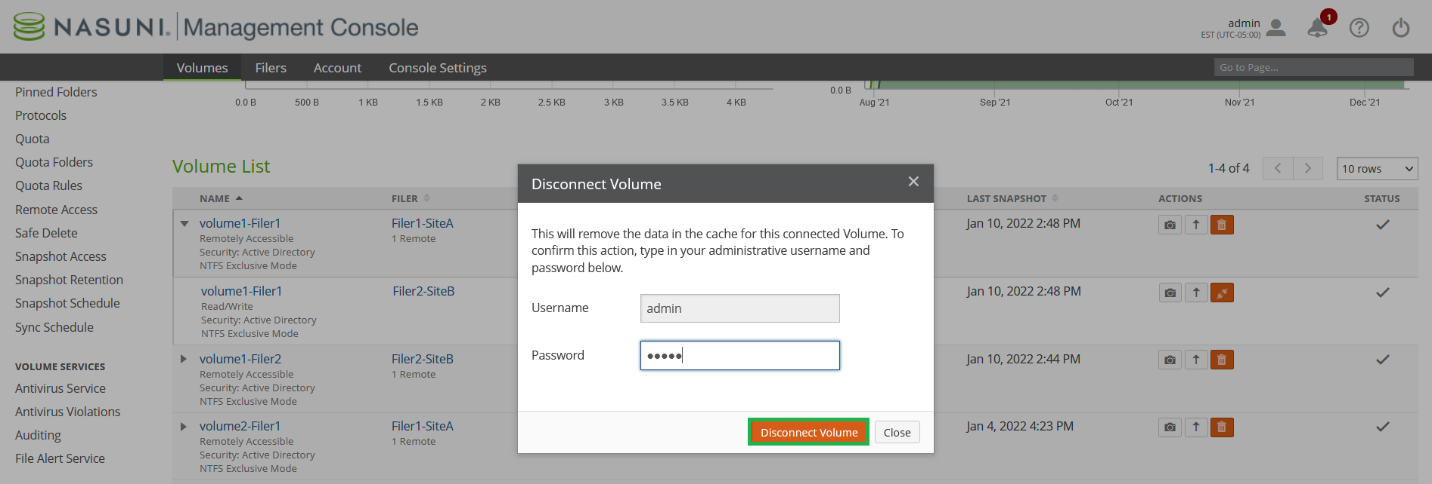
8.5 Repeat all steps in step 8 for the affected volumes where you need to do a major or full volume restore.
9. Before restoring, prepare the encrypted directory trees for restore
Tip: If using Targeted Restore, this section is unnecessary. For details, see Ransomware: Targeted Restore on page 8.
During a ransomware attack, there are normally many encrypted directories that can reside within a volume or multiple volumes. To restore encrypted data as fast as possible, Nasuni recommends creating a new directory named “OLD” and then moving the encrypted file tree to the “OLD” directory. Note that, after restoring the encrypted directory, the “OLD” directory will still contain encrypted data.
Make sure that there are no SMB (CIFS) and NFS non-Windows Administrator clients accessing opened files on the volumes that you want to restore. For SMB (CIFS) clients, open files needed for restore cannot be moved into the “OLD” directory. You can check if there are open files by logging into the Nasuni Management console, browsing the Filers tab, and selecting CIFS File Locks. The CIFS File Locks page shows you the paths for open files. Make sure that there are no users accessing the share with Read/Write permissions because encrypted files cannot be moved into the “OLD” directory. The only user that should have Read/Write access to the share should be the Windows Administrator user configured in step 4.4.

If there are no users except the Windows Administrator who might be accessing shares, proceed to step 9.2 to check whether Global File Lock is enabled.
Important: If Global File Lock is not disabled before restoring data, ransomware-encrypted files might re-appear after the restore.
9.2 On the Nasuni Management Console, navigate to the File System Browser.
9.3 Select the Volume containing the ransomware-encrypted data.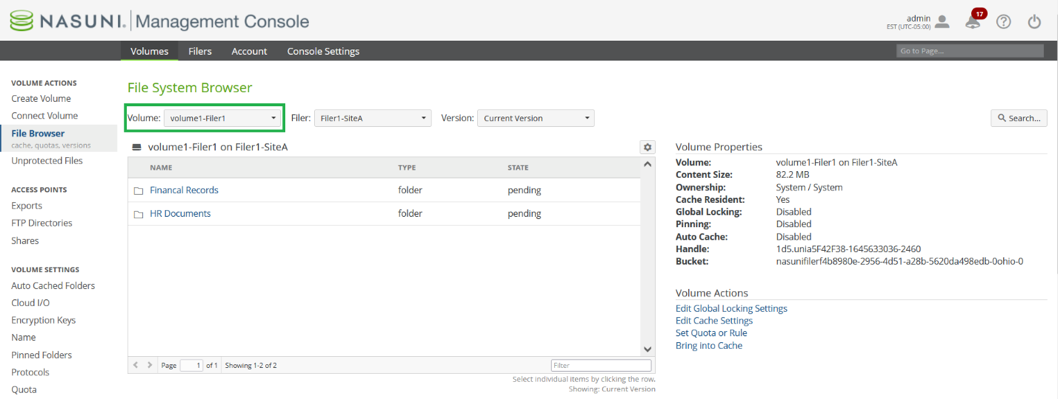
9.4 Set the Version to “Current version”.
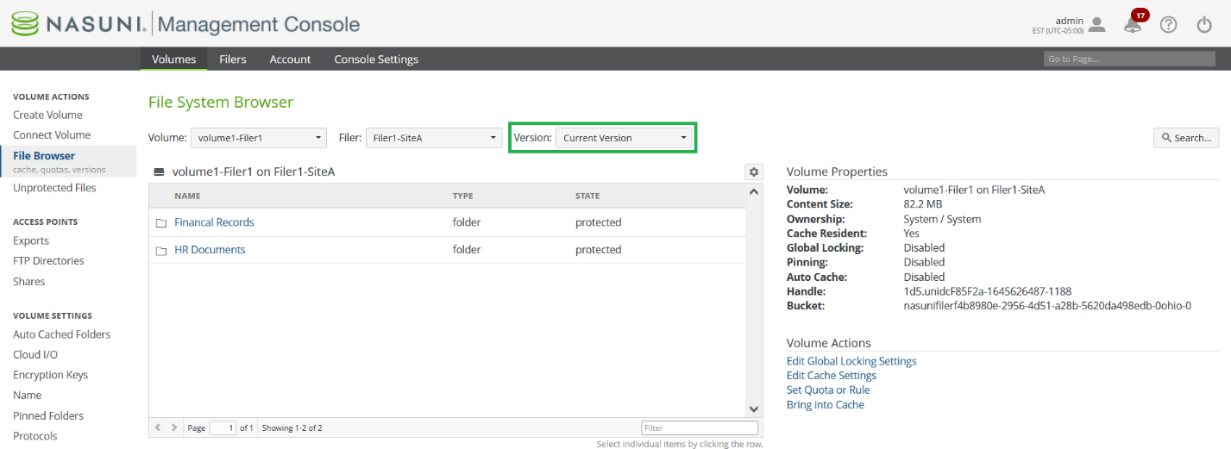
Tip: To restore a single file, click the directory name to select the directory. From within the directory, select the file you want to restore and click “Restore File”. Repeat this process for other files that you want to restore.
9.5 Navigate to the file or folder directory where Global File Lock is enabled and click Edit Global Locking Settings.
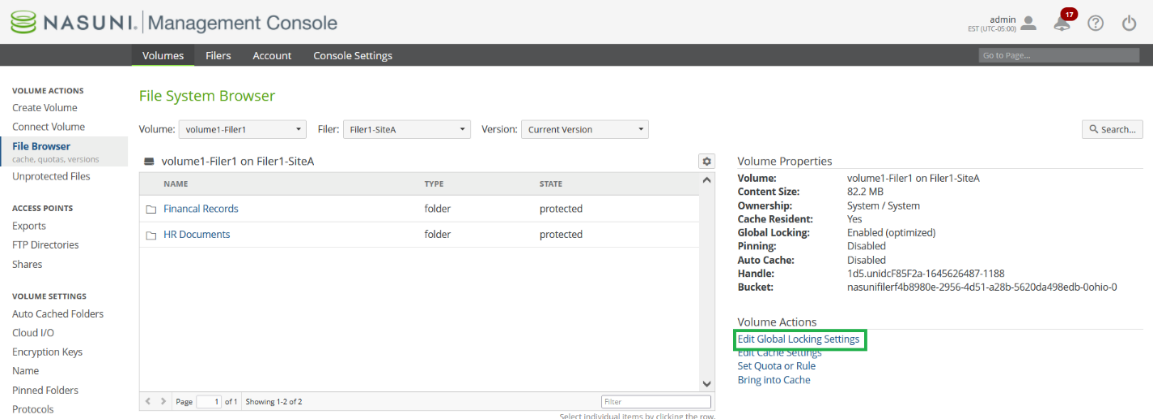
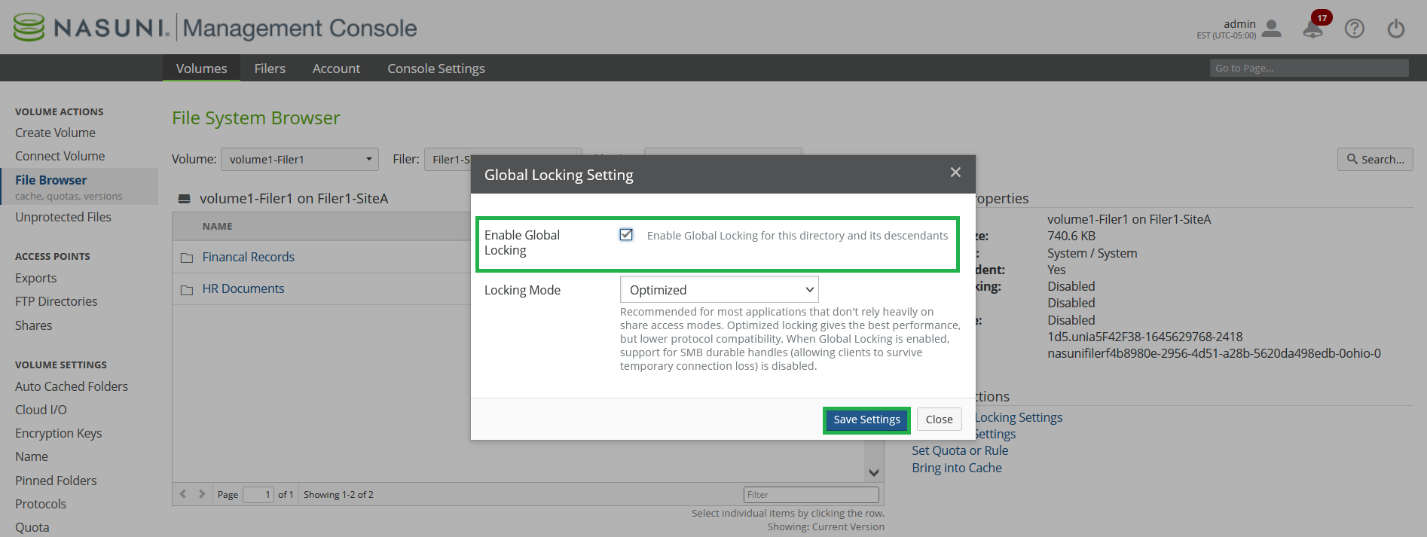
9.6 The Global Lock Setting dialog box appears.
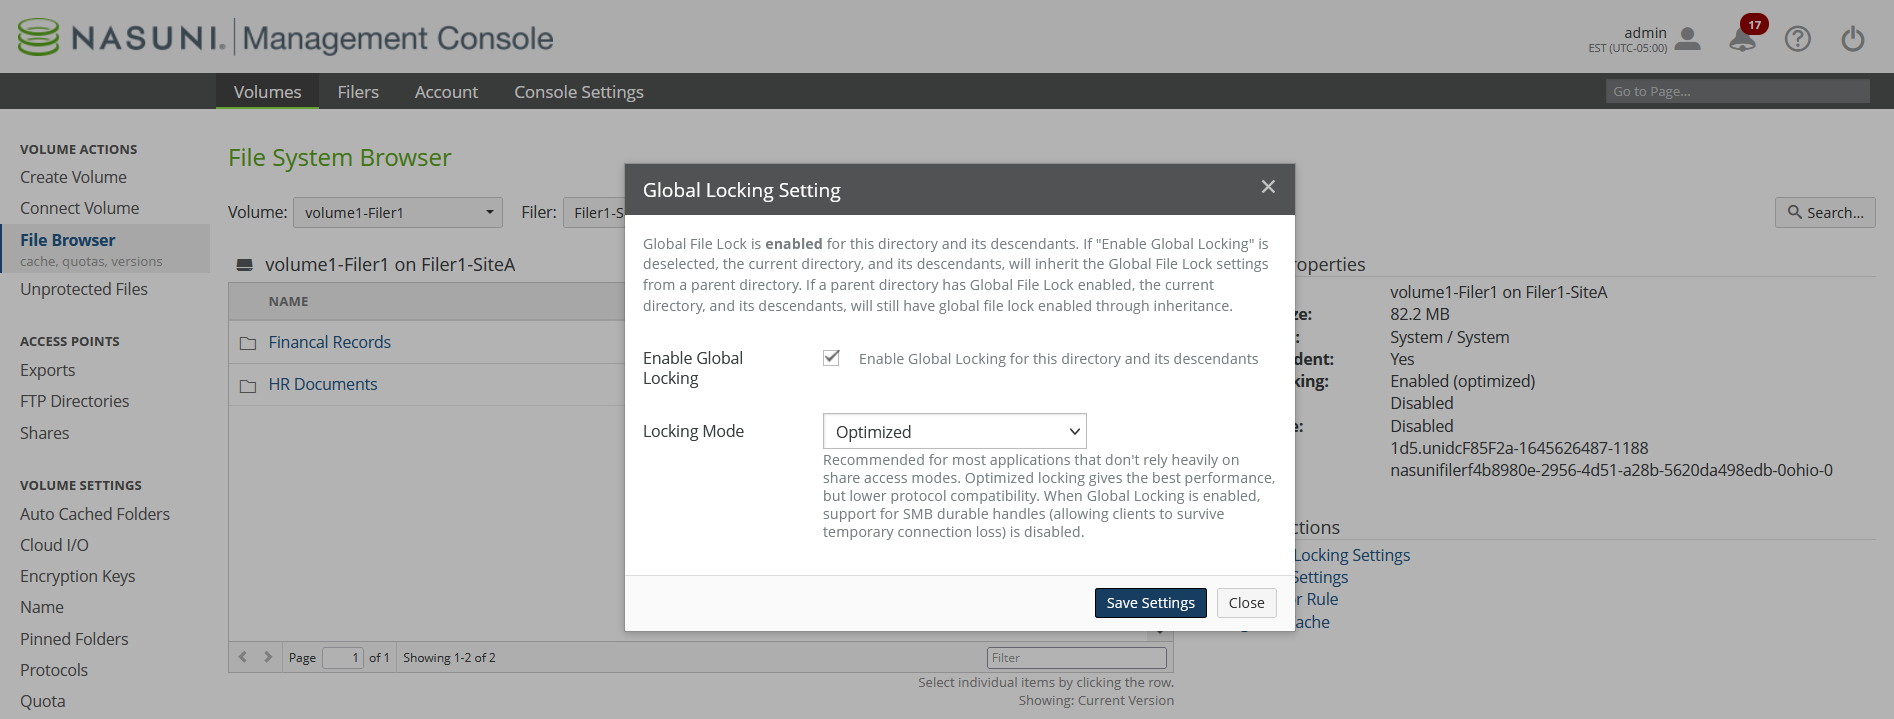
9.7 Uncheck the Enable Global Locking checkbox to disable Global File Lock and click Save Settings. In this example, Global File Lock is enabled at the “root” level directory of the volume.
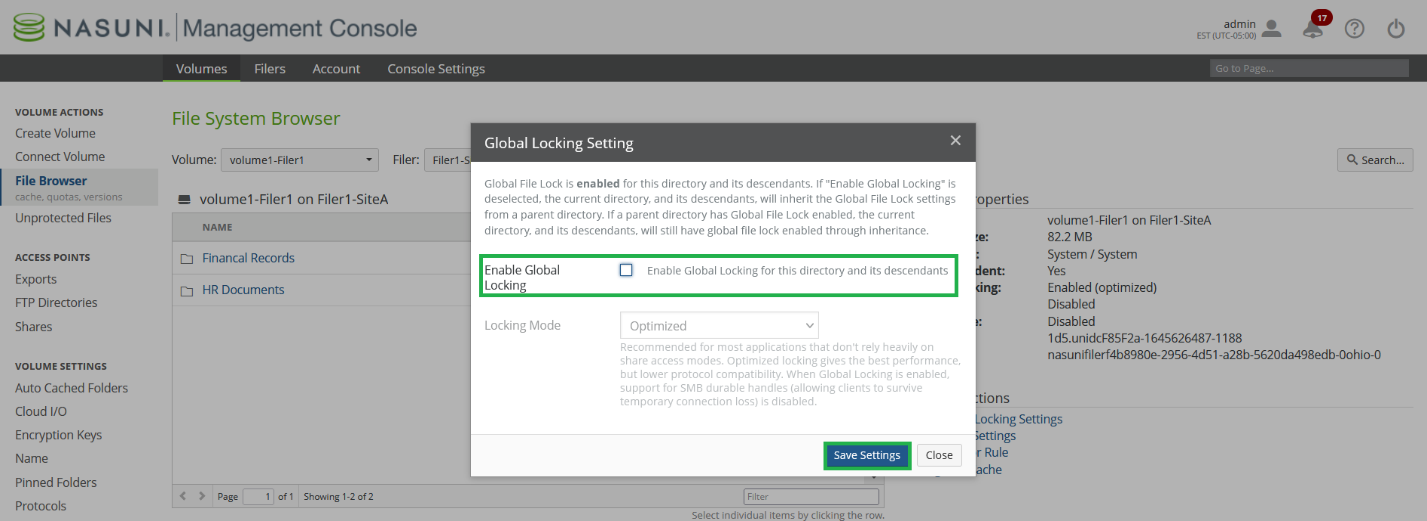
Note: You can enable and disable Global File Lock using the NMC API. For details, see Nasuni Labs.
Important: If Global File Lock is not enabled at the “root” level directory of the volume, Global File Lock might still be enabled on other directories, even after unchecking the “Enable Global Locking” checkbox. If you believe Global File Lock is enabled at the sub-root directory level, consult with Support before continuing to the next step. If Global File Lock is not fully disabled before restoring data, ransomware-encrypted files might re-appear after the restore.
Important: It is recommended to record the directories that have Global File Lock enabled before Global File Lock is disabled. This information is needed if you decide to re-enable Global File Lock on file or folder directories after the restore.
Important: Global File Lock must be disabled on the same Edge Appliance where 1) the “OLD” directory is created, 2) the directories are moved to the “OLD” directory, and 3) the restored directories. Only a single Edge Appliance can be chosen for restore.
9.8 Create a directory named “OLD” in the same parent directory location as the encrypted files that you want to restore. In this example, there are two directories, named “HR Documents” and “Financial Records”, that contain encrypted data.
9.9 Set NTFS permissions to block users from accessing encrypted data within the “OLD” directory.
Similarly, set NFS permissions to prevent the “OLD” directory from being accessed for NFS-only volumes or multiple protocol volumes.
9.10 Move the encrypted directories into the “OLD” directory. In this example, the “HR Documents” and “Financial Records” directories are moved into the “OLD” directory.

Warning: Before proceeding with the restore on step 10 “Restoring encrypted data”, it is important to first understand what data and versions need to be restored.
10. Restoring encrypted data
Tip: If using Targeted Restore, this section is unnecessary. For details, see Ransomware: Targeted Restore on page 8 or the Targeted Restore section in the NMC Guide.
10.1 On the Nasuni Management Console, navigate to the File System Browser.
10.2 Select the Volume containing the encrypted data.
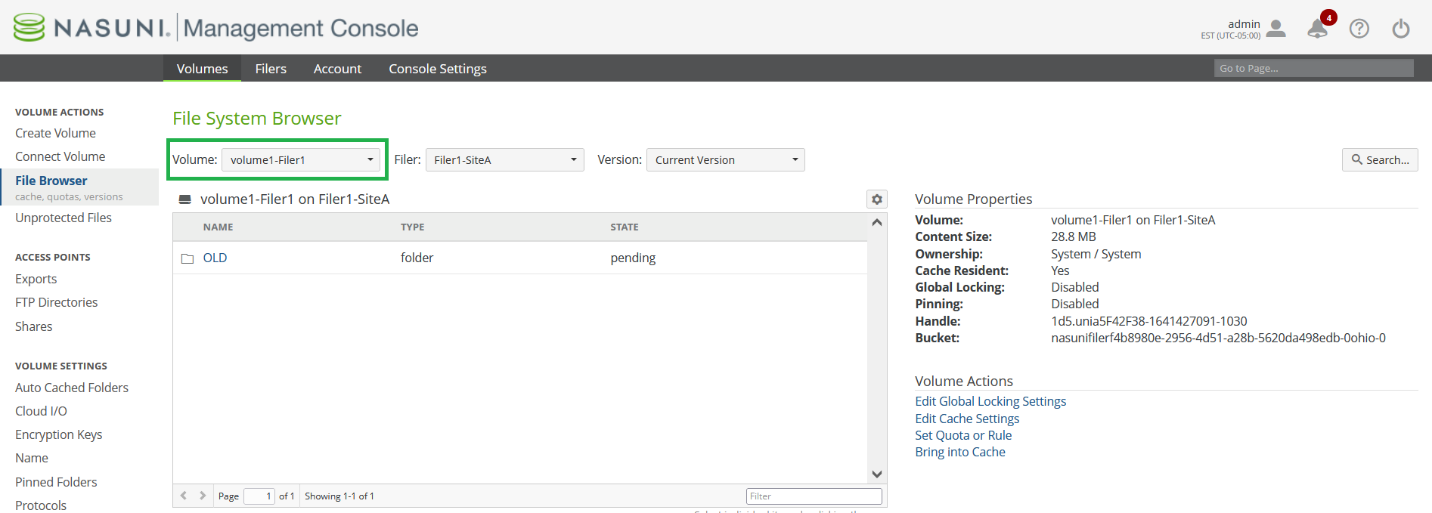
10.3 Select the Version that you want to restore from. The selected Version should be a point in time before the ransomware attack took place.
10.4 Navigate to the directory tree that you want to restore. In this example, the encrypted directory tree selected for restore resides in “\” and consists of two directories, “HR Documents” and “Financial Records,” for volume “volume-filer1” with “known-clean” version “Jan 5, 2022, 10:38:38 AM”.
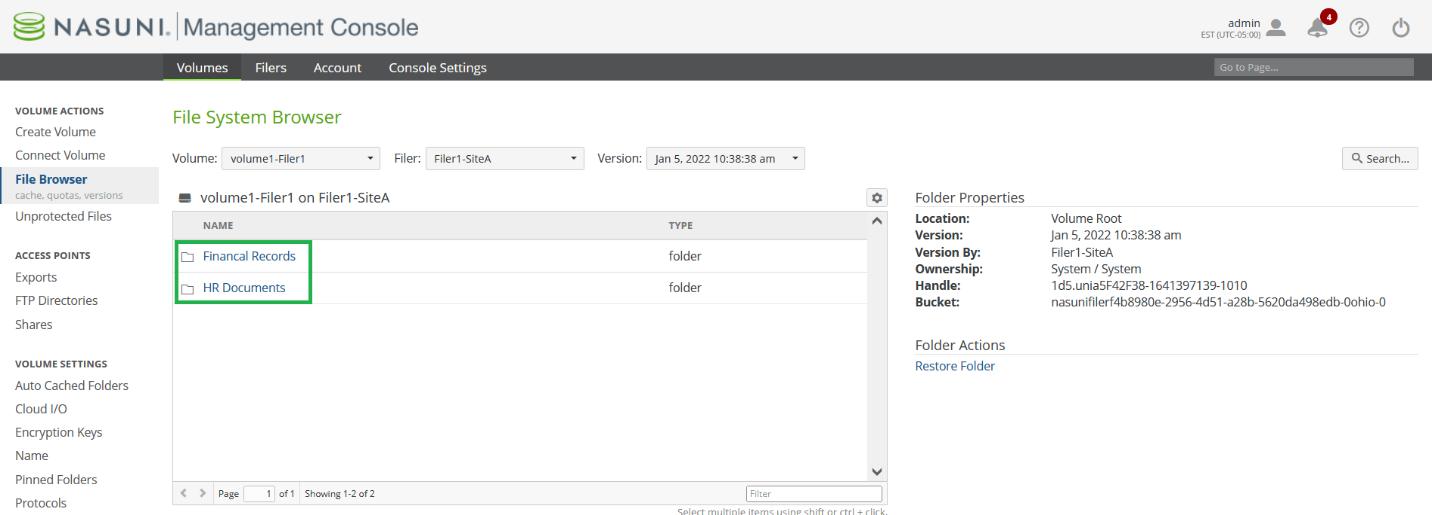
Tip: For restoring a single file, click the directory name text to select the directory. From within the directory, select the file you want to restore and click “Restore File”. Note that this process should be repeated for other files within the directory that you want to restore.
10.5 Click Restore Folder to begin recovery of the encrypted directory tree.
10.6 De-select Back-up Existing, which is set by default.
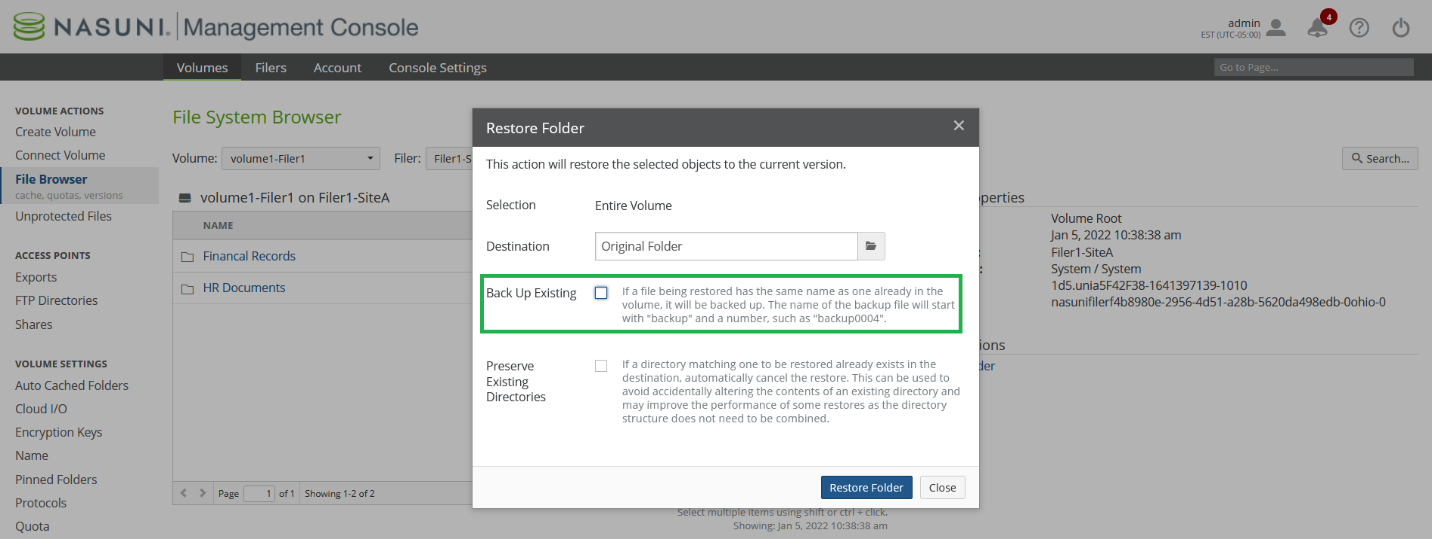
10.7 For a fast restore, ensure that Destination is set to “Original folder”. If the Destination is not “Original folder”, a fast restore does not occur.
10.8 Click Restore Folder to begin restoring encrypted data. You can view the progress of the Restore within the File Browser. When the restore is complete, a notification appears within the Nasuni Management Console. This notification includes how much data was restored and whether any data was unable to be restored.
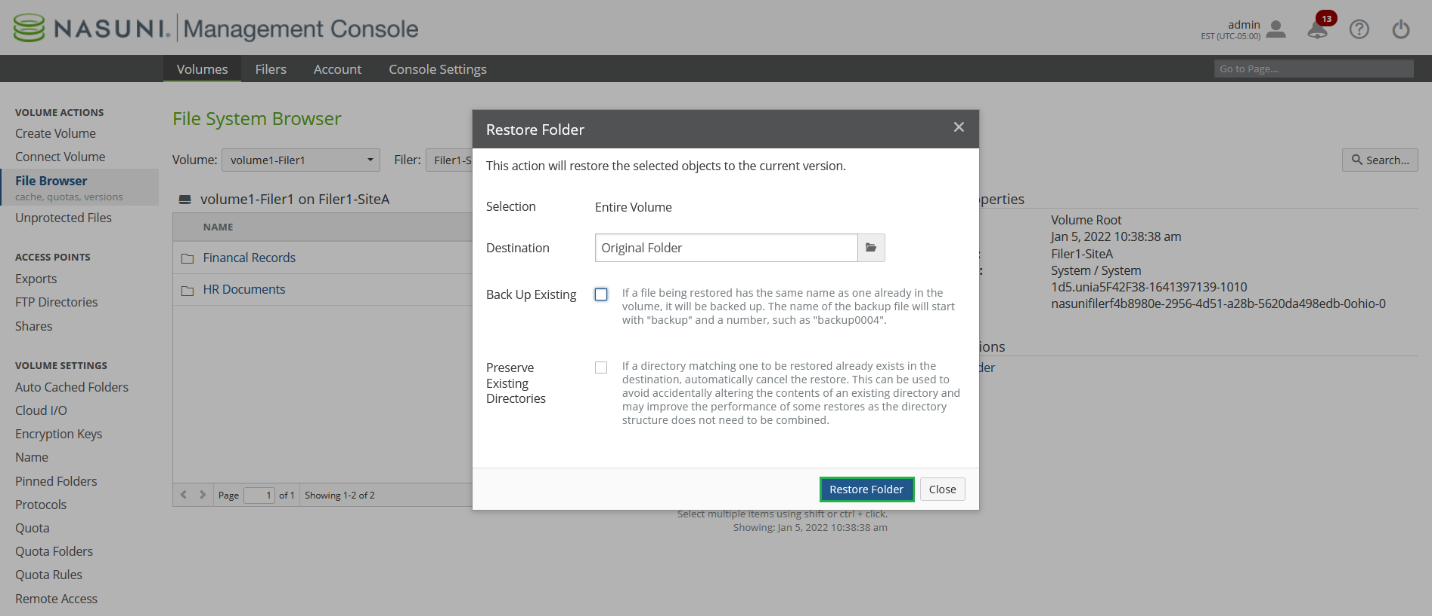
10.9 Repeat all steps in step 10 to restore encrypted directory trees.
11. Cleanup tasks after restoring
11.1 After restoring the directory, navigate to the restored directory. A refresh of the directory within File Explorer might be required. The restored directories (highlighted) appear, along with another directory named “OLD” containing the encrypted data.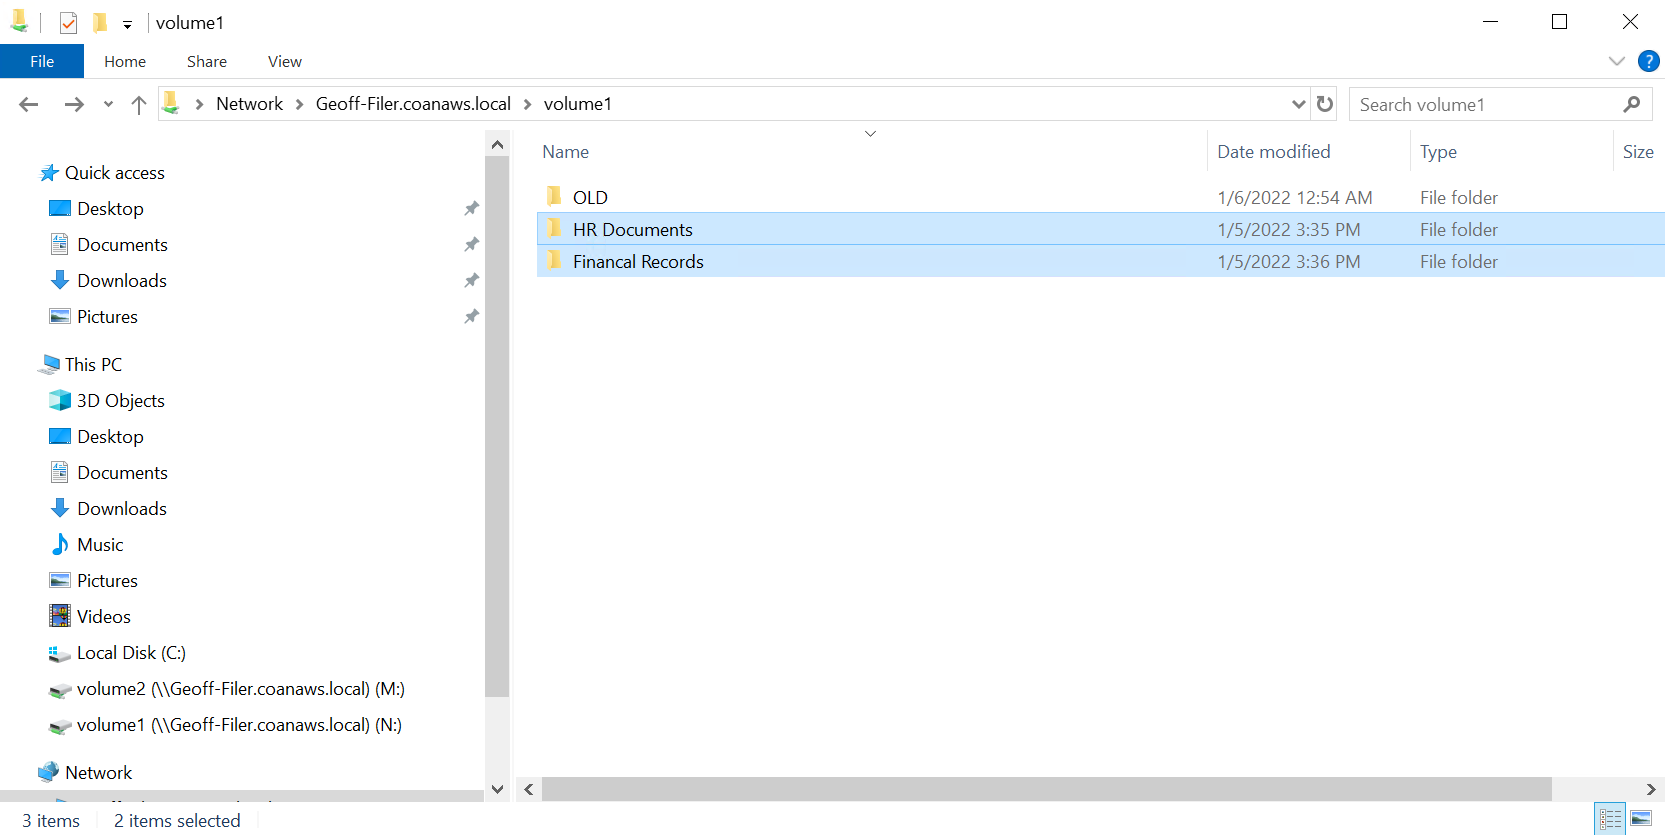
11.1.1 Take a snapshot after restoring. You must do this before reconnecting the volumes so that Edge Appliances can access the restored data.
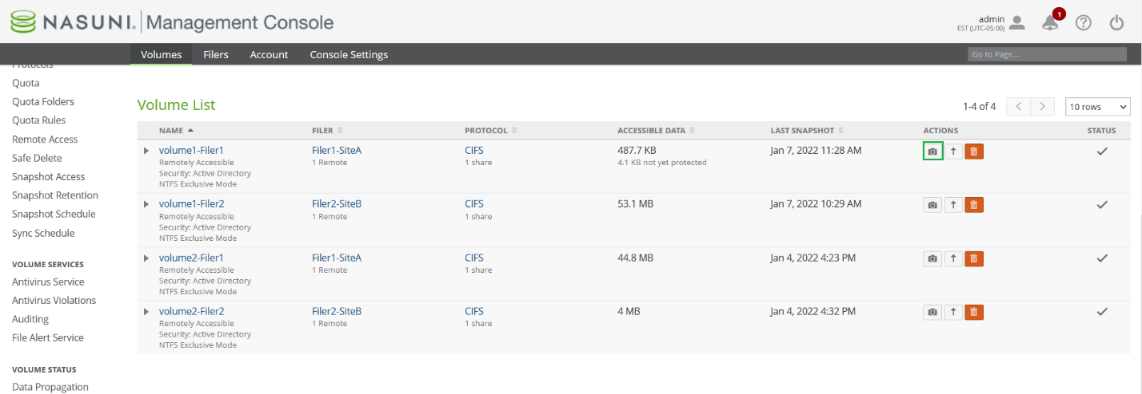
11.2 Re-connect Remote Volumes
11.2.1 On the Nasuni Management Console, navigate to Connect Volume.

11.2.2 Under the Actions column, click Edit Connections. Note that only one Edge Appliance connection can be edited at a time.

After clicking Edit Connections, the following dialog box appears.
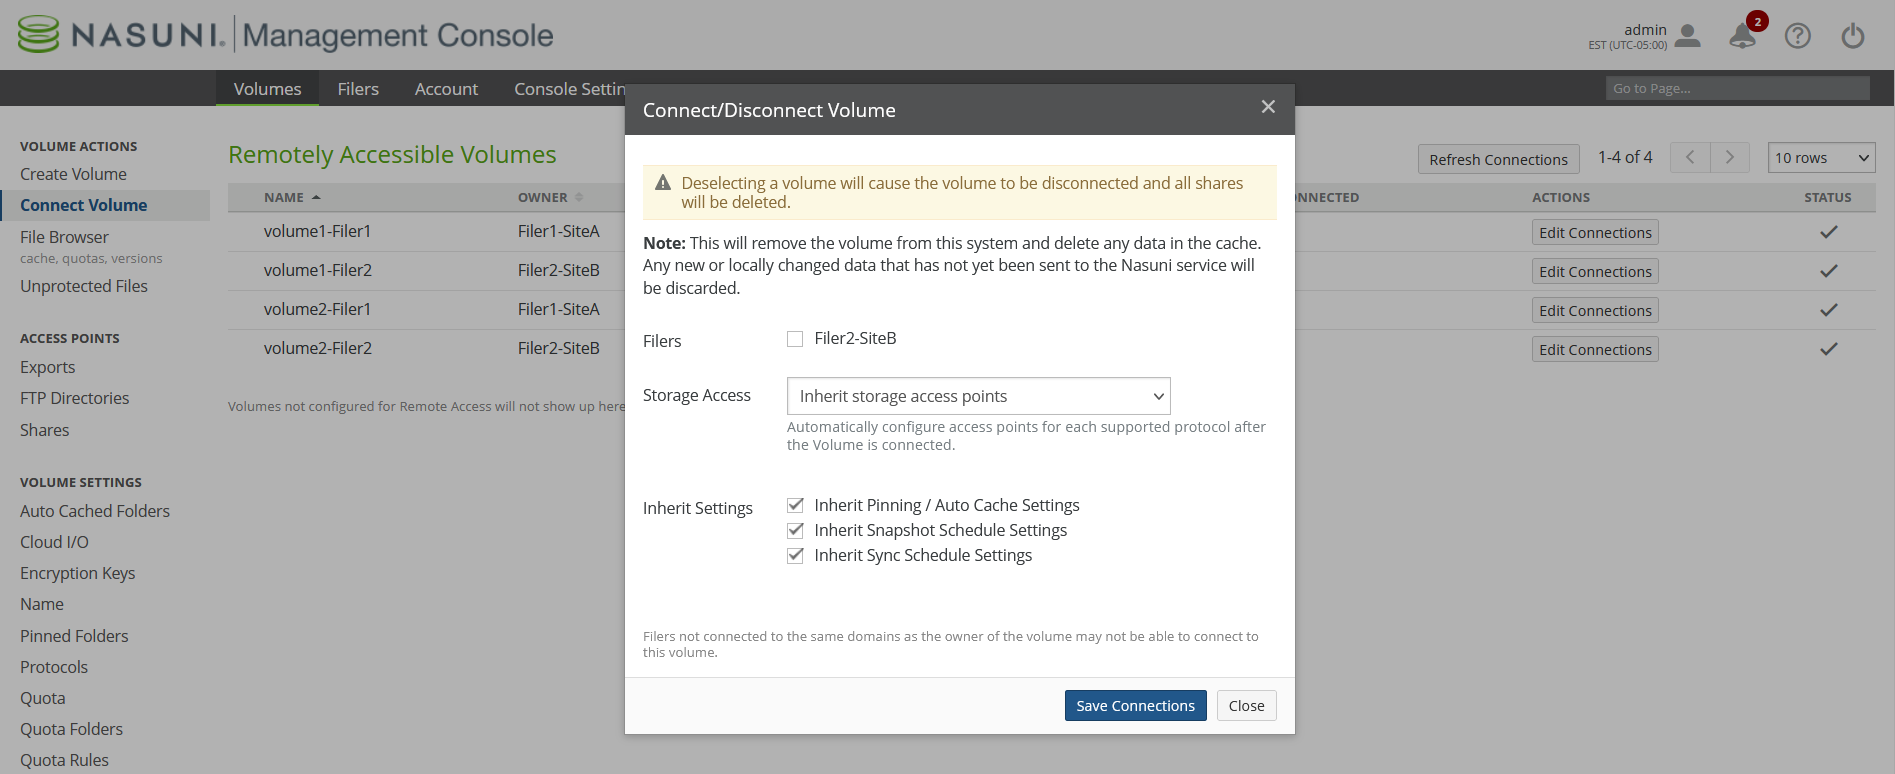
11.2.3 To re-connect the Edge Appliance, click the Filers check box, and click Save Connection.
Warning: Do not change any of the settings for “Storage Access” or “Inherit Settings.”
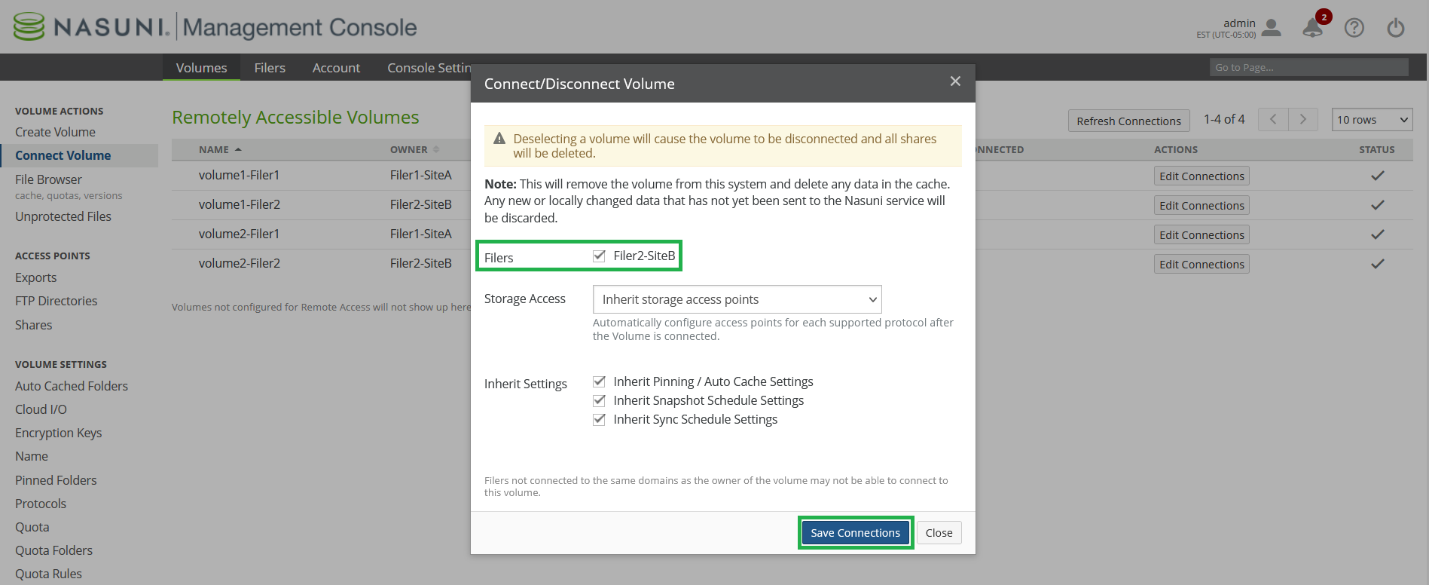
11.2.4 Repeat all steps for step 11.2 to reconnect all disconnected Remote Volumes.
11.3 Re-enable Read-Write Permissions
Enabling Read Write Permissions for the restored shares allows users to access the newly restored files and directories.
11.3.1 On the Nasuni Management Console, navigate to Shares.

11.3.2 Click Edit to edit a Share.
11.3.3 De-select Read Only (if selected).
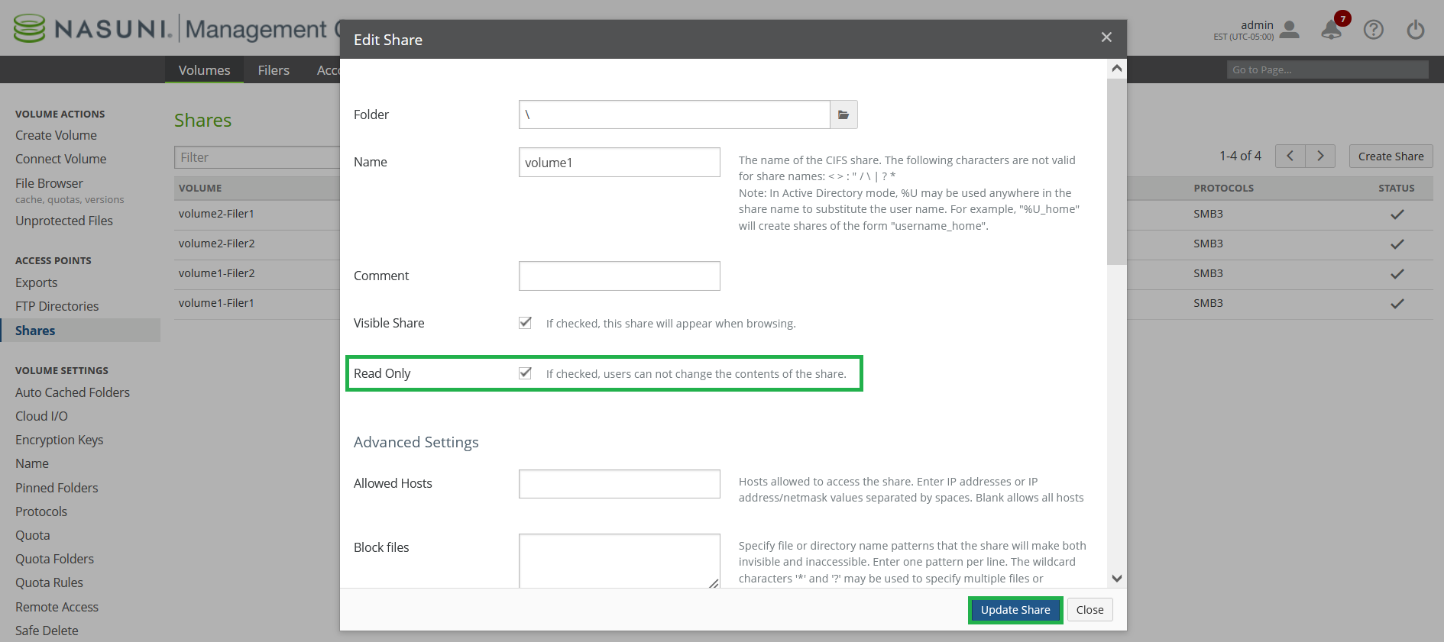
11.3.4 Reset the SMB (CIFS) connects by logging into the Nasuni Management Console, navigating to Filer CIFS Clients and clicking Reset All Clients.
11.3.5 The Reset All Clients dialog box appears.

11.3.6 Select the Targets checkboxes and click Reset Clients.
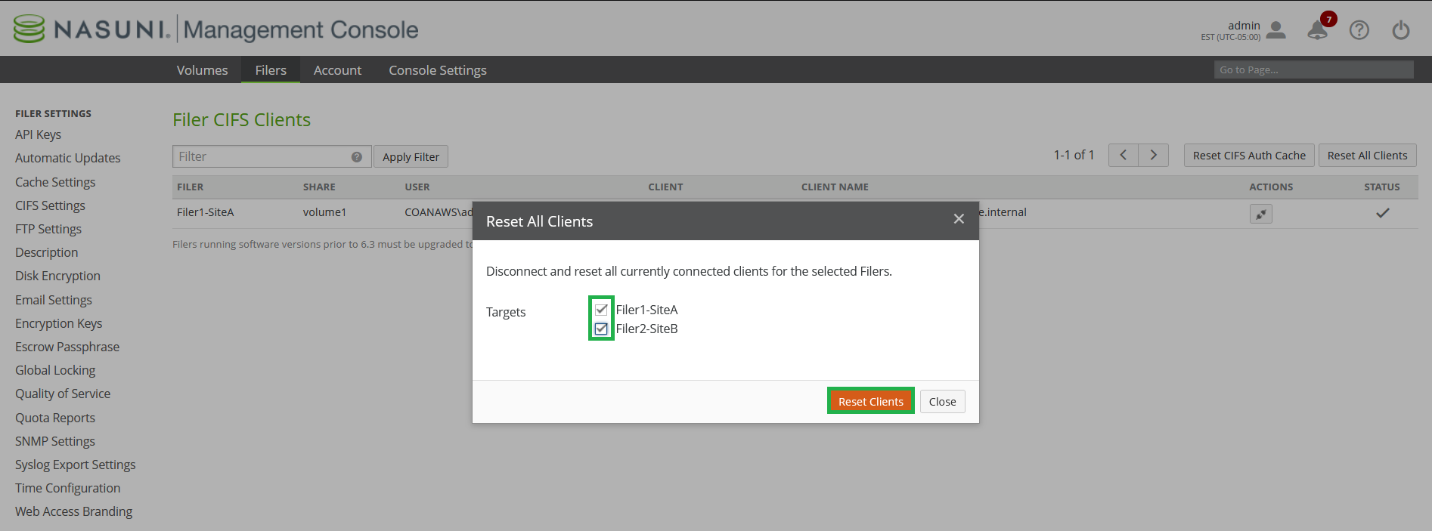
After disabling “Read Only” and resetting SMB (CIFS) clients, users can now access the restored data on the volume.
11.4 Re-enable Volume Sync Schedule
11.4.1 On the Nasuni Management Console, navigate to Volume Sync Schedule.
11.4.2 Select one or more volumes and click Edit Volumes.

11.4.3 The Volume Sync Schedule appears.
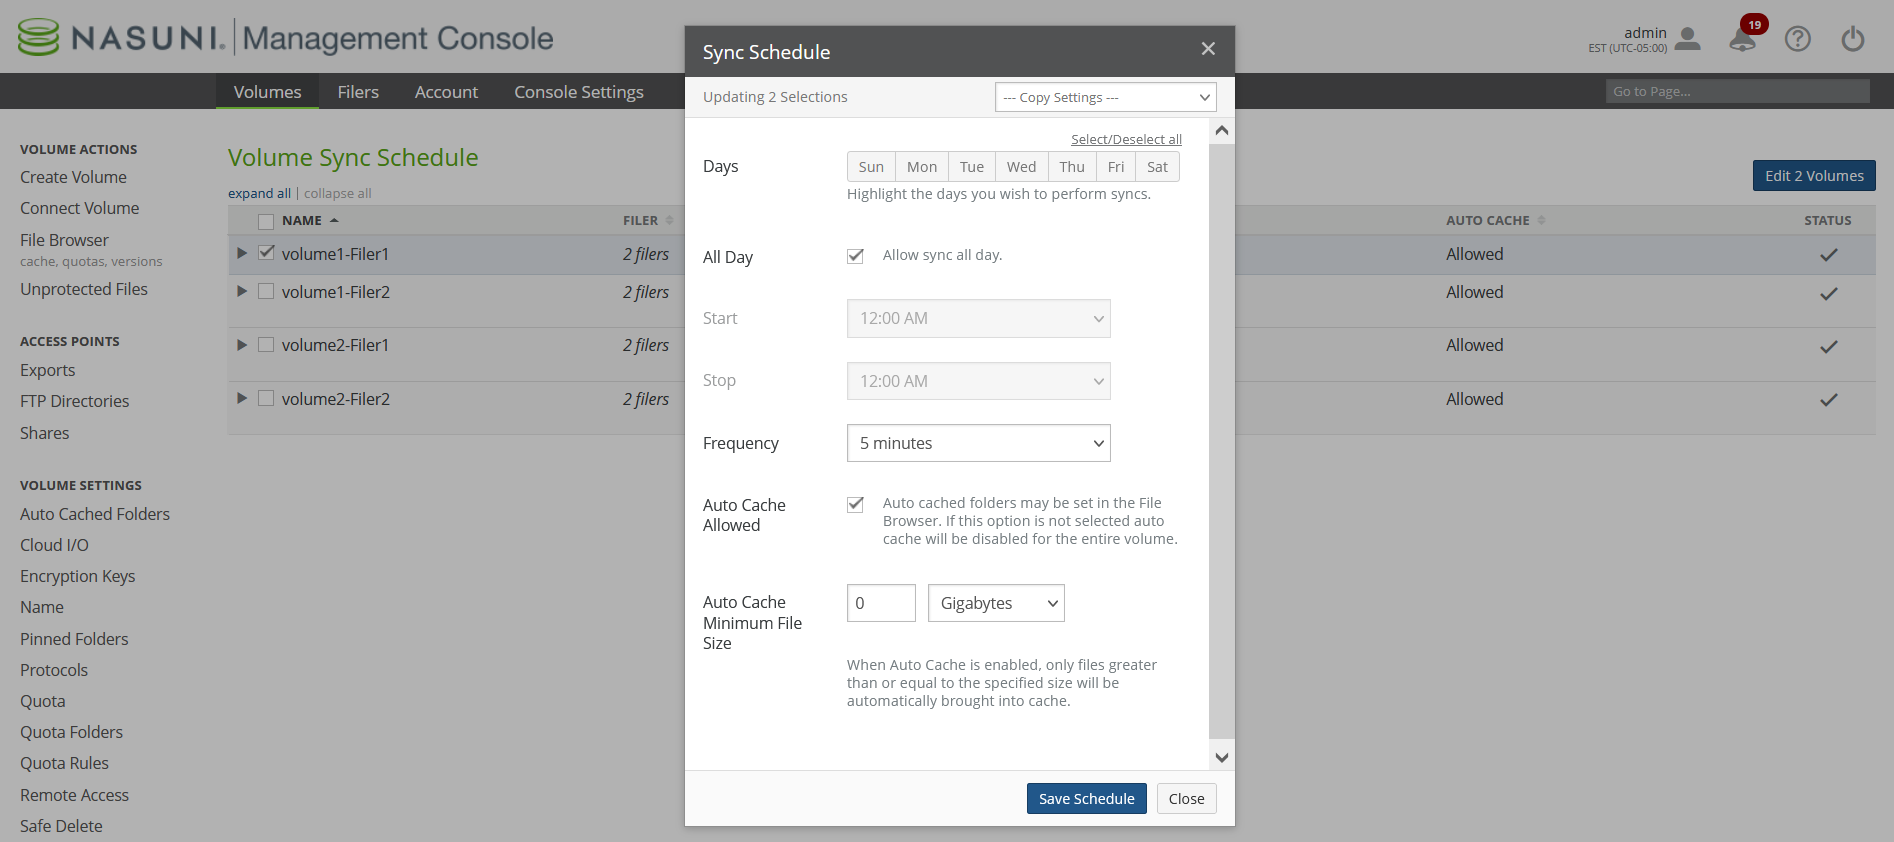
Tip: If you have configured a snapshot schedule or a sync schedule for a volume, and if that volume is shared by more than two Edge Appliances, consider enabling the Global File Acceleration (GFA) service on this volume. GFA is a smart and automatic substitute for manually configured snapshot and sync schedules. You use the NMC to configure GFA. GFA must be enabled in your customer license. For details, see the NMC Guide.
11.4.4 Select all days by clicking “Select/Deselect all” within Sync Schedule, and click Save Schedule.
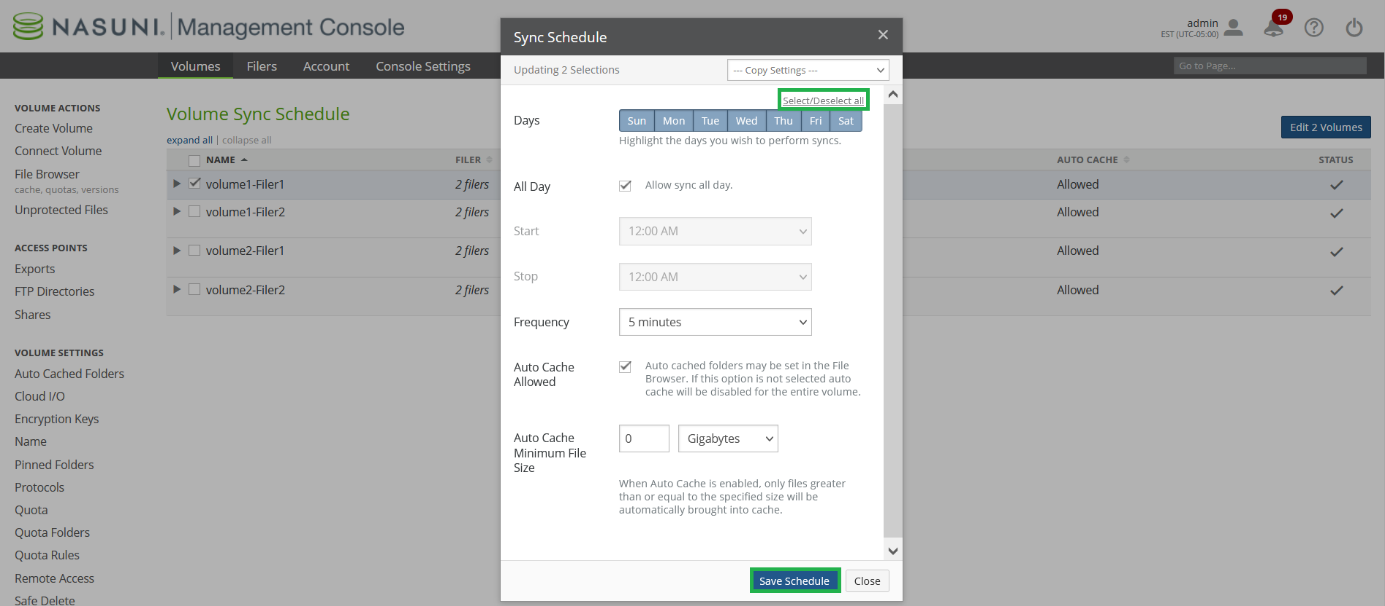
Note: After disabling the Sync Schedule, the Schedule for volumes displays the “Sync Schedule”

11.5 Re-enable Snapshot Schedule
11.5.1 On the Nasuni Management Console, navigate to Snapshot Schedule.

11.5.2 Select one or more volumes and click Edit Volumes.

11.5.3 Specify the Snapshot Schedule and click Save Schedule to update the Snapshot Schedule.
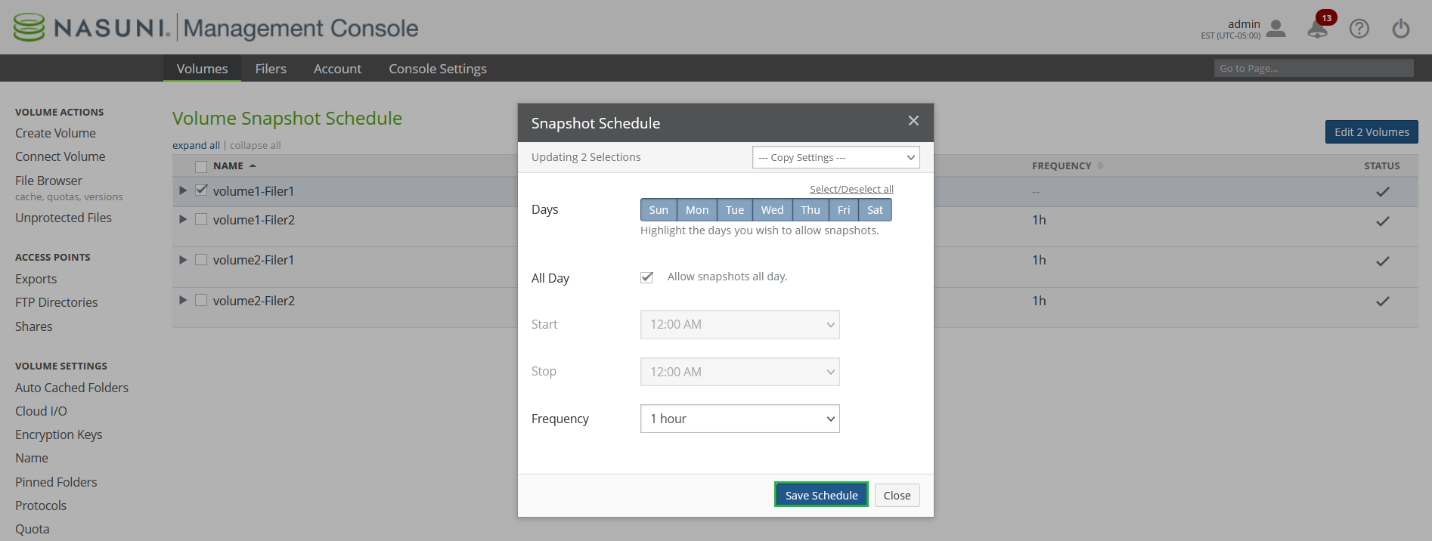
In case the volume was under Global File Acceleration, enable GFA and select the previously configured profile.
Tip: You can select the Copy Settings option to copy the Snapshot Schedule to other volumes.
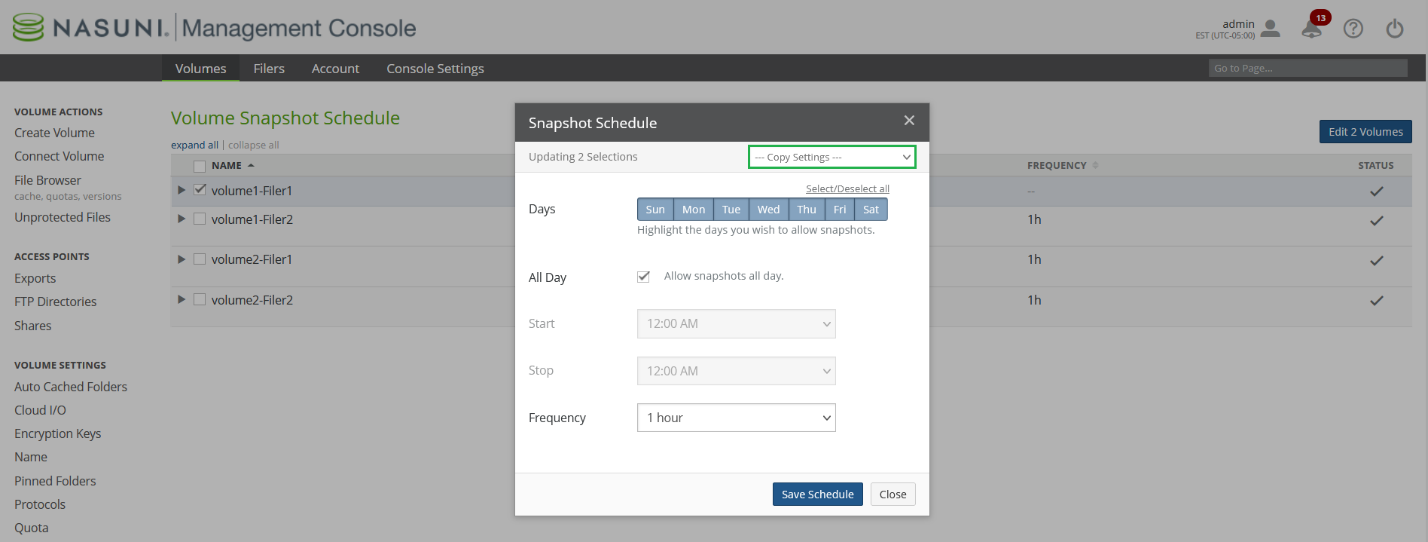
11.5.4 Repeat all steps in step 11.5 to set the Snapshot Schedule for the remaining volumes.
11.5.6 If snapshots were disabled manually on the Edge Appliances, Nasuni Support must manually re-enable snapshots.
11.6 Re-enable Snapshot Retention
11.6.1 To enable Snapshot Retention, log into the Nasuni Management Console and navigate to Volume Snapshot Retention.
11.6.2 Select the volumes where Snapshot Retention is disabled. If Retention displays “All Snapshots,” then Snapshot Retention is disabled for the volume. Click Edit Volumes.
11.6.3 Select the desired Snapshot Retention policy to re-enable Snapshot Retention for the volume. Users can either set the number of Snapshots within a range or select the time to retain Snapshots. For this example, Snapshot Retention is enabled with a 1-year retention period.
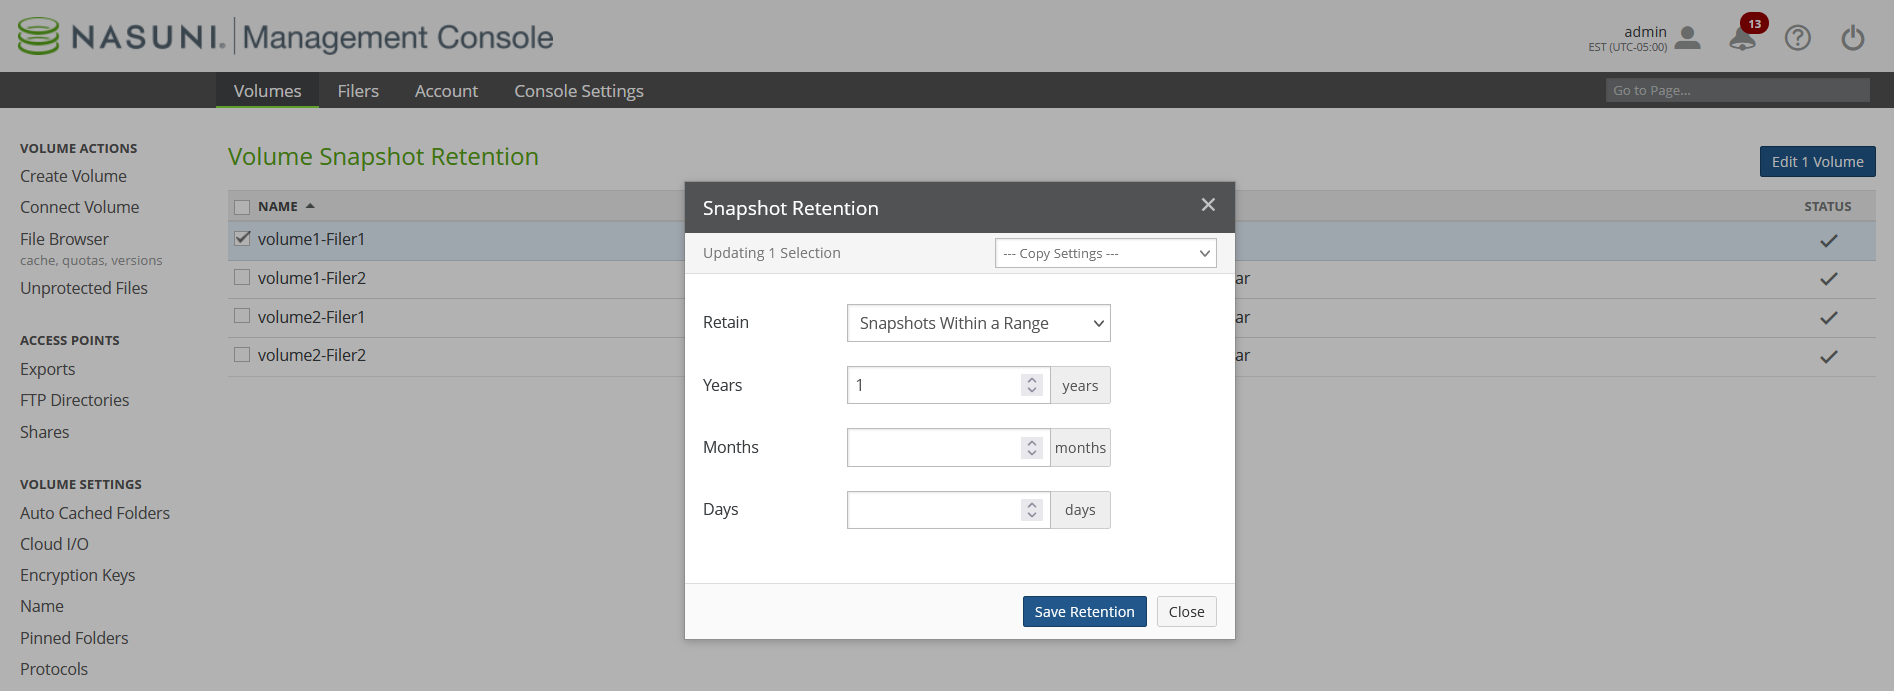
11.6.4 Click Save Retention to update the retention settings for the volume.
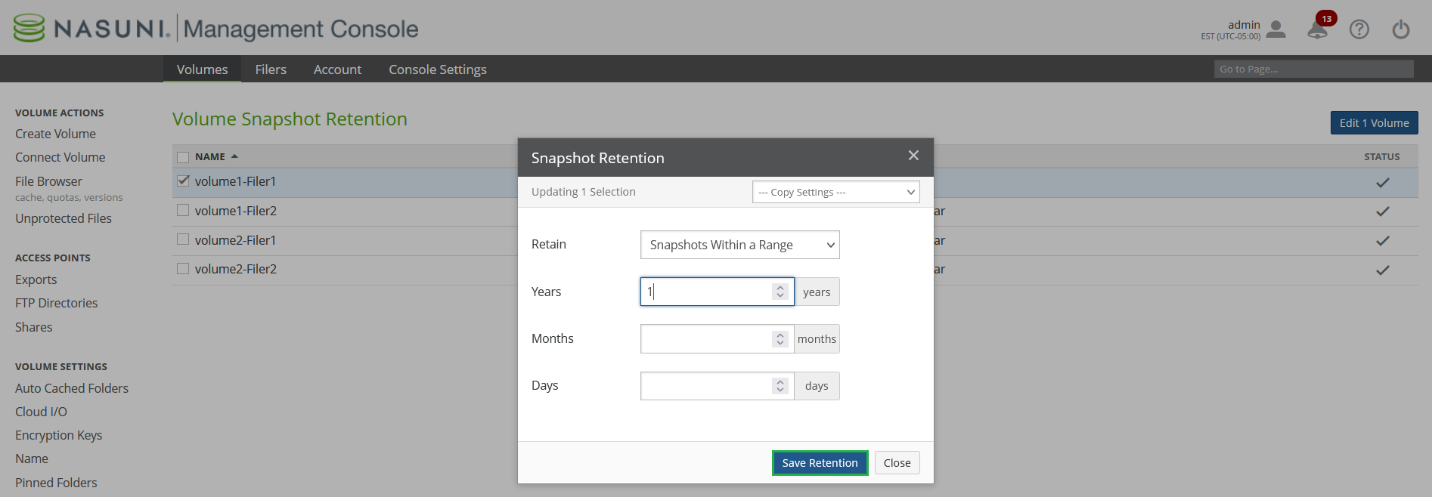
Tip: After enabling Snapshot Schedule and Snapshot Retention, you can take a snapshot of all restored volumes to save as a known “clean” point in time before removing all encrypted data.
11.7 Delete encrypted data
11.7.1 After enabling Read Write permissions for shares, log into the Windows File Server as “Administrator” and navigate to the restored directory tree containing the directory named “OLD”.

11.7.2 Using Windows File Explorer, delete the directory named “OLD” containing encrypted data. It is recommended to perform this step on an Edge Appliance that does not have users accessing the share, as data will be brought into cache to delete it, which might take additional time.
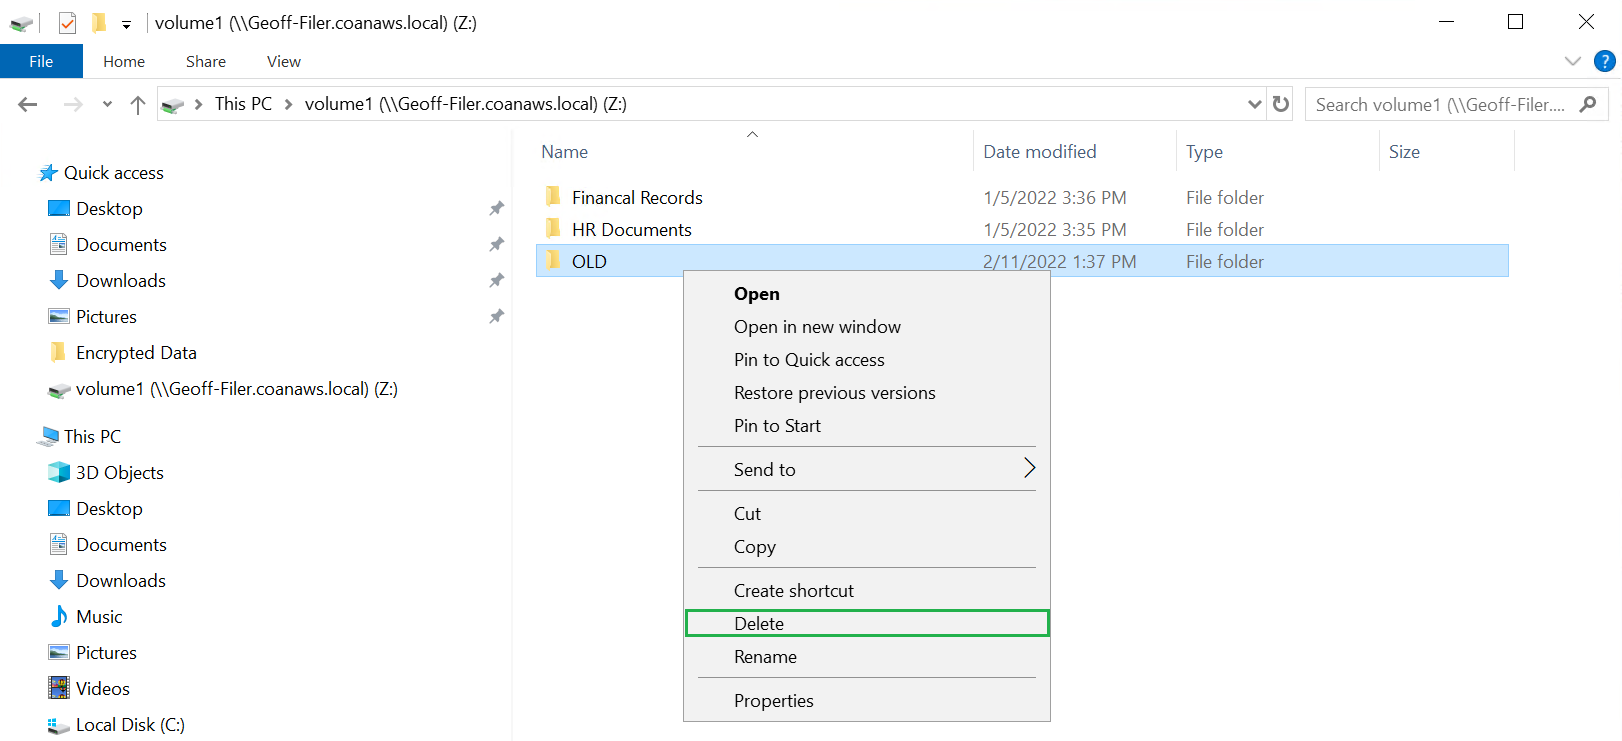
11.7.3 After deleting the encrypted data in the “OLD” folder, if you choose to re-enable Global File Lock, select the Volume containing the restored data.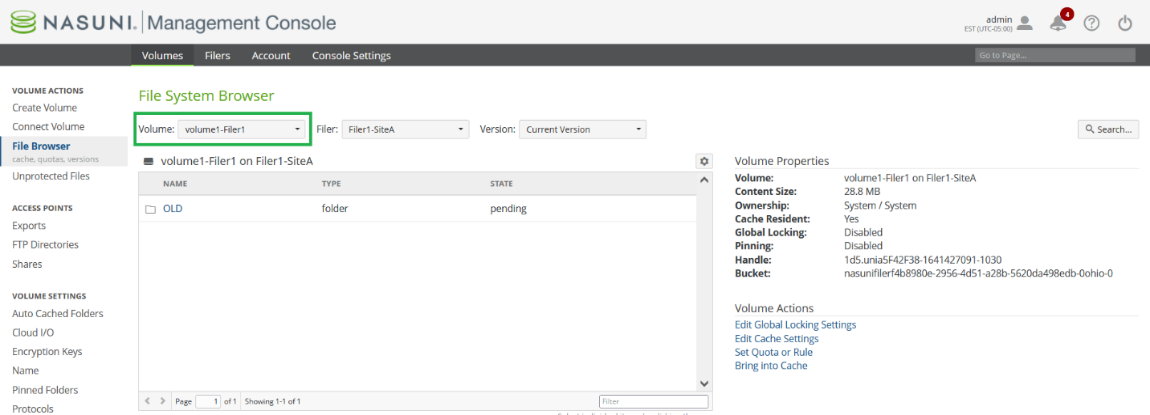
11.7.4 Set the Version to Current.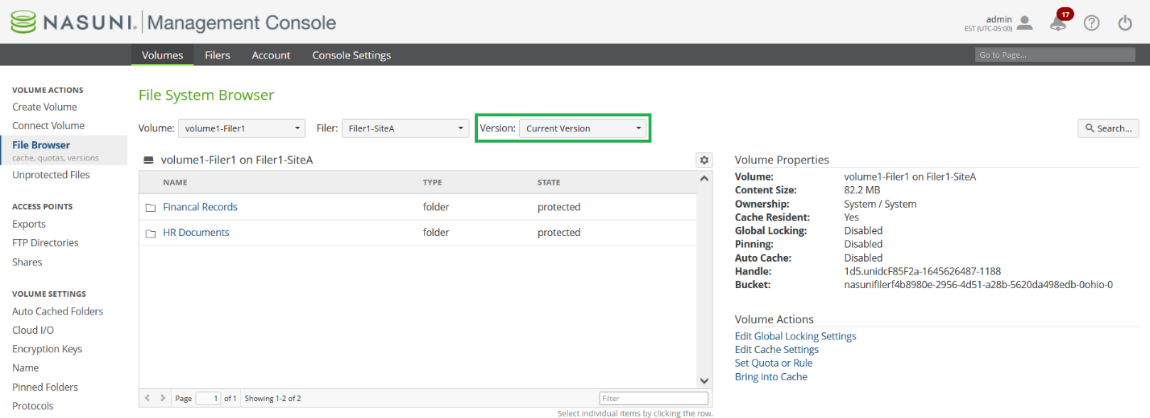
11.7.5 Navigate to the file or directory that you wish to re-enable Global File Lock on, and click Edit Global Locking Settings.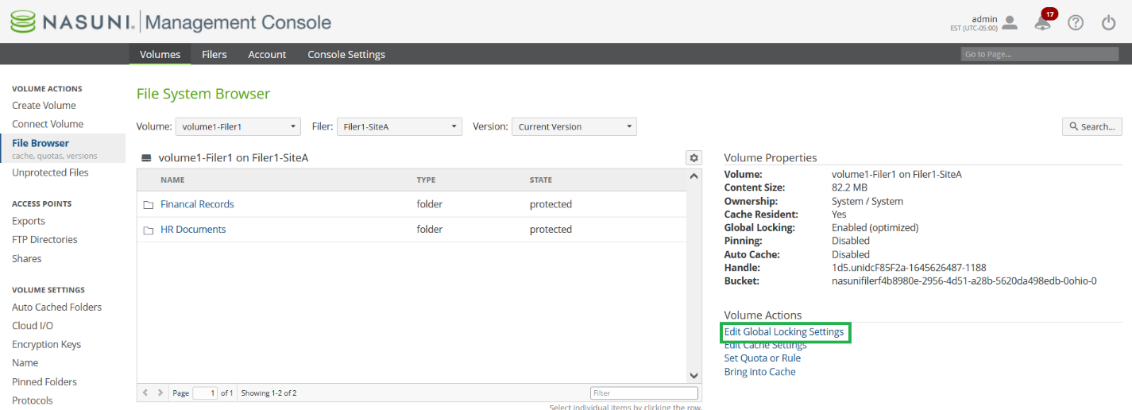
11.7.6 The Global Lock Setting dialog box is displayed.
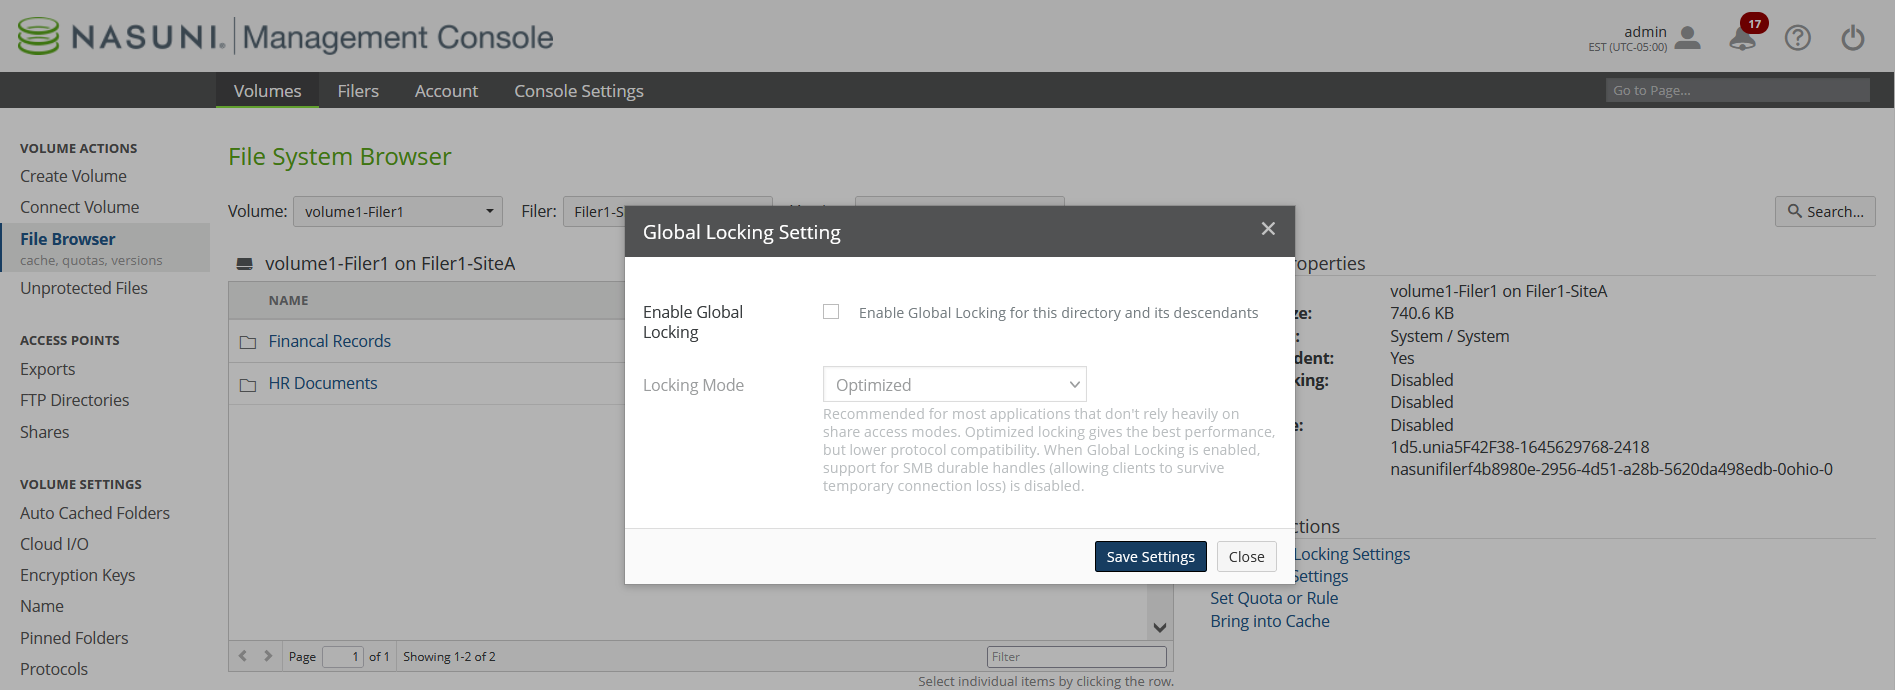
11.7.7 Check the Enable Global Locking checkbox to enable Global File Lock, and click Save Settings.
Note: You can enable and disable Global File Lock using the NMC API. For details, see Nasuni Labs.
Tip: If Global File Lock was disabled at the directory or file level, you can navigate within File Browser and click “Edit Global Locking Settings” to set Global File Lock for each file or folder. Repeat steps 11.7.3 through 11.7.7 for any files and folders that need to have Global File Lock re-enabled. If you are unsure where Global File Lock was enabled, consult with Support for guidance.
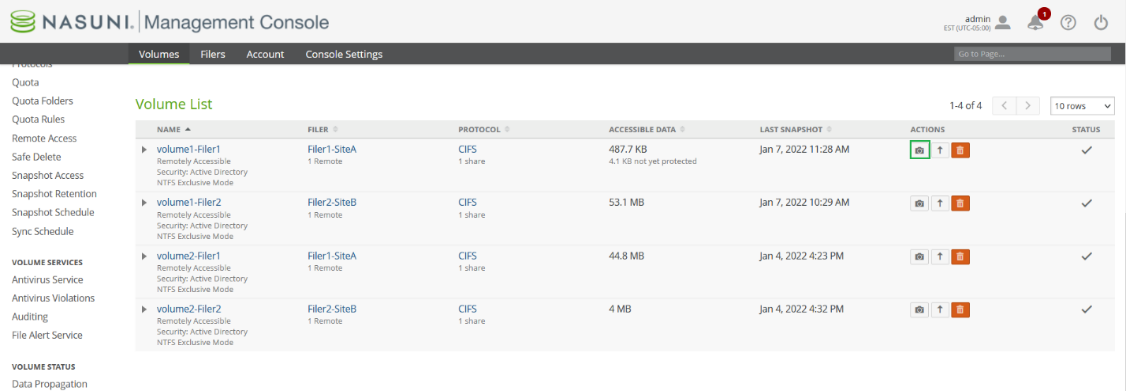
11.7.8 After removing all encrypted data and re-enabling Global File Lock (if applicable), take a snapshot after cleanup to save as a known “clean” point in time.
Copyright © 2010-2024 Nasuni Corporation. All rights reserved.