The Proxmox Virtual Environment is a complete open-source platform for enterprise virtualization. Using the built-in web interface you can manage VMs, containers, software-defined storage, networking, high-availability clustering, and multiple included tools using a single solution. You can install the Nasuni Edge Appliance on Proxmox.
This guide is intended for the IT administrator or person responsible for installing the Nasuni Appliance or the Nasuni Management Console on the Proxmox platform.
Warning: DO NOT attempt to restore from a virtual machine snapshot or backup. Attempting to restore from a virtual machine snapshot or backup puts the Edge Appliance in an unknown state in relation to the Nasuni Orchestration Center (NOC), and requires a disaster recovery process to recover. This might result in data loss.
Installing on the Proxmox Platform
This section describes how to install the Edge Appliance Solution on Proxmox.
Warning: Virtual machine snapshots are not supported. Do not attempt to restore from a virtual machine snapshot or backup. Attempting to restore from a virtual machine snapshot or backup puts the Appliance in an unknown state in relation to the Nasuni Orchestration (NOC) and requires a recovery process. This might result in data loss.
Important: Edge Appliances must be configured with operational DNS servers and a time server (internal or external) within your environment. The Edge Appliance is configured with a default time server time.nasuni.com. If you need to use a different time server, the procedure to change the default time server is documented in the Nasuni Edge Appliance Time Configuration section of the Nasuni Edge Administration guide.
Important: When using virtual machine Appliances, Nasuni recommends running under a hypervisor supported by its vendor. If a customer runs an Appliance on an unsupported hypervisor version, a warning is logged at boot time.
Tip: This document is about deploying virtual machines. It does not cover configuring a storage account for use with Nasuni volumes.
Day 1 Edge Appliance Installation Checklist
To complete a day 1 Edge Appliance installation, follow this checklist:
Step | Action |
1 | Complete 1. Before you Begin section in this document. Your account manager can assist you with this item. |
2 | Complete 2. Installing the Edge Appliance section in this document. |
1. Before you Begin
The following items should be readily available so that you can navigate the Edge Appliance installation and setup process. It is recommended that you complete these requirements before starting or have a way to fulfill them during the installation process.
Item | Description |
|---|---|
Contact Nasuni | Contact your Account Manager to configure your account for the Edge Appliance. |
Proxmox server | You should have already installed the Proxmox server in your environment. |
Proxmox server IP address | Obtain the IP address for the Proxmox server. |
Proxmox storage pool | Configure Proxmox storage pool to store the Nasuni Edge appliance software image. |
NMC Login | Authentication and Authorization to your organization’s Nasuni Management Console to configure the Edge Appliance for your environment. |
Portal Login | Authentication and authorization to your organization’s Portal account to retrieve your Edge Appliance Serial Number and Authorization Code, and to configure the Edge Appliance. |
Serial & Auth Code | The Edge Appliance Serial Number is in your Nasuni Account. It is paired with an Authorization Code (Auth Code) in a table at the bottom of the page. |
Username and Password | The first boot setup of the Edge Appliance requires a new username and password. These values are specific to the Edge Appliance only. |
Hostname | When you go through the first boot wizard for the Edge Appliance, you must provide a hostname for the machine. Note: Host names longer than 15 characters cannot be added to Active Directory services. |
Network Details | When going through the first boot wizard for the Edge Appliance, provide the machine's network details. If you have a proxy in front of your Edge Appliance, also provide those details. |
AD Credentials | The following information might be necessary:
|
2. Installing the Edge Appliance
To complete the installation of the Edge Appliance, follow these steps:
Download the Edge Appliance software.
Store the extracted VM archive on the SMB server for importing.
Install the Edge Appliance using Proxmox.
Configure the virtual machine.
Download the Edge Appliance software
The Edge Appliance can run as a virtual appliance on your network and is distributed as a downloadable image. To access the download page, register for a user account and password on the Nasuni website.
To download the Edge Appliance software from the Nasuni website:
Log in to portal.nasuni.com.
From the Overview tab, click Downloads.
Scroll down to the Edge Appliance section and click Download Generic VM Format.
A dropdown list with the available Edge Appliance versions for generic KVM formats appears.From the dropdown list, select an available release for Edge Appliance.
Save the Edge Appliance software file to a location on your local drive.
Note: The time required to download the Edge Appliance software file depends on your internet connection.
Installing the Edge Appliance on Proxmox
You can install the Edge Appliance on Proxmox in either of two different ways:
2.2.1 Installing the Edge Appliance using the Proxmox CLI
2.2.2 Installing the Edge Appliance using the Proxmox GUI
Installing the Edge Appliance using the Proxmox CLI
You can install the Edge Appliance on Proxmox using the Proxmox command line interface.
Important: Edge Appliances and the NMC must be configured with operational DNS servers and a time server (internal or external) within your environment.
Important: To access Active Directory-enabled volumes, the Edge Appliance must access the same Active Directory domains as the other Nasuni Edge Appliances connected to the volume. This requires access to the Active Directory Domain Controller or the necessary network connectivity.
Important: Similarly, to access LDAP-enabled volumes, the Edge Appliance must be able to access LDAP and Kerberos in the same LDAP domain. You cannot enable Active Directory and LDAP Directory Services for an Edge Appliance.
To install the Edge Appliance on Proxmox, follow these steps:
Upload the Edge Appliance software file (which you downloaded in step “Download the Edge Appliance software”) to the Proxmox server IP address (which you obtained in step “1. Before you Begin ”), using this command:
scp <PathToSoftwareFile> <username>@<ProxmoxIPaddress>:/var/lib/vz/images
Access the Proxmox host using SSH or launch the Shell using the Proxmox Web Console.
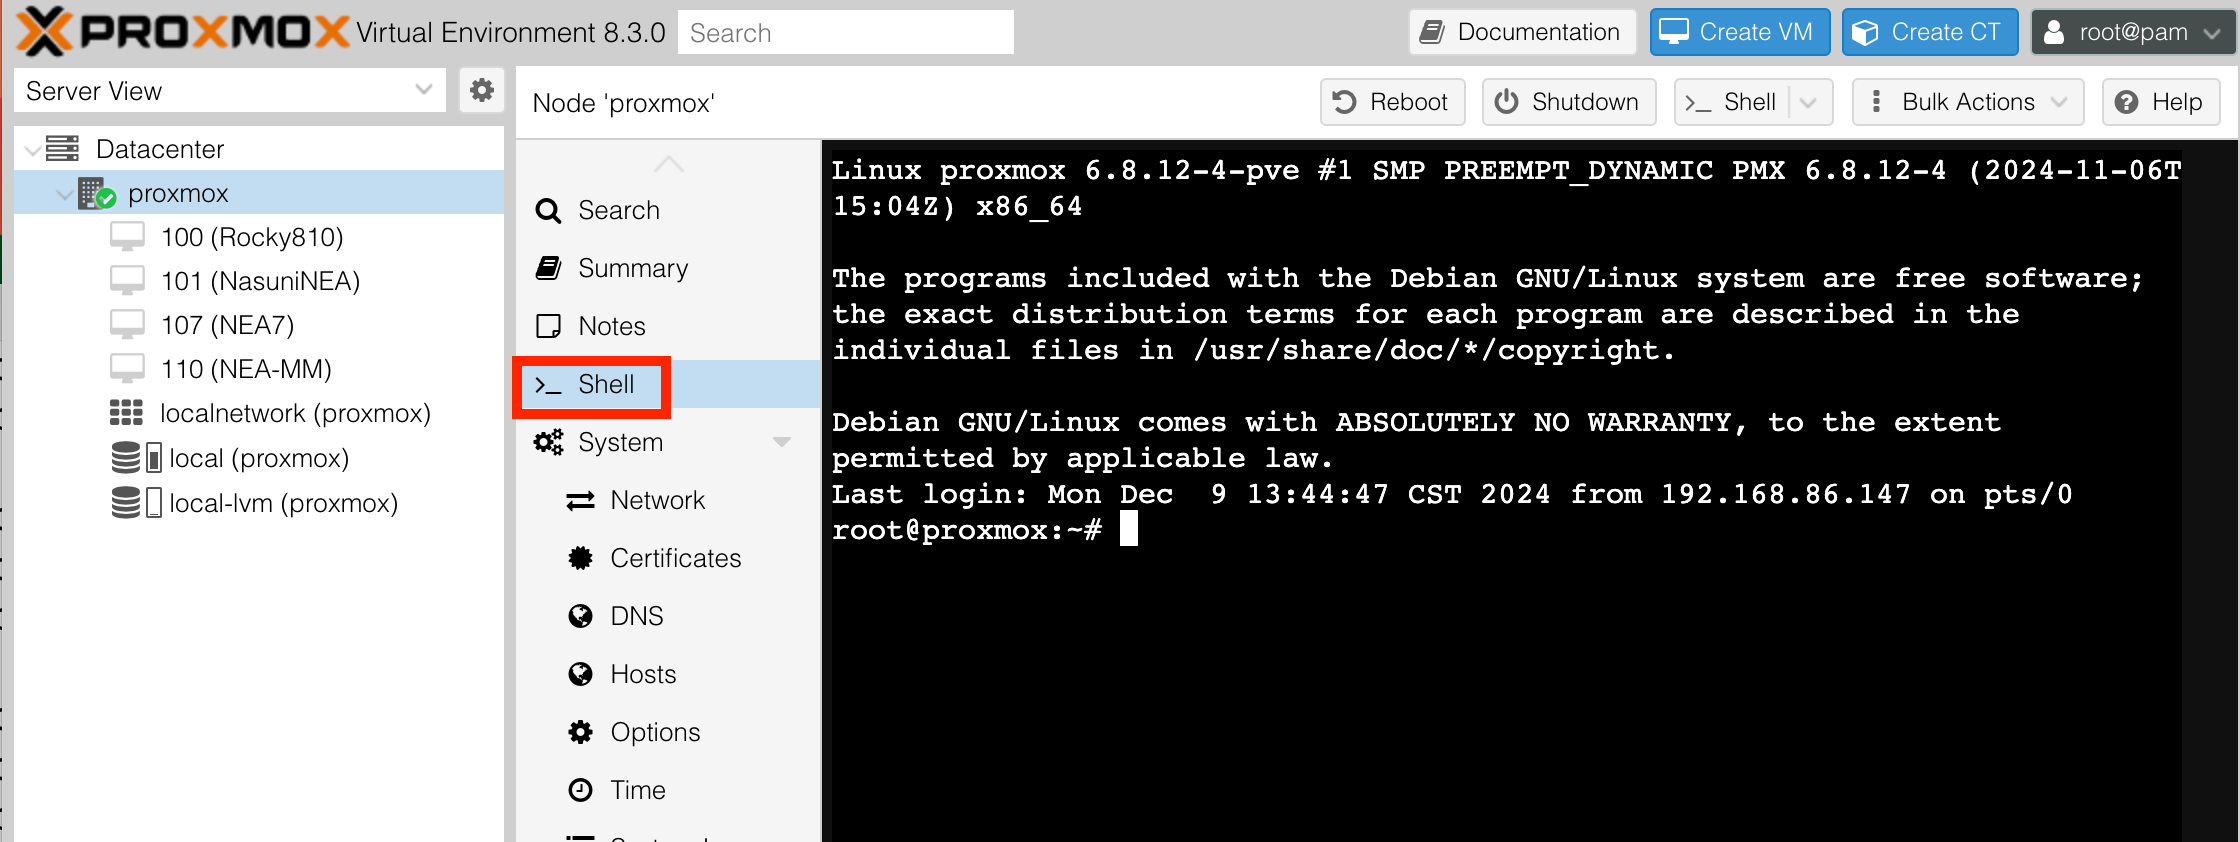
Create the virtual machine by running this command, either using SSH or the Shell:
qm create <vm_id> --name <vm_name> --memory <memory_size_in_MB>
--cores <num_cores> --sockets <num_sockets> --bios ovmf
--machine q35 --cpu x86-64-v2-AES
--scsihw virtio-scsi-pci
--net0 virtio,bridge=vmbr0,firewall=1
where
<vm_id>: A unique identifier for the VM within Proxmox. This number (such as 100 or 101) is used to reference the VM in future commands.
<vm_name>: Name of the VM. This is a user-friendly identifier for easier management and recognition in the Proxmox GUI.
<memory_size_in_MB>: Amount of RAM for the VM, specified in megabytes (MB).
<num_cores>: Number of cores for the VM.
<num_sockets>: Number of sockets for the VM (usually 1).
ovmf: Specifies that the VM should use UEFI firmware, which is required for modern OSes and for enabling UEFI boot. OVMF is the UEFI implementation used in KVM. Do not select SeaBIOS, because it does not support UEFI.
q35: The q35 machine type is a modern PCI Express chipset model, which provides better hardware compatibility and support for newer features like PCI passthrough and UEFI boot.
cpu: Use the host CPU type to maximize performance by exposing all host CPU features to the VM. This allows the VM to utilize all optimizations available on your processor.
virtio-scsi-single: Use for the SCSI controller. Virtio-scsi-single is optimized for better performance with multiple disks.
virtio: Using virtio as the network adapter along with the default settings provided by Proxmox.
Example command:
qm create 100 --name Nea1 --memory 16384 --cores 8
--sockets 1 --bios ovmf --machine q35
--cpu host --scsihw virtio-scsi-single
--net0 virtio,bridge=vmbr0,firewall=1
Import the OS disk you uploaded in step 1, using this command:
qm importdisk <vm_id> /var/lib/vz/images/<qcow2> <storagePool>
where
<vm_id> is the VM identifier defined above.
<qcow2> in the NEA software file you uploaded.
<storagePool> is the Proxmox storage pool (which you configured in step “1. Before you Begin ”),
The importdisk command shows the progress of the import. The final line gives the imported disk name, such as the following:
successfully imported disk 'nvme-storage:100/vm-100-disk-1.raw'
Note the imported disk name for the next step.
Attach the OS disk, using this command:
qm set <vm_id> --scsi0 <storage_pool:<vm_id>/vm-<vm_id>-disk-0.raw
where
<vm_id> is the VM identifier defined above.
<storagePool> is the Proxmox storage pool (which you configured in step “1. Before you Begin ”),
<qcow2> is the NEA software file you uploaded.
vm-<vm_id>-disk-0.raw is the imported disk name from the step above.
iothread=1 enables a unique IO thread per disk for better performance.
cache=writeback caches writes in RAM before committing them to disk, reducing latency.
backup=0 excludes the disk from VM backups. Customers should use the Disaster Recovery process to restore VMs. Nasuni does not support appliance recovery using VM backups.
Example command:
qm set 100 --scsi0 nvme-storage:100/vm-100-disk-0.raw,
iothread=1,cache=writeback,backup=0
Add the cache disk, using this command:
qm set <vm_id> --scsi1 <storagePool>:<cacheDiskSizeInGB>,
iothread=1,cache=writeback,backup=0
where
<vm_id> is the VM identifier defined above.
<storagePool> is the Proxmox storage pool (which you configured in step “1. Before you Begin ”),
<cacheDiskSizeInGB> is the disk size in GB.
iothread=1 enables a unique IO thread per disk for better performance.
cache=writeback caches writes in RAM before committing them to disk, reducing latency.
backup=0 excludes the disk from VM backups. Customers should use the Disaster Recovery process to restore VMs. Nasuni does not support appliance recovery using VM backups.
Example command:
qm set 100 --scsi1 nvme-storage:250,
iothread=1,cache=writeback,backup=0
Add the COW disk, using this command:
qm set <vm_id> --scsi2 <storagePool>:<CowDiskSizeInGB>,
iothread=1,cache=writeback,backup=0
where
<vm_id> is the VM identifier defined above.
<storagePool> is the Proxmox storage pool (which you configured in step “1. Before you Begin ”),
<CowDiskSizeInGB> is the disk size in GB.
iothread=1 enables a unique IO thread per disk for better performance.
cache=writeback caches writes in RAM before committing them to disk, reducing latency.
backup=0 excludes the disk from VM backups. Customers should use the Disaster Recovery process to restore VMs. Nasuni does not support appliance recovery using VM backups.
Example command:
qm set 100 --scsi2 nvme-storage:50,
iothread=1,cache=writeback,backup=0
Configure EFI settings storage, which is required to store UEFI settings such as the boot disk selection, using this command:
qm set <vm_id> --efidisk0 <storagePool>:1,
format=raw,efitype=4m
where
<vm_id> is the VM identifier defined above.
<storagePool> is the Proxmox storage pool (which you configured in step “1. Before you Begin ”),
Example command:
qm set 100 --efidisk0 nvme-storage:1,
format=raw,efitype=4m
Set the OS Disk as the boot device, using this command:
qm set <vm_id> --boot order=scsi0
where
<vm_id> is the VM identifier defined above.
Example command:
qm set 100 --boot order=scsi0
Start the VM, using this command:
qm start <vm_id>
where
<vm_id> is the VM identifier defined above.
Example command:
qm start 100
Installing the Edge Appliance using the Proxmox GUI
Note: The GUI configuration procedure requires some CLI commands, as shown above.
Important: For the GUI procedure, you start by setting up the VM in the GUI. However, Proxmox does not directly support creating a VM from a disk image, so we have the Proxmox GUI create an OS disk that we remove and replace in later steps.
To install the Edge Appliance on Proxmox using the Proxmox GUI, follow these steps:
Log in to the Proxmox GUI. The Proxmox GUI runs on port 8006.

Begin the process of creating a virtual machine by clicking “Create VM”.
Note: Clicking “Create CT” would create a container, which Nasuni does not support.
The Create Virtual Machine dialog box appears.

On the General tab, enter the following information:
VM ID: A unique Numerical Identifier for your VM (used in later commands). Default is 100.
Name: A display name for your VM.
Click the OS tab.
Specify the following:
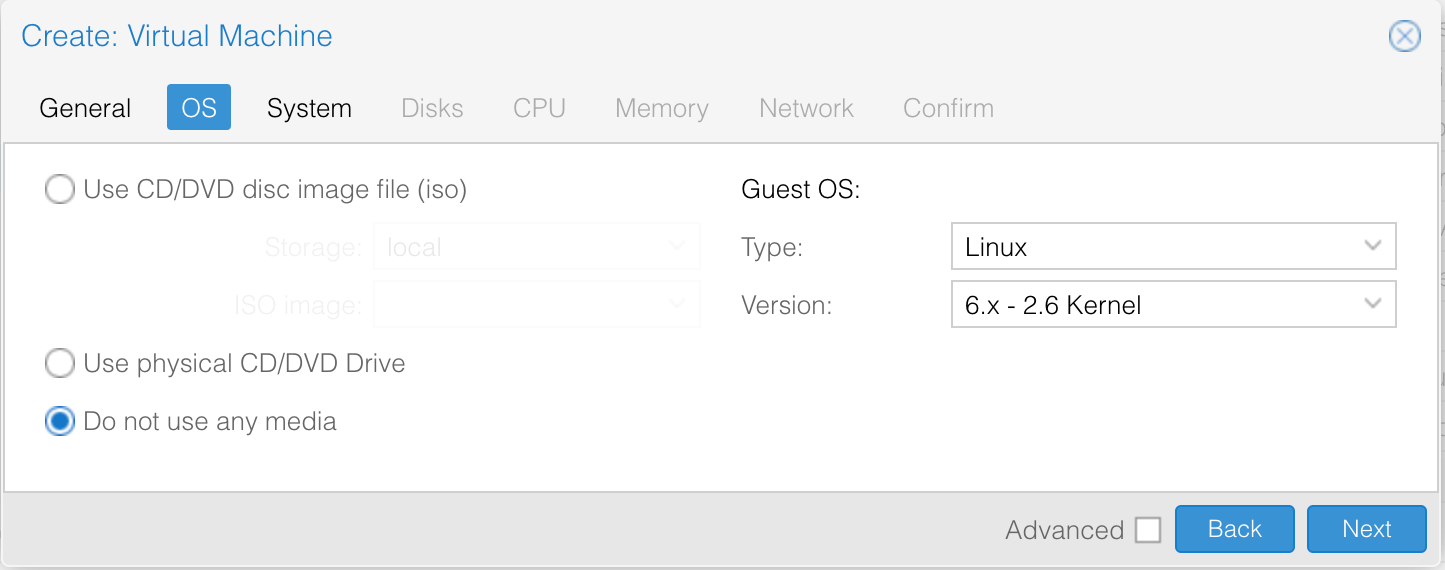
a. Select “Do not use any media”.
b. Guest OS: specify “Linux” and “e”.
Click the System tab.
Specify the following:
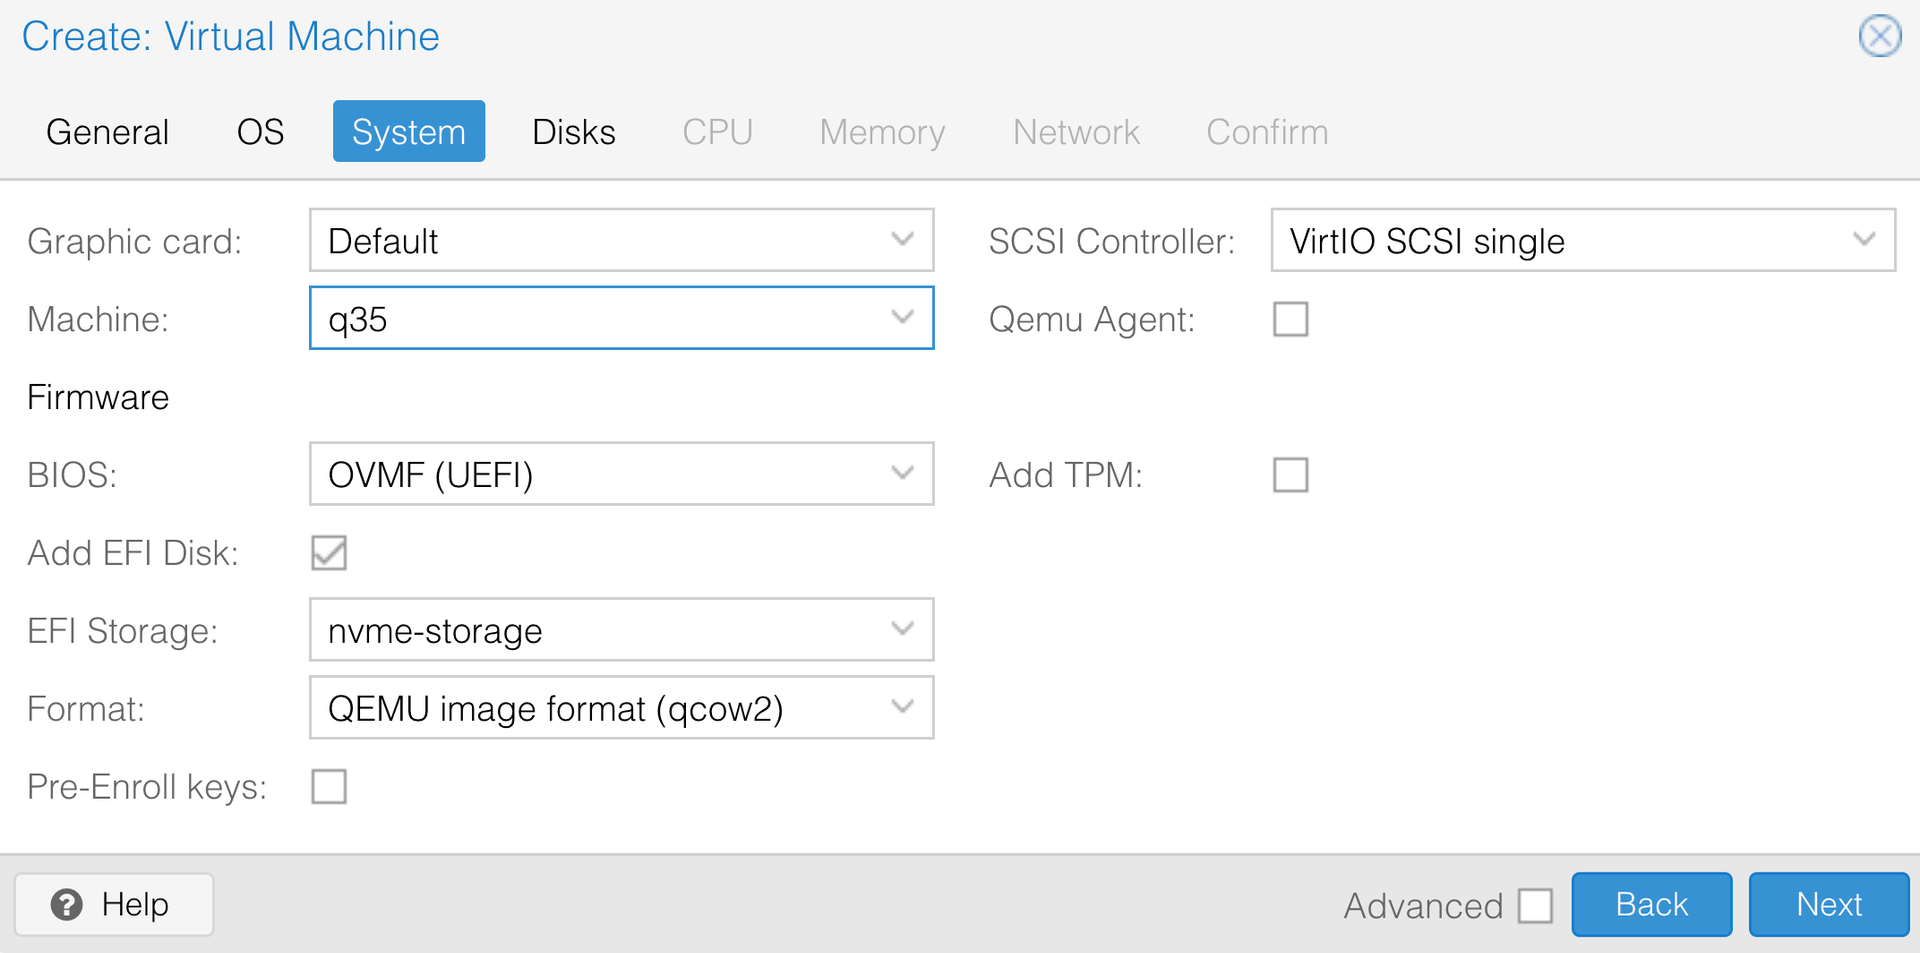
Graphic card: Default.
Machine: q35.
BIOS: OVMF (UEFI). Do not select SeaBIOS since it does not support UEFI.
Add EFI Disk: Select.
EFI storage: Your configured storage pool. Or local-lvm if it is the only configured storage.
Pre-Enroll keys: Deselect. (Default is selected.) Leaving this selected would break UEFI boot.
SCSI Controller: Select VirtIO SCSI Single.
Qemu Agent: Deselect.
Add TPM: Deselect.
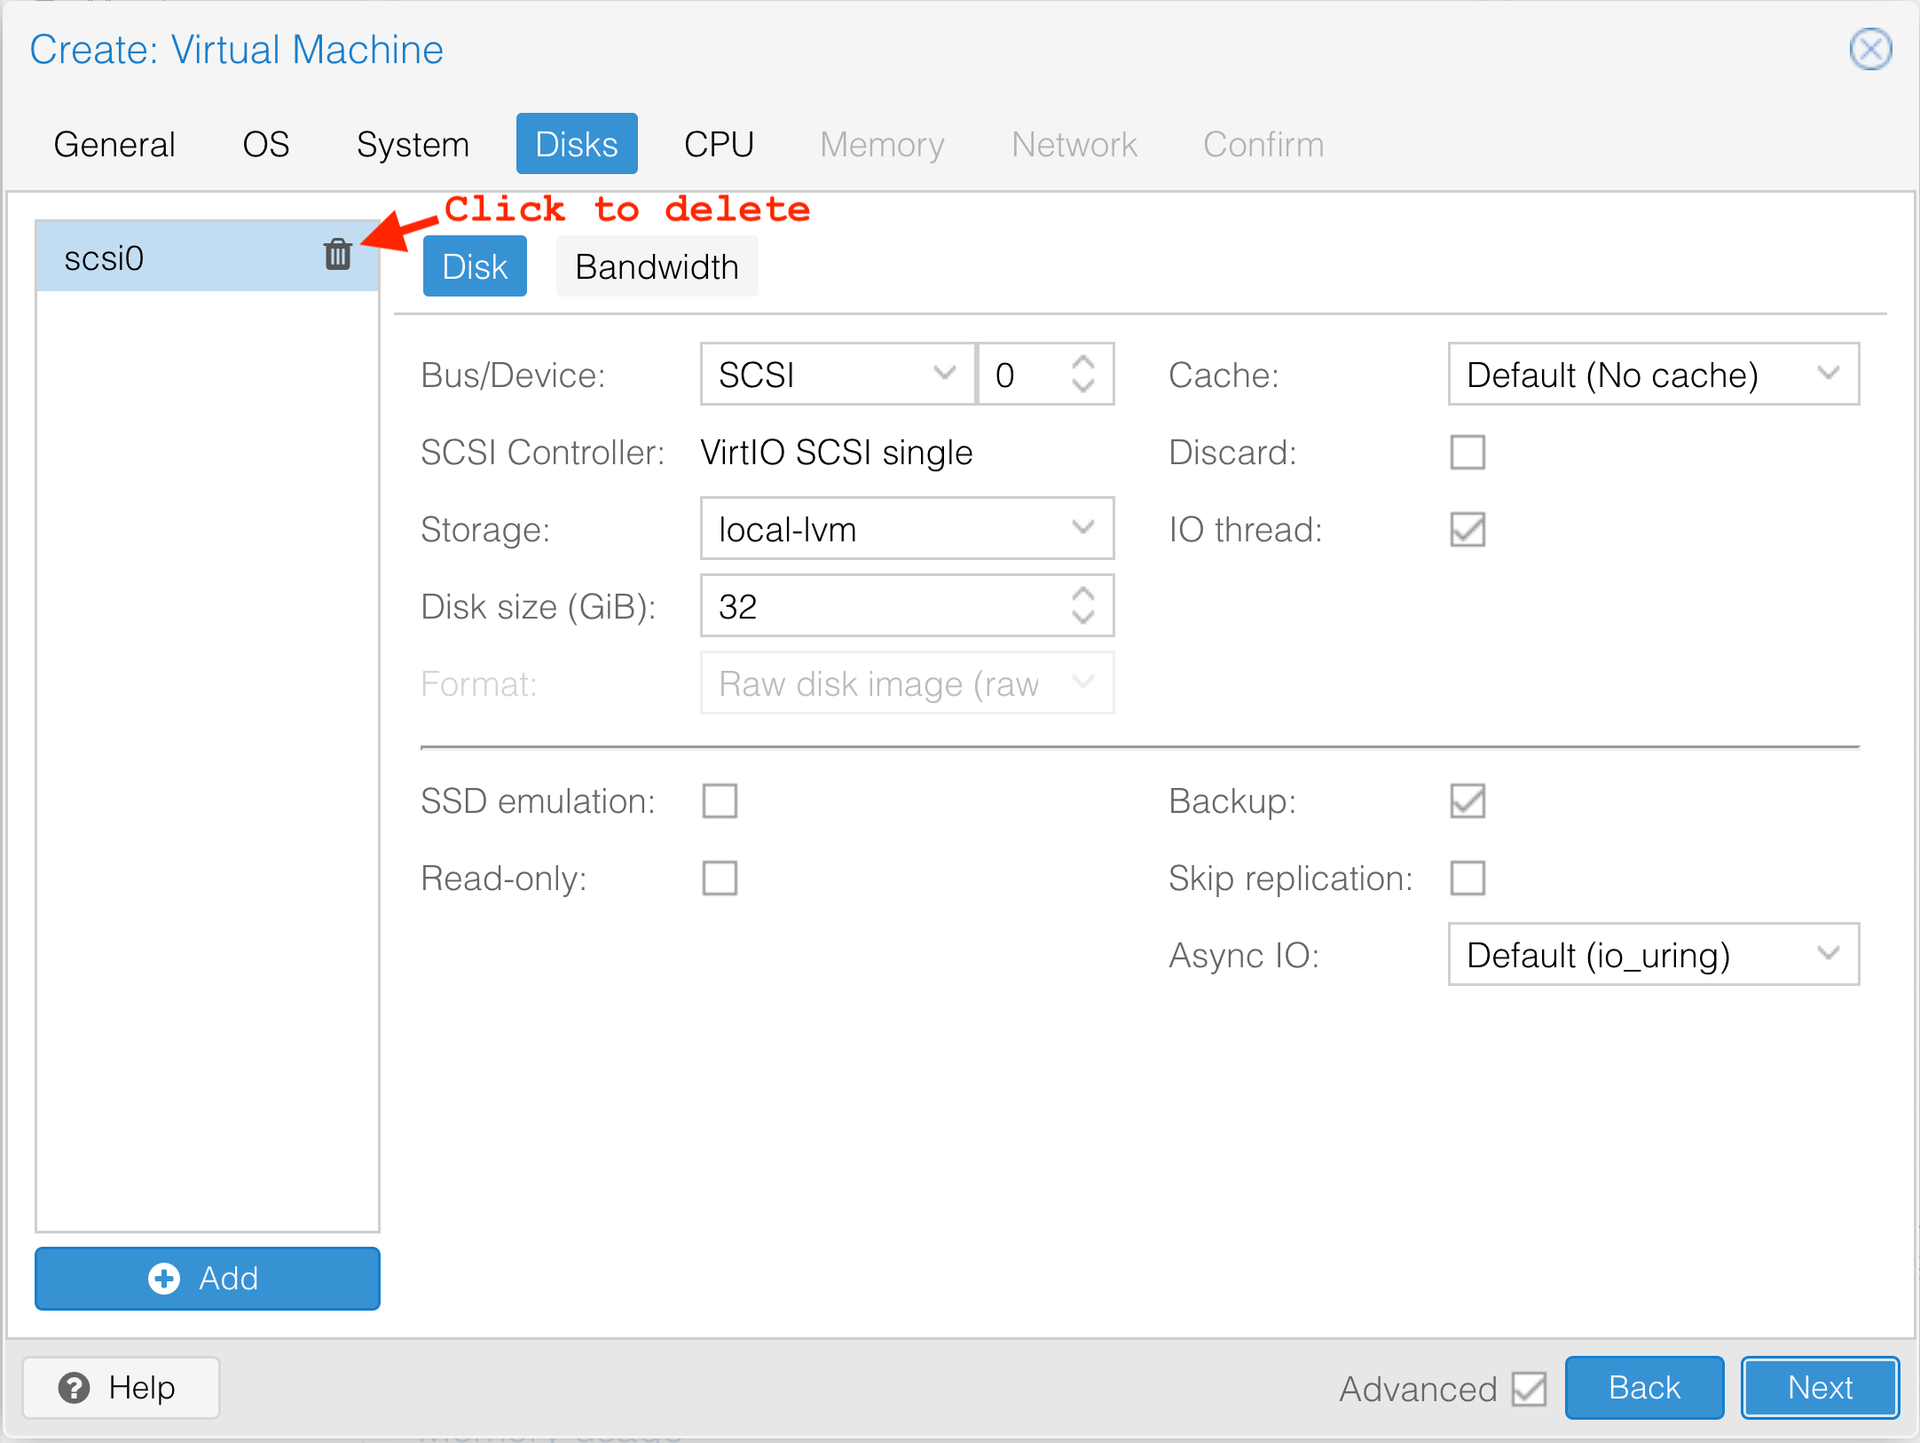
Click the Disks tab.
Delete the scsi0 disk before clicking “Next” to proceed. We add disks after VM creation.
Click the CPU tab.
Specify the following:

Sockets: 1 (typically).
Cores: Specify the number of Cores.
Type: host.
Click the Memory tab.
Specify the following:

Memory: Specify Memory in MiB.
Click the Network tab.
Specify the following:
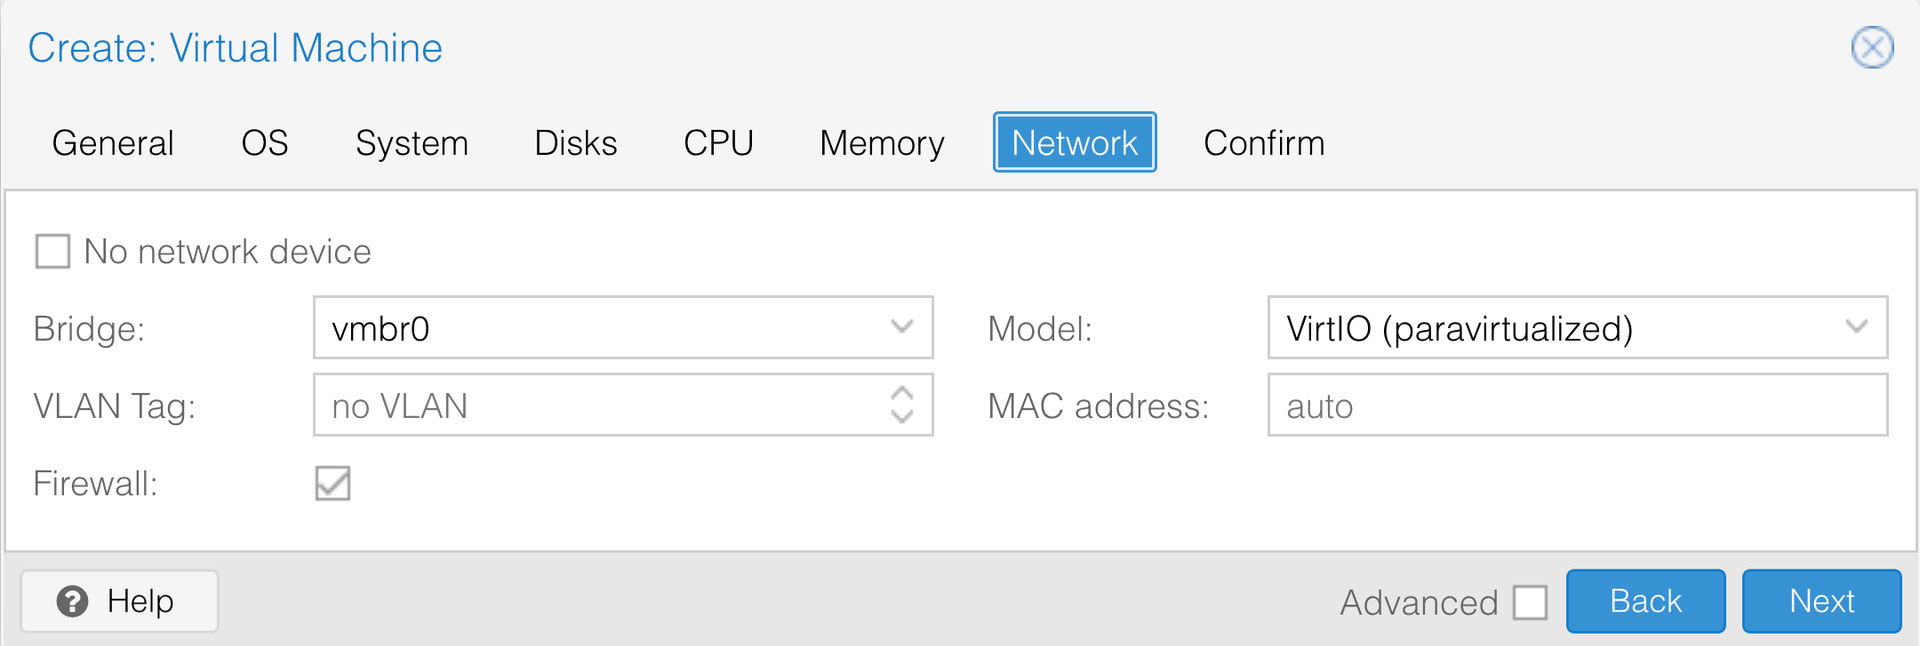
Model: VirtIO (paravirtualized).
All other settings: leave as default.
Click the Confirm tab.
Confirm all selections, then click “Finish” to create the VM.
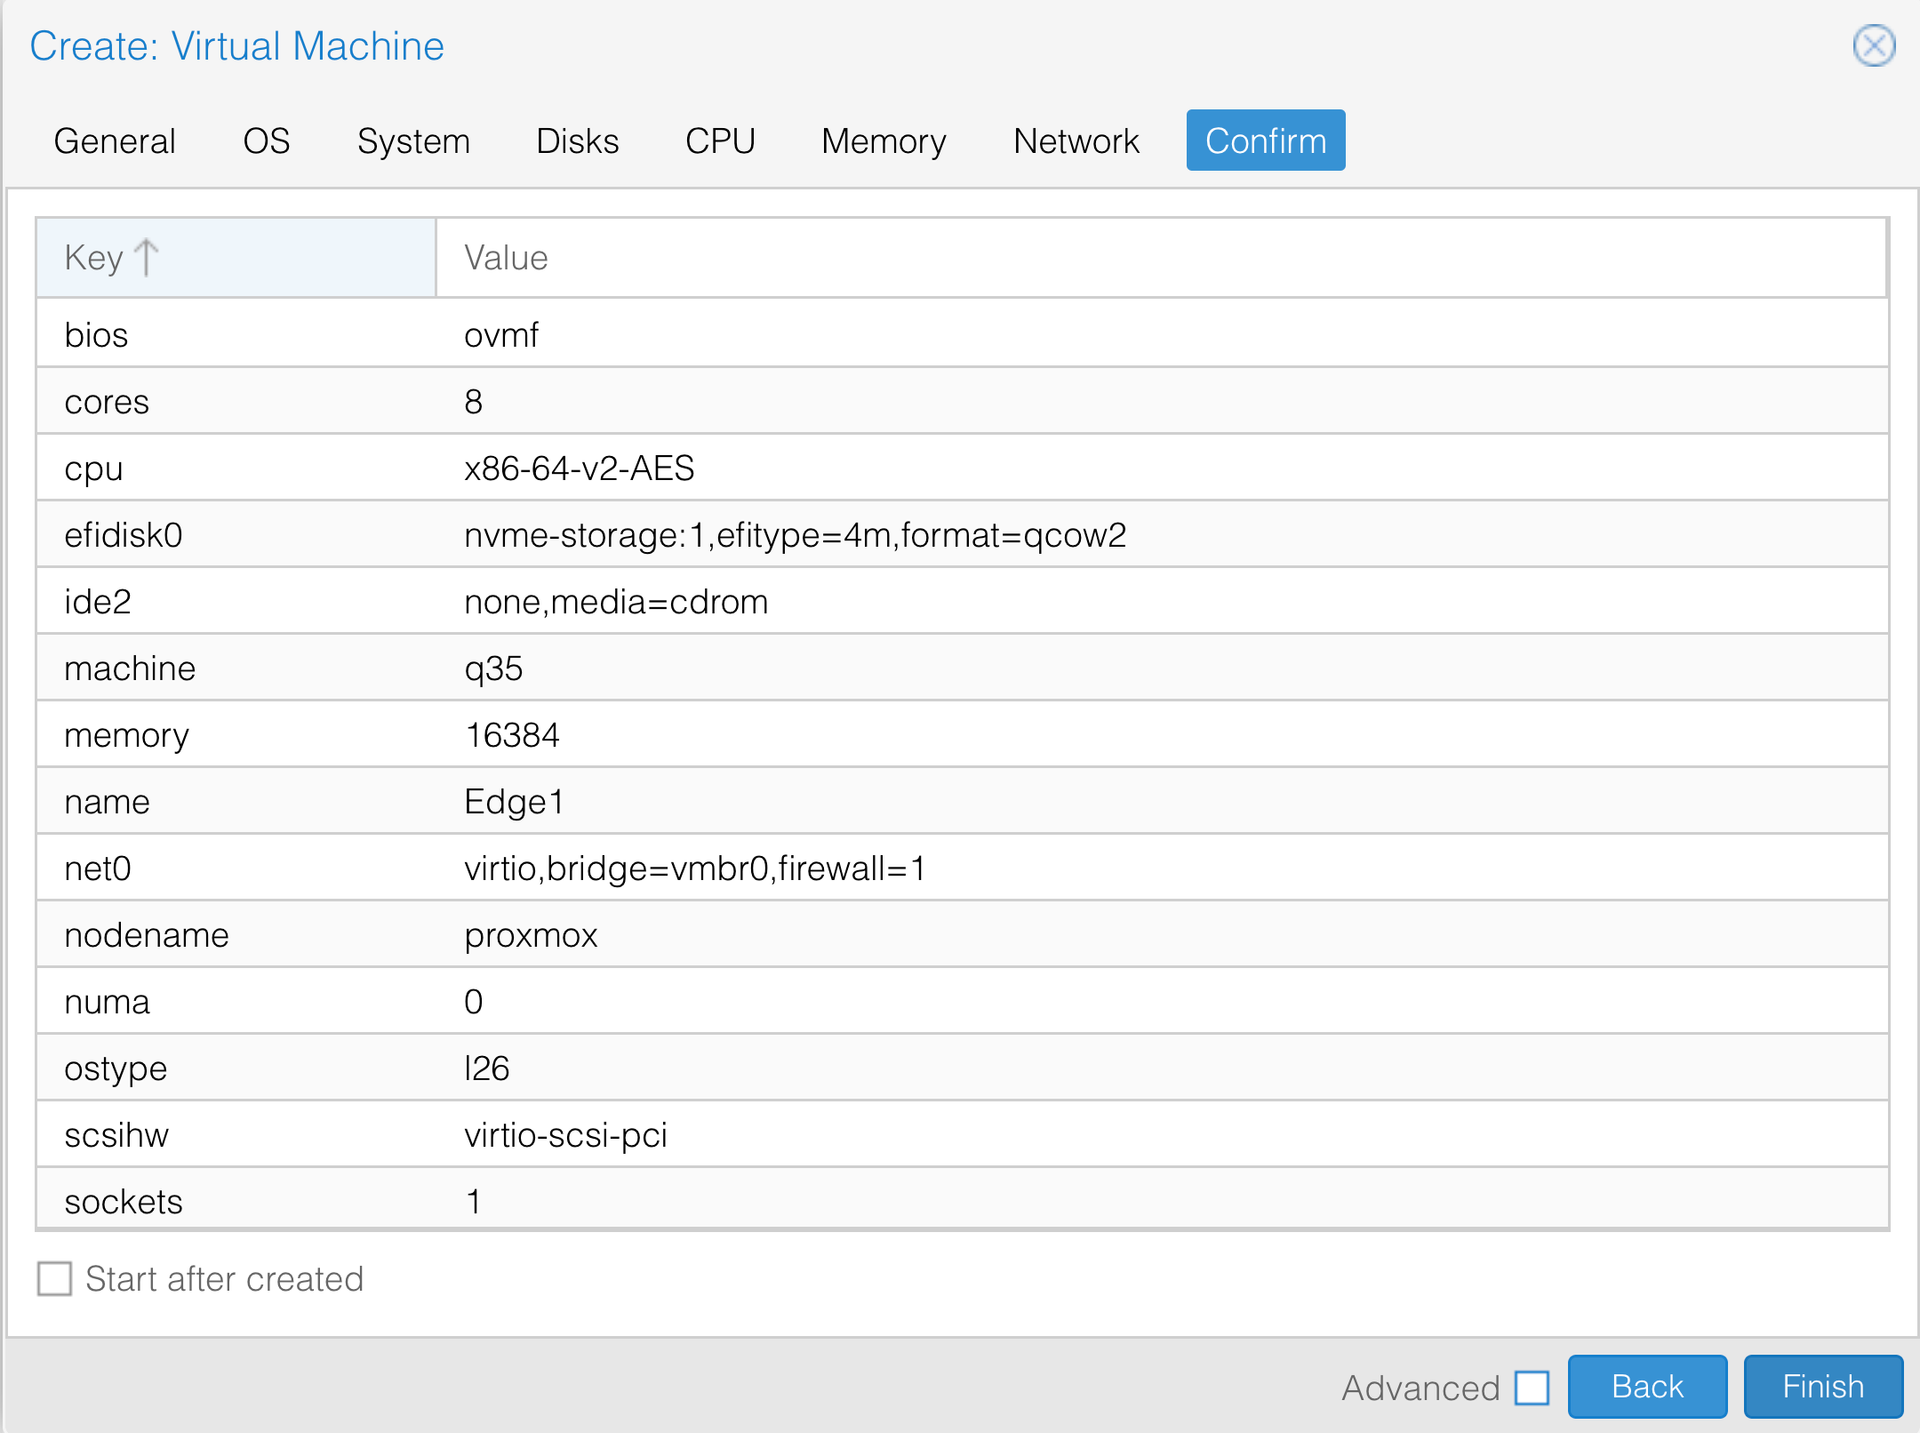
Refer to the CLI procedure above and do the following steps:
Step 1: Upload the boot disk image to the Proxmox server.
Step 2: Connect to the Proxmox Shell using the Web UI or SSH.
Skip Step 3: You already created the VM.
Steps 4-8: Add the OS Disk, attach it, and add the Cache and COW disks.
Step 9-11: Make the OS disk bootable.
Step 12: Start the VM.