On the Console Settings page, you can view an overview of the configuration of the Nasuni Management Console.
From the Console Settings page, you can also perform the following actions:
Schedule automatic updates of the Nasuni Management Console software.
Change the description of the Nasuni Management Console.
Configure email settings for Nasuni Edge Appliances and the Nasuni Management Console.
Configure SNMP settings for the Nasuni Management Console.
Configure console syslog export settings for the Nasuni Management Console.
Configure time servers for the Nasuni Management Console.
Configure Directory Services for Active Directory and LDAP Directory Services.
Manage encryption keys.
Manage NMC API access keys.
Review SSL certificates for the Nasuni Management Console.
Manage users and groups for the Nasuni Management Console.
Configure the firewall for the Nasuni Management Console.
Configure network settings for the Nasuni Management Console.
Configure proxy server settings for the Nasuni Management Console.
Update the Nasuni Management Console software.
Configure remote support settings for the Nasuni Management Console.
Send diagnostic information to Nasuni Technical Support about the Nasuni Management Console.
Configuration Overview page
Click Console Settings. The Configuration Overview page displays.
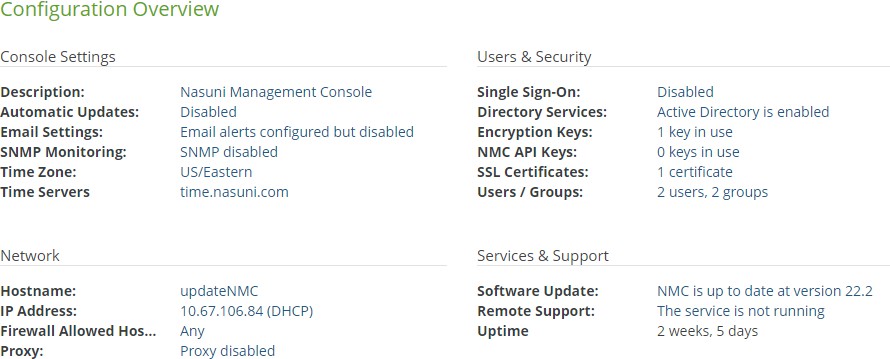
Figure 10-1: Configuration Overview page.
This page serves as a dashboard for the status of the Nasuni Management Console. In the Console Settings area, the following information appears:
Description: The description of the Nasuni Management Console.
Automatic Updates: The days of the week and the time on which to look for automatic software updates. If no days are selected to look for automatic software updates, then automatic software updates are disabled.
Email Settings: If email alerts are enabled, indicates destination email addresses to which to send alerts. If email alerts are configured but not enabled, the status is “Email alerts configured but disabled”. If email alerts are not configured, the status is “Email alerts not configured”.
SNMP Monitoring: Indicates whether SNMP monitoring is enabled or disabled.
Time Zone: The configured time zone.
Time Servers: The configured Network Time Protocol (NTP) servers.
To change any of these settings, click the setting. The appropriate page opens.
In the Users & Security area, the following information appears:
Single Sign-On: Indicates whether NMC Single Sign-On (SSO) is enabled or disabled.
Directory Services: Indicates whether Directory Services is enabled or disabled.
Encryption Keys: The number of encryption keys currently in use.
Users / Groups: The number of permission groups and users defined.
To change any of these settings, click the setting. The appropriate page opens.
In the Network area, the following information appears:
Hostname: The hostname for the Nasuni Management Console.
IP Address: The IP address, plus an indication of the type of IP address: either Static or DHCP.
Firewall Allowed Hosts: The hosts that you permit to access your Nasuni Management Console user interface.
Proxy: If proxy server is enabled, indicates the proxy server. If proxy server is not enabled, the status is “Proxy disabled”.
To change any of these settings, click the setting. The appropriate page opens.
In the Services & Support area, the following information appears:
Software Update: Indicates any available software updates.
Remote Support: If Remote Support is enabled with no time limit, indicates “The service is running”. If Remote Support is enabled with a time limit, gives the time until the service shuts down. If Remote Support is not enabled, indicates “The service is not running”.
Uptime: The length of time this Nasuni Management Console has been running. To change any of these settings, click the setting. The appropriate page opens.
Automatic Software Updates for NMC
You can schedule automatic software updates for the Nasuni Management Console on the Console Automatic Updates page. This feature is disabled by default.
Important: The version of the Nasuni Management Console must be equal to or greater than the version of the Nasuni Edge Appliance that the Nasuni Management Console is to manage. If a Nasuni Edge Appliance is joined to a Nasuni Management Console, update the Nasuni Management Console software before updating the Nasuni Edge Appliance software.
For details, see “NMC Version”.
Tip: To prevent automatic software updates from occurring at inconvenient times, specify the days and times for automatic software updates to occur. To prevent automatic software updates entirely, clear all days and times.
Note: Updating the Nasuni Management Console software does not affect Nasuni Edge Appliances or access to data.
You can also manually update the Nasuni Management Console software, as detailed in “Software Update for NMC”.
Viewing automatic software update settings for the NMC
To view automatic software update settings for the Nasuni Management Console, follow these steps:
Click Console Settings, then click Automatic Updates in the left-hand column. The Console Automatic Updates page displays the current schedule for automatic updates of the software for the Nasuni Management Console.
.png?sv=2026-02-06&spr=https&st=2026-06-23T02%3A53%3A59Z&se=2026-06-23T04%3A45%3A59Z&sr=c&sp=r&sig=zpXGbxtUicv6rIZuKiTsKRno7Z%2FZhnlnAKQ6dTOgUdY%3D)
Figure 10-2: Console Automatic Updates page.
Editing automatic software update settings for the NMC
To edit automatic software update settings for the Nasuni Management Console, follow these steps:
On the Console Automatic Updates page, select the days to look for automatic software updates (for example, Sunday, Tuesday, and Thursday).
From the Time drop-down list, select the time on the selected days to look for automatic software updates.
Click Save Schedule. The automatic software update settings for the Nasuni Management Console are changed.
Description
You can view and change the description of the Nasuni Management Console on the Console Description page.
You can change the name of the Nasuni Management Console from the name assigned when you installed it. The name can be up to 255 characters in length.
Caution: Avoid using characters that systems, such as Active Directory, specify as disallowed, including period (.), backslash (\), forward slash (/), colon (:), asterisk (*), question mark (?), quotation mark ("), less than sign (<), greater than sign (>), percent (%), and vertical bar (|). Errors can occur for a Nasuni Management Console whose name includes such characters. For example, it might not be possible to configure the Nasuni Management Console for Active Directory access.
Viewing description
To view description, follow these steps:
Click Console Settings, then click Description in the left-hand column. The Console Description page displays the description of the Nasuni Management Console.
.png?sv=2026-02-06&spr=https&st=2026-06-23T02%3A53%3A59Z&se=2026-06-23T04%3A45%3A59Z&sr=c&sp=r&sig=zpXGbxtUicv6rIZuKiTsKRno7Z%2FZhnlnAKQ6dTOgUdY%3D)
Figure 10-3: Console Description page.
The following information appears:
Description: The description of the Nasuni Management Console.
Editing the description
To edit the description of the Nasuni Management Console, follow these steps:
On the Console Description page, enter a new description in the Description text box.
Caution: Avoid using characters that systems, such as Active Directory, specify as disallowed, including period (.), backslash (\), forward slash (/), colon (:), asterisk (*), question mark (?), quotation mark ("), less than sign (<), greater than sign (>), percent (%), and vertical bar (|). Errors can occur for a Nasuni Management Console whose name includes such characters. For example, it might not be possible to configure the Nasuni Management Console for Active Directory access.
To accept your selections, click Save Description. The description is changed.
Email Settings
You can configure email alerts, which are sent to your email account from the Nasuni Management Console. Email configurations apply to Nasuni Edge Appliances under the control of the Nasuni Management Console. The alert messages you receive can also be viewed on the Notifications page.
To select which alerts to receive, see “Adding Permission Groups”.
Note: Nasuni Edge Appliances managed by the NMC send emails using this configuration.
Emails are sent by the NMC. No emails are sent directly by managed Nasuni Edge Appliances.
To configure email settings:
Click Console Settings, then select Email Settings in the left-hand column. The Filer & Console Email Settings page appears.
.png?sv=2026-02-06&spr=https&st=2026-06-23T02%3A53%3A59Z&se=2026-06-23T04%3A45%3A59Z&sr=c&sp=r&sig=zpXGbxtUicv6rIZuKiTsKRno7Z%2FZhnlnAKQ6dTOgUdY%3D)
Figure 10-4: Filer & Console Email Settings page.
To enable email notifications, set Enable Email to On. To disable email notifications, set Enable Email to Off.
To send a test email with these settings when you click Save Settings, select the Test Settings check box.
Enter a source email address in the From name text box. You can use this source email address to filter emails or ensure that it does not go into a spam folder.
In the Test Email Recipient text box, enter a destination email address, to which to send alerts.
Specify the SMTP server in the SMTP server text box. For example,
mail.mycompany.net.When sending an email alert, Nasuni logs into the specified SMTP server using the specified credentials and sends the email from the source email address.Specify the SMTP port number in the SMTP port text box. If you do not specify a value, the default port 25 is used.
For details about ports and firewalls, see Firewall and Port Requirements.
Optionally, enter a login name (for example, an email account) in the Login text box (case- sensitive) if your email server requires it. For example,
name@mycompany.com. Optionally, enter a password (case-sensitive) in the Password text box if your email server requires it.If you require TLS security, select the Require TLS check box.
If this check box is selected, and the email server does not support TLS security, the Nasuni Edge Appliance does not use the server.
If the check box is not selected, TLS security is still used by default if the email server supports it.
To test your settings and then save your settings, click Save Settings. If Test Settings is selected, a test message is sent to the specified email address for confirmation purposes.
SNMP Monitoring
You can configure SNMP monitoring of the Nasuni Management Console.
The Nasuni Edge Appliance supports monitoring via the Simple Network Management Protocol (SNMP) v1, v2c, and v3. The Nasuni Edge Appliance exposes the standard SNMPv1 MIB (management information base), as well as the NASUNI-FILER-MIB, SNMPv2-MIB, HOST-RESOURCES-MIB, UCD- SNMP-MIB, UCD-DISKIO-MIB, and IF-MIB. Both 32-bit and 64-bit SNMP network counters are supported. Each of the displayed MIBs is a link. If you click a link, a page with that MIB information appears.
As the SNMP agent, Nasuni receives requests on UDP port 161 from the third-party SNMP manager that is used for system monitoring. Nasuni sends agent responses back to the source port on the third- party SNMP manager. The third-party SNMP manager receives notifications (including Traps and InformRequests) on SNMP destination port 162. You cannot change port 161 or port 162.
For details about ports and firewalls, see Firewall and Port Requirements. Nasuni automatically provides the EngineID value.
Editing SNMP settings
To edit SNMP settings, follow these steps:
Click Console Settings, then click SNMP Monitoring in the left-hand column. The Console SNMP Monitoring page appears.
.png?sv=2026-02-06&spr=https&st=2026-06-23T02%3A53%3A59Z&se=2026-06-23T04%3A45%3A59Z&sr=c&sp=r&sig=zpXGbxtUicv6rIZuKiTsKRno7Z%2FZhnlnAKQ6dTOgUdY%3D)
Figure 10-5: Console SNMP Monitoring page.
To enable SNMP v1,v2c monitoring, click Enable v1,v2c Support. Selecting On enables SNMP v1,v2c monitoring. Selecting Off disables SNMP monitoring.
If you enable SNMP v1,v2c monitoring, in the Community Name text box, enter the SNMP community name for the Nasuni Management Console. The default community name is
public. Changing the community name from the default improves security.To enable SNMP v3 monitoring, click Enable v3 Support. Selecting On enables SNMP v3 monitoring. Selecting Off disables SNMP monitoring.
If you enable SNMP v3 monitoring, enter a Username and Password for SNMP v3 authorization.
If you enable SNMP monitoring, in the System Location text box, enter the physical location of the Nasuni Management Console.
If you enable SNMP monitoring, in the System Contact text box, enter the contact information of the person responsible for SNMP monitoring for the Nasuni Management Console.
Click Save SNMP Settings. The SNMP settings are changed.
Syslog Export
Syslog Export enables you to direct NMC console notifications to your syslog servers. Tools that work with syslog can then process, store, and report on these messages. The syslog protocol is used to convey event notification messages. It also provides a message format that allows vendor-specific extensions to be provided in a structured way. Syslog Export supports UDP protocol. For more details, see “Syslog Export”.
Important: Because each Edge Appliance sends syslog messages directly to the specified syslog servers, ensure that the appropriate port is open between each Edge Appliance and the syslog servers. This is usually UDP port 514.
For details about ports and firewalls, see Firewall and Port Requirements.
A standard syslog message (based on the RFC 5424 specification) uses the following format:
<PRIORITY>VERSION TIMESTAMP HOSTNAME APPLICATION PROCID MESSAGEID [STRUCTURED_DATA] MESSAGE
where:
Segment | Data Type | Expected values |
|---|---|---|
Priority | Numerical | Priority is a combination of the numerical Facility value and the numerical Severity value, such that: Priority = 8 * Facility + Severity The Facility value is a numerical logging component associated with the message: 16 (Local0) through 23 (Local7). Severity values are one of the following:
|
Version | Numerical | Version of syslog messaging. |
Timestamp | String timestamp | Timestamp, in ISO 8601 format. |
Hostname | String | FQDN hostname or IP address. |
Application | String | Device or Application that triggered the message. Default of “Edge Appliance” or “NMC”. |
Process ID | Arbitrary | String or ID to improve log aggregation grouping. |
Message ID | String | Message IDs allow aggregators to filter messages and typically indicate messages of the same semantics/format. |
Structured Data | Structured Data Elements | (Not currently used. A ‘-’ appears instead.) Unique data elements consisting of well-known key-value pairs within a set of brackets. |
Message | Unicode UTF-8 String | Message data. |
Editing console syslog export settings
To edit console syslog export settings, follow these steps:
Click Console Settings, then click Console Syslog Export Settings in the left-hand column. The Console Syslog Export Settings page appears.
.png?sv=2026-02-06&spr=https&st=2026-06-23T02%3A53%3A59Z&se=2026-06-23T04%3A45%3A59Z&sr=c&sp=r&sig=zpXGbxtUicv6rIZuKiTsKRno7Z%2FZhnlnAKQ6dTOgUdY%3D)
Figure 10-6: Console Syslog Export Settings page.
In the Servers text box, enter a comma-separated list of hosts (and, optionally, ports) to receive syslog events, in
host[:port]format.To send console Notification messages to syslog Servers, set “Send Notification messages” to On.
From the Logging Facility drop-down list, select the facility to use for console Notification messages.
You can select any facility. Facilities are similar to tags that you can use to group events. For example, you might send all audit messages to “local1” and all system messages to “local2”.
From the “Lowest Log Level” drop-down list, select the lowest Notification level to send. Each Notification level includes all the Notifications in the levels above it in the drop-down list. For example, the ‘Info’ level includes all the other levels, but the ‘Alert’ level includes only alerts.
To send test messages to the currently listed Servers, click “Send Test Messages”. A test message is sent to all listed Servers. If Notifications are on, the messages use the selected Notification level and facility. If Notifications are off, the messages are sent with the selected
Notification facility at ‘Info’ level.
Sending test messages does not save the configuration.
Click Save Settings. Your settings are saved.
Time Configuration
Important: Edge Appliances and the NMC must be configured with operational DNS servers and a time server (internal or external) within your environment.
You can set the time zone and time server for the Nasuni Management Console, which are necessary for notifications and file sharing purposes. The time zone setting you select should be for the region where the Nasuni Management Console is located. For example, use “US/Eastern” if you are located in the eastern part of the United States.
Setting time zone and time source
Caution: Editing the Edge Appliance time configuration (time zone or time servers) disconnects and resets all currently connected SMB clients for the selected Edge Appliance.
To set time zone and time source for the Nasuni Management Console, follow these steps:
Click Console Settings, then click Time Configuration in the left-hand column. The Console Time Configuration page appears.
.png?sv=2026-02-06&spr=https&st=2026-06-23T02%3A53%3A59Z&se=2026-06-23T04%3A45%3A59Z&sr=c&sp=r&sig=zpXGbxtUicv6rIZuKiTsKRno7Z%2FZhnlnAKQ6dTOgUdY%3D)
Figure 10-7: Console Time Configuration page.
The following information appears:
Current Time: The current date and time of the Nasuni Management Console.
From the Time Zone drop-down list, select a time zone.
In the Time Server text box, enter the names of one or more valid Network Time Protocol (NTP) servers, separated by commas. By default, all Nasuni Edge Appliances are set to use Nasuni's NTP server, time.nasuni.com, to set the time daily. If you cannot open port 123 in your firewall to access time.nasuni.com, you should change to an internal NTP server.
For details about ports and firewalls, see Firewall and Port Requirements.
Click Save Timezone. The time zone and time source settings are changed.
Directory Services
The Nasuni Management Console supports Directory Services using either Active Directory or LDAP (Lightweight Directory Access Protocol) with Kerberos for authentication.
Tip: For Nasuni recommendations for volume configuration, see “Volume Configuration”.
Important: You cannot enable both Active Directory and LDAP Directory Services for a Nasuni Management Console.
Caution: Edge Appliances joined to LDAP cannot share volumes with Edge Appliances joined to Active Directory. Similarly, Edge Appliances joined to Active Directory cannot share volumes with Edge Appliances joined to LDAP. If you want Edge Appliances to share volumes, ensure that they are joined to the same directory service.
Important: To connect an Edge Appliance to a shared volume owned by another Edge Appliance, the following must be true:
The Edge Appliance must join the same domain as the owning Edge Appliance.
The domain configuration for the Edge Appliance must match the domain configuration for the owning Edge Appliance.
Tip: You can configure users and groups so that users have access to data even if domain connectivity fails. For details, see Appendix E, “Ensuring user access to data if domain connection lost”.
You can associate an Active Directory or LDAP Directory Services domain group with a permission group. This enables you to log in using Active Directory or LDAP Directory Services credentials. See “Adding Permission Groups”.
Specifying multiple protocol access
For single protocol access, Nasuni supports Kerberos and NTLMv2 over SMB protocol for appliances bound to Microsoft Windows Active Directory. Nasuni also supports Kerberos over NFSv4 for appliances bound to a supported LDAP Directory, including FreeIPA, Oracle Directory Services, and Apple Open Directory.
For multiple protocol access using both NFSv4 and SMB protocol to access the same data, the SMB protocol is authenticated using Kerberos or NTLMv2 by Active Directory. However, Nasuni multiple protocol access with NFSv4 only supports NFS basic authentication (AUTH_SYS). AUTH_SYS does not use tokens or passwords for authentication or access control, relying on the client to provide an ID validated on the server side to limit and control access.
In multiple protocol use cases, Nasuni recommends using network segmentation, and using the Allowed Hosts list to specify NFS client IP addresses, in order to restrict the endpoints that can access NFS exports.
About Active Directory
Tip: For Nasuni recommendations for volume configuration, see “Volume Configuration”.
Microsoft's Active Directory (AD) service is capable of providing security across multiple domains or forests through domain and forest trust relationships. The trusts established between domains allow or deny users access to resources outside their native domain. After you establish the correct trust relationships among your Active Directory servers, you can enable access and permissions for users and groups within the trusted domains. Configuration of trusts between domains is outside the scope of this document.
Important: Only two-way trusts are supported.
Tip: Nasuni also supports the “Identity Management for UNIX” role service for Active Directory. This feature allows UNIX-style user and group identities to be stored in Active Directory, and can synchronize identity management across CIFS (SMB) and NFS.
If your organization requires this functionality:
The Nasuni Management Console can join one Windows Active Directory domain server and access its users and groups. These users and groups can only be edited through Active Directory tools.
Note: Limits on domains, groups, users, objects, and other items are the same as the limits of Active Directory. See Active Directory Maximum Limits - Scalability for details.
Important: If joining an Active Directory domain, members of the Active Directory "Protected Users" security group cannot be used to join the domain. This is due to the login restrictions for members of that security group. Nasuni recommends using a Domain Admin account that is not a part of the “Protected Users” group to join Active Directory.
The Nasuni Management Console joins one domain, called the primary domain. If the client’s environment has valid, active trust relationships between the primary domain and other domains, the Nasuni Management Console attempts to discover those domains automatically. You can then select which of the non-primary domains to allow to access the Nasuni Management Console.
Important: You cannot use Active Directory passwords longer than 127 characters to log in to the NMC.
The Nasuni Management Console offers support for trusted domains of multiple Active Directory servers. This can simplify enabling access and permissions for users and groups within trusted domains. To use trusted domains of multiple Active Directory servers, you must establish the correct trust relationships among your Active Directory servers.
There are two aspects to trusted domain support: authentication and sharing. The authentication aspect allows a user to access a Nasuni Management Console's resources in a different domain. The sharing aspect enables systems in different domains to access the same data.
Tip: You can configure users and groups so that users have access to data even if domain connectivity fails. For details, see Appendix E, “Ensuring user access to data if domain connection lost”.
About LDAP Directory Services
Tip: For Nasuni recommendations for volume configuration, see “Volume Configuration”.
As an alternative to Microsoft Active Directory, some organizations prefer to use their own LDAP and Kerberos services. This is often the case for organizations that rely heavily on UNIX-style clients, such as Linux or macOS. The LDAP protocol is used for identifying users and other resources. The Kerberos protocol is used for authentication. In lieu of joining a domain, the Nasuni Management Console requires a Kerberos keytab file, which contains encryption keys associated with network services (service principal names).
Tip: LDAP Directory Services must be enabled in the client license before joining an LDAP domain. Active Directory is enabled by default.
Tip: For detailed procedures for LDAP with Apple OpenDirectory, Oracle Enterprise Directory Server (Oracle DS), and FreeIPA, see the LDAP Best Practices Guide.
Note: The Nasuni Management Console requires the use of Kerberos for secure authentication, and does not support storing passwords in LDAP.
Caution: Edge Appliances joined to LDAP cannot share volumes with Edge Appliances joined to Active Directory. Similarly, Edge Appliances joined to Active Directory cannot share volumes with Edge Appliances joined to LDAP. If you want Edge Appliances to share volumes, ensure that they are joined to the same directory service.
Important: You cannot enable both Active Directory and LDAP Directory Services for a Nasuni Edge Appliance.
Tip: You can configure users and groups so that users have access to data even if domain connectivity fails. For details, see Appendix E, “Ensuring user access to data if domain connection lost”.
Joining Nasuni Management Console (not previously joined) to a domain
Important: You cannot enable both Active Directory and LDAP Directory Services for a Nasuni Management Console.
Caution: Edge Appliances joined to LDAP cannot share volumes with Edge Appliances joined to Active Directory. Similarly, Edge Appliances joined to Active Directory cannot share volumes with Edge Appliances joined to LDAP. If you want Edge Appliances to share volumes, ensure that they are joined to the same directory service.
Important: If joining an Active Directory domain, members of the Active Directory "Protected Users" security group cannot be used to join the domain. This is due to the login restrictions for members of that security group. Nasuni recommends using a Domain Admin account that is not a part of the “Protected Users” group to join Active Directory.
Important: To connect an Edge Appliance to a shared volume owned by another Edge Appliance, the following must be true:
The Edge Appliance must join the same domain as the owning Edge Appliance.
The domain configuration for the Edge Appliance must match the domain configuration for the owning Edge Appliance.
Tip: You can configure users and groups so that users have access to data even if domain connectivity fails. For details, see Appendix E, “Ensuring user access to data if domain connection lost”.
If the Nasuni Management Console has not previously joined any Active Directory domain or LDAP Directory Services domain before, follow these steps:
Click Console Settings, then select Directory Services from the list. On the Console Directory Services page, the Type should be Disabled, and the Connection Status should be DISABLED.
.png?sv=2026-02-06&spr=https&st=2026-06-23T02%3A53%3A59Z&se=2026-06-23T04%3A45%3A59Z&sr=c&sp=r&sig=zpXGbxtUicv6rIZuKiTsKRno7Z%2FZhnlnAKQ6dTOgUdY%3D)
Figure 10-8: Console Directory Services page.
To join an Active Directory domain, follow the procedure below. Otherwise, to join an LDAP Directory Services domain, skip to step 3.
Important: You cannot enable both Active Directory and LDAP Directory Services for a Nasuni Management Console.
Important: It is not supported for users in the Active Directory Protected Users security group to log in to the NMC.
Important: It is not supported for users in the Active Directory Protected Users security group to log in to the NMC.
Important: You cannot use Active Directory passwords longer than 127 characters to log in to the NMC.
Caution: Avoid using characters in the description (or name) that systems, such as Active Directory, specify as disallowed, including period (.), backslash (\), forward slash (/), colon (:), asterisk (*), question mark (?), quotation mark ("), less than sign (<), greater than sign (>), percent (%), and vertical bar (|). Errors can occur for a Nasuni Management Console whose name includes such characters. For example, it might not be possible to configure the Nasuni Management Console for Active Directory access.
Important: In order to link an Active Directory domain group to a permission group, the “Group type” of the Active Directory domain group must be “Security”. If the “Group type” of the Active Directory domain group is “Distribution”, users within the Active Directory domain group are not able to log in.
Important: If joining an Active Directory domain, members of the Active Directory "Protected Users" security group cannot be used to join the domain. This is due to the login restrictions for members of that security group. Nasuni recommends using a Domain Admin account that is not a part of the “Protected Users” group to join Active Directory.
Note: Limits on domains, groups, users, objects, and other items are the same as the limits of Active Directory. See Active Directory Maximum Limits - Scalability for details.
If joining a Read-Only Domain Controller (RODC), see “Considerations for a Read-Only Domain Controller (RODC)“.
In the Domain text box, enter the fully qualified Active Directory domain name that you want the Nasuni Management Console to join, in lower-case letters, such as,
subdomain.domain.com. The Nasuni Management Console joins this domain to authenticate users from the Active Directory server.Leave Auto Detect selected. If Auto Detect is selected, the wizard attempts to retrieve pertinent information using DNS.
Note: For Auto Detect to work, the DNS must be configured to refer to directory service settings.
If, after you click Continue (step j), the wizard is unsuccessful in automatically detecting configuration information, deselect Auto Detect. The Directory Service Type drop-down list becomes available.
To automatically alter the system’s hostname so that it is part of the domain to be joined, select Alter System Hostname. For example, if joining a Nasuni Management Console (such as
nmc) to a domain (such asdomain.com), Nasuni recommends using the fully qualified domain name with the hostname to form the new hostname (such asnmc.domain.com). Alternatively, if you know that the hostname is correct for this domain, deselect Alter System Hostname.If Auto Detect is deselected, the Directory Service Type drop-down list becomes available. From the drop-down list, select Active Directory.
(Optional) In the Workgroup text box, enter a local Windows NT-compatible workgroup name (15 characters maximum) in which the Nasuni Management Console can be accessed.
To use the default workgroup for the domain, leave this field blank. Some domains need this value if the name cannot be automatically determined.
Tip: This value cannot be changed after the Nasuni Management Console joins the domain.
(Optional) In the Domain Controller text box, enter the fully qualified domain name of the primary domain controller. For example,
DomainControllerName.domain.com.Entering a Domain Controller name forces the Nasuni Management Console to use only that domain controller. However, leaving the Domain Controller text box blank causes the Nasuni Management Console to use the primary domain controller on the join, and also allows for domain controller failover. Unless you want only one specific domain controller to be used, leave the Domain Controller text box blank.
In particular, if you want support for trusted domains of multiple Active Directory servers, leave the Domain Controller text box blank.
(Optional) In the Computer OU text box, enter a domain organization unit in which the Nasuni Management Console is placed. You can use standard notation, such as:
OU=<name>,..., DC=<name>, ...If you leave this value blank, the Nasuni Management Console is placed in a default location. The computer’s container is the default location.
Tip: This value cannot be changed after the Nasuni Management Console joins the domain.
(Optional) To use Network Time Protocol (NTP) services provided by domain controllers, select NTP from Domain Controllers. If no NTP services are available from domain controllers, the current NTP server is used. See “Time Configuration”.
Tip: This value cannot be changed after the Nasuni Management Console joins the domain.
Click Continue. The wizard attempts to look up domain information in the DNS. If successful, the wizard returns to this page, enters the information found, and deselects Auto Detect. You can then enter or change any information.
If the message appears that Auto Detect was successful, verify any values that Auto Detect added, deselect Auto Detect if still selected, then click Continue.
The Confirm/Authenticate Directory Service dialog box appears.
.png?sv=2026-02-06&spr=https&st=2026-06-23T02%3A53%3A59Z&se=2026-06-23T04%3A45%3A59Z&sr=c&sp=r&sig=zpXGbxtUicv6rIZuKiTsKRno7Z%2FZhnlnAKQ6dTOgUdY%3D)
Figure 10-9: Confirm/Authenticate Directory Service dialog box.
Enter the user name and password of a user who is authorized to join this Nasuni Management Console to the specified domain. Click Submit.
The wizard attempts to configure for the specified domain. If successful, the Enable Domains tab is selected.
.png?sv=2026-02-06&spr=https&st=2026-06-23T02%3A53%3A59Z&se=2026-06-23T04%3A45%3A59Z&sr=c&sp=r&sig=zpXGbxtUicv6rIZuKiTsKRno7Z%2FZhnlnAKQ6dTOgUdY%3D)
Figure 10-10: Enable Domains tab.
A list of available domains appears. From this list, select the domains that you want the Nasuni Management Console to access.
Click Continue.
The wizard attempts to enable the selected domains. If successful, the “Complete the Configuration” tab is selected.
.png?sv=2026-02-06&spr=https&st=2026-06-23T02%3A53%3A59Z&se=2026-06-23T04%3A45%3A59Z&sr=c&sp=r&sig=zpXGbxtUicv6rIZuKiTsKRno7Z%2FZhnlnAKQ6dTOgUdY%3D)
Figure 10-11: “Complete the Configuration” tab.
Verify the configuration values, then click Finish.
The wizard attempts to complete the configuration. If successful, the Console Directory Services page appears.
.png?sv=2026-02-06&spr=https&st=2026-06-23T02%3A53%3A59Z&se=2026-06-23T04%3A45%3A59Z&sr=c&sp=r&sig=zpXGbxtUicv6rIZuKiTsKRno7Z%2FZhnlnAKQ6dTOgUdY%3D)
Figure 10-12: Console Directory Services page.
The newly joined domain appears in the Domain Settings list.
To configure directory services settings, see “Directory Services”.
To update the list of trusted domains that the Nasuni Management Console is aware of, click Update Domains. This adds new trusted domains, as well as changes to existing domains that the Nasuni Management Console is aware of.
This button does not remove decommissioned domains that had previously been discovered.
Alternatively, to join an LDAP Directory Services domain, follow the procedure below.
Tip: LDAP Directory Services must be enabled in the client license before joining an LDAP domain. Active Directory is enabled by default.
Important: You cannot enable both Active Directory and LDAP Directory Services for a Nasuni Management Console.
Tip: For detailed procedures for LDAP with Apple OpenDirectory, Oracle Enterprise Directory Server (Oracle DS), and FreeIPA, see the LDAP Best Practices Guide.
Important: Before configuring LDAP Directory Services, ensure that SSL client certificates have been uploaded. See “Uploading SSL Certificates”.
Important: We recommend the use of indexes for uidNumber and gidNumber attributes. If your LDAP Directory Server can look up records based on uidNumber and gidNumber quickly without an index, this is also sufficient.
In the Domain text box, enter the fully qualified LDAP Directory Services domain name that you want the Nasuni Management Console to join, in lower-case letters, such as,
subdomain.domain.com. The Nasuni Management Console joins this domain to authenticate users from the LDAP Directory Services server.Leave Auto Detect selected. If Auto Detect is selected, the wizard attempts to retrieve pertinent information using DNS. If the wizard detects an LDAP Directory Services domain, it also tries to detect the type of domain (FreeIPA, Apple Open Directory, or Generic).
Note: For Auto Detect to work, the DNS must be configured to refer to directory service settings.
If, after clicking Continue (step g), the wizard is unsuccessful in automatically detecting configuration information, deselect Auto Detect. The Directory Service Type drop-down list becomes available.
To automatically alter the system’s hostname so that it is part of the domain to be joined, select Alter System Hostname. For example, if joining a Nasuni Management Console (such as
nmc) to a domain (such asdomain.com), Nasuni recommends using the fully qualified domain name with the hostname to form the new hostname (such asnmc.domain.com). Alternatively, if you know that the hostname is correct for this domain, deselect Alter System Hostname.If Auto Detect is deselected, the Directory Service Type drop-down list becomes available. From the drop-down list, select LDAP Directory Services.
If the directory services provider has not already been selected, from the Directory Services Provider drop-down list, select the provider that matches your LDAP and Kerberos servers. Options include FreeIPA, Generic LDAP/Kerberos, and Apple OpenDirectory. By selecting the appropriate provider, the wizard selects various connection parameters. The following steps detail the Generic LDAP/Kerberos option where the wizard does not assume any connection settings.
Note: Some of the following fields are optional, depending on the choice of Directory Services Provider.
In the LDAP Servers text box, enter a list of the IP addresses or hostnames of the LDAP servers for the Nasuni Management Console to connect to, separated by commas. Use lower-case letters.
To use DNS to retrieve information, leave this text box blank.
In the Kerberos KDC Servers text box, enter a list of the IP addresses or hostnames of the Kerberos Key Distribution Center (KDC) servers for the Nasuni Management Console to connect to, separated by commas. Use lower-case letters.
To use DNS to retrieve information, leave this text box blank.
From the LDAP ID Schema drop-down list, select the LDAP ID schema to use: RFC2307 or RFC2307bis.
In the LDAP User Search Base text box, enter an LDAP DN (distinguished name) that indicates a subtree that contains users.
In the LDAP Group Search Base text box, enter an LDAP DN (distinguished name) that indicates a subtree that contains groups.
In the LDAP User Name Attribute text box, enter the LDAP user name attribute.
In the LDAP Group Name Attribute text box, enter the LDAP group name attribute.
In the LDAP Netgroup Search Base text box, enter an LDAP DN (distinguished name) that indicates a subtree that contains netgroups.
In the LDAP Bind DN text box, enter an LDAP DN (distinguished name) to use instead of an anonymous bind.
In the LDAP Bind Password text box, enter a password to use to bind with DN.
In the Minimum Supported ID text box, enter the minimum user or group ID to map to the Nasuni Management Console.
To have Auto Detect find this, leave blank.
In the Maximum Supported ID text box, enter the maximum user or group ID to map to the Nasuni Management Console.
To have Auto Detect find this, leave blank.
Click Continue. The wizard attempts to look up domain information in DNS. If successful, the wizard returns to this page, enters the information found, and deselects Auto Detect. You can then enter or change any information.
The Confirm/Authenticate Directory Service dialog box appears.
.png?sv=2026-02-06&spr=https&st=2026-06-23T02%3A53%3A59Z&se=2026-06-23T04%3A45%3A59Z&sr=c&sp=r&sig=zpXGbxtUicv6rIZuKiTsKRno7Z%2FZhnlnAKQ6dTOgUdY%3D)
Figure 10-13: Confirm/Authenticate Directory Service dialog box.
If necessary, enter the user name and password of a directory user who is authorized to join this Nasuni Management Console to the specified domain. Click Submit.
Click Continue. The wizard attempts to look up domain information in the DNS. If successful, the wizard returns to this page, enters the information found, and deselects Auto Detect. You can then enter or change any information.
.png?sv=2026-02-06&spr=https&st=2026-06-23T02%3A53%3A59Z&se=2026-06-23T04%3A45%3A59Z&sr=c&sp=r&sig=zpXGbxtUicv6rIZuKiTsKRno7Z%2FZhnlnAKQ6dTOgUdY%3D)
Figure 10-14: Directory Services page.
If the message appears that Auto Detect was successful, verify any values that Auto Detect added, deselect Auto Detect if still selected, then click Continue.
The wizard checks the provided information before proceeding to the Keytab step. If the wizard is successful in checking the LDAP domain and other information, the wizard highlights the Keytab step.
From the Keytab Source drop-down list, select the source of the Kerberos keytab for the Nasuni Management Console from the following choices:
If you select a server, enter the Username, Password, and Repeat Password, then click Continue.
If you select to upload a keytab file, click Browse to navigate to the file, then click Continue.
Caution: The maximum length of a file name is 255 bytes.
In addition, the length of a path, including the file name, must be less than 4,000 bytes.
Since the UTF-8 representation of characters from some character sets can occupy several bytes, the maximum number of characters that a file path or a file name might contain can vary.
If a particular client has other limits, the smaller of the two limits applies.
The wizard checks the provided keytab information before proceeding to the Volume Selection step. If the wizard is successful in obtaining the Kerberos keytab information, the “Complete the Configuration” tab is selected.
Verify the configuration values, then click Continue.
The wizard attempts to complete the configuration. If successful, the Console Directory Services page appears.
.png?sv=2026-02-06&spr=https&st=2026-06-23T02%3A53%3A59Z&se=2026-06-23T04%3A45%3A59Z&sr=c&sp=r&sig=zpXGbxtUicv6rIZuKiTsKRno7Z%2FZhnlnAKQ6dTOgUdY%3D)
Figure 10-15: Console Directory Services page.
The newly joined domain appears in the Domain Settings list.
To configure directory services settings, see “Directory Services”.
Considerations for a Read-Only Domain Controller (RODC)
If there is a Read-Only Domain Controller (RODC) in your Active Directory environment, certain considerations are necessary before joining the domain.
To use a Read-Only Domain Controller in your Active Directory environment, follow these steps:
Before joining a Read-Only Domain Controller, first join a Read-Write Domain Controller (RWDC) in your Active Directory environment. See step 2b in Joining Nasuni Management Console (not previously joined) to a domain.
This procedure includes entering, in the Domain Controller text box, the fully qualified domain name of the Read-Write Domain Controller (RWDC). See step 2h in Joining Nasuni Management Console (not previously joined) to a domain.
Identify the Read-Only Domain Controllers in your Active Directory environment.
Each Read-Only Domain Controller has a unique ID that includes the string ‘krbtgt’ and an ID number. This ID number must be less than 32768. To determine the ID, run this PowerShell command:
Repadmin /showattr <WritableDC> <DNDP> /subtree/filter:"(&(objectclass=computer)(msDS-Krbtgtlink=*))"/atts:msDS-krbtgtlinkwhere
WritableDCis the hostname of a writable domain controller (RWDC) andDNDPis the distinguished name of the domain partition, such asdc=domain,dc=comThis command provides a list of Read-Only Domain Controllers with their associated UIDs for the KRBTGT account.
If the number is above 32768, you must redeploy the Read-Only Domain Controller.
If you have access to the Windows Server 2016 Active Directory Administrative Center, you pre-configure the Read-Only Domain Controller with a number less than 32768. You can then use this Read-Only Domain Controller.
If you are using Windows Server 2012 Active Directory Administrative Center, the number is assigned randomly. The number must be less than 32768.
Add the Nasuni Management Console computer object to the Password Replication Policy by following these steps:
Log in to the Read-Write Domain Controller that was joined in step 1 in “Considerations for a Read-Only Domain Controller (RODC)“.
Open Server Manager → Tools → Active Directory Users and Computers. The “Active Directory Users and Computers” application opens.
In the left-hand pane, select “Domain Controllers“. A list of domain controllers appears, including Read-Only Domain Controllers.
From the list of domain controllers, right-click the Read-Only Domain Controller, then select Properties from the drop-down list.
Click the “Password Replication Policy” tab. A list of current groups, users, and computers appears.
Double-click “Allowed RODC Password Replication Group“. The “Allowed RODC Password Replication Group Properties” dialog box appears.
Click the Members tab. A list of members appears.
Click Add.
Add the Nasuni Management Console computer object as a member.
Click OK.
Remove the Read-Write Domain Controller, using these steps:
Click Configuration, then select Directory Services from the list. The Directory Services page appears.
.png?sv=2026-02-06&spr=https&st=2026-06-23T02%3A53%3A59Z&se=2026-06-23T04%3A45%3A59Z&sr=c&sp=r&sig=zpXGbxtUicv6rIZuKiTsKRno7Z%2FZhnlnAKQ6dTOgUdY%3D)
Figure 10-16: Directory Services page for Active Directory.
Ensure that the Domain Controller text box is blank.
Ensure that “Rejoin Active Directory” is set to Off before performing the following step.
Click Submit.
Important: By default, Nasuni changes the computer object password every 7-10 days. After you complete this procedure, contact Support to disable the password change policy.
This completes the procedure for handling a Read-Only Domain Controller (RODC) in your Active Directory environment.
Viewing information about Directory Services already configured
To view information about Directory Services, follow these steps:
Click Console Settings, then select Directory Services from the list. The Console Directory Services page appears.
.png?sv=2026-02-06&spr=https&st=2026-06-23T02%3A53%3A59Z&se=2026-06-23T04%3A45%3A59Z&sr=c&sp=r&sig=zpXGbxtUicv6rIZuKiTsKRno7Z%2FZhnlnAKQ6dTOgUdY%3D)
Figure 10-17: Console Directory Services page for Active Directory.
For Active Directory, information on this page includes the following:
Type: Type of authentication, such as Publicly Available, Active Directory, and LDAP Directory Services.
Connection Status: The current status of the connection.
ENABLED indicates that the connection has been configured successfully. DISABLED indicates that the connection has not been configured successfully. HEALTHY indicates that the connection is successful.
UNHEALTHY indicates that the connection is not successful.
For Active Directory, to update the list of trusted domains that the Nasuni Management Console is aware of, click Update Domains. This adds new trusted domains, as well as changes to existing domains that the Nasuni Management Console is aware of.
This button does not remove decommissioned domains that had previously been discovered.
For LDAP Directory Services, the Console Directory Services page looks like this.
.png?sv=2026-02-06&spr=https&st=2026-06-23T02%3A53%3A59Z&se=2026-06-23T04%3A45%3A59Z&sr=c&sp=r&sig=zpXGbxtUicv6rIZuKiTsKRno7Z%2FZhnlnAKQ6dTOgUdY%3D)
Figure 10-18: Console Directory Services page for LDAP Directory Services.
For LDAP Directory Services, information on this page includes the following:
Type: Type of authentication, such as Publicly Available, Active Directory, and LDAP Directory Services.
Connection Status: The current status of the connection.
ENABLED indicates that the connection has been configured successfully. DISABLED indicates that the connection has not been configured successfully. HEALTHY indicates that the connection is successful.
UNHEALTHY indicates that the connection is not successful.
Domain Settings: A list of domains appears, displaying the following information:
Domain: The IP address or the hostname of the domain.
Details: Details about the Directory Services entry, including the following:
Keytab Contents: The contents of the keytab file used to authenticate to the KDC, including the following information:
Service Type: The service type and the IP address or the hostname of the host that is offering it.
Realm: The IP address or the hostname of the server hosting the application.
Editing LDAP Directory Services domain settings
Tip: For detailed procedures for LDAP with Apple OpenDirectory, Oracle Enterprise Directory Server (Oracle DS), and FreeIPA, see the LDAP Best Practices Guide.
Tip: You can configure users and groups so that users have access to data even if domain connectivity fails. For details, see Appendix E, “Ensuring user access to data if domain connection lost”.
To edit settings for the LDAP Directory Services domain, follow these steps:
Click Console Settings, then select Directory Services from the list. The Console Directory Services page appears.
.png?sv=2026-02-06&spr=https&st=2026-06-23T02%3A53%3A59Z&se=2026-06-23T04%3A45%3A59Z&sr=c&sp=r&sig=zpXGbxtUicv6rIZuKiTsKRno7Z%2FZhnlnAKQ6dTOgUdY%3D)
Figure 10-19: Console Directory Services page for LDAP Directory Services.
For the domain whose information you want to edit, click Edit. The Edit Domain dialog box appears.
.png?sv=2026-02-06&spr=https&st=2026-06-23T02%3A53%3A59Z&se=2026-06-23T04%3A45%3A59Z&sr=c&sp=r&sig=zpXGbxtUicv6rIZuKiTsKRno7Z%2FZhnlnAKQ6dTOgUdY%3D)
Figure 10-20: Edit Domain dialog box.
Note: The fields available depend on the Directory Services Provider selected.
In the LDAP Servers text box, enter a list of the IP addresses or hostnames of the LDAP servers for the Nasuni Management Console to connect to, separated by commas. Use lower-case letters.
To use DNS to retrieve information, leave this text box blank.
In the Kerberos KDC Servers text box, enter a list of the IP addresses or hostnames of the Kerberos Key Distribution Center (KDC) servers for the Nasuni Management Console to connect to, separated by commas. Use lower-case letters.
To use DNS to retrieve information, leave this text box blank.
Click Save. The information is applied to the selected domain.
Updating the keytab file
Tip: For detailed procedures for LDAP with Apple OpenDirectory, Oracle Enterprise Directory Server (Oracle DS), and FreeIPA, see the LDAP Best Practices Guide.
The Kerberos keytab file contains encryption keys associated with services (the service principal names) located on servers hosting Kerberos-enabled protocols.
To update the keytab file, follow these steps:
Click Console Settings, then select Directory Services from the list. The Console Directory Services page appears.
.png?sv=2026-02-06&spr=https&st=2026-06-23T02%3A53%3A59Z&se=2026-06-23T04%3A45%3A59Z&sr=c&sp=r&sig=zpXGbxtUicv6rIZuKiTsKRno7Z%2FZhnlnAKQ6dTOgUdY%3D)
Figure 10-21: Console Directory Services page for LDAP Directory Services.
Click Update Keytab. The Update Keytab dialog box appears.
.png?sv=2026-02-06&spr=https&st=2026-06-23T02%3A53%3A59Z&se=2026-06-23T04%3A45%3A59Z&sr=c&sp=r&sig=zpXGbxtUicv6rIZuKiTsKRno7Z%2FZhnlnAKQ6dTOgUdY%3D)
Figure 10-22: Update Keytab dialog box.
From the Keytab Source drop-down list, select the source of the Kerberos keytab for the Nasuni Management Console.
If you select a server, enter the Username, Password, and Repeat Password, then click Submit.
If you select to upload a keytab file, click Choose File to navigate to the file, then click Submit.
Caution: The maximum length of a file name is 255 bytes.
In addition, the length of a path, including the file name, must be less than 4,000 bytes.
Since the UTF-8 representation of characters from some character sets can occupy several bytes, the maximum number of characters that a file path or a file name might contain can vary.
If a particular client has other limits, the smaller of the two limits applies.
The keytab file is updated.
Editing Active Directory domain settings
Tip: You can configure users and groups so that users have access to data even if domain connectivity fails. For details, see Appendix E, “Ensuring user access to data if domain connection lost”.
To edit settings for an Active Directory domain, follow these steps:
Click Console Settings, then select Directory Services from the list. The Console Directory Services page appears.
.png?sv=2026-02-06&spr=https&st=2026-06-23T02%3A53%3A59Z&se=2026-06-23T04%3A45%3A59Z&sr=c&sp=r&sig=zpXGbxtUicv6rIZuKiTsKRno7Z%2FZhnlnAKQ6dTOgUdY%3D)
Figure 10-23: Console Directory Services page.
To update the list of trusted domains that the Nasuni Management Console is aware of, click Update Domains. This adds new trusted domains, as well as changes to existing domains that the Nasuni Management Console is aware of.
This button does not remove decommissioned domains that had previously been discovered.
For the domain whose information you want to edit, click Edit. The Edit Domain dialog box appears.
.png?sv=2026-02-06&spr=https&st=2026-06-23T02%3A53%3A59Z&se=2026-06-23T04%3A45%3A59Z&sr=c&sp=r&sig=zpXGbxtUicv6rIZuKiTsKRno7Z%2FZhnlnAKQ6dTOgUdY%3D)
Figure 10-24: Edit Domain dialog box.
To enable or disable resources in the Active Directory domain accessing the Nasuni Management Console, select or deselect Enable Source.
Tip: The Primary domain cannot be disabled.
Click Save. The information is applied to the selected domain.
Editing Active Directory general settings
Tip: You can configure users and groups so that users have access to data even if domain connectivity fails. For details, see Appendix E, “Ensuring user access to data if domain connection lost”.
To edit settings for Active Directory, follow these steps:
Click Console Settings, then select Directory Services from the list. The Console Directory Services page appears.
.png?sv=2026-02-06&spr=https&st=2026-06-23T02%3A53%3A59Z&se=2026-06-23T04%3A45%3A59Z&sr=c&sp=r&sig=zpXGbxtUicv6rIZuKiTsKRno7Z%2FZhnlnAKQ6dTOgUdY%3D)
Figure 10-25: Console Directory Services page.
To update the list of trusted domains that the Nasuni Management Console is aware of, click Update Domains. This adds new trusted domains, as well as changes to existing domains that the Nasuni Management Console is aware of.
This button does not remove decommissioned domains that had previously been discovered.
(Optional) In the Domain Controller text box, enter the fully qualified domain name of the primary domain controller. For example,
DomainControllerName.domain.com.Entering a Domain Controller name forces the Nasuni Management Console to use only that domain controller. However, leaving the Domain Controller text box blank causes the Nasuni Management Console to use the primary domain controller on the join, and also allows for domain controller failover. Unless you want only one specific domain controller to be used, leave the Domain Controller text box blank.
In particular, if you want support for trusted domains of multiple Active Directory servers, leave the Domain Controller text box blank.
To rejoin Active Directory after leaving Active Directory, select Rejoin Active Directory.
.png?sv=2026-02-06&spr=https&st=2026-06-23T02%3A53%3A59Z&se=2026-06-23T04%3A45%3A59Z&sr=c&sp=r&sig=zpXGbxtUicv6rIZuKiTsKRno7Z%2FZhnlnAKQ6dTOgUdY%3D)
Figure 10-26: Rejoin Active Directory selected.
Click Submit. The information is applied to the selected domain.
Disconnecting an Edge Appliance from an Active Directory domain
To disconnect an Edge Appliance from an Active Directory domain, you must first perform the procedure “Deleting Active Directory domain configuration” of the Edge Appliance Administration Guide. If you are unable to perform this procedure, or if you cannot disconnect the Edge Appliance from the Active Directory domain after performing the procedure, contact Nasuni Support.
After disconnecting an Edge Appliance from an Active Directory domain, the Edge Appliance can then join another Active Directory domain, or rejoin the original Active Directory domain.
Encryption Keys
You can view, upload, escrow, and delete encryption keys on the Console Settings Encryption Keys page. The encryption keys that you upload to the Nasuni Management Console can then be sent to Nasuni Edge Appliances to use with volumes. You can view, add, enable, and disable volume encryption keys on the Volume Encryption Keys page. You can view, upload, send, escrow, and delete encryption keys on the Filer Encryption Keys page.
The Nasuni Edge Appliance automatically encrypts your data at your premises using the OpenPGP encryption protocol, with 256-bit Advanced Encryption Standard (AES-256) encryption as the default encryption. The data remains encrypted in cloud object storage.
You can generate your own encryption keys using any OpenPGP-compatible program, such as Gpg4win, GPGTools, and OpenPGP Studio. For details, see Generating Encryption Keys.
Important: The PGP key generation and management tools listed above are industry-standard applications widely used in enterprise environments. Nasuni has tested and validated these tools for generating keys compatible with our encryption system.
To observe security best practices:
• Download tools only from approved distribution channels or official project websites such as those linked above.
• Verify digital signatures or checksums when provided by the publisher of the tool.
• Customers are free to use any PGP-compliant key generation tool that meets their organization's security standards.
As with all cryptographic operations, customers are responsible for securing their own key generation environment and for validating the authenticity of the tools they choose to use.
You can then add (import or upload) the encryption key to the Nasuni Management Console. (For security reasons, encryption keys that you upload cannot be downloaded from the system.) The encryption key is used to encrypt your data before it is sent to cloud object storage and decrypt data when it is read back. The Nasuni Edge Appliance accepts multiple encryption algorithms for encryption keys.
Note: If an uploaded encryption key has an associated passphrase, that passphrase is removed from the encryption key when it is uploaded. The Edge Appliance does not need the passphrase in order to use the encryption key. However, if you do not escrow this encryption key, if you ever perform a recovery procedure on the Edge Appliance, you must provide that passphrase when you upload that encryption key during the recovery procedure.
All data on a volume is encrypted using one or more OpenPGP-compatible encryption keys before being sent to cloud object storage. Volumes may be encrypted with one or more encryption keys, and encryption keys may be used for any number of volumes.
There are several actions you can perform on encryption keys, including adding new encryption keys, enabling or disabling encryption keys, escrowing encryption keys with Nasuni, and, under certain circumstances, deleting encryption keys.
All uploaded encryption keys must be at least 2048 bits long.
Warning: Do NOT save encryption key files to a volume on a Nasuni Edge Appliance. You will NOT be able to use these to recover data. This is NOT how to upload encryption keys to a Nasuni Edge Appliance. To upload encryption keys to a Nasuni Edge Appliance, use the Encryption Keys page.
At least one encryption key must be enabled for a volume, but several encryption keys can be enabled at the same time. When multiple encryption keys are enabled, all of the encryption keys enabled at the time are used to encrypt the data. Any of the encryption keys enabled at the time a piece of data is encrypted can be used to later decrypt the data. Only the encryption keys enabled when the data was written can decrypt that data. An encryption key that was enabled after the data was written cannot decrypt any data that was written before that key was enabled.
There are several reasons you might want to disable an encryption key, such as, when someone with access to the encryption key leaves the company, or if your enterprise has a policy of rotating encryption keys periodically. (For details about “rotating” or rolling over encryption keys, see “Rotating” (or rolling over) encryption keys for a volume.) When you disable an encryption key, no future data is encrypted with that encryption key. However, all data previously encrypted by that disabled encryption key remains encrypted by that disabled encryption key. For this reason, before you disable an encryption key, you should consider establishing a snapshot retention policy that removes the data that was encrypted with the disabled encryption key. Because volumes must have at least one encryption key associated with them, in practice you add a new encryption key to a volume first, and then disable the existing encryption key.
You can delete encryption keys, but only in the case where they are not being used by any volumes.
You cannot modify encryption keys stored on the system. For security reasons, encryption keys that you upload cannot be downloaded from the system. You can only download encryption keys that the Nasuni Edge Appliance has generated internally.
You can escrow your encryption keys with Nasuni (or a trusted third party), or store your own encryption keys. Before you can escrow your encryption keys with Nasuni, you must create an escrow passphrase, in case you need these escrowed encryption keys when you perform a recovery procedure.
You can specify that you do not want Nasuni to generate any of your encryption keys. This ensures that your data is encrypted only with encryption keys that you upload. If you specify this, you must upload all the encryption keys used. Specifically, when creating a volume, you cannot select Create New Key as the source of the volume encryption key. For security reasons, encryption keys that you upload cannot be downloaded from the system. If you want to specify that Nasuni not generate encryption keys, request Nasuni Support to disable key generation in your license.
Similarly, you can specify that you do not want Nasuni to escrow encryption keys. If you specify this, you must manage your own encryption keys, because Nasuni does not manage them. If you specify this, you can still have Nasuni generate encryption keys, and those generated encryption keys are still automatically escrowed, because all generated encryption keys are automatically escrowed. If you want to specify that Nasuni not escrow encryption keys, request Nasuni Support to disable key escrow in your license.
To ensure that none of your encrypted keys is escrowed with Nasuni, you must specify BOTH that Nasuni not generate encryption keys AND that Nasuni not escrow encryption keys.
Note: To add an encryption key to a volume, see “Adding encryption keys to a volume”.
Viewing encryption keys on the Nasuni Management Console
To view encryption keys on the Nasuni Management Console, follow these steps:
Click Console Settings, then click Encryption Keys in the left-hand column. The Encryption Keys page displays a list of encryption keys on the Nasuni Management Console.
.png?sv=2026-02-06&spr=https&st=2026-06-23T02%3A53%3A59Z&se=2026-06-23T04%3A45%3A59Z&sr=c&sp=r&sig=zpXGbxtUicv6rIZuKiTsKRno7Z%2FZhnlnAKQ6dTOgUdY%3D)
Figure 10-27: Encryption Keys page.
The following information appears for each encryption key in the list:
Escrowed by Nasuni: Whether this encryption key is escrowed by Nasuni: Yes (encryption key is escrowed by Nasuni) or No (encryption key is not escrowed by Nasuni).
Actions: Actions available for each encryption key.
Uploading (importing or adding) encryption keys to the NMC
You can upload (import or add) encryption keys to the Nasuni Management Console.
You can generate your own encryption keys using any OpenPGP-compatible program, such as Gpg4win, GPGTools, and OpenPGP Studio. For details, see Generating Encryption Keys.
Important: The PGP key generation and management tools listed above are industry-standard applications widely used in enterprise environments. Nasuni has tested and validated these tools for generating keys compatible with our encryption system.
To observe security best practices:
• Download tools only from approved distribution channels or official project websites such as those linked above.
• Verify digital signatures or checksums when provided by the publisher of the tool.
• Customers are free to use any PGP-compliant key generation tool that meets their organization's security standards.
As with all cryptographic operations, customers are responsible for securing their own key generation environment and for validating the authenticity of the tools they choose to use.
You can then add (import or upload) the encryption key to the Nasuni Management Console. The encryption key is used to encrypt your data before it is sent to cloud object storage and decrypt data when it is read back. The Nasuni Edge Appliance accepts multiple encryption algorithms for encryption keys.
All uploaded encryption keys must be at least 2048 bits long.
Important: For security reasons, encryption keys that you upload cannot be downloaded from the system.
Note: If an uploaded encryption key has an associated passphrase, that passphrase is removed from the encryption key when it is uploaded. The Edge Appliance does not need the passphrase in order to use the encryption key. However, if you do not escrow this encryption key, if you ever perform a recovery procedure on the Edge Appliance, you must provide that passphrase when you upload that encryption key during the recovery procedure.
Important: Imported encryption keys are not automatically escrowed. You MUST SAVE all imported encryption keys to another location outside the Nasuni Management Console, so that they are available if needed for disaster recovery. All encryption keys associated with a volume must be recovered as part of the disaster recovery process. To escrow encryption keys with Nasuni, see “Escrowing encryption keys with Nasuni”.
To upload (import or add) encryption keys to the Nasuni Management Console, follow these steps:
On the Encryption Keys page, click Upload Encryption Keys. The Import Key(s) dialog box appears.
.png?sv=2026-02-06&spr=https&st=2026-06-23T02%3A53%3A59Z&se=2026-06-23T04%3A45%3A59Z&sr=c&sp=r&sig=zpXGbxtUicv6rIZuKiTsKRno7Z%2FZhnlnAKQ6dTOgUdY%3D)
Figure 10-28: Import Key(s) dialog box.
Click Choose File, then navigate to the encryption key file. This file should be OpenPGP- compatible.
Caution: The maximum length of a file name is 255 bytes.
In addition, the length of a path, including the file name, must be less than 4,000 bytes.
Since the UTF-8 representation of characters from some character sets can occupy several bytes, the maximum number of characters that a file path or a file name might contain can vary.
If a particular client has other limits, the smaller of the two limits applies.
If an encryption key passphrase is needed, enter the encryption key passphrase in the Key Passphrase text box.
Important: The encryption key passphrase must consist only of ASCII letters (A–Z, a–z), ASCII numerals (0–9), and the special characters listed in Allowed ASCII Special Characters.
Also, the maximum length of the encryption key passphrase is 200 characters.
Note: If an uploaded encryption key has an associated passphrase, that passphrase is removed from the encryption key when it is uploaded. The Edge Appliance does not need the passphrase in order to use the encryption key. However, if you do not escrow this encryption key, if you ever perform a recovery procedure on the Edge Appliance, you must provide that passphrase when you upload that encryption key during the recovery procedure.
Click Import Key. The encryption key is imported to the Nasuni Management Console. Alternatively, to exit this screen without importing any encryption keys, click the Close button.
Downloading the NMC’s generated encryption key
You can download the Nasuni Management Console’s automatically-generated encryption key.
When a new Nasuni Management Console is created, it needs an encryption key to encrypt the configuration information that it backs up regularly, in case the Nasuni Management Console ever needs to be recovered. The Nasuni Management Console can generate its own encryption key for this purpose. However, if you upload an encryption key to the Nasuni Management Console before it generates its own encryption key, it uses the encryption key that you uploaded, and does not generate its own encryption key.
If the Nasuni Management Console does generate its own encryption key, this generated encryption key is the only encryption key that can ever be downloaded from a Nasuni Management Console.
Important: The time to generate an encryption key can vary widely, depending on the hardware (real or virtual) that the Nasuni Edge Appliance is executing on. Encryption keys are generated in the background, so as to not block use of the Nasuni Edge Appliance during generation.
If you perform a disaster recovery procedure on a Nasuni Management Console, during which you upload that generated encryption key to the Nasuni Management Console, then you can no longer download that encryption key, because downloading uploaded encryption keys is never permitted. As a result, a Nasuni Management Console might have one encryption key available for download, because that generated encryption key has never been uploaded to the Nasuni Management Console. Alternatively, a Nasuni Management Console might not have any encryption key available to download, either because there was no generated encryption key or because that generated encryption key was uploaded at some time to the Nasuni Management Console as part of the disaster recovery process.
You cannot download any Nasuni Edge Appliance encryption key from a Nasuni Management Console, because the Nasuni Edge Appliance never transmits any encryption keys to a Nasuni Management Console. The Nasuni Management Console is never in possession of any encryption key generated by a Nasuni Edge Appliance. In particular, if you use the Nasuni Management Console to create a volume on a Nasuni Edge Appliance, and specify generating a new encryption key for that volume, that new encryption key is generated on the Nasuni Edge Appliance, not on the Nasuni Management Console. The only way to download a Nasuni Edge Appliance encryption key is by using the Nasuni Edge Appliance user interface.
There are other encryption keys present on the Nasuni Management Console that a Nasuni Edge Appliance might use. However, these encryption keys have been uploaded to the Nasuni Management Console, and are not eligible for downloading.
Important: Automatically-generated encryption keys are automatically escrowed with Nasuni. However, Nasuni recommends that you safeguard all of your own encryption keys.
To download the Nasuni Management Console’s generated encryption key, follow these steps:
If the Nasuni Management Console’s generated encryption key is available for download, on the Encryption Keys page, click Download Generated Key
 .
.The generated encryption key is saved in the form of a .pgp file. Safeguard this encryption key file.
Escrowing encryption keys with Nasuni
You can escrow your encryption keys with Nasuni.
Escrowing an encryption key with Nasuni means that you can, at any time, request the encryption key during a disaster recovery from Nasuni. Your key is protected on Nasuni servers using the same security practices that we use for all keys escrowed with Nasuni.
To escrow encryption keys with Nasuni, follow these steps:
For the encryption key that you want to escrow with Nasuni, on the Encryption Keys page, click Escrow Key
.png?sv=2026-02-06&spr=https&st=2026-06-23T02%3A53%3A59Z&se=2026-06-23T04%3A45%3A59Z&sr=c&sp=r&sig=zpXGbxtUicv6rIZuKiTsKRno7Z%2FZhnlnAKQ6dTOgUdY%3D) . The Escrow Encryption Key dialog box appears.
. The Escrow Encryption Key dialog box appears..png?sv=2026-02-06&spr=https&st=2026-06-23T02%3A53%3A59Z&se=2026-06-23T04%3A45%3A59Z&sr=c&sp=r&sig=zpXGbxtUicv6rIZuKiTsKRno7Z%2FZhnlnAKQ6dTOgUdY%3D)
Figure 10-29: Escrow Encryption Key dialog box.
Type
Escrow Encryption Keyin the Confirmation Phrase text field.Caution: You are about to permanently escrow your encryption key with the Nasuni Corporation. This process is irreversible.
Click Escrow Key. Your encryption key is escrowed with Nasuni. The information in the encryption key list updates to reflect this change.
Alternatively, to exit this screen without escrowing any encryption keys, click the Close button.
Deleting Encryption Keys
You can delete encryption keys from the Nasuni Management Console, as long as the encryption key is not currently assigned to a volume and never has been assigned to a volume. Encryption keys that were once assigned to a volume, but are now disabled, might be needed for disaster recovery procedures and so cannot be deleted.
To delete an encryption key from the Nasuni Management Console, follow these steps:
For the encryption key that you want to delete, on the Encryption Keys page, click Delete Key
 . The text dialog box appears.
.png?sv=2026-02-06&spr=https&st=2026-06-23T02%3A53%3A59Z&se=2026-06-23T04%3A45%3A59Z&sr=c&sp=r&sig=zpXGbxtUicv6rIZuKiTsKRno7Z%2FZhnlnAKQ6dTOgUdY%3D)
Figure 10-30: Delete Encryption Key dialog box.
Type
Delete Encryption Keyin the Confirmation Phrase text field.Caution: You are about to permanently delete this encryption key. This process is irreversible.
Click Delete Key. Your encryption key is deleted. The list of encryption keys updates to reflect this change.
Alternatively, to exit this screen without deleting any encryption keys, click the Close button.
NMC Escrow Passphrase
To perform a recovery procedure on the NMC, you MUST have at least one of the encryption keys for the NMC. This means that, if Nasuni is escrowing this encryption key, one of the following must occur:
You must have created an escrow passphrase.
You must have this encryption key available.
You must contact Nasuni and verify your identity so that Nasuni can issue a special one-time- use recovery key.
The escrow passphrase must satisfy these constraints:
Contain only ASCII letters (A–Z, a–z), ASCII numerals (0–9), and the special characters listed in Allowed ASCII Special Characters.
Contain no Unicode.
Cannot exceed 511 characters.
To create an escrow passphrase for the NMC, follow these steps:
Click Console Settings, then click Encryption Keys in the left-hand column. The Encryption Keys page displays a list of encryption keys on the Nasuni Management Console.
.png?sv=2026-02-06&spr=https&st=2026-06-23T02%3A53%3A59Z&se=2026-06-23T04%3A45%3A59Z&sr=c&sp=r&sig=zpXGbxtUicv6rIZuKiTsKRno7Z%2FZhnlnAKQ6dTOgUdY%3D)
Figure 10-31: Encryption Keys page.
Click Set NMC Escrow Passphrase. The Set Escrow Passphrase dialog box appears.
.png?sv=2026-02-06&spr=https&st=2026-06-23T02%3A53%3A59Z&se=2026-06-23T04%3A45%3A59Z&sr=c&sp=r&sig=zpXGbxtUicv6rIZuKiTsKRno7Z%2FZhnlnAKQ6dTOgUdY%3D)
Figure 10-32: Set Escrow Passphrase dialog box.
Enter the Escrow Passphrase for the NMC. The escrow passphrase must satisfy these constraints:
Contain only ASCII letters (A–Z, a–z), ASCII numerals (0–9), and the special characters listed in Allowed ASCII Special Characters.
Contain no Unicode.
Cannot exceed 511 characters.
An indication of the strength of the passphrase is displayed.
Confirm the NMC escrow passphrase by entering it again.
Click Set Passphrase.
The NMC escrow passphrase is created.
Important: Keep this NMC escrow passphrase in a secure place. You use the escrow passphrase when performing a recovery procedure for the NMC.
Tip: If the escrow passphrase is lost, contact Nasuni Support and complete a lost passphrase form. Nasuni provides a one-time-use recovery key. The recovery key is not the escrow passphrase: Nasuni does not know your escrow passphrase and cannot provide it.
NMC API Access Keys
The NMC API enables customers to perform a variety of actions. For more details, see NMC API.
Users are granted access to the API via the "Enable NMC API Access" group permission. You can view and revoke leased keys/tokens for the NMC API.
Viewing and revoking NMC API access keys
To view and optionally revoke NMC API access keys, follow these steps:
Click Console Settings, then click NMC API Keys in the left-hand column. The NMC API Access Keys page appears.
.png?sv=2026-02-06&spr=https&st=2026-06-23T02%3A53%3A59Z&se=2026-06-23T04%3A45%3A59Z&sr=c&sp=r&sig=zpXGbxtUicv6rIZuKiTsKRno7Z%2FZhnlnAKQ6dTOgUdY%3D)
Figure 10-33: NMC API Access Keys page.
You can filter the list of NMC API access keys, using the Filter text box. The following information appears for each NMC API access key:
User: The username of the user of the NMC API access key.
Created: The date and time that the NMC API access key was created.
Expires: The date and time that the NMC API access key expires.
Actions: Available actions for the NMC API access key.
To revoke an NMC API access key, click Revoke beside the NMC API access key user. The Revoke NMC API Access Key dialog box appears.
.png?sv=2026-02-06&spr=https&st=2026-06-23T02%3A53%3A59Z&se=2026-06-23T04%3A45%3A59Z&sr=c&sp=r&sig=zpXGbxtUicv6rIZuKiTsKRno7Z%2FZhnlnAKQ6dTOgUdY%3D)
Figure 10-34: Revoke NMC API Access Key dialog box.
To revoke the NMC API access key, click Revoke Key. The selected NMC API access key is revoked.
Otherwise, click Close.
Session Timeout
You can configure the session timeout, namely, the time of inactivity that must occur before the Nasuni Management Console requires you to log in again. The default is 60 minutes.
Setting session timeout
If NMC Single Sign-On (SSO) is enabled, you cannot set session timeout using the NMC. Session timeout is managed by Azure, and this page appears.
.png?sv=2026-02-06&spr=https&st=2026-06-23T02%3A53%3A59Z&se=2026-06-23T04%3A45%3A59Z&sr=c&sp=r&sig=zpXGbxtUicv6rIZuKiTsKRno7Z%2FZhnlnAKQ6dTOgUdY%3D)
Figure 10-35: Session timeout is managed by Azure.
If NMC Single Sign-On (SSO) is not enabled, to set the session timeout, follow these steps:
Click Console Settings, then click Session Timeout in the left-hand column. The Console Session Timeout page appears.
.png?sv=2026-02-06&spr=https&st=2026-06-23T02%3A53%3A59Z&se=2026-06-23T04%3A45%3A59Z&sr=c&sp=r&sig=zpXGbxtUicv6rIZuKiTsKRno7Z%2FZhnlnAKQ6dTOgUdY%3D)
Figure 10-36: Console Session Timeout page.
In the Idle Timeout text box, enter the time, in minutes, of inactivity that must occur before the Nasuni Management Console requires you to log in again. The minimum time is 5 minutes, and the maximum time is 1440 minutes (24 hours).
To save these settings, click Save Settings.
SSL Certificates
You can view, generate, upload, copy, replace, and delete SSL certificates.
You can view the SSL certificates or self-signed certificate that you can use when accessing the Nasuni Management Console user interface.
You can also create a new SSL certificate, by generating a new Certificate Request to submit to a Certificate Authority (CA) for signing. When you receive the signed SSL certificate from the CA, you can associate the SSL certificate (and optional certificate chain) with the request. After this is done, you can use that new SSL certificate to manage the Nasuni Management Console.
Important: For version 10.0 or later, signed SSL certificates require a certificate that is generated with the SHA-256 cryptographic hash function or better and an encryption key that is at least 2048 bits.
Note: This procedure does not generate a Subject Alternative Name (SAN). If a SAN is required, you can generate the Certificate Request on another system that does generate a SAN.
Viewing SSL certificate information
To view SSL certificate information, follow these steps:
Click Console Settings, then click SSL Certificates in the left-hand column. The Console SSL Certificates page displays a list of SSL certificates for the Nasuni Management Console.
.png?sv=2026-02-06&spr=https&st=2026-06-23T02%3A53%3A59Z&se=2026-06-23T04%3A45%3A59Z&sr=c&sp=r&sig=zpXGbxtUicv6rIZuKiTsKRno7Z%2FZhnlnAKQ6dTOgUdY%3D)
Figure 10-37: Console SSL Certificates page.
The following information appears for each SSL certificate:
Name: The name of the certificate. Click View Details for detailed information about this SSL certificate.
End Date: The date that the SSL certificate is valid until.
Actions: Available actions for the SSL certificate.
To view details of an existing SSL certificate, click View Details. The Certificate Details box appears.
.png?sv=2026-02-06&spr=https&st=2026-06-23T02%3A53%3A59Z&se=2026-06-23T04%3A45%3A59Z&sr=c&sp=r&sig=zpXGbxtUicv6rIZuKiTsKRno7Z%2FZhnlnAKQ6dTOgUdY%3D)
Figure 10-38: Certificate Details box.
The certificate information displayed includes the following:
Name: The name of the certificate.
Type: The type of certificate.
Subject: The string containing the subject of the certificate.
Issuer: The string containing the issuing party.
Signature type: The type of cryptographic signature of the certificate.
Note: The signature type Sha1WithRsaEncryption is being deprecated and should be avoided, if possible.
Start Date: The date that the certificate becomes effective.
End Date: The date that the certificate is no longer in effect.
Common Name: The IP address or fully qualified domain name (FQDN) of the web server that receives the SSL certificate.
Country Code: The two-letter ISO abbreviation for the country (for example, US for the United States) where your organization's office is legally registered.
State/Province: The full name of the state or province where your organization's office is located.
Locality Name: The full name of the city where your organization's office is located.
Organization: The name under which your organization is legally registered.
Click Close to close this box.
Copying SSL certificate
You might need to copy an SSL certificate as part of a manual process for recreating or updating an SSL certificate.
To copy an SSL certificate, follow these steps:
Click Console Settings, then click SSL Certificates in the left-hand column. The Console SSL Certificates page displays a list of SSL certificates for the Nasuni Management Console.
.png?sv=2026-02-06&spr=https&st=2026-06-23T02%3A53%3A59Z&se=2026-06-23T04%3A45%3A59Z&sr=c&sp=r&sig=zpXGbxtUicv6rIZuKiTsKRno7Z%2FZhnlnAKQ6dTOgUdY%3D)
Figure 10-39: Console SSL Certificates page.
To copy an existing SSL certificate, select Copy from the Actions drop-down list next to the name of the certificate in the list. The Copy Certificate dialog box appears.
.png?sv=2026-02-06&spr=https&st=2026-06-23T02%3A53%3A59Z&se=2026-06-23T04%3A45%3A59Z&sr=c&sp=r&sig=zpXGbxtUicv6rIZuKiTsKRno7Z%2FZhnlnAKQ6dTOgUdY%3D)
Figure 10-40: Copy Certificate dialog box.
In the New Management Name text box, enter a new name for the certificate.
To create a self-signed certificate instead of a certificate request, select Self-Sign Certificate.
Click Copy Certificate. A duplicate certificate is created. If you selected Self-Sign Certificate, a duplicate self-signed certificate is created.
Alternatively, to exit this screen without copying any certificates, click the Close button.
Generating SSL certificates or a self-signed certificate to the NMC
Note: This procedure does not generate a Subject Alternative Name (SAN). If a SAN is required, you can generate the Certificate Request on another system that does generate a SAN.
Important: For version 10.0 or later, signed SSL certificates require a certificate that is generated with the SHA-256 cryptographic hash function or better and an encryption key that is at least 2048 bits.
To generate a new SSL certificate or a self-signed certificate to the Nasuni Management Console, follow these steps:
On the Console SSL Certificates page, click Generate Certificate. The Create Certificate Signing Request page appears.
.png?sv=2026-02-06&spr=https&st=2026-06-23T02%3A53%3A59Z&se=2026-06-23T04%3A45%3A59Z&sr=c&sp=r&sig=zpXGbxtUicv6rIZuKiTsKRno7Z%2FZhnlnAKQ6dTOgUdY%3D)
Figure 10-41: Create Certificate Signing Request page.
In the Management Name text box, enter the name that you use to refer to this certificate.
In the Common Name text box, enter the fully qualified domain name or IP address that you use to access the Nasuni Management Console user interface. The optional but most common choice is the Nasuni Management Console's fully-qualified domain name.
Note: This MUST match the way users connect to the Nasuni Management Console.
In the Country Code text box, enter the two-letter country code, such as
US.In the State/Province Name text box, enter the name of the state or province, such as
Massachusetts.In the Locality text box, enter the name of the city or town, such as
Boston.In the Organization Name text box, optionally enter the name of your organization, such as
Nasuni.To create a self-signed certificate instead of a certificate request, select Self-Sign Certificate.
Click Save Request. A certificate request is created.
If you selected Self-Sign Certificate, a self-signed certificate is created.
Alternatively, to exit this screen without adding any certificates, click the Close button.
Note: This procedure does not generate a Subject Alternative Name (SAN). If a SAN is required, you can generate the Certificate Request on another system that does generate a SAN.
If you did not select Self-Sign Certificate, download the certificate request .csr file, on the SSL Certificates page, by clicking Save Request File next to the name of the certificate request in the list.
Submit this certificate request to a Certificate Authority (CA) for signing.
When you receive the signed certificate file, click Add Signed Certificate next to the name of the certificate request in the list. The Add Certificate Files dialog box appears.
.png?sv=2026-02-06&spr=https&st=2026-06-23T02%3A53%3A59Z&se=2026-06-23T04%3A45%3A59Z&sr=c&sp=r&sig=zpXGbxtUicv6rIZuKiTsKRno7Z%2FZhnlnAKQ6dTOgUdY%3D)
Figure 10-42: Add Certificate Files dialog box.
Click Choose File next to Certificate File, then navigate to the PEM-encoded X.509 or PKCS#7 certificate file.
Caution: The maximum length of a file name is 255 bytes.
In addition, the length of a path, including the file name, must be less than 4,000 bytes.
Since the UTF-8 representation of characters from some character sets can occupy several bytes, the maximum number of characters that a file path or a file name might contain can vary.
If a particular client has other limits, the smaller of the two limits applies.
Optionally, click Choose File next to Certificate Chain File, then navigate to the certificate chain file.
Caution: The maximum length of a file name is 255 bytes.
In addition, the length of a path, including the file name, must be less than 4,000 bytes.
Since the UTF-8 representation of characters from some character sets can occupy several bytes, the maximum number of characters that a file path or a file name might contain can vary.
If a particular client has other limits, the smaller of the two limits applies.
Click Save Certificate. The certificate is installed and becomes available in the list of certificates on the Console SSL Certificates page.
Alternatively, to exit this screen without adding a certificate, click the Close button.
Uploading SSL Certificates
To upload an existing SSL certificate:
Click Console Settings, then click SSL Certificates in the left-hand column. The Console SSL Certificates page displays a list of SSL certificates for the Nasuni Management Console.
.png?sv=2026-02-06&spr=https&st=2026-06-23T02%3A53%3A59Z&se=2026-06-23T04%3A45%3A59Z&sr=c&sp=r&sig=zpXGbxtUicv6rIZuKiTsKRno7Z%2FZhnlnAKQ6dTOgUdY%3D)
Figure 10-43: Console SSL Certificates page.
Click Upload Certificate. The Add Certificate Files page appears.
.png?sv=2026-02-06&spr=https&st=2026-06-23T02%3A53%3A59Z&se=2026-06-23T04%3A45%3A59Z&sr=c&sp=r&sig=zpXGbxtUicv6rIZuKiTsKRno7Z%2FZhnlnAKQ6dTOgUdY%3D)
Figure 10-44: Add Certificate Files page.
In the Certificate Name text box, enter the name that you use to refer to this SSL certificate.
To add an SSL key file or SSL key and certificate bundle file, click Choose File next to Key File, then navigate to the SSL key file or SSL key and certificate bundle file.
Caution: The maximum length of a file name is 255 bytes.
In addition, the length of a path, including the file name, must be less than 4,000 bytes.
Since the UTF-8 representation of characters from some character sets can occupy several bytes, the maximum number of characters that a file path or a file name might contain can vary.
If a particular client has other limits, the smaller of the two limits applies.
If an SSL certificate was not part of the bundle file in step 4, to add an SSL certificate, click
Choose File next to Certificate File, then navigate to the SSL certificate file.
Caution: The maximum length of a file name is 255 bytes.
In addition, the length of a path, including the file name, must be less than 4,000 bytes.
Since the UTF-8 representation of characters from some character sets can occupy several bytes, the maximum number of characters that a file path or a file name might contain can vary.
If a particular client has other limits, the smaller of the two limits applies.
If an SSL certificate chain was not part of the bundle file in step 4, to add an SSL certificate chain file, click Choose File next to Certificate Chain File, then navigate to the SSL certificate chain file.
Caution: The maximum length of a file name is 255 bytes.
In addition, the length of a path, including the file name, must be less than 4,000 bytes.
Since the UTF-8 representation of characters from some character sets can occupy several bytes, the maximum number of characters that a file path or a file name might contain can vary.
If a particular client has other limits, the smaller of the two limits applies.
Enter the Password, if required.
Click Save Certificate. The certificate is installed and becomes available in the list of certificates on the Console SSL Certificates page.
Replacing SSL Certificates or SSL Certificate Chains
You can replace an existing SSL certificate or SSL certificate chain. This might occur if you need an SSL certificate chain file, or if you are replacing one SSL certificate with another one.
To replace an existing SSL certificate:
Click Console Settings, then click SSL Certificates in the left-hand column. The Console SSL Certificates page displays a list of SSL certificates for the Nasuni Management Console.
.png?sv=2026-02-06&spr=https&st=2026-06-23T02%3A53%3A59Z&se=2026-06-23T04%3A45%3A59Z&sr=c&sp=r&sig=zpXGbxtUicv6rIZuKiTsKRno7Z%2FZhnlnAKQ6dTOgUdY%3D)
Figure 10-45: Console SSL Certificates page.
For the SSL certificate that you want to replace, select Replace Signed Certificate/Chain from the Actions drop-down list next to the name of the certificate in the list. The Add Certificate Files dialog box appears.
.png?sv=2026-02-06&spr=https&st=2026-06-23T02%3A53%3A59Z&se=2026-06-23T04%3A45%3A59Z&sr=c&sp=r&sig=zpXGbxtUicv6rIZuKiTsKRno7Z%2FZhnlnAKQ6dTOgUdY%3D)
Figure 10-46: Add Certificate Files dialog box.
Click Choose File next to Certificate File, then navigate to the PEM- and DER-encoded X.509 file or PKCS#7 certificate file.
Caution: The maximum length of a file name is 255 bytes.
In addition, the length of a path, including the file name, must be less than 4,000 bytes.
Since the UTF-8 representation of characters from some character sets can occupy several bytes, the maximum number of characters that a file path or a file name
might contain can vary.
If a particular client has other limits, the smaller of the two limits applies.
Optionally, click Choose File next to Certificate Chain File, then navigate to the SSL certificate chain file.
Caution: The maximum length of a file name is 255 bytes.
In addition, the length of a path, including the file name, must be less than 4,000 bytes.
Since the UTF-8 representation of characters from some character sets can occupy several bytes, the maximum number of characters that a file path or a file name might contain can vary.
If a particular client has other limits, the smaller of the two limits applies.
Click Save Certificate. The existing certificate is replaced and appears in the list of certificates on the Console SSL Certificates page.
Enabling SSL Certificates
You can select which of several SSL certificates to enable as the SSL certificate for the NMC. To enable a new SSL certificate:
Click Console Settings, then click SSL Certificates in the left-hand column. The Console SSL Certificates page displays a list of SSL certificates for the Nasuni Management Console.
.png?sv=2026-02-06&spr=https&st=2026-06-23T02%3A53%3A59Z&se=2026-06-23T04%3A45%3A59Z&sr=c&sp=r&sig=zpXGbxtUicv6rIZuKiTsKRno7Z%2FZhnlnAKQ6dTOgUdY%3D)
Figure 10-47: Console SSL Certificates page.
For the SSL certificate that you want to select, click Enable Certificate. The Enable SSL Certificate for NMC dialog box appears.
.png?sv=2026-02-06&spr=https&st=2026-06-23T02%3A53%3A59Z&se=2026-06-23T04%3A45%3A59Z&sr=c&sp=r&sig=zpXGbxtUicv6rIZuKiTsKRno7Z%2FZhnlnAKQ6dTOgUdY%3D)
Figure 10-48: Enable SSL Certificate for NMC dialog box.
Enter a Username (case-sensitive) and Password (case-sensitive) that has permission to perform this operation, then click Enable Certificate. Your changes are saved.
Downloading SSL Certificate Request Files
To download an SSL certificate request file:
Click Console Settings, then click SSL Certificates in the left-hand column. The Console SSL Certificates page displays a list of SSL certificates for the Nasuni Management Console.
.png?sv=2026-02-06&spr=https&st=2026-06-23T02%3A53%3A59Z&se=2026-06-23T04%3A45%3A59Z&sr=c&sp=r&sig=zpXGbxtUicv6rIZuKiTsKRno7Z%2FZhnlnAKQ6dTOgUdY%3D)
Figure 10-49: Console SSL Certificates page.
From the Actions drop-down list next to the name of the certificate or certificate request that you want to save, select Download. The SSL certificate request file is downloaded and saved, in the way your browser handles downloads.
Deleting SSL Certificates or Certificate Requests
To delete an SSL certificate or certificate request, follow these steps:
Click Console Settings, then click SSL Certificates in the left-hand column. The Console SSL Certificates page displays a list of SSL certificates for the Nasuni Management Console.
.png?sv=2026-02-06&spr=https&st=2026-06-23T02%3A53%3A59Z&se=2026-06-23T04%3A45%3A59Z&sr=c&sp=r&sig=zpXGbxtUicv6rIZuKiTsKRno7Z%2FZhnlnAKQ6dTOgUdY%3D)
Figure 10-50: Console SSL Certificates page.
For the SSL certificate that you want to delete, select Delete from the Actions drop-down list next to the name of the certificate in the list. The About to Delete Certificate dialog box appears.
Click Delete Certificate. The certificate or certificate request is deleted.
Alternatively, to exit this screen without deleting a certificate, click the Cancel button.
Saving SSL Certificates
To download and save an SSL certificate:
Click Console Settings, then click SSL Certificates in the left-hand column. The Console SSL Certificates page displays a list of SSL certificates for the Nasuni Management Console.
.png?sv=2026-02-06&spr=https&st=2026-06-23T02%3A53%3A59Z&se=2026-06-23T04%3A45%3A59Z&sr=c&sp=r&sig=zpXGbxtUicv6rIZuKiTsKRno7Z%2FZhnlnAKQ6dTOgUdY%3D)
Figure 10-51: Console SSL Certificates page.
From the Actions drop-down list next to the name of the certificate or certificate request that you want to save, select “Save certificate as zip”. The certificate is downloaded and saved as a zip file, in the way your browser handles downloads.
Single Sign-On (SSO)
Single Sign-On (SSO) is an authentication scheme that allows a user to log in with a single ID and password to any of several related, yet independent, software systems.
Single Sign-On providers also support Multi-Factor Authentication (MFA) for login, requiring users to use MFA for login when configured.
Tip: A complete description of Microsoft Entra ID for NMC SSO is in NMC Single Sign-On (SSO).
Important: To manage settings for NMC SSO, the user must have the “Manage Single Sign-On Settings” permission.
Important: Logging out of the NMC does not log the user out of Microsoft Entra ID. The user must log out of Microsoft Entra ID separately.
NMC SSO features
Customers can log in to the NMC using accounts from their Identity Provider (IdP). NMC SSO was introduced in the 22.2 NMC release, and initially supports the Microsoft Entra ID IdP. Additional SSO IdP support is planned for future releases.
NMC SSO uses OAuth 2.0-based SSO for Authorization and OpenID Connect for authentication to meet requirements for security and MFA.
Edge Appliances work in conjunction with an SSO-enabled NMC to ensure that critical administrative actions are reserved for SSO users:
SSO is only supported for NMC login. The NMC API, Edge Appliance Admin UI, Web Access, and Access Points (SMB, NFS, FTP) do not support SSO.
Important: If SSO is configured on the NMC, you can only log in to the NMC using SSO. Native and Domain accounts are not allowed to login to the NMC.
To prevent SSO bypass for administrative actions normally reserved for the NMC, the Edge Appliance Administrative UI no longer presents an option to leave NMC management when NMC SSO is enabled. If leaving NMC management is required, use the Edge Appliance Service Console command:
nmc_leaveNote: A backend option can be configured by Nasuni that allows the Edge Appliance Administrative UI to be used to leave NMC management even when managed by an SSO-enabled NMC. If you require this option, contact Nasuni Customer Support.
Tip: Details of Microsoft Entra ID for NMC SSO are in NMC Single Sign-On (SSO).
Centrally managing groups for Edge Appliance administration
Tip: Details of Microsoft Entra ID for NMC SSO are in NMC Single Sign-On (SSO).
SSO-enabled NMCs retain the ability to be joined to Active Directory so that the NMC can be used for the NMC Centralized Group Administration feature. When both the NMC and Edge Appliances are joined to the same primary AD domain, Centralized Group Administration automatically distributes the Native and Domain Group configuration to Edge Appliances, allowing these accounts to access the Edge Appliance Management UI.
Edge Appliances joined to a primary domain that differs from the NMC’s domain, or Edge Appliances not configured for a domain, do not participate in Centralized Group Administration, requiring administrators to log in using locally configured accounts.
Configuring NMC SSO
This section describes the procedure for configuring NMC SSO. NMC SSO uses Microsoft Entra ID, which is Microsoft’s cloud-based identity and access management service. Some of these procedures involve Microsoft Entra ID, and some involve the NMC.
Important: The complete procedure for configuring Microsoft Entra ID for NMC SSO is in NMC Single Sign-On (SSO).
Microsoft Entra ID Procedure
This section outlines the steps needed to set up an Azure workspace for use with NMC SSO.
Important: The complete procedure for configuring Microsoft Entra ID for NMC SSO is in NMC Single Sign-On (SSO).
Note: Actions performed on Azure can have some latency, so allow those actions time to complete before proceeding to each new step.
An Azure Tenant must be set up. An Azure Tenant is a service that users can create in Microsoft’s cloud in order to control and manipulate their cloud-based services, such as configure OAuth/SAML and manage AD.
The Azure Tenant must be able to generate new Enterprise Applications.
Microsoft Entra Connect must be set up on a specified Tenant if you plan to use users and groups managed by Windows AD for Microsoft Entra ID authentication. This is a mechanism to sync Windows Active Directory users and groups to Microsoft Entra ID. For more information on Microsoft Entra Connect, see Microsoft Entra Connect sync: Understand and customize synchronization.
Configuring NMC SSO on NMC
This section details the steps needed on the NMC. For details, see NMC Single Sign-On (SSO).
At this point, you should have configured the following:
Azure Tenant is configured and set up.
Azure Application registration is configured and set up.
There is at least one user that is a member of the group assigned to the application.
The next steps are required for the NMC and Edge Appliance to work with Azure to enable SSO authentication:
On the NMC, navigate to the “Console Single Sign-On Configuration” page.
.png?sv=2026-02-06&spr=https&st=2026-06-23T02%3A53%3A59Z&se=2026-06-23T04%3A45%3A59Z&sr=c&sp=r&sig=zpXGbxtUicv6rIZuKiTsKRno7Z%2FZhnlnAKQ6dTOgUdY%3D)
Figure 10-52: “Console Single Sign-On Configuration” page.
Enter the information as follows:
Client ID
Acquired from Azure. Navigate to “App registrations” → Overview.
.png?sv=2026-02-06&spr=https&st=2026-06-23T02%3A53%3A59Z&se=2026-06-23T04%3A45%3A59Z&sr=c&sp=r&sig=zpXGbxtUicv6rIZuKiTsKRno7Z%2FZhnlnAKQ6dTOgUdY%3D)
Figure 10-53: “App registrations” → Overview.
Client Secret
Acquired from Azure during creation of secret.
Go to “Certificates & secrets”.
Click “Client secrets”.
.png?sv=2026-02-06&spr=https&st=2026-06-23T02%3A53%3A59Z&se=2026-06-23T04%3A45%3A59Z&sr=c&sp=r&sig=zpXGbxtUicv6rIZuKiTsKRno7Z%2FZhnlnAKQ6dTOgUdY%3D)
Figure 10-54: Client secrets.
Click “New client secret”. Enter a description and configure the expiration.
Set a reminder for the expiration date, since you must generate a new client secret and provide it to the NMC before expiration.
You MUST copy and save the secret value for this application now. Azure only allows access to the secret value upon creation.
Resource URL
Unless Microsoft makes a major change, use the default https://graph.microsoft.com.
Tenant ID
Acquired from Azure. Navigate to “App registrations” → Overview.
.png?sv=2026-02-06&spr=https&st=2026-06-23T02%3A53%3A59Z&se=2026-06-23T04%3A45%3A59Z&sr=c&sp=r&sig=zpXGbxtUicv6rIZuKiTsKRno7Z%2FZhnlnAKQ6dTOgUdY%3D)
Figure 10-55: Tenant ID.
Azure Group name
Name of a Group that has been assigned to the Enterprise Application in Azure.
.png?sv=2026-02-06&spr=https&st=2026-06-23T02%3A53%3A59Z&se=2026-06-23T04%3A45%3A59Z&sr=c&sp=r&sig=zpXGbxtUicv6rIZuKiTsKRno7Z%2FZhnlnAKQ6dTOgUdY%3D)
Figure 10-56: Group name.
Click “Enable Single Sign-On Configuration”. The “Single Sign-On Enabled” message should appear.
.png?sv=2026-02-06&spr=https&st=2026-06-23T02%3A53%3A59Z&se=2026-06-23T04%3A45%3A59Z&sr=c&sp=r&sig=zpXGbxtUicv6rIZuKiTsKRno7Z%2FZhnlnAKQ6dTOgUdY%3D)
Figure 10-57: Single Sign-On Enabled” message.
A new “SSO Administrator Group” is created as the initial administrator group for SSO. Considerations:
At this point, the user who configured SSO is still logged in using a native or domain account. This Administrative User, and any other users who are currently logged in, continue to have active and valid sessions.
After any of those users logs out, they are required to use SSO login to log back in.
Log out and log in as an Azure user that is a member of the Azure group that you provided to the NMC.
You can create or edit NMC groups to specify the NMC SSO Group Association for the Azure Group you chose. This requires the group to be assigned to the application first.
Important: Logging out of the NMC does not log the user out of Microsoft Entra ID. The user must log out of Microsoft Entra ID separately.
Disabling NMC SSO
NMC SSO can be disabled, making it possible to log in to the NMC using a native or domain account. Disabling SSO could be required if the SSO identity provider is offline or unreachable, or if the client secret for SSO has expired and needs to be updated. Disabling SSO does not delete established SSO group associations.
Tip: Details of Microsoft Entra ID for NMC SSO are in NMC Single Sign-On (SSO).
There are two methods for an administrator to disable NMC SSO:
The NMC Service Console has a command to disable SSO: delete_sso_configuration
Performing a Recovery operation on the NMC disables SSO on the newly deployed NMC. After recovery, SSO is not automatically re-enabled. Following recovery, a notification is raised that reminds the administrator to re-configure SSO.
For more information on performing a recovery operation on the NMC, see NMC Recovery Guide.
Updating the Client Secret
NMC SSO login depends upon a valid client secret that has not expired. Azure’s default validity for secrets is 6 months, and the maximum allowed is 24 months.
To ensure that the NMC always has a valid client secret, Administrators should track client secret expiration as part of their IT operations, using the same practice that they use for tracking SSL certificate expiration.
Tip: Details of Microsoft Entra ID for NMC SSO are in NMC Single Sign-On (SSO).
Updating the Client Secret before expiration
If the client secret has not yet expired, follow these steps to update the client secret:
Create a new client secret in Azure and note the new secret value. Creating a new client secret does not invalidate existing secrets.
Use the NMC Single Sign-On page to input the new Client Secret and click Update Single Sign-On Configuration to complete the update.
New logins to the NMC use the new client secret to authenticate.
Updating the Client Secret after expiration
When the client secret expires, users can no longer authenticate to the NMC. If the client secret has expired, follow these steps to update the client secret:
Use the steps in “Disabling NMC SSO” to restore login for native and Active Directory users, so that you can log in to the NMC.
Create a new client secret for the NMC’s App registration in Azure, and make a note of the new secret value.
Use the NMC Single Sign-On page to input the required values for SSO to re-enable SSO. Existing NMC Groups and SSO Group Associations are preserved.
Updating the Client Secret in the NMC
To update the Client Secret used by the NMC, follow these steps:
On the NMC, navigate to the “Console Single Sign-On Configuration” page.
.png?sv=2026-02-06&spr=https&st=2026-06-23T02%3A53%3A59Z&se=2026-06-23T04%3A45%3A59Z&sr=c&sp=r&sig=zpXGbxtUicv6rIZuKiTsKRno7Z%2FZhnlnAKQ6dTOgUdY%3D)
Figure 10-58: “Console Single Sign-On Configuration” page.
The Client Secret field is available. Other fields are not available. Enter the new Client Secret as follows:
Client Secret acquired from the Azure App Registration.
Go to “Certificates & secrets”.
Click “Client secrets”.
.png?sv=2026-02-06&spr=https&st=2026-06-23T02%3A53%3A59Z&se=2026-06-23T04%3A45%3A59Z&sr=c&sp=r&sig=zpXGbxtUicv6rIZuKiTsKRno7Z%2FZhnlnAKQ6dTOgUdY%3D)
Figure 10-59: Client secrets.
Click “New client secret”. Enter a description and configure the expiration.
Set a reminder for the expiration date, since you must generate a new client secret and provide it to the NMC before expiration.
You MUST copy and save the secret value for this application now. Azure only allows access to the secret value upon creation.
Click “Update Single Sign-On Configuration”. The “Single Sign-On Enabled” message should appear.
.png?sv=2026-02-06&spr=https&st=2026-06-23T02%3A53%3A59Z&se=2026-06-23T04%3A45%3A59Z&sr=c&sp=r&sig=zpXGbxtUicv6rIZuKiTsKRno7Z%2FZhnlnAKQ6dTOgUdY%3D)
Figure 10-60: Single Sign-On Enabled” message.
Console Users and Groups
The Nasuni Edge Appliance and the Nasuni Management Console provide role-based access control. You can define specific access permissions for groups and users to perform actions within the Nasuni Edge Appliance and the Nasuni Management Console user interfaces. You can define up to 500 users and 500 groups.
On the Nasuni Management Console, there is a default group, called NMC Administrators. NMC Administrators access grants full access to all aspects of the Nasuni Management Console (super user). The NMC Administrators group cannot be deleted.
Viewing permission groups and users
To view permission groups and users, follow these steps:
Click Console Settings, then select Users/Groups in the left-hand column. The Console Users and Groups Overview page appears.
.png?sv=2026-02-06&spr=https&st=2026-06-23T02%3A53%3A59Z&se=2026-06-23T04%3A45%3A59Z&sr=c&sp=r&sig=zpXGbxtUicv6rIZuKiTsKRno7Z%2FZhnlnAKQ6dTOgUdY%3D)
Figure 10-61: Console Users and Groups Overview page.
The information displayed includes the following:
Total Users: The total number of users, including Native Users and Domain Users. To view a list of users, click the displayed value or click Manage Users.
Native Users: The number of native users, namely, users explicitly defined and managed using the Nasuni Management Console. To view a list of users, click the displayed value or click Manage Users. To add a user, see “Adding Native Users”.
Domain Users: The number of domain users, namely, users automatically created because they are members of an Active Directory or LDAP Directory Services domain group associated with a permission group. To view a list of users, click the displayed value or click Manage Users. To add a permission group with an associated Active Directory or LDAP Directory Services domain group, see “Adding Permission Groups”.
Users with Storage Access: The number of native users who are members of permission groups that have Storage Access enabled. To view a list of users, click the displayed value or click Manage Users. To add a permission group that has Storage Access enabled, see “Adding Permission Groups”.
Tip: Users with Storage Access enabled do not require connectivity to the domain. If connectivity to the domain is interrupted, users with Storage Access enabled can still access data.
SSO Users: The number of users that have logged in using NMC SSO.
Tip: To configure NMC Single Sign-On (SSO), see “Single Sign-On (SSO)”. For complete details about NMC Single Sign-On (SSO), see NMC Single Sign-On (SSO).
Total Groups: The total number of permission groups, including Groups with Domain Associations, Groups with Storage Access, and permission groups that do not have Group Associations or Storage Access. To view a list of permission groups, click the displayed value or click Manage Groups.
Groups with Domain Associations: The number of permission groups that have Active Directory or LDAP Directory Services domain groups associated with them. To view a list of permission groups, click the displayed value or click Manage Groups.
Groups with Storage Access: The number of permission groups that have Storage Access enabled. To view a list of permission groups, click the displayed value or click Manage Groups.
Tip: Users with Storage Access enabled do not require connectivity to the domain. If connectivity to the domain is interrupted, users with Storage Access enabled can still access data.
Groups with SSO Associations: The number of permission groups that have NMC SSO enabled.
Tip: To configure NMC Single Sign-On (SSO), see “Single Sign-On (SSO)”. For complete details about NMC Single Sign-On (SSO), see NMC Single Sign-On (SSO).
Groups without Members: The number of permission groups that do not have any members. To view a list of permission groups, click the displayed value or click Manage Groups.
In the Filer Status area, the following properties appear for each Nasuni Edge Appliance:
Description: The name of each Nasuni Edge Appliance.
Users with Access: The users that have access to that Nasuni Edge Appliance.
Groups with Access: The permission groups that have access to that Nasuni Edge Appliance.
Viewing Users
To view users, follow these steps:
On the Console Users and Groups Overview page, click Manage Users. The Console Users page appears.
.png?sv=2026-02-06&spr=https&st=2026-06-23T02%3A53%3A59Z&se=2026-06-23T04%3A45%3A59Z&sr=c&sp=r&sig=zpXGbxtUicv6rIZuKiTsKRno7Z%2FZhnlnAKQ6dTOgUdY%3D)
Figure 10-62: Console Users page.
The following properties appear for each user:
Username: The username of the Nasuni Management Console user. You can change this by clicking Edit
.png?sv=2026-02-06&spr=https&st=2026-06-23T02%3A53%3A59Z&se=2026-06-23T04%3A45%3A59Z&sr=c&sp=r&sig=zpXGbxtUicv6rIZuKiTsKRno7Z%2FZhnlnAKQ6dTOgUdY%3D) .
.Type: The type of user: either Native or Domain. Native users are explicitly defined and managed using the Nasuni Management Console. Domain users are automatically created because they are members of an Active Directory or LDAP Directory Services domain group associated with a permission group.
Email: The email address of the Nasuni Management Console user. Might be blank if no email address is entered. You can change this by clicking Edit
.png?sv=2026-02-06&spr=https&st=2026-06-23T02%3A53%3A59Z&se=2026-06-23T04%3A45%3A59Z&sr=c&sp=r&sig=zpXGbxtUicv6rIZuKiTsKRno7Z%2FZhnlnAKQ6dTOgUdY%3D) .
.Groups: Permission groups to which the Nasuni Management Console user belongs. You can change this by clicking Edit
.png?sv=2026-02-06&spr=https&st=2026-06-23T02%3A53%3A59Z&se=2026-06-23T04%3A45%3A59Z&sr=c&sp=r&sig=zpXGbxtUicv6rIZuKiTsKRno7Z%2FZhnlnAKQ6dTOgUdY%3D) .
.Storage Access (For Native Users only): An indication of whether Storage Access is enabled for any of the groups that the user belongs to: Yes (if Storage Access is enabled) or No (if Storage Access is not enabled, or if user is a Domain User).
Tip: Users with Storage Access enabled do not require connectivity to the domain. If connectivity to the domain is interrupted, users with Storage Access enabled can still access data.
To add a user, click Add Native User.
To link a domain user, click Add Domain User.
Adding Native Users
You can add native users, which you then assign to permission groups. For each user, you can specify to which permission groups that user belongs.
To add a native user, follow these steps:
On the Console Users and Groups Overview page, click Manage Users. The Console Users page appears.
.png?sv=2026-02-06&spr=https&st=2026-06-23T02%3A53%3A59Z&se=2026-06-23T04%3A45%3A59Z&sr=c&sp=r&sig=zpXGbxtUicv6rIZuKiTsKRno7Z%2FZhnlnAKQ6dTOgUdY%3D)
Figure 10-63: Console Users page.
On the Console Users page, click Add Native User. The Add Native User dialog box appears.
.png?sv=2026-02-06&spr=https&st=2026-06-23T02%3A53%3A59Z&se=2026-06-23T04%3A45%3A59Z&sr=c&sp=r&sig=zpXGbxtUicv6rIZuKiTsKRno7Z%2FZhnlnAKQ6dTOgUdY%3D)
Figure 10-64: Add Native User dialog box.
Tip: Except for “NMC Administrators”, the Groups in this list are created on the Console Groups page.
In the Username text box, enter the name for this user. The Username can have up to 30 characters, including letters, digits, and the following symbols:
@ . + - _ (at symbol, period, plus sign, minus sign, underline)
Important: The name “root” cannot be used when creating a Native User Username.
Important: It is not supported for users in the Active Directory Protected Users security group to log in to the NMC.
In the Email text box, enter the email address for this user.
In the Password text box, enter the password for this user.
Important: You cannot use Active Directory passwords longer than 127 characters to log in to the NMC.
Enter the same password in the Password confirmation text box. An indicator of password strength appears. Although password strength is not enforced, you should use strong passwords.
In the Groups list, for each of the groups, select or clear the check box for granting membership to the group.
To accept your selections, click Add User. The user is added with membership in the selected groups.
Alternatively, to exit the dialog box without adding a user, click Close.
Editing Users and Changing User Passwords
You can edit the features of existing users, including editing the password of existing users.
To edit a user, follow the steps in “Adding Native Users”, except click Edit .png?sv=2026-02-06&spr=https&st=2026-06-23T02%3A53%3A59Z&se=2026-06-23T04%3A45%3A59Z&sr=c&sp=r&sig=zpXGbxtUicv6rIZuKiTsKRno7Z%2FZhnlnAKQ6dTOgUdY%3D) instead of
instead of
Add User. The dialog box is named Edit User.
To change a user password, in the New Password text box, enter a new password for this user.
Important: You cannot use Active Directory passwords longer than 127 characters to log in to the NMC.
Enter the same password in the Password confirmation text box. An indicator of password strength appears. Although password strength is not enforced, you should use strong passwords.
Click Save User at the end. The user and his or her groups are changed.
Linking Domain Users
You can add a single Domain User, which links the Nasuni Management Console to the account credentials for an Active Directory or LDAP Directory Services domain. For each user, you can specify to which permission groups that user belongs.
Note: Adding a domain group allows all Active Directory or LDAP Directory Services users in that group to access the user interface. You do not need to explicitly add those users. You only need to add Active Directory or LDAP Directory Services users individually if you do not want to grant access to the entire group.
Tip: If you plan to link many Domain Users, set up a Group Association with a Domain Group in order to automatically create Domain Users upon login. See step 10 of “Adding Permission Groups”.
Important: In order to link an Active Directory domain group to a permission group, the “Group type” of the Active Directory domain group must be “Security”. If the “Group type” of the Active Directory domain group is “Distribution”, users within the Active Directory domain group are not able to log in.
To link a Domain User, follow these steps:
On the Console Users and Groups Overview page, click Manage Users. The Console Users page appears.
.png?sv=2026-02-06&spr=https&st=2026-06-23T02%3A53%3A59Z&se=2026-06-23T04%3A45%3A59Z&sr=c&sp=r&sig=zpXGbxtUicv6rIZuKiTsKRno7Z%2FZhnlnAKQ6dTOgUdY%3D)
Figure 10-65: Console Users page.
On the Console Users page, click Add Domain User. The Add Domain User dialog box appears.
.png?sv=2026-02-06&spr=https&st=2026-06-23T02%3A53%3A59Z&se=2026-06-23T04%3A45%3A59Z&sr=c&sp=r&sig=zpXGbxtUicv6rIZuKiTsKRno7Z%2FZhnlnAKQ6dTOgUdY%3D)
Figure 10-66: Add Domain User dialog box.
Tip: Except for “NMC Administrators”, the Groups in this list are created on the Console Groups page.
To link a member of an Active Directory domain group, and allow that member to use their domain credentials to access volumes on Nasuni Edge Appliances, the exact NT-compatible name of a user in an Active Directory domain is necessary.
In the Username text box, enter any text from the member’s NT-compatible user name, and click Search. The Select User dialog box appears. Click Search. From the list of members that include the search text, select the member, then click Add Selected User.
Alternatively, enter the exact NT-compatible user name in the Username text box.
In the Groups list, for each of the groups, select or clear the check box for granting membership to the group.
To accept your selections, click Link User. The user is linked with membership in the selected groups.
Alternatively, to exit the dialog box without linking a user, click Close.
Deleting Users
Note: You cannot delete the last user in the Filer Administrators group.
Important: You must have at least one NMC SSO-associated group with NMC super user permission. Otherwise, you receive this warning.
.png?sv=2026-02-06&spr=https&st=2026-06-23T02%3A53%3A59Z&se=2026-06-23T04%3A45%3A59Z&sr=c&sp=r&sig=zpXGbxtUicv6rIZuKiTsKRno7Z%2FZhnlnAKQ6dTOgUdY%3D)
Figure 10-67: Warning about NMC SSO-associated group.
To delete a user, follow these steps:
On the Console Users and Groups Overview page, click Manage Users. The Console Users page appears.
.png?sv=2026-02-06&spr=https&st=2026-06-23T02%3A53%3A59Z&se=2026-06-23T04%3A45%3A59Z&sr=c&sp=r&sig=zpXGbxtUicv6rIZuKiTsKRno7Z%2FZhnlnAKQ6dTOgUdY%3D)
Figure 10-68: Console Users page.
For the user that you want to delete, click Delete
.png?sv=2026-02-06&spr=https&st=2026-06-23T02%3A53%3A59Z&se=2026-06-23T04%3A45%3A59Z&sr=c&sp=r&sig=zpXGbxtUicv6rIZuKiTsKRno7Z%2FZhnlnAKQ6dTOgUdY%3D) . The About to Delete User dialog box appears.
. The About to Delete User dialog box appears.Click Delete User. The user is deleted.
Alternatively, to exit the dialog box without deleting a user, click Cancel.
Note: If a user enables Safe Delete, and the user's account is removed, Safe Delete remains enabled.
Note: If a user clicks Delete Volume or Approve Delete for a volume that has Safe Delete enabled, and the user's account is removed, any pending deletions and any pending deletion approvals that they have made are canceled.
Viewing Permission Groups
You can view existing permission groups.
To view permission groups, follow these steps:
On the Console Users and Groups Overview page, click Manage Groups. The Console Groups page appears.
.png?sv=2026-02-06&spr=https&st=2026-06-23T02%3A53%3A59Z&se=2026-06-23T04%3A45%3A59Z&sr=c&sp=r&sig=zpXGbxtUicv6rIZuKiTsKRno7Z%2FZhnlnAKQ6dTOgUdY%3D)
Figure 10-69: Console Groups page.
The following properties appear for each permission group:
Group: The name of the permission group. You can change this by clicking Edit
.png?sv=2026-02-06&spr=https&st=2026-06-23T02%3A53%3A59Z&se=2026-06-23T04%3A45%3A59Z&sr=c&sp=r&sig=zpXGbxtUicv6rIZuKiTsKRno7Z%2FZhnlnAKQ6dTOgUdY%3D) .
.Users: The number of users in each permission group.
Permissions: The permissions that each permission group has. You can change this by clicking Edit
.png?sv=2026-02-06&spr=https&st=2026-06-23T02%3A53%3A59Z&se=2026-06-23T04%3A45%3A59Z&sr=c&sp=r&sig=zpXGbxtUicv6rIZuKiTsKRno7Z%2FZhnlnAKQ6dTOgUdY%3D) .
.Special: Either Domain Group Association, Storage Access Enabled, or blank. You can change this by clicking Edit
.png?sv=2026-02-06&spr=https&st=2026-06-23T02%3A53%3A59Z&se=2026-06-23T04%3A45%3A59Z&sr=c&sp=r&sig=zpXGbxtUicv6rIZuKiTsKRno7Z%2FZhnlnAKQ6dTOgUdY%3D) .
.
To add a group, click Add Group.
Adding Permission Groups
You can add permission groups to which you can assign users. For each group, you can specify exactly which actions the users in that group have permission to perform. You can associate Active Directory or LDAP Directory Services domain groups with a permission group. You can select which email alerts each group receives. To configure email, see “Email Settings”.
You can think of “groups” as “roles”. For example, suppose you were creating a “Help Desk” role, whose main duties are to restore data and to handle antivirus violations. Such a role (group) might require the following permissions:
Filer Permissions (including Manage Cyber Resilience Services, Perform File Restores/Access Versions, Receive Filer alert emails, Disconnect Users from Access Points, and Perform Restores to Any Location).
Email Subscriptions (including Conflict Alerts, Snapshot Restore Alerts, and Violation Alerts).
Filer Access (including Manage All Filers (super user)).
Note: Before you associate an Active Directory domain group with a permission group, you must join the Nasuni Management Console to the domain.
Important: Email alerts are not sent to the email addresses of Active Directory domain users. To ensure that email alerts are sent, use either of the following:
Add email addresses to the Extra Emails list.
Create local users and use their email addresses.
To add a permission group, follow these steps:
On the Console Users and Groups Overview page, click Manage Groups, then click Add Group. The Add Group dialog box appears.
.png?sv=2026-02-06&spr=https&st=2026-06-23T02%3A53%3A59Z&se=2026-06-23T04%3A45%3A59Z&sr=c&sp=r&sig=zpXGbxtUicv6rIZuKiTsKRno7Z%2FZhnlnAKQ6dTOgUdY%3D)
Figure 10-70: Add Group dialog box.
In the Group Name text box, enter the name for this group. The Group Name can have up to 30 characters, including letters, digits, and symbols.
.png?sv=2026-02-06&spr=https&st=2026-06-23T02%3A53%3A59Z&se=2026-06-23T04%3A45%3A59Z&sr=c&sp=r&sig=zpXGbxtUicv6rIZuKiTsKRno7Z%2FZhnlnAKQ6dTOgUdY%3D)
Figure 10-71: Group Name and Access Type.
From the Access Type drop-down list, select the type of access from the following:
Storage Access: To grant data access to users in this permission group.
Tip: Users with Storage Access enabled do not require connectivity to the domain. If connectivity to the domain is interrupted, users with Storage Access enabled can still access data.
Note: If you select Storage Access, you cannot enter a Group Association.
In the NMC Permissions list, select or clear the Nasuni Management Console permissions that you want to grant to the new group. For a full list of displayed NMC permissions and the operational permissions that they include, see Appendix I, Permissions.
Tip: If you want this group to receive alert emails, you MUST select “Receive alert emails”.
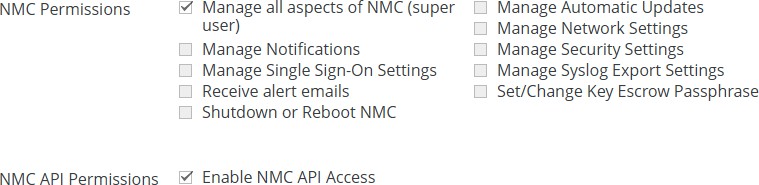
Figure 10-72: NMC Permissions and NMC API Permissions.
To gain access to the NMC API, you must select the "Enable NMC API Access" permission for this group.
Important: In addition to selecting the "Enable NMC API Access" permission for this group, NMC API users must also select the corresponding NMC permission for the action that they are performing with the NMC API. For example, setting folder quotas with the NMC API requires the "Manage Folder Quotas" NMC permission. Users must first authenticate to the NMC to obtain a token, and then can use that token to access subsequent API endpoints.
In the Filer Permissions list, select or clear the Nasuni Edge Appliance permissions that you want to grant to the new group. For a full list of displayed Nasuni Edge Appliance permissions and the operational permissions that they include, see Appendix I, Permissions.

Figure 10-73: Filer Permissions list.
Warning: Users with “Perform File Restores/Access Versions” permission have the ability to access all files on the file server.
Tip: If you want a group to NOT BE ABLE TO add volumes or delete volumes, select “Manage Volume Settings”.
If you want a group to BE ABLE TO add volumes or delete volumes, select "Manage all aspects of Volumes". This permission also includes all the other permissions of “Manage Volume Settings”.
For details of the many permissions that these permissions include, see Appendix I, Permissions.
Tip: Selecting the “Manage all aspects of the Filer (super user)” permission automatically selects all other permissions, even though those other permissions are not selected on the screen. To specify permissions at a more granular level, do not select the “Manage all aspects of the Filer (super user)” permission, and instead select combinations of individual permissions.
Tip: Users with “Disconnect Users from Access Points” permission have the ability to disconnect SMB (CIFS) or NFS users individually, which is sometimes necessary when there are locked files.
In the Email Subscriptions area, select which alerts to receive.
.png?sv=2026-02-06&spr=https&st=2026-06-23T02%3A53%3A59Z&se=2026-06-23T04%3A45%3A59Z&sr=c&sp=r&sig=zpXGbxtUicv6rIZuKiTsKRno7Z%2FZhnlnAKQ6dTOgUdY%3D)
Figure 10-74: Email Subscriptions area.
Tip: If you want this group to receive alert emails, you MUST select “Receive alert emails” in step 4 above.
To receive alerts about all available Nasuni Edge Appliance conditions to the configured email address, select the Receive All Alerts check box.
If you do not select the Receive All Alerts check box, but you want to receive alerts about specific Nasuni Edge Appliance conditions, in the Email Subscriptions area, select the specific alerts about Nasuni Edge Appliance conditions that you want sent to the configured email account.
The choices include the following:
Appliance Alerts: Alerts that occur on the appliance.
Conflict Alerts: Notices that merge conflicts have occurred during a sync.
General Alerts: Alerts not in the other categories.
Safe Delete Alerts: Alerts related to Safe Delete events. For more information, see “Safe Delete of volumes”.
Software Updates: Notices that software updates are available.
Account Alerts: Alerts related to Nasuni.com account license issues, such as expiration and capacity limits.
Capacity Alerts: Alerts related to capacity, such as volume quotas, new quotas, and account limits.
Note: If the licensed capacity is exceeded, you can still store more data temporarily. If your total stored data nears or exceeds your licensed capacity, you receive warnings to increase your licensed capacity.
Tip: To receive quota reports, you must enable Capacity Alerts.
Hardware Alerts: Alerts related to hardware events.
Snapshot Restore Alerts: When you restore data from a snapshot, this alert notifies you when the restore is complete.
Violation Alerts: Alerts about antivirus violations (infections) and ransomware detection violations. See “Cyber Resilience Page”.
Tip: To receive notifications of violations, you must have the “Manage all aspects of the Filer (super user)” or “Manage Notifications” permissions, and the appropriate “Filer Access” permissions.
In the Extra Emails text box, enter one or more destination email addresses for sending alerts to, separated by commas.
Important: Email alerts are not sent to the email addresses of Active Directory domain users. To ensure that email alerts are sent, use either of the following:
Add email addresses to the Extra Emails list.
Create local users and use their email addresses.
In the Filer Access list, select or clear the Nasuni Edge Appliances to which you want to grant access by the new group.
.png?sv=2026-02-06&spr=https&st=2026-06-23T02%3A53%3A59Z&se=2026-06-23T04%3A45%3A59Z&sr=c&sp=r&sig=zpXGbxtUicv6rIZuKiTsKRno7Z%2FZhnlnAKQ6dTOgUdY%3D)
Figure 10-75: Filer Access list and Domain Group Association text box.
(Optional.) To link a domain group (Active Directory or LDAP Directory Services) to this permission group, and allow members of that domain group to use their domain credentials to access volumes on Nasuni Edge Appliances, the exact domain name and domain group are necessary.
In the Domain Group Association text box, enter any text from the domain name or the domain group, and click Search. The Select Group dialog box appears. Click Search. From the list of domain groups that include the search text, select the domain name and domain group, then click Add Selected Group.
Alternatively, enter the exact domain name and domain group in the Group Association text box.
Important: In order to link an Active Directory domain group to a permission group, the “Group type” of the Active Directory domain group must be “Security”. If the “Group type” of the Active Directory domain group is “Distribution”, users within the Active Directory domain group are not able to log in.
Note: It is not necessary for a permission group to be linked to a domain group.
Note: Adding a domain group allows all users in that group to access the user interface. You do not need to explicitly add those users. If the group membership changes after the group is linked, the new members can still log in.
Note: If you use a Group Association, you cannot select Storage Access.
Note: The list of available domain groups are from the domains previously joined to the Nasuni Management Console.
Note: Domain groups and the members of those groups always have storage access.
In the SSO Group Association text box, enter the "Azure Group Name". For details, see step 2 of the NMC Procedure in the NMC Single Sign-On (SSO) document.
.png?sv=2026-02-06&spr=https&st=2026-06-23T02%3A53%3A59Z&se=2026-06-23T04%3A45%3A59Z&sr=c&sp=r&sig=zpXGbxtUicv6rIZuKiTsKRno7Z%2FZhnlnAKQ6dTOgUdY%3D)
Figure 10-76: Filer Access list and Domain Group Association text box.
To accept your selections, click Add Group. The group is added with the selected permissions. Alternatively, to exit the dialog box without adding a group, click Close.
Editing Permission Groups
You can edit the features of existing groups.
To edit a permission group, follow the steps in “Adding Permission Groups”, except click Edit .png?sv=2026-02-06&spr=https&st=2026-06-23T02%3A53%3A59Z&se=2026-06-23T04%3A45%3A59Z&sr=c&sp=r&sig=zpXGbxtUicv6rIZuKiTsKRno7Z%2FZhnlnAKQ6dTOgUdY%3D) instead of Add Group. The dialog box is named Edit Group, and you click Save Group at the end. The group and its permissions are changed.
instead of Add Group. The dialog box is named Edit Group, and you click Save Group at the end. The group and its permissions are changed.
Deleting Permission Groups
To delete a permission group, follow these steps:
On the Console Users and Groups Overview page, click Manage Groups. The Console Groups page appears.
.png?sv=2026-02-06&spr=https&st=2026-06-23T02%3A53%3A59Z&se=2026-06-23T04%3A45%3A59Z&sr=c&sp=r&sig=zpXGbxtUicv6rIZuKiTsKRno7Z%2FZhnlnAKQ6dTOgUdY%3D)
Figure 10-77: Console Groups page.
For the group that you want to delete, click Delete
.png?sv=2026-02-06&spr=https&st=2026-06-23T02%3A53%3A59Z&se=2026-06-23T04%3A45%3A59Z&sr=c&sp=r&sig=zpXGbxtUicv6rIZuKiTsKRno7Z%2FZhnlnAKQ6dTOgUdY%3D) The About to Delete Group dialog box appears.
The About to Delete Group dialog box appears.Click Delete Group. The group is deleted.
Alternatively, to exit the dialog box without deleting a group, click Cancel.
Firewall
You can limit which network hosts can connect to the Nasuni Management Console user interface and the Nasuni Support SSH port. This is similar to firewall protection.
For details about ports and firewalls, see Firewall and Port Requirements.
In addition to this protection, you can also configure separate access to shares, exports, and FTP/SFTP directories, as detailed in “Editing shares”, “Editing exports”, and “Editing FTP directories”.
To configure firewall protection for the Nasuni Management Console, follow these steps:
Click Console Settings, then select Firewall in the left-hand column. The Console Firewall Configuration page appears.
.png?sv=2026-02-06&spr=https&st=2026-06-23T02%3A53%3A59Z&se=2026-06-23T04%3A45%3A59Z&sr=c&sp=r&sig=zpXGbxtUicv6rIZuKiTsKRno7Z%2FZhnlnAKQ6dTOgUdY%3D)
Figure 10-78: Console Firewall Configuration page.
In the UI Hosts text box, enter a comma-separated list of IP addresses or subnet addresses of hosts that you permit to access your Nasuni Management Console user interface. If the text box is blank, any host can access your Nasuni Management Console user interface.
Examples:
Comma-separated list:
10.1.1.1, 10.1.1.2, ...Subnet addresses of host:
172.16.1.0/24In the Support SSH Hosts text box, enter a comma-separated list of IP addresses or subnet addresses of hosts that you permit to connect to your Nasuni Management Console’s Support SSH port. If the text box is blank, any host can access your Nasuni Management Console’s Support SSH port.
Note: Setting this field does not prevent the use of the Nasuni Remote Support Service, as detailed in “Remote Support Service”.
Click Save Firewall Settings to save your entries.
Tip: If you configure the firewall in such a way that you cannot access the Nasuni Management Console user interface, you can reset the firewall using the console for the Nasuni Management Console.
Press Enter to access the Service menu. The login prompt appears. Enter the username and password. The login username is service, and the default password is service. The Service Menu appears.
Enter resetfirewall
The firewall resets.
Networking
Important: Edge Appliances and the NMC must be configured with operational DNS servers and a time server (internal or external) within your environment.
To configure network settings for the Nasuni Management Console, follow these steps:
Click Console Settings, then select Networking in the left-hand column. The Console Network Configuration page appears.
.png?sv=2026-02-06&spr=https&st=2026-06-23T02%3A53%3A59Z&se=2026-06-23T04%3A45%3A59Z&sr=c&sp=r&sig=zpXGbxtUicv6rIZuKiTsKRno7Z%2FZhnlnAKQ6dTOgUdY%3D)
Figure 10-79: Console Network Configuration page.
In the Hostname box, enter a hostname for the Nasuni Management Console. The name that you enter is the name you provide to users so they can access the Nasuni Management Console. You can use ASCII letters a through z, digits 0 through 9, and hyphens.
Note: The Nasuni Management Console attempts to register the hostname in the DNS server, so that users can access this host by name.
Tip: After you change the Hostname of the NMC, you should delete the Active Directory computer object with that Hostname.
From the Network Type drop-down list, select one of the following:
DHCP (Dynamic Host Configuration Protocol): Provides a network IP address for a host on an IP network automatically. The Network Device Settings and System Settings areas become unavailable.
DHCP with custom DNS: Provides a network IP address for a host on an IP network automatically. The Network Device Settings area becomes unavailable. Enter the following information:
Enter one or more local search domains in the Search Domain text box, each separated by a space. You must enter valid hostnames.
You can use search domains to avoid typing the complete address of domains that you use frequently. The search domains that you enter are automatically appended to names that you specify for purposes such as Active Directory configuration, HTTPS proxy, and NTP server. For example, if you specify the search domain “mycompany.com”, then typing “server1” for one of these purposes would connect to “server1.mycompany.com”.
Note: There are no search domains for LDAP.
Static: You must provide Network Device Settings and System Settings. See your IT administrator for assistance. Enter the following information:
Enter the static IP address in the IP Address text box. The address of a static device must not already be present on the network. The Nasuni Management Console verifies this and displays an error if a collision is detected.
Enter a netmask address in the Netmask text box.
Enter a default gateway address in the Default Gateway text box.
The gateway address must match a subnet of a defined static network. If the External traffic group is being used, the default gateway address must match that subnet exactly.
Enter the MTU value in the MTU Value text box. MTU settings above 1500 are supported.
The maximum transmission unit (MTU) is the size (in bytes) of the largest protocol data unit that the layer can pass onwards. A larger MTU brings greater efficiency, because each packet carries more user data, while protocol overheads, such as headers, remain fixed; the resulting higher efficiency means a slight improvement in the bulk protocol throughput. A larger MTU also means processing fewer packets for the same amount of data. However, large packets can occupy a slow link for some time, causing greater delays to following packets, and increasing lag and minimum latency.
Enter one or more local search domains in the Search Domain text box, each separated by a space. You must enter valid hostnames.
You can use search domains to avoid typing the complete address of domains that you use frequently. The search domains that you enter are automatically appended to names that you specify for purposes such as Active Directory configuration, HTTPS proxy, and NTP server. For example, if you specify the search domain “mycompany.com”, then typing “server1” for one of these purposes would connect to “server1.mycompany.com”.
To save your entries, click Save Network Settings. The Confirm Network Changes dialog box appears.
.png?sv=2026-02-06&spr=https&st=2026-06-23T02%3A53%3A59Z&se=2026-06-23T04%3A45%3A59Z&sr=c&sp=r&sig=zpXGbxtUicv6rIZuKiTsKRno7Z%2FZhnlnAKQ6dTOgUdY%3D)
Figure 10-80: Confirm Network Changes dialog box.
Update Network Configuration in the Confirmation Phrase text box.
Click Confirm Change.
The network configuration is saved.
Proxy
You can configure the Nasuni Management Console to use a proxy server, if needed. All HTTPS traffic goes through the proxy server that you specify. See Firewall and Port Requirements for details of HTTPS traffic, which includes:
Storage traffic.
Global File Lock server traffic.
Antivirus definition files.
Nasuni Management Console Administrative Access.
Web Access.
NOC traffic.
Note: When you enable or disable the HTTPS proxy, the Nasuni Management Console cannot update any Nasuni Edge Appliance settings for about 2 minutes.
Note: Nasuni only supports HTTPS proxies. SOCKS proxies are not supported.
Tip: On Azure-based NMCs only, during an installation or recovery procedure, it is necessary to connect with IP address 169.254.169.254 in order to obtain information about the Azure VM instance. If you have configured an HTTPS proxy, this attempt to connect can cause a delay of several minutes. To avoid this delay, add the IP address 169.254.169.254 to the “Do Not Proxy” section of the HTTPS Proxy configuration.
To configure the Console Proxy, follow these steps:
Click Console Settings, then select Proxy in the left-hand column. The Console Proxy Configuration page appears.
.png?sv=2026-02-06&spr=https&st=2026-06-23T02%3A53%3A59Z&se=2026-06-23T04%3A45%3A59Z&sr=c&sp=r&sig=zpXGbxtUicv6rIZuKiTsKRno7Z%2FZhnlnAKQ6dTOgUdY%3D)
Figure 10-81: Console Proxy Configuration page.
To enable proxy support, click Proxy Support: On (enabled) or Off (disabled).
In the Proxy Server text box, enter the hostname or IP address of a host running an HTTPS proxy.
Tip: If you use a hostname with a round-robin DNS configuration (that is, with multiple A records associated with the HTTPS proxy server's hostname), this might affect the classification of HTTPS traffic.
Important: If the password of the Proxy Server changes, you must change the Console Proxy Password.
In the Port text box, enter the port number used by the console proxy server. For details about ports and firewalls, see Firewall and Port Requirements.
Optionally, enter a valid username (case-sensitive) as configured by the proxy server in the User Name text box and the password (case-sensitive) in the Password text box.
Caution: The Password cannot include the symbols “/” (slash) and “#” (pound sign).
Important: If the password of the Proxy Server changes, you must change the Console Proxy Password.
Optionally, in the Do Not Proxy text box, enter a list of hostnames or IP addresses not to proxy (one per line). Enter one hostname or IP address per line.
Tip: On Azure-based NMCs only, during an installation or recovery procedure, it is necessary to connect with IP address 169.254.169.254 in order to obtain information about the Azure VM instance. If you have configured an HTTPS proxy, this attempt to connect can cause a delay of several minutes. To avoid this delay, add the IP address 169.254.169.254 to the “Do Not Proxy” section of the HTTPS Proxy configuration.
To save your settings, click Save Proxy Settings.
Software Update for NMC
When a newer version of the Nasuni Management Console software is available, you can install the new software.
If updates are not available, a page appears telling you there are no updates at this time.
Important: The version of the Nasuni Management Console must be equal to or greater than the version of the Nasuni Edge Appliance that the Nasuni Management Console is to manage. If a Nasuni Edge Appliance is joined to a Nasuni Management Console, update the Nasuni Management Console software before updating the Nasuni Edge Appliance software.
For details, see “NMC Version”.
Caution: Updating the software disconnects all users currently using the Nasuni Management Console. The system can take several minutes to reboot. The time to reboot can be longer if one-time upgrade operations are necessary.
Note: Nasuni does not recommend applying software updates during your normal business hours, because this can disrupt access. Apply software updates at night or on weekends.
Tip: Review the release notes of all releases between your current release and the most recent release.
You can also view Release Notes in Release Notes Guide.
Note: Updating the Nasuni Management Console software does not affect Nasuni Edge Appliances or access to data.
To update to the latest release, follow these steps:
Click Console Settings, then select Software Update in the left-hand column. If an update is available, the Software Update Available page appears.
.png?sv=2026-02-06&spr=https&st=2026-06-23T02%3A53%3A59Z&se=2026-06-23T04%3A45%3A59Z&sr=c&sp=r&sig=zpXGbxtUicv6rIZuKiTsKRno7Z%2FZhnlnAKQ6dTOgUdY%3D)
Figure 10-82: Software Update Available page.
To review the release notes, click the hyperlink “Release Notes are available“. You can also view Release Notes in Release Notes Guide.
Note: Some software updates can take longer to apply than others. Refer to the release notes before applying the update.
Update NMCin the Confirmation Phrase text field.Click Update Console Software. The Nasuni Management Console downloads software updates and reboots the system.
Tip: To avoid any performance issues when updates occur, clear your browser’s cache.
After the reboot completes, re-log in to the Nasuni Management Console with your username (case-sensitive) and password (case-sensitive).
Important: It is not supported for users in the Active Directory Protected Users security group to log in to the NMC.
Important: You cannot use Active Directory passwords longer than 127 characters to log in to the NMC.
Remote Support Service
You can view and edit Remote Support Service settings.
The Remote Support Service allows authorized Nasuni Technical Support personnel to remotely and securely access your Nasuni Management Console. This can help Nasuni Technical Support to diagnose and resolve any issues with your Nasuni Management Console quickly and proactively. No changes to your corporate firewalls are necessary.
This service is disabled by default and is strictly opt-in. You can enable or disable this service at any time. You can also enable this service for a specific period of time. Enabling this service allows Nasuni to offer a higher level of service and support.
Tip: If you need technical assistance, contact Nasuni Technical Support and inform them if you have enabled Remote Support Service.
You receive a notification whenever the Remote Support Service is enabled or disabled.
Enabling and disabling Remote Support Service
To enable or disable the Remote Support Service, follow these steps:
Click Console Settings, then select Remote Support in the left-hand column. The Remote Support Service page appears.
.png?sv=2026-02-06&spr=https&st=2026-06-23T02%3A53%3A59Z&se=2026-06-23T04%3A45%3A59Z&sr=c&sp=r&sig=zpXGbxtUicv6rIZuKiTsKRno7Z%2FZhnlnAKQ6dTOgUdY%3D)
Figure 10-83: Remote Support Service page.
To enable the Remote Support Service, click Enable Remote Support. Selecting On enables the Remote Support Service.
If Enable Remote Support is On, the Timeout text box becomes available. Enter the length of time, in minutes, that you want to permit the Remote Support Service access to be enabled. Enter 0 (zero) to allow access for an indefinite amount of time.
Click Enable Remote Support. The Remote Support Service settings are changed. If you enable the Remote Support Service with a nonzero Timeout time, a countdown begins.
If the Remote Support Service is enabled, to disable the Remote Support Service, click Disable Remote Support. The Remote Support Service settings are changed.
Send Diagnostics
If you experience problems that you cannot resolve, you can send diagnostic information to Nasuni Technical Support for troubleshooting purposes.
Note: Local diagnostic information is automatically sent when needed, so there is typically no need to do this, unless instructed by Nasuni Technical Support. Using Send Diagnostics includes more information than the automatic diagnostic information.
To send diagnostic information, follow these steps:
Click Console Settings, then select Send Diagnostics from the menu. The Send Diagnostic Information to Nasuni page appears.
.png?sv=2026-02-06&spr=https&st=2026-06-23T02%3A53%3A59Z&se=2026-06-23T04%3A45%3A59Z&sr=c&sp=r&sig=zpXGbxtUicv6rIZuKiTsKRno7Z%2FZhnlnAKQ6dTOgUdY%3D)
Figure 10-84: Send Diagnostics page.
Send Diagnostic Information in the Confirmation Phrase text field.
Click Send Diagnostics. Diagnostic information is sent to Nasuni and the informational notification “Successfully sent alerts to nasuni.com support team” is sent.