There are two types of volumes: local volumes that are “owned” by the local Nasuni Edge Appliance, and remote volumes that belong to other Nasuni Edge Appliances.
On the Volumes page, you can view, delete, disconnect, and take snapshots of volumes. From the Volumes page, you can also perform the following actions:
Create a new volume.
Create, view, and edit connections between volumes.
View and bring into cache volumes and files.
Enabling Auto Cache for folders. View and edit Auto Cached folders.
View unprotected files currently in the cache of a volume.
Create, view, edit, and delete NFS exports, FTP/SFTP directories, and SMB (CIFS) shares.
View and edit volume encryption key information.
View and edit volume names.
View and edit folder pinning settings. Pin folders in the cache.
View and edit volume protocols.
View and edit volume quotas.
View and edit volume remote access settings.
View and edit Global File Acceleration (GFA) settings.
View and edit volume snapshot directory access and volume snapshot retention settings.
View and edit volume snapshot and volume sync schedules.
View and configure file auditing.
View and edit volume File Alert Service settings.
View charts of the time taken for data propagation, and the age of the oldest data in the cache.
Volumes page
Click Volumes. The Volumes page displays a dashboard of volume information and a list of all managed volumes.
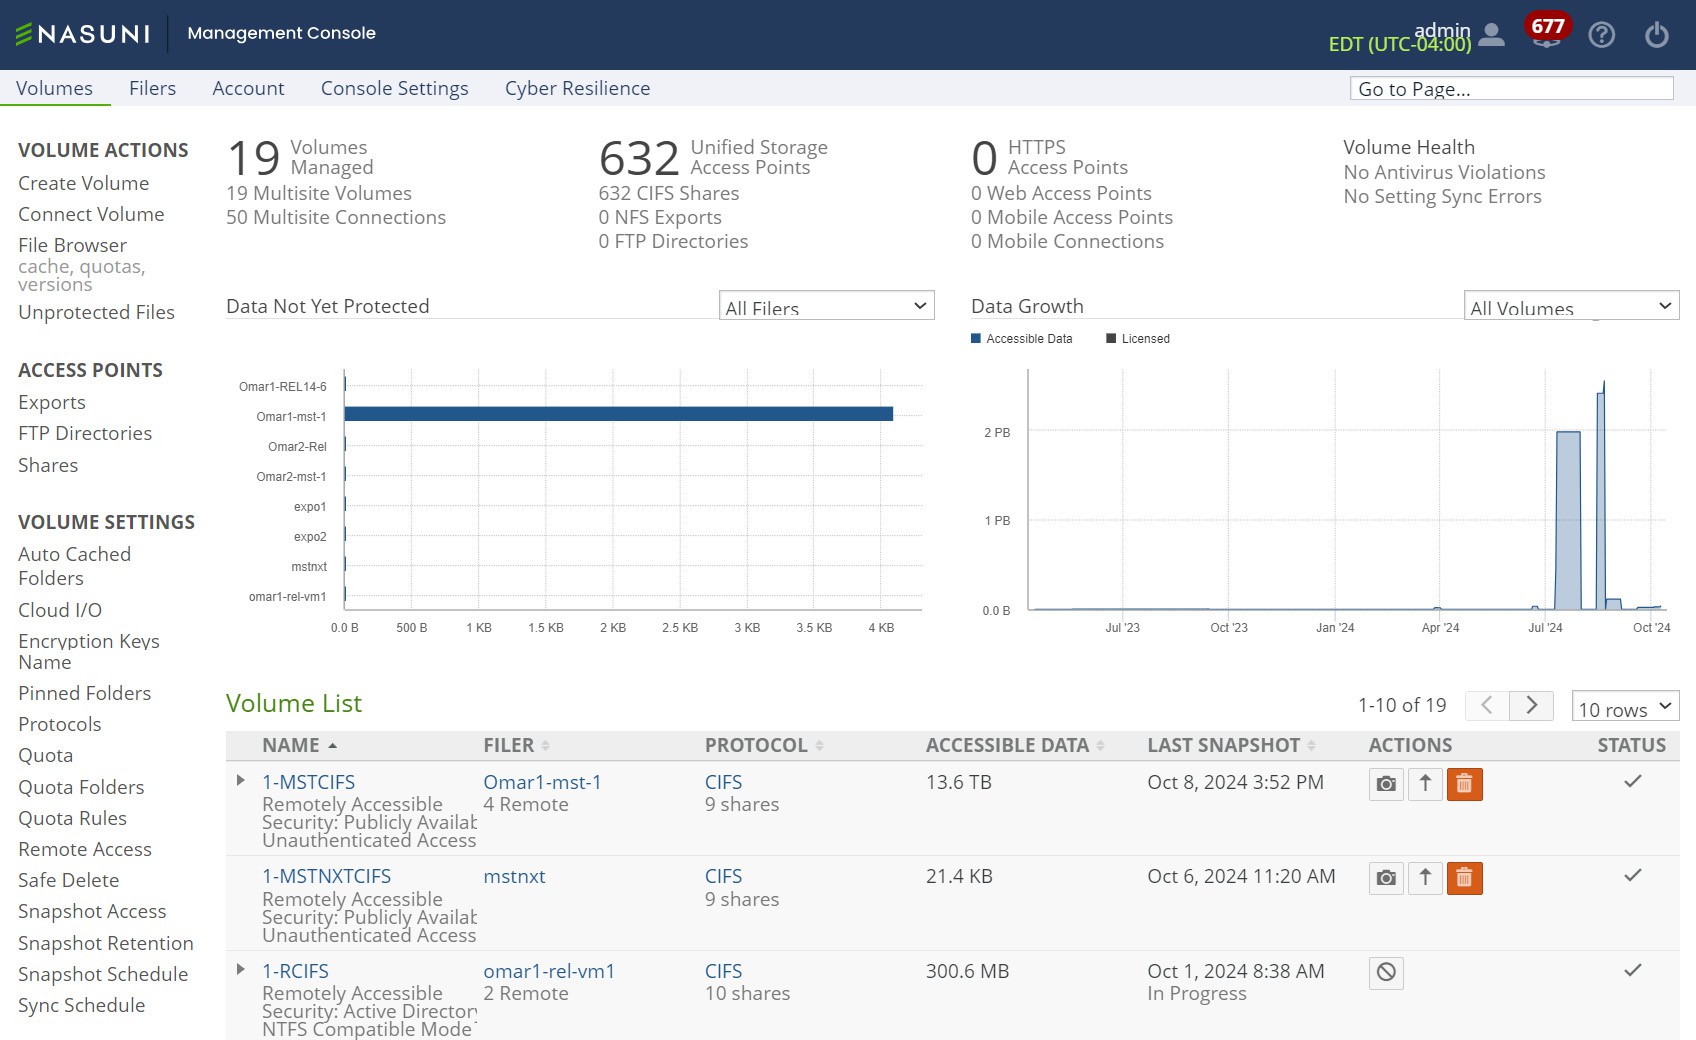
Figure 7-1: Volumes page.
Volumes Managed
In the Volumes Managed area, the following information appears:
Total number of Volumes Managed.
Note: Shared volumes that are not managed by the Nasuni Management Console might not display or total correctly.
Number of Multisite Volumes, namely, volumes that have Remote Access enabled. Clicking Multisite Volumes opens the Volume Remote Access Setting page. For details, see “Remote Access”.
Tip: For an Edge Appliance with new or changed volume configurations for remote volumes with Read/Write permissions, it can initially take up to 20 minutes before these remote volumes appear in the list of volumes. It takes time to fetch the necessary information for the remote volumes.
Number of Multisite Connections, namely, the volumes that are accessing volumes with Remote Access enabled. Clicking Multisite Connections opens the Remotely Accessible Volumes page. For details, see “Connect to (and Disconnect from) a Remote Volume”.
Unified Storage Access Points
Tip: This function can also be performed using the NMC API. For details, see NMC API.
In the Unified Storage Access Points area, the following information appears:
Total number of Unified Storage Access Points, including SMB (CIFS) shares, NFS exports, and FTP/SFTP directories.
Number of SMB (CIFS) Shares. Clicking CIFS Shares opens the Shares page. For details, see “SMB (CIFS) shares”.
Number of NFS exports. Clicking NFS Exports opens the Exports page. For details, see “NFS Exports“.
Number of FTP Directories. Clicking FTP Directories opens the FTP Directories page. For details, see “FTP Directories“.
HTTPS Access Points
In the HTTPS Access Points area, the following information appears:
Total number of HTTPS Access Points, including Web Access points.
Number of Web Access Points. Clicking Web Access Points opens the Shares page, where you can enable or disable Web Access for SMB (CIFS) shares. For details, see “Editing shares”.
Volume Health
In the Volume Health area, the following information appears:
Number of volumes available. Clicking volumes available opens the Volumes page. For details, see “Volumes page”.
If an attempt to read a volume from the cloud fails, an indication of Volume Unavailable (or Volumes Unavailable) appears. This situation is generally temporary. If the Volume Unavailable condition continues, investigate why the volume might be unavailable, such as network issues.
Number of antivirus violations. Clicking antivirus violations opens the Antivirus Violations page.
Number of setting sync errors, namely, requested changes to Nasuni Edge Appliances that have failed for some reason. Clicking setting sync errors opens the “Outstanding Settings Updates To Filers” page. For details, see “Pending Updates”.
Data Not Yet Protected chart
On the Volumes page, the Data Not Yet Protected chart appears.
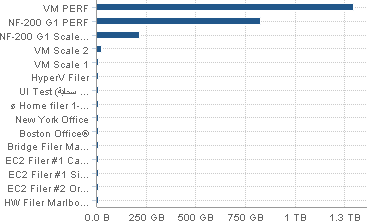
Figure 7-2: Data Not Yet Protected chart.
Horizontal bars represent the amount of data not yet protected in all Nasuni Edge Appliances or in volumes on a specific Nasuni Edge Appliance. From the drop-down list, select one of the following choices:
“All Filers”: Displays a bar graph of the amount of data not yet protected on each of the Nasuni Edge Appliances under the control of the Nasuni Management Console. The Nasuni Edge Appliances appear in order of decreasing amount of data not yet protected.
specific Nasuni Edge Appliance: Displays a bar graph of the amount of data not yet protected on each of the volumes on the selected Nasuni Edge Appliance. The volumes are in alphabetical order.
If you hover the mouse over one of the bars, a label appears displaying details about the amount of data not yet protected in that Nasuni Edge Appliance or volume.
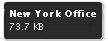
Figure 7-3: Mouse hover over bar.
If there are any files with antivirus violations that are not yet protected, the total of files with antivirus violations is displayed.
Data Growth chart
On the Volumes page, the Data Growth chart appears.
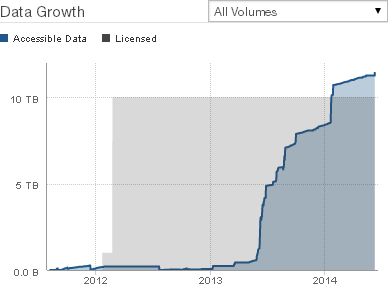
Figure 7-4: Data Growth chart: Licensed Data and Accessible Data.
From the drop-down list, select one of the following choices:
All Volumes: Displays a graph of the total amount of data in all volumes vs. time.
specific volume: Displays a graph of the amount of data in the selected volume vs. time.
This shows the amount of data on the vertical axis versus time along the horizontal axis, including the following:
Licensed Data. Licensed Data is sometimes also called “Licensed Capacity” or “Storage Volume Limit”. Licensed Data is the amount of data storage that Nasuni is managing for the customer, and that the customer is paying to store using the Nasuni service. Every customer has a Licensed Data limit. No customer has unlimited storage. However, every customer has unlimited versions of their data available. Since the Nasuni service is inherently unlimited, the Licensed Data limit can easily be changed, as business needs change. Licensed Data should be compared to data metrics such as “Now” data, which is current data and metadata in the cloud, without the effects of compression. The default Licensed Data for trial accounts is 5 TB. To select or unselect Licensed data, click Licensed Data.
Tip: For a summary of available data metrics, see “Data Metrics”.
Accessible Data. Accessible Data includes current data already protected in the cloud, as well as current data in the cache that is not yet protected. For this reason, the volume data in the cache that is not yet protected is generally less than the total accessible data, unless this volume has not completed any snapshots. Accessible Data is current data only. Accessible Data does not include previous versions or snapshots. Accessible Data does not include metadata. Accessible Data does not reflect the effects of compression. To select or unselect accessible data, click Accessible Data.
Tip: For a summary of available data metrics, see “Data Metrics”.
Cloud Usage. If the customer license includes public or private cloud providers, and if the amount of data stored with public or private cloud providers is greater than zero, the Cloud Usage data is also available. Cloud Usage data includes the size in the cloud of all data and metadata protected in the cloud, for all versions, after encryption and compression. Cloud Usage data does not include unprotected data in the cache.To select or unselect Cloud Usage, click Cloud Usage.
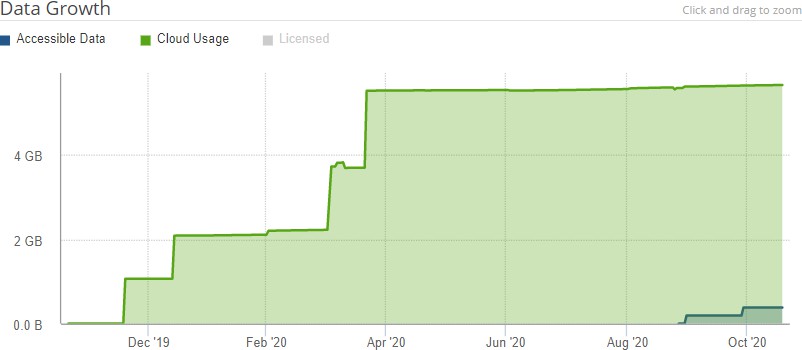
Figure 7-5: Data Growth chart: Cloud Usage and Accessible Data.
The amount of data is shown in units such as MB, GB, and TB. The length of time is shown by year and month.
Tip: For a summary of available data metrics, see “Data Metrics”.
Note: Nasuni Edge Appliances and the NMC display the size of data in base 10 units (including MB = 1,000,000 bytes, GB = 1,000,000,000 bytes, and TB = 1,000,000,000,000 bytes).
In contrast, some platforms display the size of data in base 2 units (including MB = 1,048,576 bytes, GB = 1,073,741,824 bytes, and TB = 1,099,511,627,776 bytes).
For example, a file that Nasuni displays as 10 MB would be displayed by some platforms as 9.53 MB.
Important: The NMC API can be used to pin metadata in the cache, or to enable Auto Cache for metadata.
Pinning metadata in the cache and enabling Auto Cache for metadata can affect the amount of data in the cache, and the display of data in the cache. Also, bringing all metadata into the cache adds time to the sync process and might affect user performance. With no users on a dedicated appliance (for example, to change permissions or perform searches), the effect on sync times due to syncing the entire metadata tree would not affect any user-related snapshot or sync changes.
The NMC API can also be used to verify that these features have been configured for a directory.
Because metadata-only pinning and Auto Cache pinning are currently possible only with the NMC API, directories with such pinning enabled are not displayed in the File Browser of the NMC and the Edge Appliance, nor on the NMC Pinned Folders and NMC Auto Cached Folders pages.
Important: Time marker labels indicate the end of a time period. For example, the label 'April 2024' indicates the end of April 2024. Everything to the left of this label is before the end of April 2024.
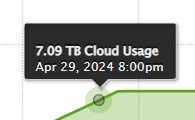
Figure 7-6: Left of time marker is before end of time period.
Everything to the right of this label is after the end of April 2024.
If you hover the mouse over any part of the chart, a label appears displaying details about the amount of data at that date and time.
Figure 7-7: Details of data and time on Data Growth chart.
To zoom in on a specific range of displayed data, click the chart at the high end of the range you want, then drag to the low end of the range you want, then release. The chart rescales to zoom in on the selected range.
To reset the zoom to the default display, click Reset zoom.
Volume List
The Volume List appears on the Volumes page.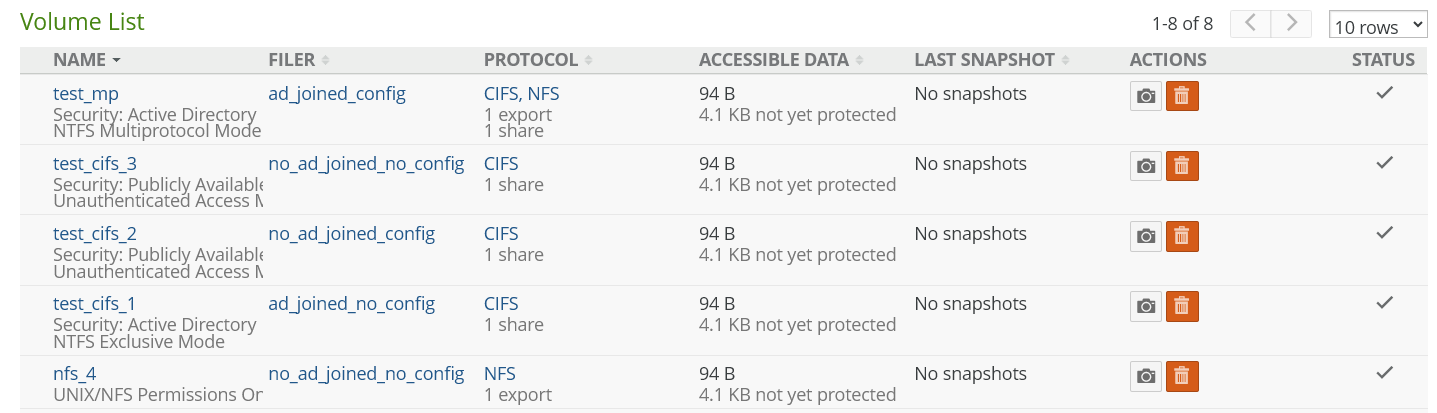
Tip: This function can also be performed using the NMC API. For details, see NMC API.
From the Rows drop-down list, select the number of rows to display on the page. The fewer the number of rows displayed, the faster the display appears.
If there is more than one page, use the left-facing and right-facing arrows to select which page of values to display.
The following properties appear for each volume in the list of volumes:
Tip: Click the right-facing arrow beside each volume to reveal the volumes connected to remotely accessible volumes. If there are more than 5 volumes connected to a remotely accessible volume, only the first 5 appear. To view more, click More. To view all, click “Show All”.
Name: The name of the volume. For local volumes, you can edit this name and change it to a customized name, if needed. See “Name of volume” for details.
For details of the display of Safe Delete status, see Details of Safe Delete status.
Tip: Click the name of the volume to view the Volume Details page for that volume. See “Volume details”.
Under each volume name:
Remote Access status (SMB (CIFS) and NFS volumes and FTP/SFTP directories only): The setting of remote access to this volume: Remotely Accessible, if the volume is remotely accessible. See “Setting or editing remote access settings” for details.
Permissions (local volumes connected to remote volumes only): The current permissions for the remote volume: Read-Only or Read/Write. Local volumes that are connected to remote volumes appear in a list under the remote volume.
Pinned: Indicates whether the entire volume, namely, the root folder of the volume, is pinned in the cache: Pinned, if volume folder is pinned. You can pin the volume folder to the cache as detailed in “Pinned Folders”. To view unprotected files in the cache, see “Unprotected Files”.
Security Mode (SMB (CIFS) volumes only): The security mode of the SMB (CIFS) volume: Active Directory, LDAP Directory Services, Publicly Available, or Unknown.
Note: If the permission of a remote volume is Disabled, the remote volume might not display the correct Security for that volume.
Filer: The name of the Nasuni Edge Appliance that the volume is on. For details, see “Filer Details page”.
Tip: This function can also be performed using the NMC API. For details, see NMC API.
Protocol: The protocol of the volume: SMB (CIFS), NFS, or FTP.
Number of shares (SMB (CIFS)), exports (NFS), or directories (FTP): For SMB (CIFS) volumes, the total number of shares. For details, see “SMB (CIFS) shares”. For NFS volumes, the total number of exports. For details, see “NFS Exports“. For FTP/SFTP directories, the total number of FTP/SFTP directories. For details, see “FTP Directories“.
Accessible Data: Accessible Data includes current data already protected in the cloud, as well as current data in the cache that is not yet protected. For this reason, the volume data in the cache that is not yet protected is generally less than the total accessible data, unless this volume has not completed any snapshots. Accessible Data is current data only. Accessible Data does not include previous versions or snapshots. Accessible Data does not include metadata. Accessible Data does not reflect the effects of compression.
not yet protected: The amount of data not yet protected.
Tip: For a summary of available data metrics, see “Data Metrics”.
Last Snapshot: For a local volume, the date and time of the latest version of the data within this volume in the cloud, that the NMC is aware of.
For a remote or shared volume, the date and time of the latest version of the data within this volume in the cloud, that the Edge Appliance has synced to, and that the NMC is aware of. If there are no snapshots yet, “No snapshots”.
For a more current representation of Edge Appliances on the NMC, click “Refresh Managed Filers” on the Filers page. For details, see “Account Filers”.
If a snapshot is in progress and has not completed, the label “In progress” displays, along with the percentage of the snapshot completed.
Tip: This function can also be performed using the NMC API. For details, see NMC API.
Actions: Actions available for each managed volume.
To initiate a snapshot, click Take Snapshot
 . A snapshot is initiated for the volume.
Tip: This function can also be performed using the NMC API. For details, see NMC API.
Note: With each Nasuni snapshot, configuration information is included, in case it is necessary to recover the Edge Appliance. The configuration information includes volume name, volume GUID, share type, software version, last pushed version, retention type, and permissions policy. The configuration bundle is encrypted in the same way that all the customer data is encrypted.
If you receive an alert that such backup configurations have failed, this might be due to intermittent network issues, or possibly due to DNS issues. If you see notifications that the Edge Appliance has successfully completed a snapshot after the backup alert, then you can safely ignore the alert.
To prioritize snapshots, click Prioritize Snapshot
 .
.If you have more than one Nasuni Edge Appliance, sometimes you might want to ensure that snapshots for one volume occur before snapshots for other volumes. This feature is called Prioritized Snapshot (also called Fast-Track Push).
Note: The volume must have sharing enabled. That is, this volume must either be a remote volume, or a local volume with Remote Access enabled.
The Prioritized Snapshot state forces this volume on this Nasuni Edge Appliance to be the next volume to obtain the snapshot lock from
nasuni.com. Essentially, this volume on this Nasuni Edge Appliance jumps to the front of the queue for snapshot processing.If no new data is placed on this volume on this Nasuni Edge Appliance, this state continues until new data is placed on this volume on this Nasuni Edge Appliance, or until the expiration time passes. This state continues until either the snapshot for this volume on this Nasuni Edge Appliance completes, or until the expiration time passes. The expiration time is 24 hours.
During this state:
If this volume is a local volume, no other volume on this Nasuni Edge Appliance can create a snapshot.
If this volume is a remote volume, no other Nasuni Edge Appliance can create a snapshot for this volume.
If this becomes a concern, you can cancel Prioritized Snapshot for the volume.
To enable Prioritized Snapshot, click Prioritize Snapshot
 for the volume. As long as another volume on this Nasuni Edge Appliance does not already have the Prioritized
Snapshot state, and another Nasuni Edge Appliance does not already have the Prioritized Snapshot state for this volume, the Prioritize Snapshot dialog box appears.
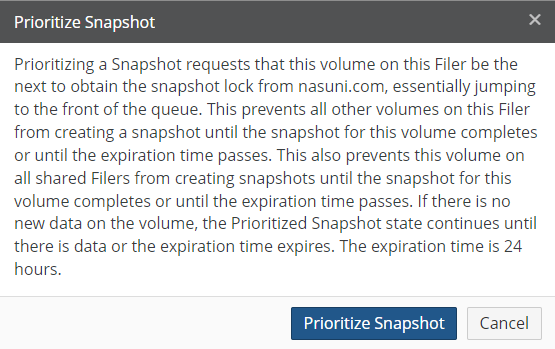
Figure 7-9: Prioritize Snapshot dialog box.
Click Prioritize Snapshot.
The state changes to a red
 . The snapshot is prioritized.
To cancel Prioritized Snapshot, click the red
 . The Prioritize Snapshot dialog box appears.
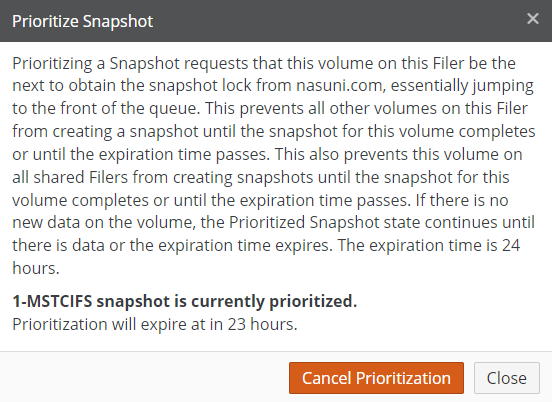
Figure 7-10: Prioritize Snapshot dialog box.
Click Cancel Prioritization. The state of the Prioritize Snapshot item changes to black and white
 . The snapshot is no longer prioritized.
To delete a local volume, click Delete
 . See “Deleting a local volume”.
Warning: Deleting a volume destroys all the volume’s data stored in the cache, as well as data stored in cloud object storage.
Other Nasuni Edge Appliances connected to the volume lose access to the data in the volume.
To disconnect a remote volume, click Disconnect
 . See “Disconnecting from a remotevolume”.
Caution: Disconnecting a Nasuni Edge Appliance from a remotely accessible volume causes all shares and exports of the remotely accessible volume to be deleted from the Nasuni Edge Appliance.
Details of Safe Delete status
If Safe Delete is enabled for this volume, and if the deletion of the volume is awaiting approval by volume-delete-capable administrators, the status “Pending Delete Approval” appears.
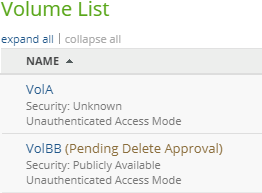
Figure 7-11: “Pending Delete Approval” status.
If Safe Delete is enabled for this volume, and if the deletion of the volume has been approved by volume-delete-capable administrators, the status “Pending Delete” appears. To cancel a pending deletion, see “Canceling volume deletion”. To revoke approval of a deletion, see “Revoking approval of volume deletion”.
Tip: Volumes become Read-Only when they are either "Pending Delete Approval" or "Pending Delete", and return to their initial state if a delete is canceled. Administrators should notify the file system users that the volume is going to be deleted.
Volume details
Tip: This function can also be performed using the NMC API. For details, see NMC API.
In the Volume List, clicking the volume name opens the Volume Details page.
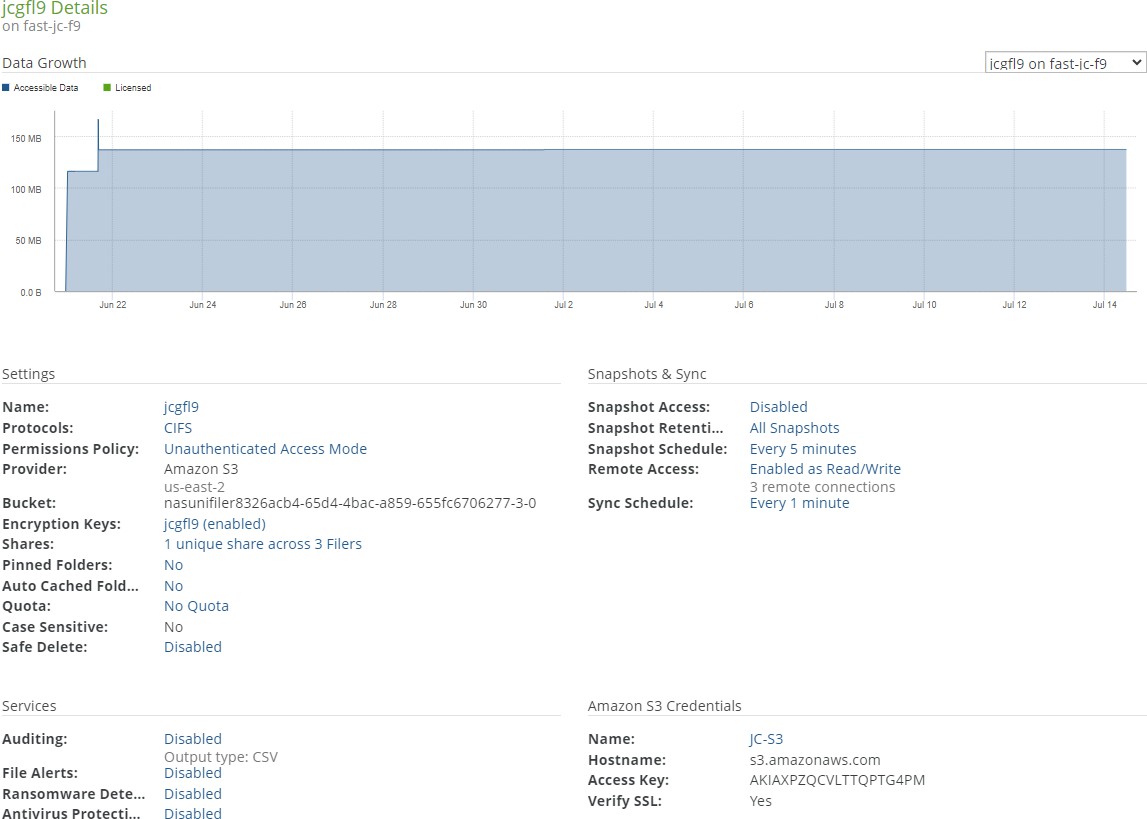
Figure 7-12: Volume Details page.
The Volume Details page displays a summary of information about the volume:
Safe Delete pending deletion
If Safe Delete is enabled for this volume, and if the Delete Volume key has been pressed for this volume, the following message appears:

Figure 7-13: Pending Safe Delete message.
If the user is one of the volume-delete-capable administrators, and deletion has not occurred, the “Cancel Delete” button appears.
Also, if the user is one of the volume-delete-capable administrators, but not the initiator of the delete, and deletion has not been approved, the “Approve Delete” button appears.
Also, if the user is one of the volume-delete-capable administrators, but not the initiator of the delete, and they have approved the deletion, the “Revoke Approval” button appears.
Also, if the user is the initiator of the delete and all approvals have been received, the “Delete Immediately” button appears.
Data Growth chart:
This shows the amount of data on the vertical axis versus time along the horizontal axis, including the following:
Licensed Data. Licensed Data is sometimes also called “Licensed Capacity” or “Storage Volume Limit”. Licensed Data is the amount of data storage that Nasuni is managing for the customer, and that the customer is paying to store using the Nasuni service. Every customer has a Licensed Data limit. No customer has unlimited storage. However, every customer has unlimited versions of their data available. Since the Nasuni service is inherently unlimited, the Licensed Data limit can easily be changed, as business needs change. Licensed Data should be compared to data metrics such as “Now” data, which is current data and metadata in the cloud, without the effects of compression. The default Licensed Data for trial accounts is 5 TB. To select or unselect Licensed data, click Licensed Data.
Tip: For a summary of available data metrics, see “Data Metrics”.
Accessible Data. Accessible Data includes current data already protected in the cloud, as well as current data in the cache that is not yet protected. For this reason, the volume data in the cache that is not yet protected is generally less than the total accessible data, unless this volume has not completed any snapshots. Accessible Data is current data only. Accessible Data does not include previous versions or snapshots. Accessible Data does not include metadata. Accessible Data does not reflect the effects of compression. To select or unselect accessible data, click Accessible Data.
Tip: For a summary of available data metrics, see “Data Metrics”.
Cloud Usage. If the customer license includes public or private cloud providers, and if the amount of data stored with public or private cloud providers is greater than zero, the Cloud Usage data is also available. Cloud Usage data includes the size in the cloud of all data and metadata protected in the cloud, for all versions, after encryption and compression. Cloud Usage data does not include unprotected data in the cache. To select or unselect Cloud Usage, click Cloud Usage.
Tip: For a summary of available data metrics, see “Data Metrics”.
The amount of data is shown in units such as MB, GB, and TB. The length of time is shown by year and month.
Note: Nasuni Edge Appliances and the NMC display the size of data in base 10 units (including MB = 1,000,000 bytes, GB = 1,000,000,000 bytes, and TB = 1,000,000,000,000 bytes).
In contrast, some platforms display the size of data in base 2 units (including MB = 1,048,576 bytes, GB = 1,073,741,824 bytes, and TB = 1,099,511,627,776 bytes).
For example, a file that Nasuni displays as 10 MB would be displayed by some platforms as 9.53 MB.
Important: The NMC API can be used to pin metadata in the cache, or to enable Auto Cache for metadata.
Pinning metadata in the cache and enabling Auto Cache for metadata can affect the amount of data in the cache, and the display of data in the cache. Also, bringing all metadata into the cache adds time to the sync process and might affect user
performance. With no users on a dedicated appliance (for example, to change permissions or perform searches), the effect on sync times due to syncing the entire metadata tree would not affect any user-related snapshot or sync changes.
The NMC API can also be used to verify that these features have been configured for a directory.
Because metadata-only pinning and Auto Cache pinning are currently possible only with the NMC API, directories with such pinning enabled are not displayed in the File Browser of the NMC and the Edge Appliance, nor on the NMC Pinned Folders and NMC Auto Cached Folders pages.
If you hover the mouse over one of the chart areas, a label appears displaying details about the amount of data at that date at that time.

Figure 7-14: Mouse hover over chart.
Note: If remote volumes have different values, the overall value displays “Varies”.
To zoom in on a specific range of displayed data, click the chart at the high end of the range you want, then drag to the low end of the range you want, then release. The chart rescales to zoom in on the selected range.
To reset the zoom to the default display, click Reset zoom.
Name: The name of the local volume, or the local name of the remote volume. Clicking the name opens the Volume Name page, with the Volume Name Settings dialog box selected. For details, see “Name of volume”.
Protocols: The protocols used for the volume: SMB (CIFS), NFS, or FTP. Clicking the protocol opens the Volume Protocols page, with the Volume Protocol Settings dialog box selected.
Permissions Policy: (Not visible on remote volumes.) The permissions policy for the protocols, from the following:
NTFS Multiprotocol Mode:
New mode for CIFS (SMB) and NFS (NFSv4 clients only) volumes on Nasuni Edge Appliances joined to Active Directory.
Produces full NTFS permissions support for CIFS (SMB) shares and NFS exports.
Recommended for CIFS (SMB) volumes that also require NTFS permissions for NFS.
Not supported: FTP, LDAP authentication.
Allows durable handles with SMB 2.0 and higher clients, which can then open a file and survive a temporary connection loss (60 seconds or less).
NTFS Exclusive Mode:
Default mode for CIFS (SMB) volumes on Nasuni Edge Appliances joined to Active Directory.
Produces full NTFS permissions support for CIFS (SMB) shares. This volume permissions policy offers the greatest Windows and Mac client compatibility.
Recommended for CIFS (SMB) volumes that do not require multiple protocols.
Not Supported: NFS, FTP, LDAP authentication.
Allows durable handles with SMB 2.0 and higher clients, which can then open a file and survive a temporary connection loss (60 seconds or less).
Note: When Global Locking is enabled, support for SMB durable handles (allowing clients to survive temporary connection loss) is disabled. Enabling Global Locking anywhere on the volume disables durable handles. If durable handles is disabled in this way, durable handles cannot be enabled again.
Caution: A CIFS NTFS Exclusive Mode volume cannot have multiple volume protocols. If this CIFS volume must support multiple protocols, select NTFS Compatible Mode.
Important: You cannot switch from NTFS Exclusive Mode to NTFS Compatible Mode.
NTFS Compatible Mode:
Optional mode for CIFS (SMB) volumes on Nasuni Edge Appliances joined to Active Directory.
Provides a high level of Windows and Mac compatibility through the CIFS (SMB) protocol, with some limitations.
This mode is required for multiple protocol support that does NOT involve NFS, such as CIFS (SMB) with FTP/SFTP, as well as CIFS (SMB).
NFS and FTP/SFTP protocols cannot see all NTFS permissions and do not obey all access rules in NTFS permissions. NFS and FTP/SFTP protocols obey only the POSIX access control list (ACL) component of inheritance rules.
All of the settings available in POSIX Mixed Mode are available.
File attributes are available.
In Unix/Linux, the
attrcommand is available.In Windows, the attributes are used to store extended Windows rights.
Not supported: NFS-only volumes, LDAP authentication.
POSIX Mixed Mode:
Default mode for CIFS (SMB) volumes on Nasuni Edge Appliances joined to LDAP. Also available for Nasuni Appliances joined to Active Directory.
Recommended for combined NFS and CIFS (SMB) volumes, and for combined CIFS (SMB) and FTP/SFTP volumes. Also recommended for LDAP-authenticated CIFS (SMB)-only volumes with Linux or Mac clients, with UNIX extensions enabled.
The settings available in UNIX/NFS Permissions Only Mode are available.
ACLs are available.
In Unix/Linux, the
setfaclandgetfaclcommands are available to set and get ACLs.In Windows, multiple users and groups are represented on the ACLs.
Inheritance is represented as default ACLs.
More information:
Access control lists (ACLs) are supported entirely through POSIX ACLs. Windows clients receive mapping of POSIX ACLs to NTFS ACLs. However, the mappings are not as complete as mappings done for NTFS Compatible Mode. NFS clients cannot view the ACLs.
The NFSv4 protocol automatically translates the underlying ACLs to NFSv4 ACLs. The common tools for managing POSIX ACLs are not supported on NFSv4. To manage ACLs using NFSv4, you must use the NFSv4 ACL tools.
UNIX/NFS Permissions Only Mode:
Default mode for NFS volumes.
Recommended for primary or heavy NFS use.
Not available for CIFS (SMB) volumes. Not recommended for Windows users.
All permissions are set using the standard User, Group, and Other settings.
ACLs and attributes are not available. Attempting to set ACLs or attributes returns "Operation not supported".
If CIFS is used with this mode, only one user, one group, and Everyone can be set. Attempting to set other values returns "Access is denied".
More information:
Only supports traditional UNIX mode bits to control permissions (
chmod).Windows can view permissions as access control lists (ACLs), but cannot add or remove access control entries (ACEs).
Unauthenticated Access Mode:
Default mode for CIFS (SMB) volumes on Nasuni Edge Appliances that are not joined to Active Directory or to LDAP. Also available for Nasuni Edge Appliances joined to Active Directory or LDAP, if the client (such as Windows) is joined to the same domain.
Recommended for CIFS (SMB) Public-mode volumes. For CIFS (SMB) clients, this mode acts as an open share. For all other protocols, this mode acts identically to POSIX Mixed Mode.
Clicking the permissions policy opens the Volume Protocols page, with the Volume Protocol Settings dialog box selected.
See “Changing Permissions Policy from NTFS Compatible to NTFS Exclusive”. See “Enabling multiple volume protocols”.
Storage Class (for Google Cloud Storage volumes only):

Figure 7-15: Storage Class.
The Storage Class, from the following:
Standard: Best for data that is frequently accessed ("hot" data), or stored for only brief periods of time.
Nearline: Low-cost, highly durable storage service for storing infrequently accessed data.
Coldline: Very-low-cost, highly durable storage service for storing infrequently accessed data.
Archive: Lowest-cost, highly durable storage service for data archiving, online backup, and disaster recovery.
For details, see Google Cloud Storage classes.
Bucket (for Amazon S3 volumes only): The bucket of storage that contains this volume.
Container (for Microsoft Azure volumes only): The container of storage that contains this volume.
Vault (for IBM Cloud Object Storage volumes only): The name of the IBM Cloud Object Storage vault.
Encryption Keys: The Name and Enabled setting of the encryption keys for the volume. To add, disable, or enable encryption keys, click the status. Clicking the status opens the Volume Encryption Keys page, with the Edit Encryption Keys dialog box selected. For details, see “Encryption Keys”.
Shares (SMB (CIFS) only), Exports (NFS only), or Directories (FTP): Total number of SMB (CIFS) shares, NFS exports, or FTP/SFTP directories, and number of Nasuni Edge Appliances. To add or edit SMB (CIFS) shares, NFS exports, or FTP/SFTP directories, click the status. For details, see “SMB (CIFS) shares”, “NFS Exports“, and “FTP Directories“.
Pinned Folders: Indicates whether any volume folder is pinned in the cache: Yes or No. To view pinned folders, click the status. For details, see “Pinned Folders”. To view unprotected files in the cache, see “Unprotected Files”.
Auto Cached Folders: Indicates whether folders have Auto Cache (automatically bringing data from other Nasuni Edge Appliances into the local cache immediately) enabled. To see folders with Auto Cache enabled, click the status. For details, see “Enabling Auto Cache forFolders”. To enable or disable Auto Cache for a volume, see “SchedulingSyncs”.
Note: Auto Cache must be enabled for a volume before Auto Cache is enabled for a folder in the volume.
Quota: The quota (maximum capacity) configuration in GB, or “No Quota” if there is no quota. To change the quota, click the status. For details, see “Quota”.
Note: If the licensed capacity is exceeded, you can still store more data temporarily. If your total stored data nears or exceeds your licensed capacity, you receive warnings to increase your licensed capacity.
Tip: For a summary of available data metrics, see “Data Metrics”.
Safe Delete: Indicates whether the Safe Delete feature is Enabled or Disabled. To enable or disable the Safe Delete feature, click the status. For details, see “Safe Delete of volumes”.
In the Snapshots & Sync area:
Snapshot Access: Indicates whether access to the snapshot directory for the volume is Enabled or Disabled. To enable or disable snapshot directory access for a volume, click the status. Clicking the status opens the Volume Snapshot Directory Access page, with the Edit Snapshot Directory Access dialog box selected. For details, see “Snapshot Directory Access".
Tip: If both the SMB (CIFS) protocol and the NFS protocol are enabled on a volume, then the
.snapshotdirectory is not available.Snapshot Retention: The current snapshot retention policy. The current snapshot retention service choice appears in parentheses: Filer (if the Snapshot Retention Service is running on the Edge Appliance) or Cloud (if the Snapshot Retention Service is running in the cloud). To configure a snapshot retention policy, click the status. Clicking the status opens the Volume Snapshot Retention page, with the Snapshot Retention dialog box selected. For details, see “Snapshot Retention”.
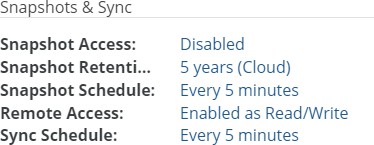
Figure 7-16: Snapshot Retention Service running in the cloud.
Snapshot Schedule: The schedule for snapshots. If there is no schedule for snapshots, indicates Disabled. To schedule snapshots, click the status. Clicking the status opens the Volume Snapshot Schedule page, with the Snapshot Schedule dialog box selected. For details, see “Snapshot Schedule”.
If a volume has Global File Acceleration set as Active, and not Observation, the Snapshot Schedule for the volume displays “Global File Accelerator”.
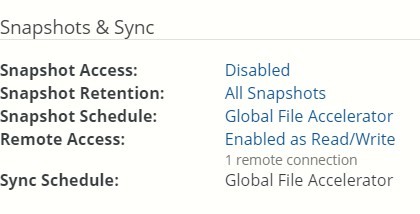
Figure 7- 17: Volume managed by Global File Acceleration.
Remote Access: The setting of remote access for this volume: Enabled or Disabled. If Enabled, displays number of connections. To enable or disable remote access, click the status. Clicking the status opens the Volume Remote Access Setting page, with the Edit Volume Remote Access Settings dialog box selected. For details, see “Remote Access”.
Number of remote connections.
Sync Schedule: The schedule of when the volume synchronizes data (“syncs”) from Nasuni, merging local data with data from other Nasuni Edge Appliances connected to this volume. If there is no schedule for syncs, indicates Disabled. To schedule syncs, click the status. For details, see “Sync Schedule”.
If a volume has Global File Acceleration set as Active, and not Observation, the Sync Schedule for the volume displays “Global File Accelerator”.

Figure 7-18: Volume managed by Global File Acceleration.
In the Volume Services area (SMB (CIFS) and NFS volumes and FTP/SFTP directories only):
Auditing: Indicates whether file system auditing for the volume is Enabled or Disabled. To enable or disable file system auditing for a volume, click the status. Clicking the status opens the Volume Auditing Settings page, with the Edit Volume Auditing Settings dialog box selected. For details, see “File System Auditing”.
File Alerts: Indicates whether the File Alert Service (automatically notifying you when files or directories with particular names are written to the Nasuni Edge Appliance) is Enabled or Disabled. If enabled, displays the number of patterns. To enable or disable the File Alert Service, click the status. Clicking the status opens the Volume File Alert Service page, with the Edit File Alert Service dialog box selected. For details, see “File System Auditing”.
Ransomware Detection: Indicates whether Ransomware Detection is Enabled or Disabled. To enable or disable Ransomware Detection, click the status. Clicking the status opens the Detection & Mitigation page, with the Edit Detection and Mitigation Settings dialog box selected. For details, see “Ransomware: Detection & Mitigation Page”.
Antivirus Service: Indicates whether Antivirus Service is Enabled or Disabled. To enable or disable Antivirus Service, see “Antivirus Services Page”.
Antivirus Violations (If Antivirus Service enabled.): Displays the number of violations. To view the list of Antivirus Violations, click the status. For details, see “Antivirus Violations".
If the Cloud Provider is a customer-provided cloud provider, the following appears in the Cloud I/O area:
Compression: Before sending data to the cloud, Nasuni breaks files into optimally-sized chunks that are then compressed to improve performance. This displays the status for compression: Enabled or Disabled. To enable or disable compression, click the status. For more details, see “Cloud I/O”.
Chunk Size: Before sending data to the cloud, Nasuni breaks files into optimally-sized chunks to improve performance. This displays the size of the chunks. To change the chunk size, click the value. For more details, see “Cloud I/O”.
If the Cloud Provider is a customer-provided cloud provider, the following appears in the Credentials area (for details, see “Cloud Credentials”):
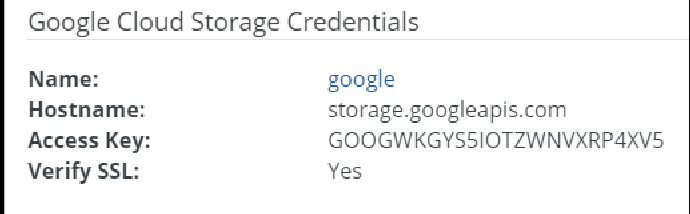
Figure 7-19: Credentials area (for Google Cloud Storage).
Name: The name of the credentials.
Hostname (for certain platforms): The hostname of the cloud provider.
For Amazon S3, a region-specific hostname is chosen when the volume is created.
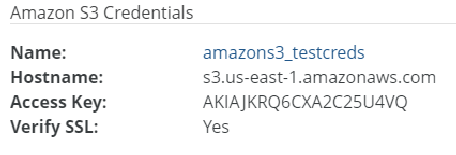
Figure 7-20: Region-specific hostname.
Account Name (for certain platforms): The name of the account on the cloud provider.
Access Key (for certain platforms): The access key of the credentials of the account on the cloud provider.
Verify SSL (for certain platforms): Indicates whether the cloud provider verifies SSL connections: Yes or No.
Notes (for certain platforms): Any notes on the credentials of the cloud provider.
Deleting a local volume
You can delete a local "owned" volume.
When you schedule a volume for deletion, the volume is removed from the display immediately, but a background process actually deletes the volume, and this can take some time to complete. For this reason, you should never delete the associated bucket or container at the cloud object storage provider: the system could be left in an inconsistent state. The associated bucket or container is deleted as part of the background process.
Also, you should not shut down the Edge Appliance virtual machine or hardware appliance until you receive a notification that the volume was fully deleted. The notification is of the form “Volume delete of <volume name> completed.” Similarly, if the background process does not complete successfully, the NOC does not allow you to decommission the appliance. This is by design, in order to ensure that the volume has been definitely deleted before decommissioning the appliance. For details about decommissioning an Edge Appliance, see Decommissioning a Nasuni Edge Appliance or NMC.
Warning: Before deleting a volume, you must:
Disconnect all remote Nasuni Edge Appliances connected to the volume.
Disable remote access on the volume.
If this is not done, it might be possible for remote Nasuni Edge Appliances
TO WRITE DATA TO THE DELETED VOLUME FOR A SHORT TIME (MOST LIKELY FOR LESS THAN 10 MINUTES, BUT POSSIBLY FOR MUCH LONGER).
Data written to the deleted volume is not protected. This can result in data loss.
Warning: Deleting a volume destroys all the volume’s data stored in the cache, as well as data stored in cloud object storage.
Other Nasuni Edge Appliances connected to the volume lose access to the data in the volume.
If Safe Delete is enabled for this volume, a specified number of volume-delete-capable administrators must approve the deletion. To enable or disable Safe Delete, see “Safe Delete of volumes”.
If Safe Delete is enabled for this volume, after the “Delete Volume” button is clicked, the following events are possible:
Any of the volume-delete-capable administrators can click “Approve Delete” to approve the deletion of the volume.
If the required number of volume-delete-capable administrators approves the deletion, the volume is scheduled for deletion.
If any of the volume-delete-capable administrators clicks “Cancel Delete”, the volume’s deletion is canceled.
If any volume-delete-capable administrator who approved deletion clicks “Revoke Approval”, their approval of the deletion is revoked.
Tip: Volumes become Read-Only when they are either "Pending Delete Approval" or "Pending Delete", and return to their initial state if a delete is canceled. Administrators should notify the file system users that the volume is going to be deleted.
Note: If a user clicks Delete Volume or Approve Delete for a volume that has Safe Delete enabled, and the user's account is removed, any pending deletions and any pending deletion approvals that they have made are canceled.
Note: For any volume that is either Pending Delete or Pending Delete Approval, the pending deletions might be canceled after the volume's Nasuni Edge Appliance is recovered.
Before deleting a volume, complete the following prerequisites:
If other Nasuni Edge Appliances are connected to the volume, disconnect them from the volume. See “Connect to (and Disconnect from) a Remote Volume” for details about disconnecting from a volume.
If the volume is configured for remote access by other Nasuni Edge Appliances, disable remote access on the volume before deleting it. See “Remote Access” for details.
Administrators should notify the file system users that the volume is going to be deleted.
Note: Deleting a volume reduces the licensed capacity used; however, the background delete operation can take time to process, depending on the number of files or blocks. Notifications indicate when the volume deletion is complete.
Tip: For a summary of available data metrics, see “Data Metrics”.
To delete a local "owned" volume, follow these steps:
Caution: You cannot undo this procedure.
Warning: Deleting a volume destroys all the volume’s data stored in the cache, as well as data stored in cloud object storage.
Other Nasuni Edge Appliances connected to the volume lose access to the data in the volume.
On the Volume List, click Delete
 next to the volume you want to delete. The Delete Volume dialog box appears.
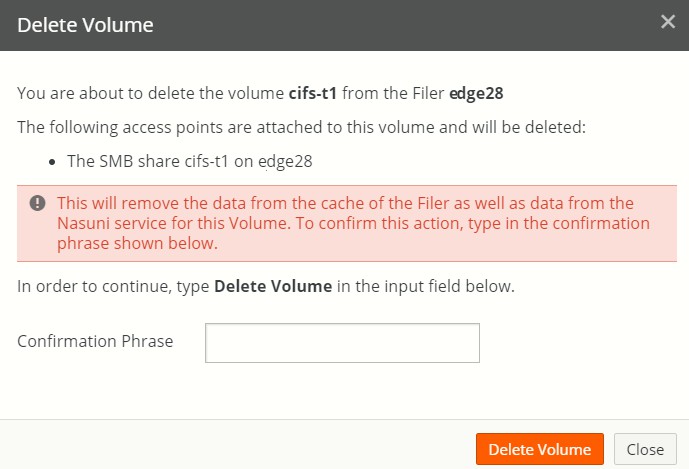
Figure 7-21: Delete Volume dialog box.
Read any warnings that appear in the Delete Volume dialog box.
For example, if there are ransomware incidents associated with the volume, a message warns that deleting the volume also deletes those incidents.
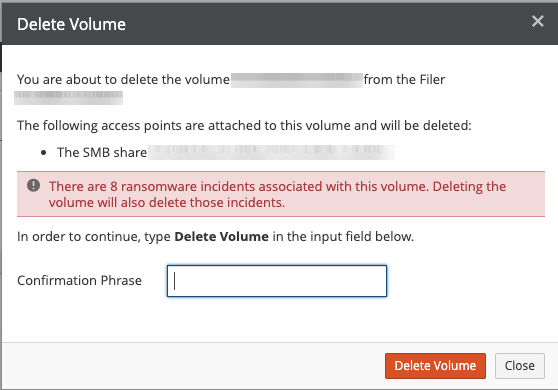
Figure 7-22: Volume with ransomware incidents.
Ensure that the prerequisites mentioned above have been satisfied to avoid data loss.
Type
Delete Volumein the Confirmation Phrase text box.Click Delete Volume to schedule this volume for deletion.
If Safe Delete is enabled for this volume, the volume is not immediately scheduled for deletion. Instead, the specified number of volume-delete-capable administrators must approve the deletion before the volume is scheduled for deletion.
Tip: Volumes become Read-Only when they are in either the "Pending Delete Approval" state or in the "Pending Delete" state, and return to their initial state if a delete is canceled. Administrators should notify the file system users that the volume is going to be deleted.
Note: If a user clicks Delete Volume or Approve Delete for a volume that has Safe Delete enabled, and the user's account is removed, any pending deletions and any pending deletion approvals that they have made are canceled.
If notifications are enabled, a notification is created. If email alerts are enabled, an email alert is sent. To enable Notifications, see “Notifications”. To enable email alerts, enable “Safe Delete Alerts”.
If Safe Delete is enabled for this volume, volume-delete-capable administrators can approve the deletion by clicking “Approve Delete”.
Alternatively, volume-delete-capable administrators can cancel the proposed delete by clicking “Cancel Delete”.
After the final volume delete approval is received, the initiator of the delete can choose to click “Delete Immediately” to immediately delete the volume. Otherwise, the volume is deleted within 24 hours of receiving the final approval.
Tip: Volumes become Read-Only when they are either "Pending Delete Approval" or "Pending Delete", and return to their initial state if a delete is canceled. Administrators should notify the file system users that the volume is going to be deleted.
Alternatively, to exit this screen without deleting the volume, click the Close button.
Safe Delete of volumes
To help ensure that one administrator cannot delete a volume accidentally or by themselves, you can specify how many administrators must approve deleting a volume. This feature is called “Safe Delete”. Only if the specified number of administrators approves the deletion does the volume become scheduled for deletion. Safe Delete settings are managed on a per-volume basis.
Tip: For further strategies to prevent accidental or deliberate deletion of volumes or cloud object storage buckets or containers, see Deletion Security.
An administrator with the ability to delete a volume, initiate a volume deletion, or approve a volume deletion, is called a volume-delete-capable administrator, and includes administrators with any of these permissions:
Manage all aspects of the Nasuni Filer (super user)
Manage all aspects of Volumes
Add and Delete Volumes
Tip: Only administrators with the permission “Manage all aspects of the Nasuni Filer (super user)” can enable or disable Safe Delete.
All actions related to Safe Delete are logged, including the following:
Enable Safe Delete
Disable Safe Delete
Change required number of approvals
Request volume delete
Approval received
Final approval granted
Approval revoked
Delete request canceled
If enabled, for each of these actions, a notification is created, and an email alert is sent. To enable Notifications, see “Notifications”. To enable email alerts, enable “Safe Delete Alerts”.
In addition, once per day, a report is generated of all pending deletions, pending deletion approvals, and volumes recently deleted through the automated Safe Delete cleanup process. This report includes the state of volume pending deletion, which administrator initiated the pending deletion, and which administrators have approved the pending deletion. You can receive this report if you are configured to receive email alerts.
Enabling Safe Delete
To enable Safe Delete, follow this procedure:
Click Volumes, then click “Safe Delete”. The “Volume Safe Delete Setting” page appears.
Select volumes from the list to enable Safe Delete.
Click “Edit Volumes”. The “Volume Safe Delete Settings” dialog box appears.

Figure 7-23: Volume Safe Delete Settings dialog box.
To copy settings from another volume, click “Copy Settings” and select the volume from the drop-down list.
To enable Safe Delete, set “Enable Safe Delete” to On.
Then, enter the number of “Approvals Required”. The number of “Approvals Required” must be less than the number of volume-delete-capable administrators. For example, if the number of volume-delete-capable administrators is 3, then the number of “Approvals Required” can be 1 or 2, because the volume delete initiator is not included in the number of volume-delete-capable administrators available for approval.
Click Save.
The Safe Delete feature is enabled. If notifications are enabled, a notification is created. If email alerts are enabled, an email alert is sent. To enable Notifications, see “Notifications”. To enable email alerts, enable “Safe Delete Alerts”.
Note: If a user enables Safe Delete, and the user's account is removed, Safe Delete remains enabled.
Disabling Safe Delete
To disable Safe Delete, follow this procedure:
Click Volumes, then click “Safe Delete”. The “Volume Safe Delete Setting” page appears.
Select volumes from the list to enable Safe Delete.
Click “Edit Volumes”. The “Volume Safe Delete Settings” dialog box appears.
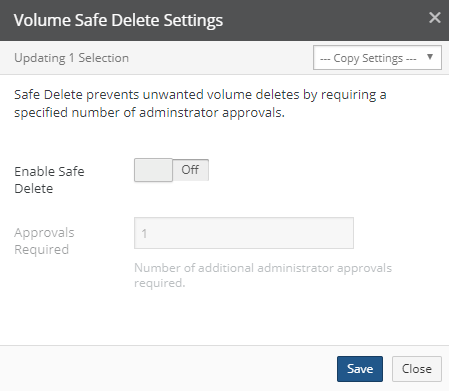
Figure 7-24: Volume Safe Delete Settings dialog box.
To copy settings from another volume, click “Copy Settings” and select the volume from the drop-down list.
To disable Safe Delete, set “Enable Safe Delete” to Off.
Click Save.
The Safe Delete feature is disabled. The Safe Delete feature is disabled and the number of “Approvals Required” is reset to 1. If notifications are enabled, a notification is created. If email alerts are enabled, an email alert is sent. To enable Notifications, see “Notifications” on
page 564. To enable email alerts, enable “Safe Delete Alerts”.
Canceling volume deletion
If Safe Delete is enabled for this volume, and if “Delete Volume” has been clicked, the volume is either awaiting approval for deletion by volume-delete-capable administrators, or has already been approved for deletion by volume-delete-capable administrators. In either case, any volume-delete-capable administrator can cancel the proposed or pending deletion by clicking “Cancel Delete”. If notifications are enabled, a notification is created. If email alerts are enabled, an email alert is sent. To enable Notifications, see “Notifications”. To enable email alerts, enable “Safe Delete Alerts”.
Revoking approval of volume deletion
If Safe Delete is enabled for this volume, and if “Delete Volume” has been clicked, any volume-delete- capable administrator who has approved the deletion can revoke their approval of the deletion by clicking “Revoke Approval”. If notifications are enabled, a notification is created. If email alerts are enabled, an email alert is sent. To enable Notifications, see “Notifications”. To enable email alerts, enable “Safe Delete Alerts”.
Disconnecting from a remote volume
You can disconnect from a remote volume.
Caution: Disconnecting a Nasuni Edge Appliance from a remotely accessible volume causes all shares and exports of the remotely accessible volume to be deleted from the Nasuni Edge Appliance.
Caution: Disconnecting from a volume deletes any unprotected data in the cache. To protect recently changed data, you can take an on-demand snapshot, then disconnect from the volume. See “Take Snapshot” for details.
Note: For volumes with an SMB (CIFS) share, an NFS export, or an FTP/SFTP directory, you must remove the share, export, or directory before you can disconnect from the volume. For details on deleting a share, see “Deleting shares”. For details on deleting an export, see “Deleting exports”. For details on deleting an FTP/SFTP directory, see “Deleting FTP directories”.
To disconnect from a remote volume, follow these steps:
Click Disconnect
 . The Disconnect Volume dialog box appears.
Figure 7-25: Disconnect Volume dialog box.
Type
Disconnect Volumein the Confirmation Phrase text box.Click Disconnect Volume to disconnect from the remote volume.
Caution: Disconnecting a Nasuni Edge Appliance from a remotely accessible volume causes all shares and exports of the remotely accessible volume to be deleted from the Nasuni Edge Appliance.
Caution: Disconnecting from a volume deletes any unprotected data in the cache. To protect recently changed data, you can take an on-demand snapshot, then disconnect from the volume. See Take Snapshot for details.
Alternatively, to exit this screen without deleting the volume, click Close.
Take Snapshot
To take a snapshot of a volume, follow these steps:
For the volume that you want to take a snapshot of, click Take Snapshot
 . A snapshot is scheduled for this volume.
Tip: To verify that a snapshot has been completed (both data phase and metadata phase), see Appendix E, “Verifying Snapshots,”.
Note: Because multiple Edge Appliances can share multiple volumes, snapshot handling simplifies processing in these ways:
On a given Edge Appliance, only one volume can perform a snapshot at a time.
A volume that is shared on multiple Edge Appliances can only perform the metadata push phase of a snapshot on one of the Edge Appliances at a time.
To verify that a snapshot has been completed (both data phase and metadata phase), see Appendix E, “Verifying Snapshots,”.
Note: With each Nasuni snapshot, configuration information is included, in case it is necessary to recover the Edge Appliance. The configuration information includes volume name, volume GUID, share type, software version, last pushed version, retention type, and permissions policy. The configuration bundle is encrypted in the same way that all the customer data is encrypted.
If you receive an alert that such backup configurations have failed, this might be due to intermittent network issues, or possibly due to DNS issues. If you see notifications that the Edge Appliance has successfully completed a snapshot after the backup alert, then you can safely ignore the alert.
Monitoring snapshot processing
Each snapshot includes processing for the data and for the metadata.
For both data and metadata, the Notifications in the NMC or the Edge Appliance UI show when each snapshot starts and when each snapshot completes. Each notification of a snapshot starting includes the volume name and the version number. Each notification of a snapshot completing includes the volume name, the version number, the number of objects succeeded, the number of objects failed, and the number of objects skipped.
For the data, during a snapshot, the Volumes page of the NMC shows the current percent status completion of a snapshot.
Tip: To verify that a snapshot has been completed (both data phase and metadata phase), see Appendix E, “Verifying Snapshots”.
Cancel Snapshot
After you click Take Snapshot, as described above, you can cancel that scheduled snapshot. To cancel a snapshot of a volume, click Cancel  .
.
If the snapshot for this volume can be canceled, the snapshot is canceled.
If the snapshot cannot be canceled, a message appears.
Create Volume
There are two types of volumes: local volumes that are “owned” by the local Nasuni Edge Appliance, and remote volumes that belong to other Nasuni Edge Appliances. You can use the Create Volume page to create a new SMB (CIFS) or NFS "owned" local volume on any managed Nasuni Edge Appliance.
Tip: For Nasuni recommendations for volume configuration, see “Volume Configuration”.
Tip: Before adding an "owned" local volume, configure the cloud credentials for this volume. To configure cloud credentials, see “Cloud Credentials”.
Important: The Edge Appliance that “owns” a volume (which is the Edge Appliance that created the volume) is called the “owning Appliance” or the “volume owner”. The volume owner has certain special features with respect to its owned volume. In particular, the following functions are not available if the volume owning Appliance is offline:
Creating volume.
Global File Acceleration: enabling or disabling.
Global File Lock: enabling or disabling.
Health check for volume.
Protocol: changing or adding.
Remote Access: enabling and disabling settings.
Safe Delete: enabling or disabling.
Shared volume: connecting and disconnecting.
Snapshot Directory Access: enabling or disabling.
Snapshot Retention: enabling, disabling, or changing.
Volume Quota and Volume Quota Rules.
Cloud I/O.
Note: The default maximum number of owned volumes is 8.
Tip: This function can also be performed using the NMC API. For details, see NMC API.
If you want to upload (import) an OpenPGP-compatible encryption key to use with the new volume, you must upload the encryption key before starting the volume creation process. (For security reasons, encryption keys that you upload cannot be downloaded from the system.) See “Adding (importing or uploading) encryption keys to Nasuni Edge Appliances”. All uploaded encryption keys must be at least 2048 bits long.
If you intend to use a new encryption key that Nasuni generates, that encryption key is automatically escrowed with Nasuni. To recover encryption keys escrowed with Nasuni, you must specify an escrow passphrase. Therefore, before creating a new volume with an encryption key that Nasuni generates, you must specify an escrow passphrase. See “Escrow Passphrase”.
Tip: See Worksheet for a worksheet for planning configurations.
To create a new SMB (CIFS) or NFS "owned" local volume, follow these steps:
Click Volumes then click Create Volume from the menu in the left column. The Create Volume page appears.
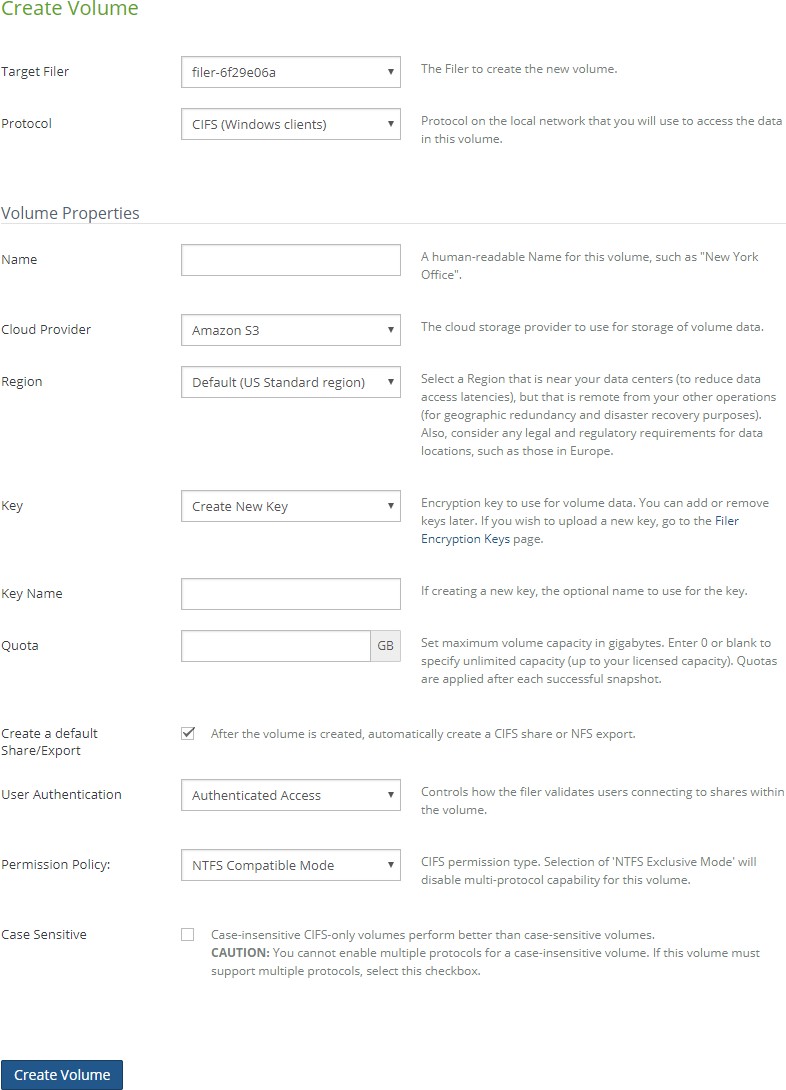
Figure 7-26: Create Volume page.
Note: If the list of Amazon S3 regions cannot be obtained from the NOC, an error message appears.
From the “Target Filer” drop-down list, select the managed Nasuni Edge Appliance where you want to create the new volume.
From the Protocol drop-down list, select a network protocol on your network. This is the protocol you use to access data on a volume.

Tip: For Nasuni recommendations for volume configuration, see “Volume Configuration”.
Tip: If you plan to enable both SMB (CIFS) and NFS protocols for this volume, Nasuni recommends using the NTFS Multiprotocol protocol.
If you prefer to configure multiple protocols manually, enable the NFS protocol first, then add the SMB (CIFS) protocol. Then select POSIX Mixed Mode as the permissions policy. See Multiple Protocols.Tip: For volumes supporting both Windows and Linux/UNIX clients, select CIFS (Windows clients) and use an SMB client on Linux/UNIX.
Your choices are:
CIFS (Windows clients): This protocol allows Windows users to share files across a network. The SMB (CIFS) protocol can be used on other operating systems besides Windows, including UNIX, Linux, and macOS.
Tip: For Nasuni recommendations for volume configuration, see “Volume Configuration”.
Tip: If you plan to enable both SMB (CIFS) and NFS protocols for this volume, enable the NFS protocol first, then add the SMB (CIFS) protocol. Then select POSIX Mixed Mode as the permissions policy.
NFS (Unix clients): This protocol allows UNIX users to access and share file systems across a computer network using UNIX and Linux.
Tip: For Nasuni recommendations for volume configuration, see “Volume Configuration”.
Note: NFS volumes can only use the Optimized or Asynchronous modes of Global File Lock.
Multiprotocol (CIFS + NFS): The NTFS Multiprotocol protocol allows Windows users and UNIX users to access and share files across a network. The SMB (CIFS) protocol can be used on other operating systems besides Windows, including UNIX, Linux, and macOS. The NFS protocol (NFSv4 clients only) can be used on other UNIX and Linux systems.
Tip: For Nasuni recommendations for volume configuration, see “Volume Configuration”.
Note: The NTFS Multiprotocol option is visible, but grayed out (not selectable), even if it has not been enabled. To enable NTFS Multiprotocol, contact Nasuni Support.
Note: Multiple protocol (SMB (CIFS) and NFS) volumes and NTFS Multiprotocol volumes only support the Optimized mode of Global File Lock.
Important: The FTP/SFTP protocol is not supported with the NTFS Multiprotocol protocol. If you require the FTP/SFTP protocol for a volume, use the SMB (CIFS) or NFS protocol.
Important: S3 is not supported with the NTFS Multiprotocol protocol. If you require S3 for a volume, use the SMB (CIFS) or NFS protocol.
Note: You can enable FTP/SFTP access to an SMB (CIFS) volume or an NFS volume after the volume is created. See Multiple Protocols.
In the Volume Properties area, enter a human-readable name for the volume in the Name text box, for example, “New York Office”. The name you enter is automatically applied as the encryption key name in the Key Name text box.
Tip: The volume name must be fewer than 25 characters.
Important: Volumes on the same Edge Appliance must have unique names.
Important: If you select to create a default share or export in step step 11, the share or export has the same name as the volume. Therefore, the name of the volume must satisfy the following requirements in order to ensure that the share or export name is valid:
Length limited to 32 bytes. Since the Unicode representation of a character can occupy several bytes, the maximum number of characters in a volume name (and in an SMB (CIFS) share name) might be less than 32.
The following characters are not valid:
< (less than)
> (greater than)
: (colon)
" (quotation mark)
/ (forward slash)
\ (backward slash)
| (vertical bar)
? (question mark)
* (asterisk)
Do not use . (period or dot) at the beginning of the volume name.
Do not use the
$character at the end of the volume name. Windows clients interpret these SMB (CIFS) shares as hidden.Do not use “global”, "homes", or "printers". These are reserved names.
Each share name (and, therefore, volume name) on an Edge Appliance must be unique. In particular, share names (and, therefore, volume names) cannot differ only by case. When connecting remote volumes, each share name (and, therefore, volume name) on all connecting Edge Appliances must be similarly unique.
You can view all share names for an Edge Appliance on the CIFS Shares page, or on the Shares page on the NMC.
NFS export names must begin with a letter or number. The rest of the NFS export name can include letters, numbers, and the characters minus sign (“-“), underscore (“_”), comma (“,”), period (“.”), at sign (“@”), and colon (“:”).
NFS volume names can include characters outside of this range. Automatically- generated NFS export names replace those characters with underscores (“_”). If this leads to a collision with an existing NFS export name, then the automatically- generated NFS export name is appended with an underscore (“_”) and a number in order to disambiguate the NFS export name.
From the Cloud Provider drop-down list, select the cloud object storage provider for this volume. The choices for the back-end cloud object storage component are part of each customer license.
Tip: It is possible to move data from one cloud provider to another. However, to do this, it is necessary to request Nasuni to do this.
From the Credentials drop-down list, select the cloud credentials for this volume. To configure cloud credentials, see “Cloud Credentials”.
For Amazon S3 credentials, credential validation always happens during volume creation.
Caution: If using AWS PrivateLink credentials, the region of the volume must match the region of the VPC interface endpoint.
(For the Google Cloud Storage provider only.)

Figure 7-27: Storage Class
From the Storage Class drop-down list, select the desired class of storage, from the following:
Archive: Lowest-cost, highly durable storage service for data archiving, online backup, and disaster recovery. Recommended for Nasuni Files for Google Cloud.
Coldline: Very-low-cost, highly durable storage service for storing infrequently accessed data.
Nearline: Low-cost, highly durable storage service for storing infrequently accessed data.
Standard: Best for data that is frequently accessed ("hot" data), or stored for only brief periods of time.
For details, see Google Cloud Storage classes.
From the Region drop-down list, specify a region where you want to store your data.
For Amazon S3 regions, both the Location Name and the Location Code are displayed. Only regions for the selected credentials appear.
If using an S3-Compatible provider, select Other (S3 Compatible) region.
You should store your data in a region that is near to your users and data centers, in order to reduce data access latencies. The region you select should be remote from your other operations for geographic redundancy and disaster recovery purposes. You should also consider any compliance requirements for the location of data.
Note: Your data is protected with multiple copies in whichever region you choose.
Tip: For details on available regions, see Compatibility and Support and the following:
For Amazon S3: https://docs.aws.amazon.com/general/latest/gr/ s3.html
For Google Cloud Storage: https://cloud.google.com/about/locations
For Microsoft Azure: https://azure.microsoft.com/en-us/global-infrastructure/geographies/#geographies
Caution: If using AWS PrivateLink credentials, the region of the volume must match the region of the VPC interface endpoint.
Tip: For the Amazon S3 GovCloud cloud provider, use the region associated with the hostname. For
hostname s3.us-gov-east-1.amazonaws.com, select AWSGovCloud (US-East). For hostname
s3.us-gov-west-1.amazonaws.com, select AWS GovCloud (US-West).You can use an existing encryption key or create a new encryption key.
To use an existing encryption key, select an encryption key from the Key drop-down list.
To create a new encryption key, select Create New Key from the Key drop-down list, then optionally enter a name for the new encryption key in the Key Name text box.
Important: If you intend to use a new encryption key that Nasuni generates, that encryption key is automatically escrowed with Nasuni. To recover encryption keys escrowed with Nasuni, you must specify an escrow passphrase.
Therefore, before creating a new volume with an encryption key that Nasuni generates, you must specify an escrow passphrase. See “EscrowPassphrase”.
Important: You can specify that you do not want Nasuni to generate any of your encryption keys. This ensures that your data is encrypted only with encryption keys that you upload. If you specify this, you must upload all the encryption keys used. Specifically, when creating a volume, you cannot select Create New Key as the source of the volume encryption key. If you want to specify that Nasuni not generate encryption keys, request Nasuni Support to disable key generation in your license.
Note: If you select Create New Key, the new encryption key is automatically escrowed for you. To use your own encryption key, see “Adding encryption keys to a volume”.
Important: The time necessary to generate an encryption key can vary widely, depending on the hardware (real or virtual) that the Nasuni Edge Appliance is executing on. Encryption keys are generated in the background, so as to not block use of the Nasuni Edge Appliance during generation.
Note: You cannot download any Nasuni Edge Appliance encryption key from a Nasuni Management Console, because the Nasuni Edge Appliance never transmits any encryption keys to a Nasuni Management Console. The Nasuni Management Console is never in possession of any encryption key generated by a Nasuni Edge Appliance. In particular, if you use the Nasuni Management Console to create a volume on a Nasuni Edge Appliance, and specify generating a new encryption key for that volume, that new encryption key is generated on the Nasuni Edge Appliance, not on the Nasuni Management Console. The only way to download a Nasuni Edge Appliance encryption key is by using the Nasuni Edge Appliance user interface.
For SMB (CIFS), NFS, and NTFS Multiprotocol volumes only, set the maximum volume capacity (in gigabytes) in the Quota text box. A value of 0 (zero) or blank specifies an unlimited volume capacity (up to your licensed capacity).
Quotas are applied after each successful snapshot. Nasuni recommends that you only increase quotas rather than decrease them. A notification occurs when the volume reaches 90 percent of the quota. Another notification occurs when the volume reaches the quota. If the volume is shared, then the quota is compared to the sum of all Nasuni Edge Appliances connected to the volume.
For SMB (CIFS) and NFS and NTFS Multiprotocol volumes only, to automatically create an SMB (CIFS) share or an NFS export for the new volume, leave the Create a default Share/Export check box selected.
Tip: You can create, update, and delete NFS exports using the NMC API.
(Not available for NTFS Multiprotocol) For SMB (CIFS) volumes only, from the User Authentication drop-down list, select the method for the Nasuni Edge Appliance to authenticate users connecting to SMB (CIFS) shares within this volume.
Tip: For Nasuni recommendations for volume configuration, see “Volume Configuration”.
Note: “Authenticated Access” refers to either Active Directory or LDAP Directory Services.
Note: If the Nasuni Edge Appliance is configured for Active Directory authentication, but is not joined to a domain, a message appears, indicating that the new volume is not usable until the Nasuni Edge Appliance joins a domain, at which time you can choose Active Directory, LDAP Directory Services, or Public authentication.
Tip: It is not possible to change the authentication mode of a volume after you create the volume.
The following authentication options are available:
Authenticated Access: Refers to either Active Directory or LDAP Directory Services.
Publicly Available to All Users: If the Edge Appliance is joined to Active Directory, in order to create a share that does NOT require authentication, you must create a Publicly Available volume, by selecting Publicly Available to All Users.
Note: If the Edge Appliance is NOT joined to Active Directory, the volume is created as Publicly Available by default.
A default share is created that can then be edited to restrict access to only certain hosts.
Tip: To access the share from a Mac:
Open Finder.
Select Go > Connect to Server.
Enter the IP address of the Edge Appliance or hostname/
When prompted for credentials, select "Guest" and hit Connect.
Tip: To access the share from a Windows 10 or later computer:
Because Windows 10 has the Guest account option disabled, you must make a registry change in order to access the share. Open regedit and go to the following path: "HKEY_LOCAL_MACHINE\SYSTEM\CurrentControlSet\Services\ LanmanWorkstation\Parameters". Change the value of "AllowInsecureGuestAuth" from 0 to 1.
Also, for Windows 11 24H2 (or later) and Windows Server 2025 (or later), Microsoft also requires SMB Signing, which also prevents the connection. To remove this requirement, you must do either of the following:
• In regedit, change the value for “RequireSecuritySignature” from 1 to 0.
• Alternatively, run these two commands in PowerShell:
Set-SmbClientConfiguration -EnableInsecureGuestLogons $true
Set-SmbClientConfiguration -RequireSecuritySignature $false
Open Windows Explorer.
In the address bar, enter the IP address of the Edge Appliance and the shares should become available.
Note: If the Edge Appliance is NOT currently connected to Active Directory, and you have never gone through the Directory Services wizard, when you attempt to join this Edge Appliance to the Active Directory domain, it asks if you want to convert any Publicly Available volumes to be secured under Active Directory.
If the Edge Appliance is already connected to Active Directory, and you want to convert a Publicly Available volume to be secured under Active Directory, you must perform a Recovery process (Recovery Guide), after which you must rejoin Active Directory. It then prompts you to convert the Publicly Available volume.
If, at any point, you did go through the Directory Services wizard and failed to join Active Directory, contact Nasuni Customer Support for assistance.
(Not available for NTFS Multiprotocol) For SMB (CIFS) volumes only, if the Nasuni Edge is configured for Active Directory or LDAP Directory Services authentication, the CIFS-Specific Properties area appears. From the Permissions Policy drop-down list, select one of the following.
Tip: For Nasuni recommendations for volume configuration, see “Volume Configuration”.
NTFS Multiprotocol Mode:
New mode for CIFS (SMB) and NFS (NFSv4 clients only) volumes on Nasuni Edge Appliances joined to Active Directory.
Produces full NTFS permissions support for CIFS (SMB) shares and NFS exports.
Recommended for CIFS (SMB) volumes that also require NTFS permissions for NFS.
Not supported: FTP, LDAP authentication.
Allows durable handles with SMB 2.0 and higher clients, which can then open a file and survive a temporary connection loss (60 seconds or less).
NTFS Exclusive Mode:
Default mode for CIFS (SMB) volumes on Nasuni Edge Appliances joined to Active Directory.
Produces full NTFS permissions support for CIFS (SMB) shares. This volume permissions policy offers the greatest Windows and Mac client compatibility.
Recommended for CIFS (SMB) volumes that do not require multiple protocols.
Not Supported: NFS, FTP, LDAP authentication.
Allows durable handles with SMB 2.0 and higher clients, which can then open a file and survive a temporary connection loss (60 seconds or less).
Note: When Global Locking is enabled, support for SMB durable handles (allowing clients to survive temporary connection loss) is disabled. Enabling Global Locking anywhere on the volume disables durable handles. If durable handles is disabled in this way, durable handles cannot be enabled again.
Caution: A CIFS NTFS Exclusive Mode volume cannot have multiple volume protocols. If this CIFS volume must support multiple protocols, select NTFS Compatible Mode.
Important: You cannot switch from NTFS Exclusive Mode to NTFS Compatible Mode.
NTFS Compatible Mode:
Optional mode for CIFS (SMB) volumes on Nasuni Edge Appliances joined to Active Directory.
Provides a high level of Windows and Mac compatibility through the CIFS (SMB) protocol, with some limitations.
This mode is required for multiple protocol support that does NOT involve NFS, such as CIFS (SMB) with FTP/SFTP, as well as CIFS (SMB).
NFS and FTP/SFTP protocols cannot see all NTFS permissions and do not obey all access rules in NTFS permissions. NFS and FTP/SFTP protocols obey only the POSIX access control list (ACL) component of inheritance rules.
All of the settings available in POSIX Mixed Mode are available.
File attributes are available.
In Unix/Linux, the
attrcommand is available.In Windows, the attributes are used to store extended Windows rights.
Not supported: NFS-only volumes, LDAP authentication.
POSIX Mixed Mode:
Default mode for CIFS (SMB) volumes on Nasuni Edge Appliances joined to LDAP. Also available for Nasuni Appliances joined to Active Directory.
Recommended for combined NFS and CIFS (SMB) volumes, and for combined CIFS (SMB) and FTP/SFTP volumes. Also recommended for LDAP-authenticated CIFS (SMB)-only volumes with Linux or Mac clients, with UNIX extensions enabled.
The settings available in UNIX/NFS Permissions Only Mode are available.
ACLs are available.
In Unix/Linux, the
setfaclandgetfaclcommands are available to set and get ACLs.In Windows, multiple users and groups are represented on the ACLs.
Inheritance is represented as default ACLs.
More information:
Access control lists (ACLs) are supported entirely through POSIX ACLs. Windows clients receive mapping of POSIX ACLs to NTFS ACLs. However, the mappings are not as complete as mappings done for NTFS Compatible Mode. NFS clients cannot view the ACLs.
The NFSv4 protocol automatically translates the underlying ACLs to NFSv4 ACLs. The common tools for managing POSIX ACLs are not supported on NFSv4. To manage ACLs using NFSv4, you must use the NFSv4 ACL tools.
UNIX/NFS Permissions Only Mode:
Default mode for NFS volumes.
Recommended for primary or heavy NFS use.
Not available for CIFS (SMB) volumes. Not recommended for Windows users.
All permissions are set using the standard User, Group, and Other settings.
ACLs and attributes are not available. Attempting to set ACLs or attributes returns "Operation not supported".
If CIFS is used with this mode, only one user, one group, and Everyone can be set. Attempting to set other values returns "Access is denied".
More information:
Only supports traditional UNIX mode bits to control permissions (
chmod).Windows can view permissions as access control lists (ACLs), but cannot add or remove access control entries (ACEs).
Unauthenticated Access Mode:
Default mode for CIFS (SMB) volumes on Nasuni Edge Appliances that are not joined to Active Directory or to LDAP. Also available for Nasuni Edge Appliances joined to Active Directory or LDAP, if the client (such as Windows) is joined to the same domain.
Recommended for CIFS (SMB) Public-mode volumes. For CIFS (SMB) clients, this mode acts as an open share. For all other protocols, this mode acts identically to POSIX Mixed Mode.
(Not available for NTFS Multiprotocol) For SMB (CIFS) volumes only, to specify that the volume should treat file and directory names as case-sensitive, select “Case Sensitive”. The default is deselected, namely, case-insensitive. For details on selecting case sensitivity, see “Case Sensitivity”.
Caution: A case-insensitive volume cannot have multiple volume protocols. If this volume must support multiple protocols, select this checkbox to make the volume case- sensitive.
Tip: For SMB (CIFS)-only volumes, certain processing is optimized for volumes that treat file names and directory names as case-insensitive (namely, volumes created with the “Case Sensitive” option unselected).
However, for case-sensitive volumes, using case-sensitive paths on SMB (CIFS) shares improves performance for certain processing. See step 16.
Important: On case-insensitive volumes, files whose UTF-8 casefolded file names contain more than 255 characters are not supported.
Important: Clients such as Windows can sometimes give inconsistent results when dealing with the case sensitivity of file names.
Click Create Volume.
The new volume appears in the list of volumes on the Volumes page. A snapshot occurs automatically after the volume is created.
For a volume created using Amazon S3 credentials, a region-specific hostname is chosen when the volume is created.
To add a share to a new SMB (CIFS) volume, see “Creating shares”. To add an export to a new NFS volume, see “Creating exports”.
To add an FTP/SFTP directory to a new SMB (CIFS) or NFS volume, see “Creating FTP directories”.
Connect to (and Disconnect from) a Remote Volume
There are two types of volumes: local volumes that are “owned” by the local Nasuni Edge Appliance, and remote volumes that belong to other Nasuni Edge Appliances. Remote access allows one or more Nasuni Edge Appliances to connect, using Nasuni, to a volume owned by another Nasuni Edge Appliance. After you enable remote access for a volume, and grant access permissions to the volume, you can connect a Nasuni Edge Appliance to the remote volume. To enable remote access and grant permissions on a volume, see “Remote Access”.
You can also disconnect an existing connection.
Important: A volume created on an NEA running version 10.2 or later cannot be shared with NEAs running a version earlier than 10.2. However, a volume created on an NEA running a version earlier than 10.2 can be shared with an NEA running version 10.2 or later. After all of the NEAs sharing a given volume have been updated to 10.2 or later, the volume version is incremented so that the volume can no longer be shared with any NEAs running earlier versions.
Tip: If the attempt to connect with a remote volume fails, try connecting again.
Tip: For an Edge Appliance with new or changed volume configurations for remote volumes with Read/Write permissions, it can initially take up to 20 minutes before these remote volumes appear in the list of volumes. It takes time to fetch the necessary information for the remote volumes.
Note: If you connect to a remote volume that has multiple protocols defined (including SMB (CIFS), NFS, and FTP), the volume inherits the same protocols as the original volume. If the protocols for the remote volume change, the volume inherits the changed protocols. This might take some time. You can refresh the volume connections in order to inherit the changed protocols immediately.
Tip: Create and configure as many shares as possible for a volume before connecting other Edge Appliances to that volume. Then, when other Edge Appliances connect to that volume, they automatically inherit all of the share definitions that were specified on the original volume. This only happens the first time that remote Edge Appliances connect to the volume, so it is important to perform as much share creation and configuration as possible before connecting to the volume.
Caution: Each share name on an Edge Appliance must be unique. In particular, share names cannot differ only by case. When connecting remote volumes, each share name on all connecting Edge Appliances must be similarly unique. You can view all share names for an Edge Appliance on the CIFS Shares page, or on the Shares page on the NMC.
Caution: Edge Appliances joined to LDAP cannot share volumes with Edge Appliances joined to Active Directory. Similarly, Edge Appliances joined to Active Directory cannot share volumes with Edge Appliances joined to LDAP. If you want Edge Appliances to share volumes, ensure that they are joined to the same directory service.
Caution: If a file or directory is renamed (and its data and permissions remain unchanged) on two different Edge Appliances that share the item’s volume, and both renames occur before the snapshots on the two Edge Appliances, then only one of the renames is effective, namely, the one with the latest snapshot.
This is not considered a merge conflict.
To connect to or disconnect from a remote volume, follow these steps:
Click Volumes, then click Connect Volume in the left-hand column. The Remotely Accessible Volumes page displays a list of remotely accessible volumes on the managed Nasuni Edge Appliances.

Figure 7-28: Remotely Accessible Volumes page.
From the Rows drop-down list, select the number of rows to display on the page. The fewer the number of rows displayed, the faster the display appears.
If there is more than one page, use the left-facing and right-facing arrows to select which page of values to display.
From the Rows drop-down list, select the number of rows to display on the page. The fewer the number of rows displayed, the faster the display appears.
If there is more than one page, use the left-facing and right-facing arrows to select which page of values to display.
The following information appears for each remotely accessible volume in the list:
Name: The name of the remotely accessible volume.
Owner: The name of the Nasuni Edge Appliance that owns this remotely accessible volume.
Protocol: The protocol of the remotely accessible volume: SMB (CIFS), NFS, or FTP.
Security Mode (SMB (CIFS) volumes only): The security mode of the SMB (CIFS) volume: Active Directory, LDAP Directory Services, Publicly Available, or Unknown.
Note: If the permission of a remote volume is Disabled, the remote volume might not display the correct Security Mode for that volume.
Connected: A list of Nasuni Edge Appliances already connected to the remotely accessible volumeIf more than one Nasuni Edge Appliance is connected to the remotely accessible volume, the number of Nasuni Edge Appliances appears. To display a list of Nasuni Edge Appliances connected to the remotely accessible volume, click this number. To collapse the list, click collapse.
Actions: Actions available for each remotely accessible volume.
To refresh the information about the list of remotely accessible volumes, click Refresh Connections.
For the remotely accessible volume whose connections you want to change, click Edit Connections. The Connect/Disconnect Volume dialog box appears.
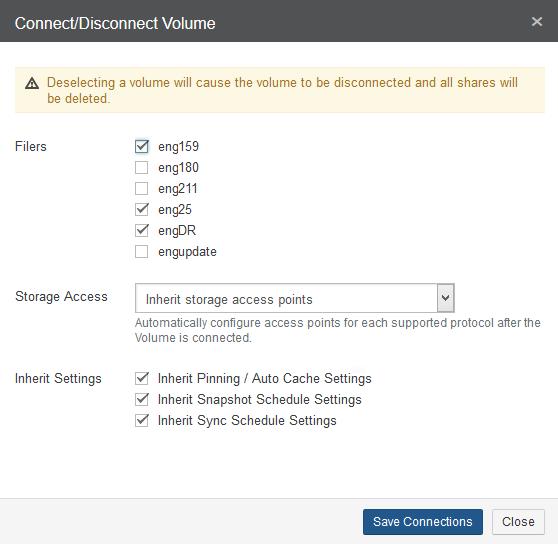
Figure 7-29: Connect/Disconnect Volume dialog box.
A list of managed Nasuni Edge Appliances appears.
Important: An Edge Appliance running a version before 9.15 cannot connect to a volume with AWS PrivateLink credentials.
Important: If the selected remotely accessible volume is an NTFS Multiprotocol volume, only NEAs with NTFS Multiprotocol capability are displayed.
To connect a currently disconnected managed Nasuni Edge Appliance to the selected remotely accessible volume, select the check box next to the managed Nasuni Edge Appliance.
Note: To connect to a remote SMB (CIFS) volume, the Nasuni Edge Appliance and the remote SMB (CIFS) volume must be in the same Active Directory or LDAP Directory Services group.
Then, from the Storage Access drop-down list, select one of the following choices:
Inherit storage access points: If the remotely accessible volume has shares or exports, inherit those same shares or exports in the new volume.
Create storage access points: To automatically create a new SMB (CIFS) share or an NFS export for the new volume.
Skip creating storage access points: To postpone creating a new share or export for the new volume. To later add a share to the new SMB (CIFS) volume, see “Creatingshares”. To later add an export to the new NFS volume, see “Creatingexports”.
To disconnect a currently connected managed Nasuni Edge Appliance from the selected remotely accessible volume, clear the check box next to the managed Nasuni Edge Appliance.
Caution: Disconnecting a Nasuni Edge Appliance from a remotely accessible volume causes all shares and exports of the remotely accessible volume to be deleted from the Nasuni Edge Appliance.
Note: It can take 10 minutes or so for the disconnection to resolve.
In the Inherit Settings area, select or deselect the settings that you want to inherit from the remotely accessible volume.
Click Save Connections to save the changes you made to connections to remotely accessible volumes.
The new information appears in the list of remotely accessible volumes on the Remotely Accessible Volumes page.
File System Browser
You can use the file system browser to perform a variety of tasks:
Browse folders and files in volumes on Nasuni Edge Appliances.
Search for folders and files by name.
Filter results by date.
Examine multiple versions of folders and files.
Bring volumes, folders, and files into the cache of the Nasuni Edge Appliance.
Enable Global File Lock for volumes.
Pin folders in the cache.
Create quotas for volumes and folders.
Restore a file or folder for an SMB (CIFS) or NFS volume or FTP/SFTP directory. You can do this, for example, if data has been deleted erroneously. For details on restoring data in the event of a disaster, see “Recovery”.
Note: Since the Nasuni Management Console does not access data directly, but through each Nasuni Edge Appliance, accessing data or information might take time.
In order to access folders and files, ensure that you have performed these necessary tasks:
Have configured at least one volume. For more information, see “Create Volume”.
For SMB (CIFS) and NFS volumes or FTP/SFTP directories, have shared or exported at least one volume. For more information, see “Creating shares” and “Creating exports”.
(Optional) Have configured a Snapshot Schedule to ensure that reliable, periodic snapshots of the volume are taken. For more information, see “Editing Snapshot Schedules”.
Selecting Volume, Folder, or Files
You can select a volume, a folder, or one or more files. You can select by browsing or by searching.
Browsing a Volume
To browse folders and files in a volume, follow these steps:
Click File Browser. The File System Browser page appears.

Figure 7-30: File System Browser page.
From the Volume drop-down list, select a volume name.
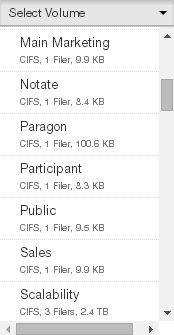
Figure 7-31: Volume drop-down list.
The properties of the selected volume are displayed.
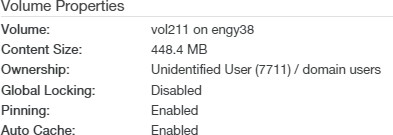
Figure 7-32: Volume properties.
The volume properties include:
Volume: The name of the volume and Nasuni Edge Appliance.
Content Size: The size of the volume and its contents. Content Size includes data already protected in the cloud, but does not include data in the cache that is not yet protected. Content Size data is current data only. Content Size data does include metadata. Content Size does not reflect the effects of compression.
Tip: For a summary of available data metrics, see “Data Metrics”.
Note: Nasuni’s display of size might differ from other indications of size, such as Windows Explorer and other utilities. Typically, such utilities display only the size of the data currently present in the local cache, while Nasuni displays the full size, regardless of where the data is.
Ownership: The owner of the volume.
Pinning: (For folders, including volumes.) Indicates whether the folder (including volumes) is pinned in the cache (Enabled). To enable pinning for a folder (including volumes), see “Pinning Folders in the Cache”. To view unprotected files in the cache, see “Unprotected Files”.
Global Locking: (For folders, including volumes.) Indicates whether Global File Lock is enabled for the volume (Enabled). To enable Global File Lock for a volume, see “Global FileLock”.
Auto Cache: (For folders, including volumes.) Indicates whether Auto Cache (automatically bringing data from other Nasuni Edge Appliances into the local cache immediately) is enabled for the folder (including volumes). To enable Auto Cache for a folder (including volumes), see “Enabling Auto Cache for Folders”.
Handle: (For volumes.) The handle for the blob in cloud object storage that represents the start of a UniFS snapshot for a specified volume.
Tip: This function can also be performed using the NMC API. For details, see NMC API.
Bucket: (For volumes.) The bucket for the blob in cloud object storage that represents the start of a UniFS snapshot for a specified volume.
Note: The term “bucket” is used in the sense of a storage container for items in cloud object storage. Specific terms depend on the cloud object storage provider.
Tip: This function can also be performed using the NMC API. For details, see NMC API.
Container: (For volumes.) The container for the blob in cloud object storage that represents the start of a UniFS snapshot for a specified volume.
Note: The term “container” is used in the sense of a storage container for items in cloud object storage. Specific terms depend on the cloud object storage provider.
Tip: This function can also be performed using the NMC API. For details, see NMC API.
From the Filer drop-down list, select a Nasuni Edge Appliance for the selected volume.
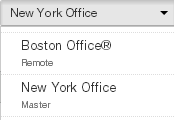
Figure 7-33: Filer drop-down list.
The files and folders that reside on the selected volume on the selected Nasuni Edge Appliance are displayed.
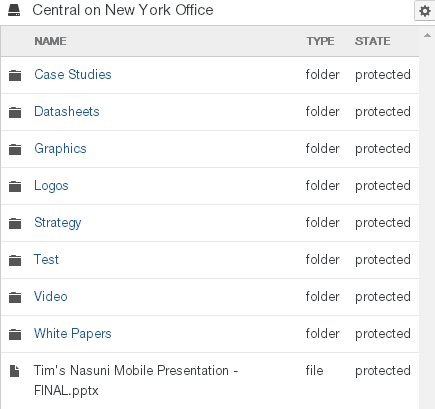
Figure 7-34: Files and folders on the volume.
The displayed properties include:
To view hidden files, click the gear icon  , then select “Show Hidden Files”.
From the list of files and folders you can select the following:
One folder: select the folder you want. The selected folder is highlighted in the list. The properties of the selected folder are displayed.
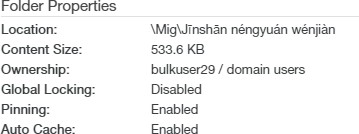
Figure 7-35: Folder properties.
The folder properties include:
Location: The path to the folder.
Content Size: The size of the folder and its contents. Content Size includes data already protected in the cloud, but does not include data in the cache that is not yet protected. Content Size data is current data only. Content Size data does include metadata. Content Size does not reflect the effects of compression.
Tip: For a summary of available data metrics, see “Data Metrics”.
Note: Nasuni’s display of size might differ from other indications of size, such as Windows Explorer and other utilities. Typically, such utilities display only the size of the data currently present in the local cache, while Nasuni displays the full size, regardless of where the data is.
Ownership: The owner of the folder.
Pinning: (For folders.) Indicates whether the folder is pinned in the cache (Enabled). To enable pinning for a folder, see “Pinning Folders in the Cache”. To view unprotected files in the cache, see “Unprotected Files” .
Auto Cache: (For folders.) Indicates whether Auto Cache (automatically bringing data from other Nasuni Edge Appliances into the local cache immediately) is enabled for the folder. To enable Auto Cache for a folder, see “Enabling Auto Cache for Folders”.
Global Locking: (For folders.) Indicates whether Global File Lock is enabled for the volume (“Enabled (inherited)”). To enable Global File Lock for a volume, see “Global FileLock”.
One file: select the file you want. The selected file is highlighted in the list. The properties of the selected file are displayed.

Figure 7-36: File properties.
The file properties include:
Location: The path to the file.
Version: The version of the file.
Version By: The Edge Appliance that was the origin of the snapshot containing this version of the file.
Size: The size of the file.
Note: Nasuni’s display of size might differ from other indications of size, such as Windows Explorer and other utilities. Typically, such utilities display only the size of the data currently present in the local cache, while Nasuni displays the full size, regardless of where the data is.
Ownership: The owner of the file.
Cache Resident: (SMB (CIFS) and NFS volumes and FTP/SFTP directories.) Indicates whether the entire file is currently in the cache of the Nasuni Edge Appliance (Yes) or not (No). To view unprotected files in the cache, see “Unprotected Files”.
Lock Status: If Global File Lock is enabled for the volume, indicates whether the file is Locked or Unlocked. To enable Global File Lock for a volume, see “Global File Lock”. If locked by multiple Nasuni Edge Appliances, a list appears.

Figure 7-37: Locked by multiple Nasuni Edge Appliances.
You can now perform actions with the selected folder or file, as described in “Actions with Selected Volume, Folder, or Files”.
You can also filter the current results by date, as described in “Filtering by Date”.
Filtering by Date
By default, the current contents of the volume are displayed. To select contents from another date and time from available snapshots, follow these steps:
Navigate to a volume as described in “Browsing a Volume”.
Click the Version drop-down list. A calendar of available dates appears. Select the date, then select the snapshot on that date. The folders and files from that snapshot appear.
Note: Some dates in the range of available dates do not have snapshots. When you click a date with no snapshots, the message “There are no snapshots for the selected date.” appears.
Folders and files from snapshots display the date and time of the version in addition to their other properties.
Select a folder or file from the list. To select multiple individual items from snapshots, use Ctrl+click. To select a range of items from snapshots, use Shift+click.
To select the current version of folders and files, click the Version drop-down list and select Current Version.
You can now perform actions with the selected folder or files, as described in “Actions with Selected Volume, Folder, or Files”.
Searching for a Folder or File by Name and Date
In addition to browsing for folders and files, you can also search for a specific folder or file by name within a snapshot, and then select it for further actions.
Caution: In most cases, snapshots are not in the cache of the Nasuni Edge Appliance, and must be brought into the local cache of the Nasuni Edge Appliance to be searched. As a result, snapshot searches can impact performance. Searching a large number of snapshots proceeds better by using a Nasuni Edge Appliance that users are not using heavily at the same time.
To search for a folder or file by name in a snapshot, follow these steps:
Navigate to a volume as described in “Browsing a Volume”. If you intend to restrict the search to a specific directory, navigate to that directory.
Caution: The maximum length of a file name is 255 bytes.
In addition, the length of a path, including the file name, must be less than 4,000 bytes.
Since the UTF-8 representation of characters from some character sets can occupy several bytes, the maximum number of characters that a file path or a file name might contain can vary.
If a particular client has other limits, the smaller of the two limits applies.
Click Search
 . The Search Versions dialog box appears.
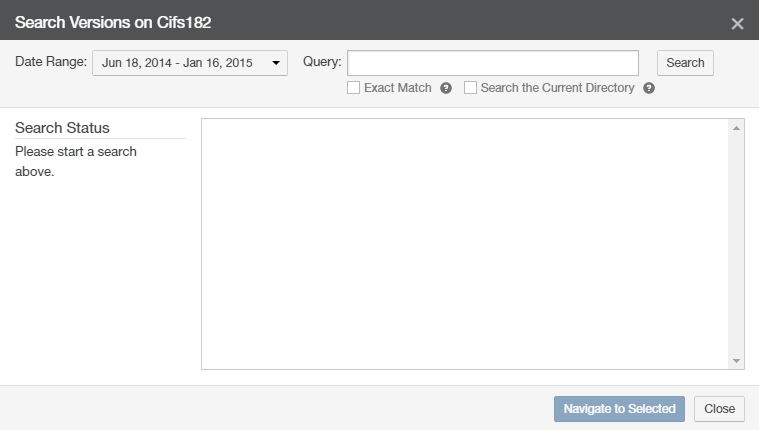
Figure 7-38: Search Versions dialog box.
The default is to search all directories. To limit the search to the currently selected directory (and any subdirectories), select Search the Current Directory. Limiting the search can save time.
The default is to search all versions. To specify search dates, click the Date Range box. The Date Range list appears.
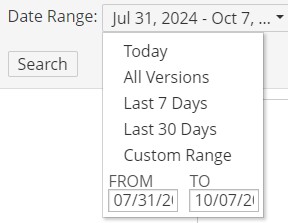
Figure 7-39: Date Range list.
From the list, select one of these options for the search date:
All Versions: Searches all snapshots regardless of date. This is the default.
Caution: Searching all snapshots can take a long time and add extra load to your Nasuni Edge Appliance.
Last 7 Days (if available): Searches only snapshots from the past 7 days, if there are any available.
Caution: Searching large numbers of snapshots can take a long time and add extra load to your Nasuni Edge Appliance.
Last 30 Days (if available): Searches only snapshots from the past 30 days, if there are any available.
Caution: Searching large numbers of snapshots can take a long time and add extra load to your Nasuni Edge Appliance.
Custom Range: Opens the Custom Range pane for you to select a start date and an end date within which to search snapshots.
Figure 7-40: Custom Range pane.
Navigate to the start date and the end date during which to search snapshots.
Caution: Searching large numbers of snapshots can take a long time and add extra load to your Nasuni Edge Appliance.
Enter all or part of the name of the folder or file to search for in the Query text box.
Note: You can use glob syntax wildcards when you specify the name, such as the following:
Wildcard | Meaning | Example |
|---|---|---|
| Matches any number of any character. |
means any file name that ends with “mp3”. |
| Matches any one character. |
means file names like “test.mp3” or “test.mp4”. |
| Matches any character in the specified sequence. |
means file names that start with an upper-case letter. |
| Matches any character NOT in the specified sequence. |
means file names that do not start with an upper- case letter. |
The search matches the query text within a folder or file name. For example, searching for “mount” finds items named “Mount”, “mounted”, “unmounted”, and “unmount”. The search is not case-sensitive.
Optionally, you can specify searching for the exact name of the file (including the filename extension) or folder by selecting the Exact Match check box. In this case, searching for “mount” only finds items named “mount”. This search is also not case-sensitive.
Click Search. The Search Status results appear.
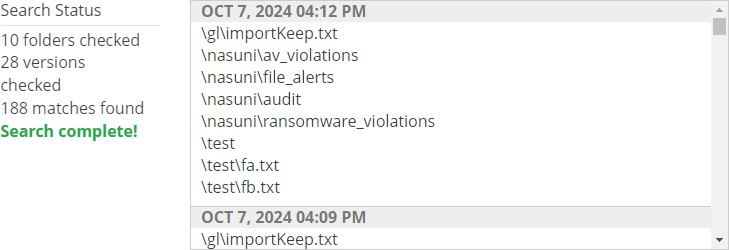
Figure 7-41: Search Status results.
To cancel a running search before it completes, click Stop Search.
After the search completes, click a folder or file to highlight it.
Click Navigate to Selected to navigate to the selected item.
Caution: The maximum length of a file name is 255 bytes.
In addition, the length of a path, including the file name, must be less than 4,000 bytes.
Since the UTF-8 representation of characters from some character sets can occupy several bytes, the maximum number of characters that a file path or a file name might contain can vary.
If a particular client has other limits, the smaller of the two limits applies.
The folder or file you searched for is selected.
You can now perform actions with the selected folder or file, as described in “Actions with Selected Volume, Folder, or Files”.
Actions with Selected Volume, Folder, or Files
After selecting a volume, folder or files, as described in “Selecting Volume, Folder, or Files”, you can perform the following actions:
Bring volume, folder, or files into the cache of the Nasuni Edge Appliance.
Pin folders in the cache.
Enable Global File Lock for volumes.
Enable Auto Cache for folders.
Create quotas for folders.
Determine the GUID of a volume.
Restore a file or folder for an SMB (CIFS) or NFS volume or FTP/SFTP directory.
Bringing Data into Cache of the Nasuni Edge Appliance
When a volume, folder, or file is selected that is not already in the cache of the Nasuni Edge Appliance, you can bring that item into the cache.
Note: If the selected data is not already present in the Nasuni Edge Appliance’s cache, selecting Bring into Cache begins the process of copying the selected data into the cache of the Nasuni Edge Appliance. This process continues running in the background until all the selected data is copied into the cache of the Nasuni Edge Appliance. If the size of the selected data exceeds the available space in the cache of the Nasuni Edge Appliance, then the Nasuni Edge Appliance releases already-protected data from the cache to make room for the incoming data. This process affects network bandwidth until it has completed. If the user requests any of the selected data while this process is running, the requested data is copied into the cache of the Nasuni Edge Appliance immediately.
To view unprotected files in the cache, see “Unprotected Files”. To bring data into the cache of the Nasuni Edge Appliance, follow these steps:
Select a volume, folder or file as described in “Selecting Volume, Folder, or Files”.
Click Bring into Cache. The Bring Into Cache dialog box appears. The dialog box is slightly different with volumes, folders, and files.
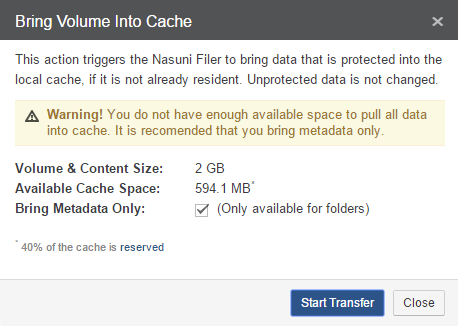
Figure 7-42: Bring Volume Into Cache dialog box.
Information about the volume, folder or file is displayed, as well as the amount of space currently available in the cache of the Nasuni Edge Appliance.
(For volume or folder only) To bring only the metadata of the volume or folder into the cache of the Nasuni Edge Appliance, but not the data itself, select the Bring Metadata Only check box.
Click Start Transfer.
This begins the process of copying data and metadata into the local cache of the Nasuni Edge Appliance. When the process is complete, by default, notifications are NOT sent, because they interfere with Varonis features. If you want to receive such notifications, and you are not using Varonis, contact Nasuni Technical Support to change the default.
Pinning Folders in the Cache
Pinning a folder specifies that the folder and its contents must remain in the local cache at all times. This can improve performance and reduce the time necessary to return accessed data to clients.
Warning: Enabling this feature means that the entire folder, and all the folder’s contents, remain resident in the cache at all times. This reduces the available cache by the size of the folder. If the amount of data pinned in the cache exceeds the size of the cache, you cannot access data that is not in the cache. If this occurs, an Alert notification is given.
Note: Pinning a folder does not bring the folder’s data into the cache. If the folder’s data is not already present in the cache, you must specifically bring that data to the cache. To check on whether data is resident in the cache, see “Browsing a Volume”. To bring data to the cache, see “Bringing Data into Cache of the Nasuni Edge Appliance”.
Important: The NMC API can be used to pin metadata in the cache, or to enable Auto Cache for metadata.
Pinning metadata in the cache and enabling Auto Cache for metadata can affect the amount of data in the cache, and the display of data in the cache. Also, bringing all metadata into the cache adds time to the sync process and might affect user performance. With no users on a dedicated appliance (for example, to change permissions or perform searches), the effect on sync times due to syncing the entire metadata tree would not affect any user-related snapshot or sync changes.
The NMC API can also be used to verify that these features have been configured for a directory.
Because metadata-only pinning and Auto Cache pinning are currently possible only with the NMC API, directories with such pinning enabled are not displayed in the File Browser of the NMC and the Edge Appliance, nor on the NMC Pinned Folders and NMC Auto Cached Folders pages.
Tip: This function can also be performed using the NMC API. For details, see NMC API.
To view pinned folders, or disable pinning for a folder, see “Pinned Folders”. To view unprotected files in the cache, see “Unprotected Files”.
Tip: See Worksheet for a worksheet for planning configurations.
To pin a folder in the cache, follow these steps:
Select a volume, folder or file as described in “Selecting Volume, Folder, or Files”.
Click Edit Cache Settings. The Folder Cache Settings dialog box appears.
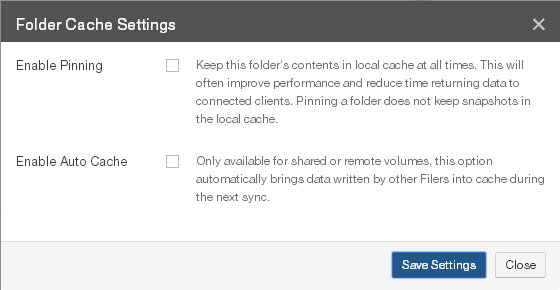
Figure 7-43: Folder Cache Settings dialog box.
Select Enable Pinning.
Click Save Settings. Your changes are saved.
Otherwise, to close the dialog box without saving changes, click Close.
Enabling Auto Cache for Folders
“Auto Cache” attempts to bring into the local cache of the specified Nasuni Edge Appliance any changes made to the specified folders by other Nasuni Edge Appliances. Without Auto Cache, any such data is only brought into the local cache as it is accessed locally. With Auto Cache enabled, the Nasuni Edge Appliance attempts to bring such data into the local cache during the scheduled syncs. For Auto Cache to run on more than one Nasuni Edge Appliance, you must enable Auto Cache for each Nasuni Edge Appliance.
Auto Cache must be enabled for a volume (on the Volume Sync Schedule screen) before Auto Cache is enabled for a folder in the volume (on the File System Browser screen). You can only enable Auto Cache for shared volumes.
Auto Cache is designed to run in the background with limited impact on the normal operation of the Nasuni Edge Appliance. For this reason, Auto Cache is not designed to bring items into the cache immediately. Also, other processes, such as snapshots, can interrupt the Auto Cache process so that it takes longer. Multiple Auto Cache jobs are processed in parallel. More available CPUs and bandwidth enable more parallel processing.
Auto Cache makes 3 attempts to bring a given item into the cache. After 3 attempts, Auto Cache skips that item. If a user references that item, the Nasuni Edge Appliance again attempts to bring the item into the cache.
Similarly, the queue for the items that Auto Cache attempts to bring into the cache is limited to 50,000 items. An item is a file or a directory. If there are more than 50,000 items, the items beyond 50,000 do not fit on the queue and are not processed. However, if a user references one of those non-processed items, the Nasuni Edge Appliance does attempt to bring the item into the cache.
If Auto Cache is enabled for directories that have Global File Lock enabled, then only the metadata is brought into the cache during the next sync. The data itself is not brought into the cache until a user accesses the file, because, if the user were to access the file at the same time that the file was brought into the cache, then the user would have to wait even longer.
Tip: Because Auto Cache is not enabled by default, new data in the folder comes into the local cache only when requested. Before enabling Auto Cache, ensure that all of the following apply to your deployment:
All the Nasuni Edge Appliances on which you plan to enable Auto Cache have caches large enough to contain data from the other Nasuni Edge Appliances.
All the data in the folder is relevant and appropriate for all other sites that access the folder.
Network access at each site is not adversely affected by automatically moving large quantities of data.
Tip: Auto Cache should not be used during the initial transfer of data into a Nasuni Edge Appliance or other large transfers of data.
Note: Before enabling Auto Cache for a folder, the folder’s volume must have Remote Access enabled and Auto Cache enabled. For details, see “Setting or editing remote access settings” and “Scheduling Syncs”.
Note: Auto Cache is only available for shared or remote volumes.
Note: You can also enable Auto Cache for volumes. See “Scheduling Syncs”.
Note: If Auto Cache is enabled and you disable Auto Cache, any process bringing data into the cache continues until complete.
Note: You can also disable Auto Cache for a folder using the Auto Cached Folders page. See “Disabling Auto Cache”.
Tip: This function can also be performed using the NMC API. For details, see NMC API.
To enable Auto Cache for a folder, follow these steps:
Select a volume, folder or file as described in “Selecting Volume, Folder, or Files”.
Click Edit Cache Settings. The Folder Cache Settings dialog box appears.
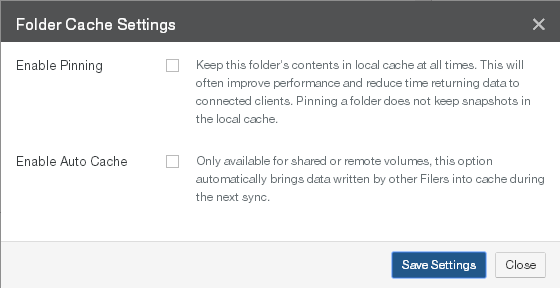
Figure 7-44: Folder Cache Settings dialog box.
Select Enable Auto Cache.
Click Save Settings. Your changes are saved.
Otherwise, to close the dialog box without saving changes, click Close.
Global File Lock
The purpose of the Global File Lock feature is to prevent conflicts when two or more users attempt to change the same file on different Nasuni Edge Appliances. If you enable the Global File Lock feature for a directory and its descendants, any files in that directory or its descendants can only be changed by one user at a time. Any other users cannot change the same file at the same time.
Typically, when User X opens a file to change it, the application locks the file, preventing access by User Y. Applications and platforms differ on specific behavior. User Y might receive the option of opening a Read-Only copy of the file, opening a copy of the file with a different name, or receiving a notice when User X closes the file. When User X does close the file, User Y can then access the file.
If Auto Cache is enabled for directories that have Global File Lock enabled, then only the metadata is brought into the cache during the next sync. The data itself is not brought into the cache until a user accesses the file, because, if the user were to access the file at the same time that the file was brought into the cache, then the user would have to wait even longer.
Tip: For Nasuni recommendations for volume configuration, see “Volume Configuration”.
Note: You can enable and disable Global File Lock using the NMC API. For details, see Nasuni Labs.
Caution: Nasuni recommends that you enable, disable, or modify Global File Lock settings only when snapshots are not running for the volume involved.
If Global File Acceleration is Active, you can specify a Global File Acceleration Enablement Window during which you can perform Global File Lock tasks.
Caution: Disabling Global File Lock does not take effect immediately for files that still have outstanding locks by one or more clients.
Tip: Enabling Global File Lock can have an impact on performance, depending on factors that include network congestion, user load, and file sizes. If users do not typically collaborate on the same file at the same time, it is unnecessary to enable Global File Lock.
Tip: To use Global File Lock, Global Locking must be enabled in the customer license.
Note: You can view the Health Status of the Nasuni Orchestration Center (NOC), Global File Acceleration (GFA), and Global File Lock (GFL) at portal.nasuni.com, under System Health.
Tip: A specific lock server can be assigned to a specific volume. Consult Nasuni Support.
Tip: Only enable Global File Lock for directories where it is necessary. Do not enable Global File Lock for directories where it is not necessary.
If Global File Lock seems necessary for the entire volume, as a best practice try to enable Global File Lock only for those directories where users have write access. If this would mean specifying a large number of directories, only then consider enabling Global File Lock for the root directory of the volume.
For any directory where Global File Lock is necessary, only enable the Global File Lock mode needed.
Tip: To learn about the use of oplocks to improve performance with Advanced mode, see “Oplocks and Global File Lock Advanced mode”.
Caution: It is not recommended to move files between directories protected by Global File Lock and directories not protected by Global File Lock. Data loss is possible.
Caution: If Global File Lock is enabled for a directory that is accessed by two different Edge Appliances, and a file is deleted or removed from the directory on one of the Nasuni Edge Appliances, the file might still be available on the other Edge Appliance.
Note: Byte-range locking is not supported for items that have Global File Lock enabled.
Important: If an open file has Global File Lock enabled, and if that file is saved, then that file is protected in the cloud outside of the regular snapshot, even if that file is still open. However, if Antivirus Service is enabled for that file, then that open file is not immediately protected in the cloud. This is because Antivirus Service must check that file before that file can be moved to cloud object storage. In this case, after Antivirus Service checks that file, and that file has no infections, then that file is protected in the cloud.
If a file does have antivirus infections, and those infections are marked “Ignore”, then the file experiences the usual Global File Lock processing.
For details of Global File Lock processing, see Global File Lock. For details of Antivirus Service processing, see Antivirus Service.
Tip: If Global File Lock is enabled for a volume that uses multiple protocols where hardlinks might be present, it is highly recommended that the parent directory where Global File Lock is enabled be exported as an “NFS export” to applications that use multiple protocols. Note that hardlinks can span multiple hierarchies where Global File Lock is enabled.
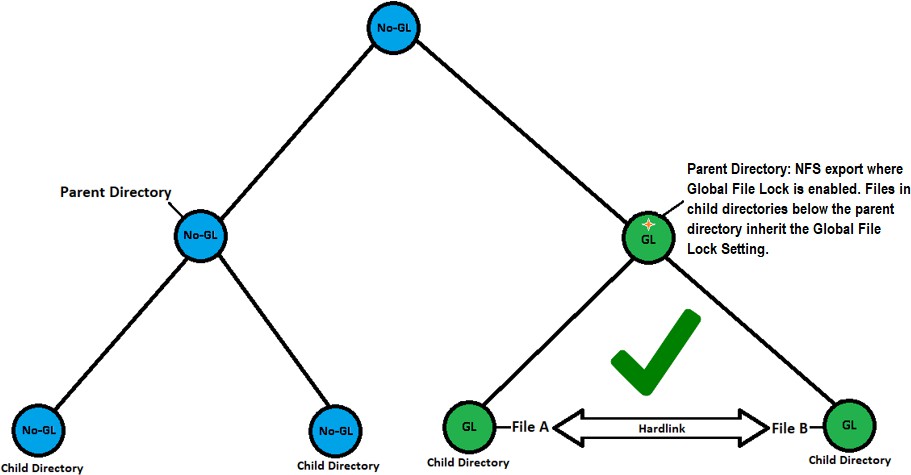
Figure 7-45: Export GFL parent directory as NFS export.
Caution: Allowing NFS hardlinks to span hierarchies outside where Global File Lock is enabled might result in data inconsistencies during file synchronization. This does not apply to soft links such as symlinks.
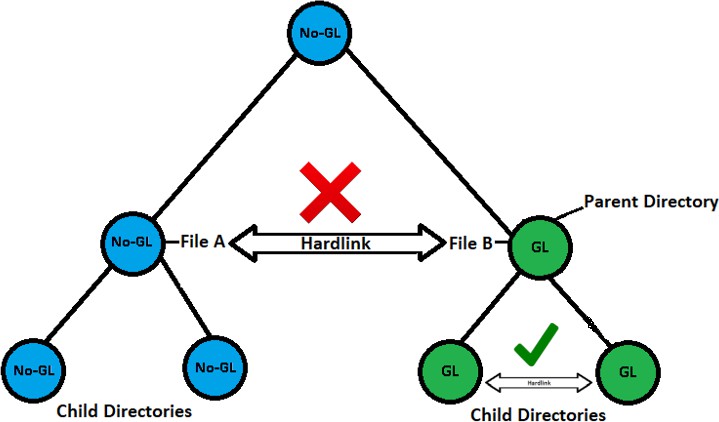
Fig ure 7- 46: Avoid NFS hardlinks outside GFL.
You can also manually break the locking of a file. This might become necessary if a user leaves a file open and another user needs to open that file.
Warning: If you manually break the locking of a file, conflicts for the file might result.
Note: If a user continues using a file after the lock is manually broken, the file might become locked again.
Restoring data protected by Global File Lock
Two types of data restore are possible: a “slow” data restore and a “fast” data restore. The differences between the two types of restore include the following:
“Fast restore”: A fast restore only needs to restore the metadata at the top level of the directory structure. Any required data or metadata is brought into the cache only when actually accessed. A fast restore can be extremely fast (a matter of minutes) for multiple TBs of data.
An Edge Appliance can generally perform a fast restore unless, for safety reasons, it must perform a slow restore (see below).
For data safety reasons, a few features prevent performing a fast restore:
Global File Lock: If Global File Lock is enabled on the data set being restored, the system must perform a slow restore on the data protected by Global File Lock. You can disable Global File Lock in order to perform a fast restore. For details, see below.
Snapshot Retention: If Snapshot Retention is enabled, and versions are marked as time boundaries, a fast restore cannot happen across these time boundaries, so that older directories and files might require slow restore.
You can disable Snapshot Retention in order to perform a fast restore. For details, see “Snapshot Retention”.
“Slow restore”: If a fast restore is not possible, you can perform a “slow restore”. A slow restore must download from cloud object storage the full metadata and data for the version that you are restoring. This can take a significant amount of time (possibly days or weeks) in order to restore larger data sets. For this reason, if you need larger restores, try to do everything possible in order to perform a fast restore.
If you intend to perform a slow restore, it is not necessary to disable Global File Lock or Snapshot Retention.
Enabling (or disabling) Global File Lock
Tip: For Nasuni recommendations for volume configuration, see “Volume Configuration”.
Note: You can enable and disable Global File Lock using the NMC API. For details, see Nasuni Labs.
Tip: To use Global File Lock, Global Locking must be enabled in the customer license.
Tip: To enable Global File Lock for a volume, you must enable Remote Access on this volume.
Tip: A specific lock server can be assigned to a specific volume. Consult Nasuni Support.
Caution: Nasuni recommends that you enable, disable, or modify Global File Lock settings only when snapshots are not running for the volume involved.
If Global File Acceleration is Active, you can specify a Global File Acceleration Enablement Window during which you can perform Global File Lock tasks.
Caution: Disabling Global File Lock does not take effect immediately for files that still have outstanding locks by one or more clients.
Note: When Global Locking is enabled, support for SMB durable handles (allowing clients to survive temporary connection loss) is disabled. Enabling Global Locking anywhere on the volume disables durable handles. If durable handles is disabled in this way, durable handles cannot be enabled again.
Note: Byte-range locking is not supported for items that have Global File Lock enabled.
Tip: This function can also be performed using the NMC API. For details, see NMC API.
To enable Global File Lock for a folder (which can be a volume) and its descendants, follow these steps:
Select a folder as described in “Selecting Volume, Folder, or Files”.
Tip: Only enable Global File Lock for directories where it is necessary. Do not enable Global File Lock for directories where it is not necessary.
If Global File Lock seems necessary for the entire volume, as a best practice try to enable Global File Lock only for those directories where users have write access. If this would mean specifying a large number of directories, only then consider enabling Global File Lock for the root directory of the volume.
For any directory where Global File Lock is necessary, only enable the Global File Lock mode needed.
Click Edit Global Locking Settings. The Global Locking Setting dialog box appears.

Figure 7-47: Global Locking Setting dialog box.
Select Enable Global Locking.
From the Locking Mode drop-down list, select one of the following locking modes.
Tip: For Nasuni recommendations for volume configuration, see “Volume Configuration”.
Optimized: All locks are elevated to write locks that allow read. Only one Nasuni Edge Appliance can have a lock on a file at a given time. Supported with both SMB (CIFS) and NFS.
Recommended for most applications that don’t rely heavily on shared access modes. Optimized locking gives the best performance, but lower protocol compatibility.
Note: NFS volumes support only Optimized mode locking.
Note: Multiple protocol (SMB (CIFS) and NFS) volumes and NTFS Multiprotocol volumes only support the Optimized mode of Global File Lock.
Advanced: Multiple Nasuni Edge Appliances can hold locks on a file at a given time, based on the share access modes. Supported with SMB (CIFS) only.
Recommended for applications that rely on shared access modes. Advanced locking provides the highest Global File Lock compatibility, but might impact performance.
Tip: To learn about the use of oplocks to improve performance with Advanced mode, see “Oplocks and Global File Lock Advanced mode”.
Caution: If you attempt to create a share on a directory on which Advanced Global File Lock is enabled, all SMB-connected users will be disconnected and might need to re-connect. Also, data reads and writes will be disrupted.
Caution: Not supported with NFS volumes or multiple multiprotocol (SMB (CIFS) and NFS) volumes or NTFS Multiprotocol volumes. If this volume must support multiple protocols, select Optimized mode or Asynchronous mode.
Note: If Advanced locking is set on a directory, then any sub-directories that inherit the Advanced setting do not have the option to “Edit Global Locking Settings”.
Tip: Not supported with NFS.
Tip: If the Advanced Global File Lock Mode is enabled for an SMB (CIFS) folder, then Linux clients might not be able to access all files.
Asynchronous: Not a true locking mode. Recommended for special applications and use cases that create all new files and that rely on Global File Lock to propagate information about new files across other Nasuni Edge Appliances.
Note: The “Asynchronous” mode is only available if activated by the product license.
Tip: The parent directory of an “Asynchronous” directory cannot be “Advanced” mode.
Click Save Settings. Your changes are saved.
Otherwise, to close the dialog box without saving changes, click Close.
To break a Global File Lock for a file, if the Edge Appliance is managed by the NMC, first disconnect the SMB (CIFS) lock for the file, as described in Disconnecting file locks.
Should that not work, to break the Global File Lock for a file, follow these steps:
Select the file as described in “Selecting Volume, Folder, or Files”.
Click Break Global Lock. The Break Global Lock dialog box appears.
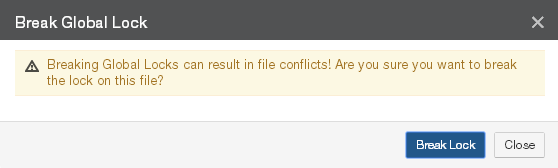
Figure 7-48: Break Global Lock dialog box.
Click Break Lock. The lock for the file is released, allowing other users to open the file. Otherwise, to close the dialog box without making changes, click Close.
Disabling Global Locking on customer license
If Global File Locking is not necessary, you can disable Global Locking on the customer license.
Tip: If any directories currently have Global File Lock enabled, then, before disabling Global Locking in the customer license, you must disable Global File Lock on these directories.
To disable Global Locking on the customer license, contact Nasuni Support.
Setting Quota or Rule
When a directory exceeds its quota limit, no further data writes to the relevant directory are permitted. If the size of the relevant directory is reduced, or the size of the quota limit is increased, then data writes to the relevant directory are permitted once more.
Important: If the size of the directory is larger than the quota limit when the quota is defined, data writes to the relevant directory are halted immediately. Data writes are not permitted until the size of the relevant directory is reduced, or the size of the quota limit is increased.
You can set a quota on the contents of a volume or a folder. You can configure quota reports to be sent to administrators or users when volumes or folders approach or exceed their quota.
Tip: This function can also be performed using the NMC API. For details, see NMC API.
To set a volume or folder quota, follow these steps:
Select a volume or folder as described in “Selecting Volume, Folder, or Files”.
Click Set Quota or Rule. The Set Quota or Rule dialog box appears.
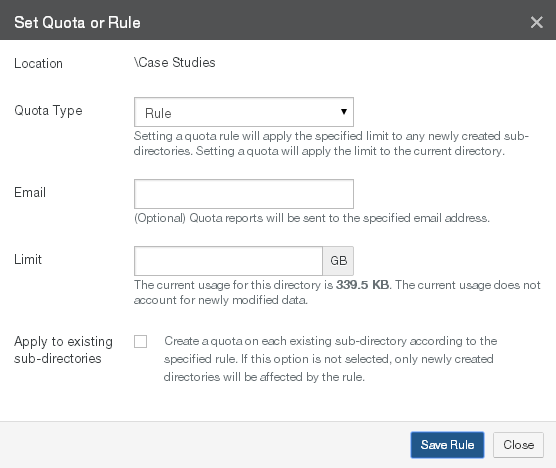
Figure 7-49: Set Quota or Rule dialog box.
From the Quota Type drop-down list, select one of the following choices:
Rule: Applies the specified Limit to any newly created subdirectories of the selected volume or folder. To apply the specified Limit to existing subdirectories, see step 6 below.
Important: Quotas cannot be nested. Quotas cannot be created anywhere in a directory tree that already has a quota set in one of the parents. Quotas also cannot be created on any parent directory when any of the subdirectories has a quota already.
Quota: Applies the specified Limit only to the selected volume or folder.
(Optional) To receive reports when the selected volume or folder is near or over its Limit, in the Email text box, enter an email address.
Tip: If User Folders Support is enabled for the SMB (CIFS) share that the directory is in, then the email address of the directory owner is used automatically. This prevents the necessity of manually entering hundreds of email addresses for multi-user systems. See step f. However, if the email address is entered here, the entered email address overrides looking up an email address from Directory Services.
In the Limit text box, enter or select the quota limit (in gigabytes or fractions of a gigabyte, such as 6.8). The content size of uncompressed data is displayed to help you decide on a quota limit.
When a directory exceeds its quota limit, no further data writes to the relevant directory are permitted. If the size of the relevant directory is reduced, or the size of the quota limit is increased, then data writes to the relevant directory are permitted once more.
Important: If the size of the directory is larger than the quota limit when the quota is defined, data writes to the relevant directory are halted immediately. Data writes are not permitted until the size of the relevant directory is reduced, or the size of the quota limit is increased.
Tip: For a summary of available data metrics, see “Data Metrics”.
Note: Nasuni’s display of size might differ from other indications of size, such as Windows Explorer and other utilities. Typically, such utilities display only the size of the data currently present in the local cache, while Nasuni displays the full size, regardless of where the data is.
For the Rule quota type, to apply the same Limit to the data in any existing sub-directories of the selected directory, select the Apply to existing sub-directories check box.
Click Save Quota to save your changes. Otherwise, click Cancel. The quota is enabled as configured.
Restoring Files or a Folder from a Snapshot
You can restore a stored version of files or a folder from a snapshot. You might do this if a file or folder was erroneously destroyed or corrupted, or if you need a previous version. You can restore the files or folder to its original location, or to another location.
Note: If you rename a file or a folder that has a previous version, then the previous versions of the newly renamed file or folder are no longer available. If the file or folder is renamed back to the original name, then any previous versions of the file or folder become available again.
Important: If you specify one directory to restore to another directory, it puts the contents of the original directory (not the original directory itself) in the target directory.
If you specify multiple directories to restore to another directory, it puts all of the actual original directories under the target directory.
Important: Restoring a snapshot of a folder does not reset the folder to its exact condition when the snapshot was completed. Instead, restoring a snapshot of a folder provides to the folder any files that the snapshot contains, but that the folder does not currently contain. Also, if the snapshot of the folder includes files that the folder does already currently contain, restoring the snapshot of the folder preserves both versions of each such file, and renames the restored version of each such file, so that there is no conflict. Restoring a snapshot of a folder never removes any file that is already in the folder.
To restore files or a folder from a snapshot, follow these steps:
Select files or a folder in a snapshot as described in “Selecting Volume, Folder, or Files”.
Tip: You can tell that you have selected files or a folder in a snapshot if the Version displays a date and not “Current Version.”
Click Restore Folder or Restore File. The Restore Folder or Restore File dialog box appears
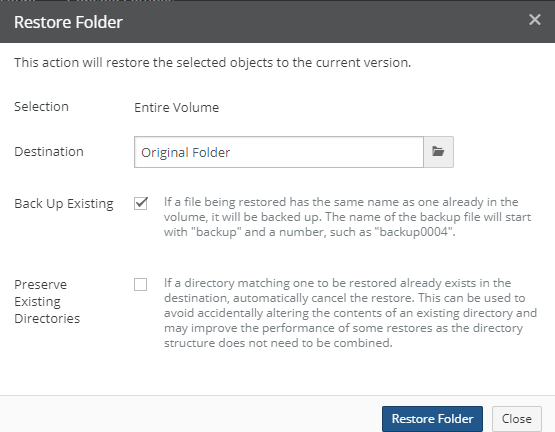
Figure 7-50: Restore Folder dialog box.
Verify the selection in the Selection text box.
By default, the file or folder is restored to its original location. To restore the file or folder to another path, click in the Destination box and navigate to the alternative path.
Caution: If the file or folder is restored to its original location, it replaces the file or folder of the same name (if any) in that original location.
Important: If you specify one directory to restore to another directory, it puts the contents of the original directory (not the original directory itself) in the target directory.
If you specify multiple directories to restore to another directory, it puts all of the actual original directories under the target directory.
Caution: The maximum length of a file name is 255 bytes.
In addition, the length of a path, including the file name, must be less than 4,000 bytes.
Since the UTF-8 representation of characters from some character sets can occupy several bytes, the maximum number of characters that a file path or a file name might contain can vary.
If a particular client has other limits, the smaller of the two limits applies.
To back up existing files before proceeding, select the Back Up Existing check box. If any files that you selected to restore also exist in your volume, they are copied and retained. Backup files are created with the preface “
backupxxxx.” For example, “backup0001.Sales.doc”.If Back Up Existing is not selected, the restore overwrites any files with the same name.
On the Restore Folder dialog box, in order to not impact existing directories, select Preserve Existing Directories. This can help prevent impacting an existing directory with the same name as a directory about to be restored. Also, by avoiding unnecessary processing, this can improve performance.
To restore the selected files or folder to your system, click Restore File or Restore Folder.
Important: When restoring a folder, if you specify one directory to restore to another directory, it puts the contents of the original directory (not the original directory itself) in the target directory.
In contrast, if you specify multiple directories to restore to another directory, it puts all of the actual original directories in the target directory.
The Restore in Progress pane appears.
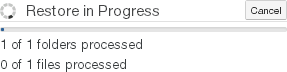
Figure 7-51: Restore in Progress pane.
This pane includes the following:
The number of folders processed.
The number of files processed.
Note: Files and folders in the snapshots are not deleted or changed during the restore.
The restored files or folder appear in the specified folder.
Determining the GUID of a volume with File System Browser
You can determine the GUID of a volume by examining the URL of the NMC while selecting that volume in File System Browser. The GUID is used for a number of purposes with the NMC API.
Tip: This function can also be performed using the NMC API. For details, see NMC API.
To determine the GUID of a volume, follow these steps:
Select the volume as described in “Selecting Volume, Folder, or Files”.
Examine the URL of the NMC in your Web browser. For example, here is a sample URL of an NMC:
https://10.100.4.53/volumes/fsbrowser/?volume=11dfd1db-5701-432a-b6a5-d25104397b80_10 &filer=3c4ec032-22d1-47ab-9119-9929481fdf08The part of the URL after “
volume=” and before “&filer=” is the volume GUID. In this example, the volume GUID is11dfd1db-5701-432a-b6a5-d25104397b80_10.
Determining the serial number of an Edge Appliance with File System Browser
You can determine the serial number of an Edge Appliance by examining the URL of the NMC while selecting a volume of that Edge Appliance in File System Browser. The serial number of an Edge Appliance is used for a number of purposes, such as installing and recovering Edge Appliances. You can also determine the serial number of an Edge Appliance, as described in “Filer Details” and in “Serial Numbers”.
To determine the serial number of an Edge Appliance with File System Browser, follow these steps:
Select a volume and Edge Appliance as described in “Selecting Volume, Folder, or Files”.
Examine the URL of the NMC in your Web browser. For example, here is a sample URL of an NMC:
https://10.100.4.53/volumes/fsbrowser/?volume=11dfd1db-5701-432a-b6a5- d25104397b80_10&filer=3c4ec032-22d1-47ab-9119-9929481fdf08 &version=now&path=tn &selected=tnThe part of the URL after “
&filer=” and before the next ampersand “&” is the serial number of the Edge Appliance. In this example, the serial number of the Edge Appliance is3c4ec032- 22d 1-47ab-9119-9929481fdf08.
Important: Authorization codes (also called “Auth codes”) are intended for a single use, and are not permanent. Authorization codes change if the associated serial number is used successfully, if the authorization code is refreshed via the NMC (Account Status --> Serial Numbers, then click Refresh), and if the authorization code is regenerated.
You can regenerate a serial number by using the Serial Numbers page of portal.nasuni.com.
Unprotected Files
You can view the current unprotected files in the cache for a volume. You can filter by file name, path, size, and owner. A file is protected if a copy of the file has been saved to cloud object storage.
Tip: To verify that a snapshot has been completed (both data phase and metadata phase), see Appendix E, “Verifying Snapshots,”.
Important: A file might not appear in this list if the file itself has been saved to the cloud, but the snapshot processing for that file has not finished with the file’s metadata. The file is not yet restorable, and the file cannot yet be propagated to another Edge Appliance.
Viewing unprotected files
To view files in the cache of a volume, follow these steps:
Click Volumes, then select Unprotected Files. The Unprotected Files page appears.
From the Filer drop-down list, select the Nasuni Edge Appliance whose volume you want to view. From the Volume drop-down list, select the volume whose cache you want to view. A list of files currently in the cache appears.
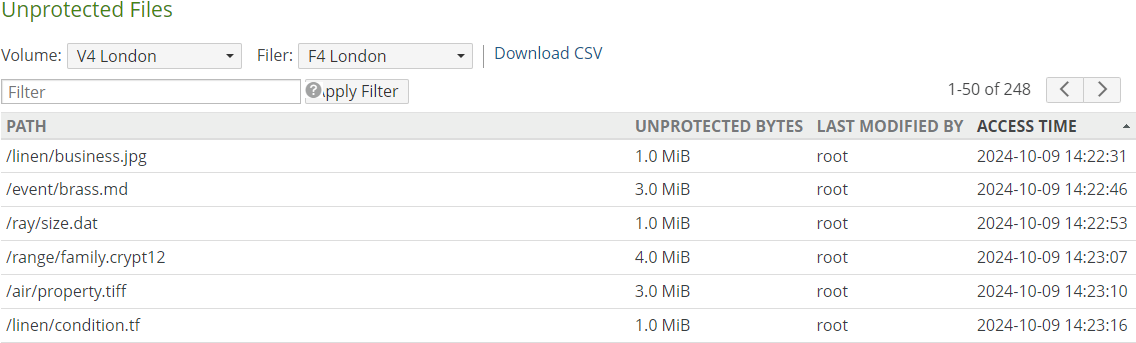
Figure 7-52: Unprotected Files page.
The following information appears for each unprotected file:
Path: The path in the volume to the file in the cache.
Unprotected Bytes: The size of each unprotected file.
Note: Nasuni’s display of size might differ from other indications of size, such as Windows Explorer and other utilities. Typically, such utilities display only the size of the data currently present in the local cache, while Nasuni displays the full size, regardless of where the data is.
Last Modified By: The user who made the latest change to the unprotected file.
Access Time: The date and time of the most recent access of the unprotected file.
Using the Filter text box, you can limit the display to items that match the criteria that you enter. See “Filtering Displays” for details.
Note: You cannot filter using any part of the path except the file name.
On this screen, the following field names are available:
Path: Matches values in the file name of the Path field.
Size: Matches values in the Unprotected Bytes field.
Owner: Matches values in the Owner field.
Name: Matches values in the file name in the Path field.
Note: If there are many files, it might take a little time to display the filtered results.
To move to the next page of unprotected files (if any), click the right arrow at the top of the page.
To move to the previous page of unprotected files (if any), click the left arrow at the top of the page.
To download a list of unprotected files as a CSV file, click Download CSV.
NFS Exports
You can create, view, edit, and delete NFS exports from NFS volumes. NFSv3 is supported. NFSv4 encrypted connections are supported. Supported protocols appear on the Exports page.
Tip: You can create, update, and delete NFS exports using the NMC API.
Viewing exports
Tip: This function can also be performed using the NMC API. For details, see NMC API.
To view NFS exports from NFS volumes, follow these steps:
Click Volumes, then click Exports in the left-hand column. The Exports page displays a list of exports from NFS volumes on managed Nasuni Edge Appliances.

Figure 7-53: Exports page.
The following information appears for each NFS export in the list:
Volume: The NFS volume of the NFS export.
Filer: The name of the Nasuni Edge Appliance with volumes that have NFS exports.
Export Name: The name of the NFS export.
Descriptive comment for the NFS export.
Path: The path to the NFS export.
Protocols: The supported versions of the NFS protocol.
Filtering the Display
Using the Filter text box, you can limit the display to items that match the criteria that you enter. See “Filtering Displays” for details. On this screen, the following field names are available:
volume: Matches values in the Volume field.
filer: Matches values in the Filer field.
name: Matches values in the Export Name field.
path: Matches values in the Path field.
On this screen, the following conditions are available:
readonly: Matches whether read-only access is enabled.
Creating exports
Tip: You can only add NFS exports to a volume that has the NFS protocol enabled. To create an NFS volume, see “Create Volume”. To enable the NFS protocol for a volume, see Multiple Protocols.
Tip: It is possible to create, update, and delete NFS exports using the NMC API.
Tip: Nasuni monitors platform-specific limits on the number of supported concurrent connections. When the number of concurrent connections reaches the “soft limit” for an Edge Appliance, you receive a notification of how many connections remain, and a suggestion to reduce the number of connections for that Edge Appliance, if possible. When the number of concurrent connections reaches the “hard limit” for an Edge Appliance, you receive a notification, and all new connections are denied for that Edge Appliance until the number of connections decreases below the “hard limit” again.
Platform | Soft Limit | Hard Limit |
|---|---|---|
N1040 | 3000 connections | 4000 connections |
N1050 | 3000 connections | 4000 connections |
N2040 | 5000 connections | 6000 connections |
N2050 | 5000 connections | 6000 connections |
N4040 | 8000 connections | 10000 connections |
N4050 | 8000 connections | 10000 connections |
To create a new NFS export, follow these steps:
On the Exports page, click Create Export. The Create Export page appears.
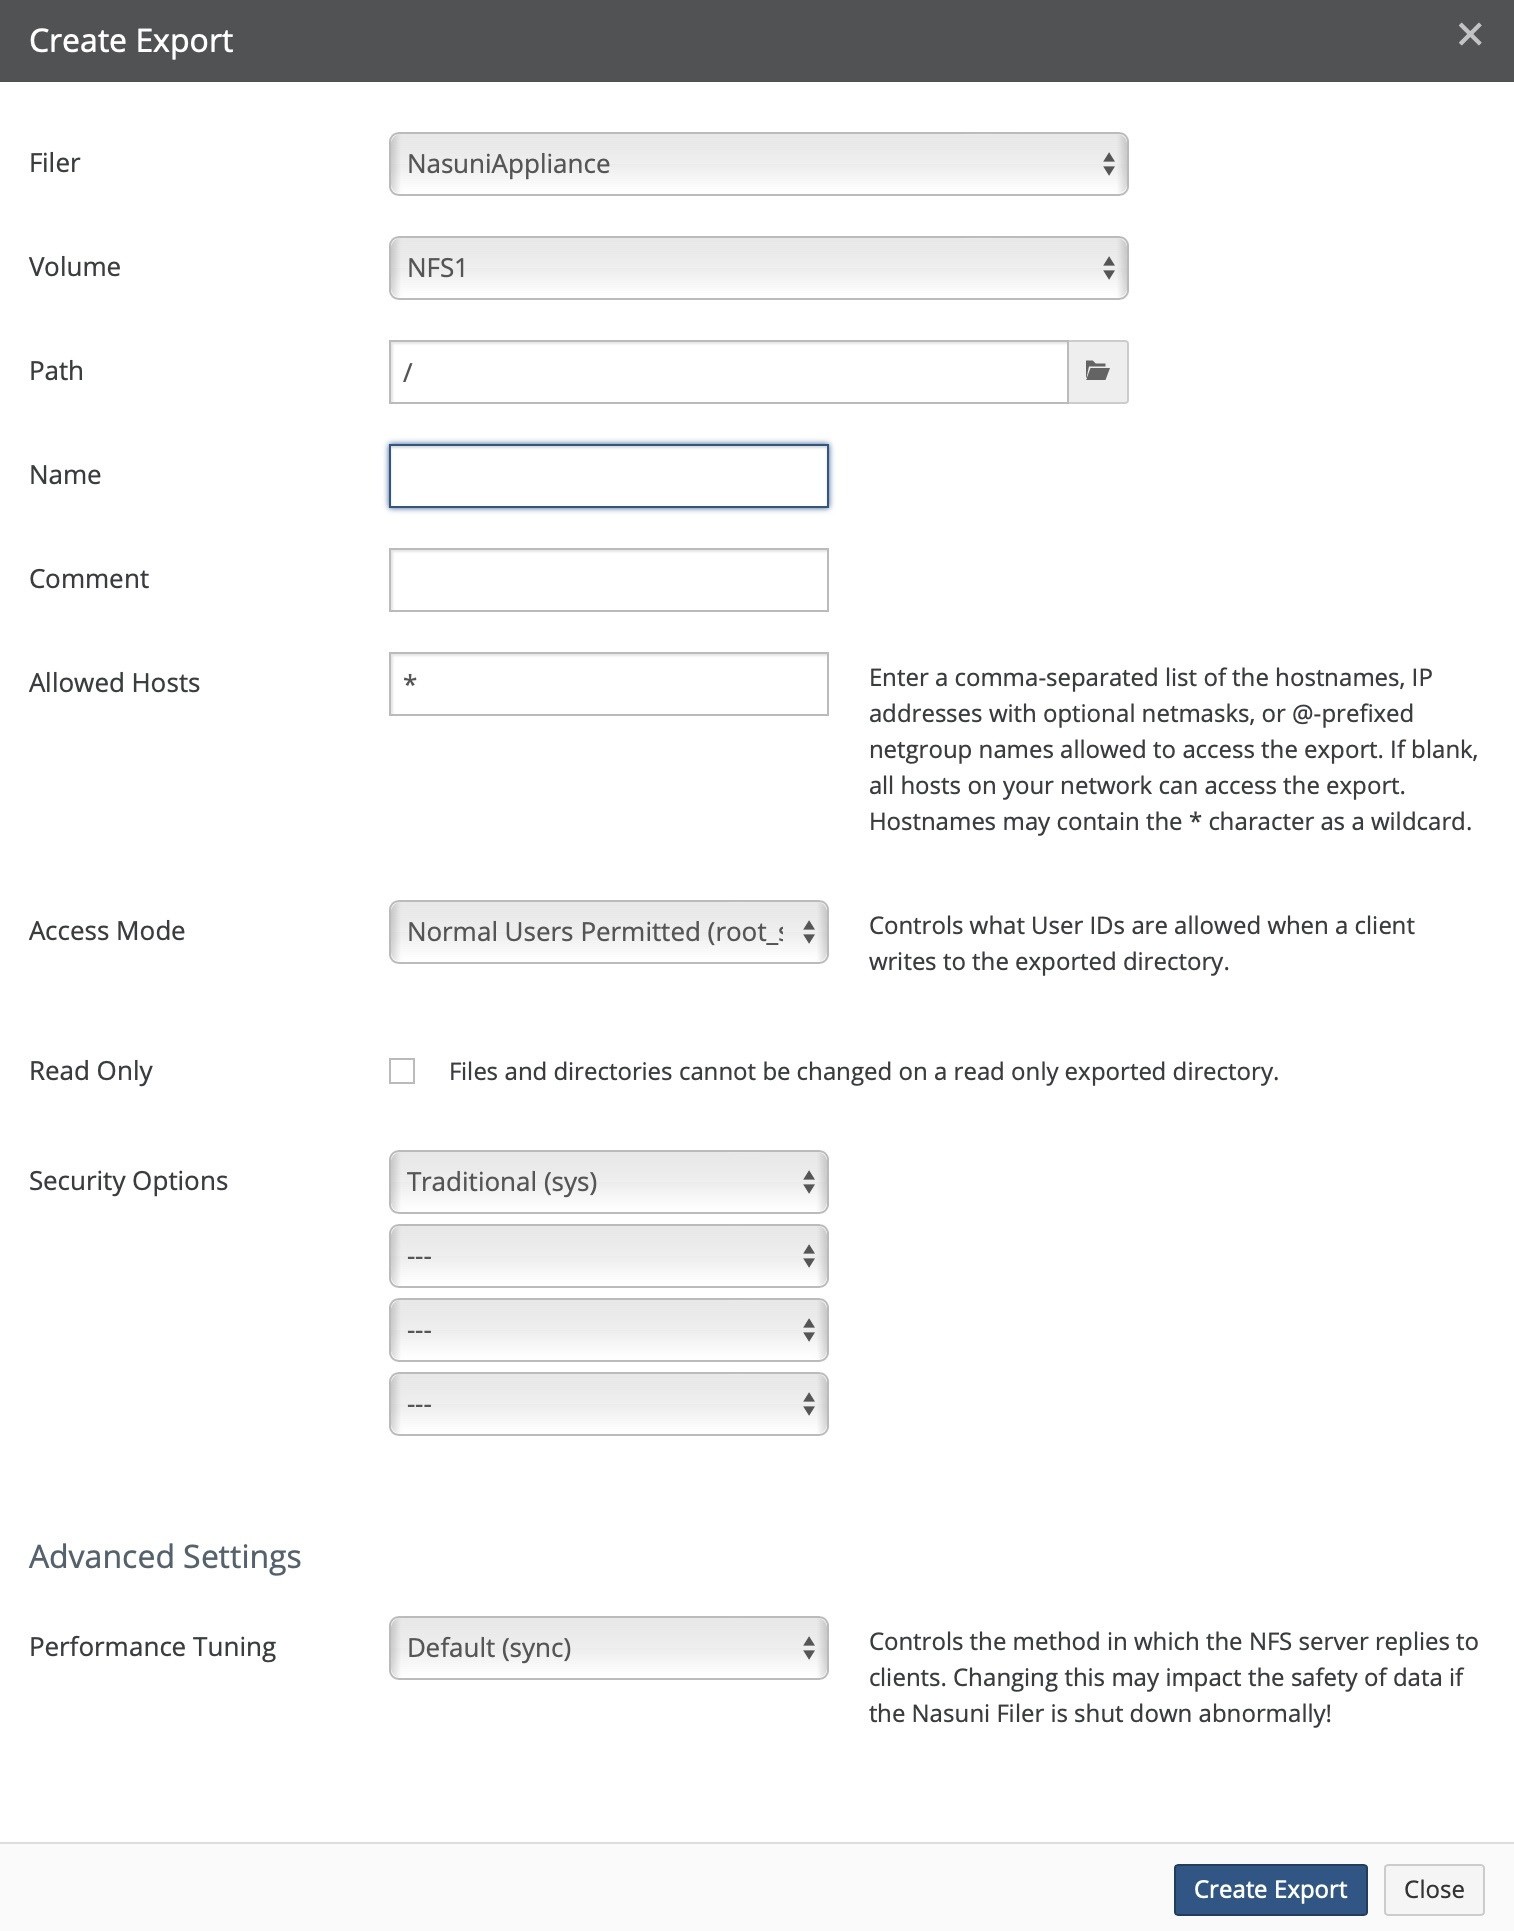
Figure 7-54: Create Export page.
From the Filer drop-down list, select the Nasuni Edge Appliance where you want to create the new NFS export.
From the Volume drop-down list, select the NFS volume on the selected Nasuni Edge Appliance where you want to create the new NFS export.
Click the Path text box and navigate to the directory you want to export.
Caution: The maximum length of a file name is 255 bytes.
In addition, the length of a path, including the file name, must be less than 4,000 bytes.
Since the UTF-8 representation of characters from some character sets can occupy several bytes, the maximum number of characters that a file path or a file name might contain can vary.
If a particular client has other limits, the smaller of the two limits applies.
In the Name text box, enter a name for this export.
NFS export names must begin with a letter or number. The rest of the NFS export name can include letters, numbers, and the characters minus sign (“-“), underscore (“_”), comma (“,”), period (“.”), at sign (“@”), and colon (“:”).
NFS volume names can include characters outside of this range. Automatically-generated NFS export names replace those characters with underscores (“_”). If this leads to a collision with an existing NFS export name, then the automatically-generated NFS export name is appended with an underscore (“_”) and a number in order to disambiguate the NFS export name.
Optionally, enter a descriptive comment in the Comment text box.
In the Allowed Hosts text box, enter the hosts that are allowed to access the NFS export. Enter a comma-separated list of the hostname, IP addresses with optional netmasks, or @- prefixed netgroup names. Use a single asterisk ( * ) to allow all hosts or within a hostname for a wildcard entry. The Allowed Hosts list is limited to 64 characters.
Tip: To define more than one host for an NFS export, see “Editing host options forexports”.
From the Access Mode drop-down list, select an access mode. Your choices are:
Normal Users Permitted (root_squash): All users who have User IDs (UIDs) greater than zero can map to the NFS export. (Typically, users with a UID of zero (root user) are forcibly mapped to the anonymous NFS UID.) This is the same as “root_squash” on UNIX systems: it reduces the access rights for a remote superuser (root).
All Users Permitted (no_root_squash): All users can map to the NFS export with their normal UID. This is the same as “no_root_squash” on UNIX systems: it allows remote root users to have root access.
Anonymize All Users (all_squash): All users are forcibly mapped to the anonymous NFS UID. This is the same as “all_squash” on UNIX systems: it converts all users to the anonymous UID and GID.
If you want the export folder to be read-only for users on the network, select the Read Only check box. This means that users can access the export, but only have read-only rights and therefore cannot make changes to any of the files in the exported folder.
From the four drop-down lists, select any or all of the NFS Security Options that you prefer. The options include the following:
Traditional (sys): Use AUTH_SYS authentication. The user's UNIX user-id and group-ids are passed in the clear on the network, unauthenticated by the NFS server. This is the default.
Authentication (krb5): krb5 uses Kerberos V5 instead of local UNIX UIDs and GIDs to authenticate users.
Integrity Protection (krb5i): krb5i uses Kerberos V5 for user authentication, and performs integrity checking of NFS operations using secure checksums to prevent data tampering.
Privacy Protection (krb5p): krb5p uses Kerberos V5 for user authentication and integrity checking, and encrypts NFS traffic to prevent traffic sniffing. This is the most secure setting, but it also involves the most performance overhead.
If you have provisioned an NTFS Multiprotocol volume, or are connecting to an NTFS Multiprotocol volume, NFS Advanced Settings options, including Performance Tuning, are not available and so are not displayed. For an NTFS Multiprotocol volume, the performance setting is automatically set to “sync”.
Otherwise, in the Advanced Settings area, from the Performance Tuning drop-down list, select the type of Performance Tuning. The choices include the following:Default (sync): Replies to each NFS request only after all data has been stored to disk. This is safer than async, but there is a delay between the store and the reply.
No Write Delay (no_wdelay / sync): If NFS deduces a likelihood of a related storage request arriving soon, then NFS’s optimization algorithm delays storage. This saves disk writes and can speed performance. However, if NFS deduces incorrectly, this behavior causes a delay in every request. The no_wdelay option eliminates the delay.
Asynchronous Replies (async): Replies to requests before the data is stored to disk. This improves performance, but results in lost data if the server goes down.
To accept your selections, click Create Export.
The export is created and appears in the list of exports. The export is available to clients under
/exports/<Directory name>and exposes the directory within the volume.
Mounting NFS exports
Important: NFS mounts using TCP are supported by default. NFS mounts using UDP are not supported by default.
To mount an NFS export in Linux or UNIX, enter the following command:
mount -t nfs <ip_address>:/nfs/<exportname> <target>
where:
ip_addressis the hostname or the IP address of the Nasuni Edge Appliance.exportnameis the name of the NFS export on the Nasuni Edge Appliance.targetis the name of the local directory.
Important: Make sure to include the '
/nfs/' part of the command.
If the default options for the mount command do not work, use these explicit options:
mount -t nfs -o tcp, vers=3, timeo=600, rsize=16384, wsize=16384, hard <ip_address>:/nfs/<exportname> <target>
This version of the mount command includes these explicit options: TCP; version NFSv3; 10 minute (600 seconds) timeout; read and write sizes of 16 KB; and hard mount (soft mounts can corrupt data).
These values of rsize and wsize are recommended, but tune them for your system.
The result of the mount command is to mount the NFS export in the target directory. Users can then add data to the NFS volume using copy commands.
Tip: You can place the
mountcommand in a login script to mount the NFS export automatically.
Tip: Depending on the specific operating system, performing the mount might also create a graphical icon of the NFS export that enables drag and drop and other GUI actions.
Editing exports
Tip: You can create, update, and delete NFS exports using the NMC API.
To edit the selected export, follow these steps:
On the Exports page, click Edit
 . The Edit Export dialog box appears. F
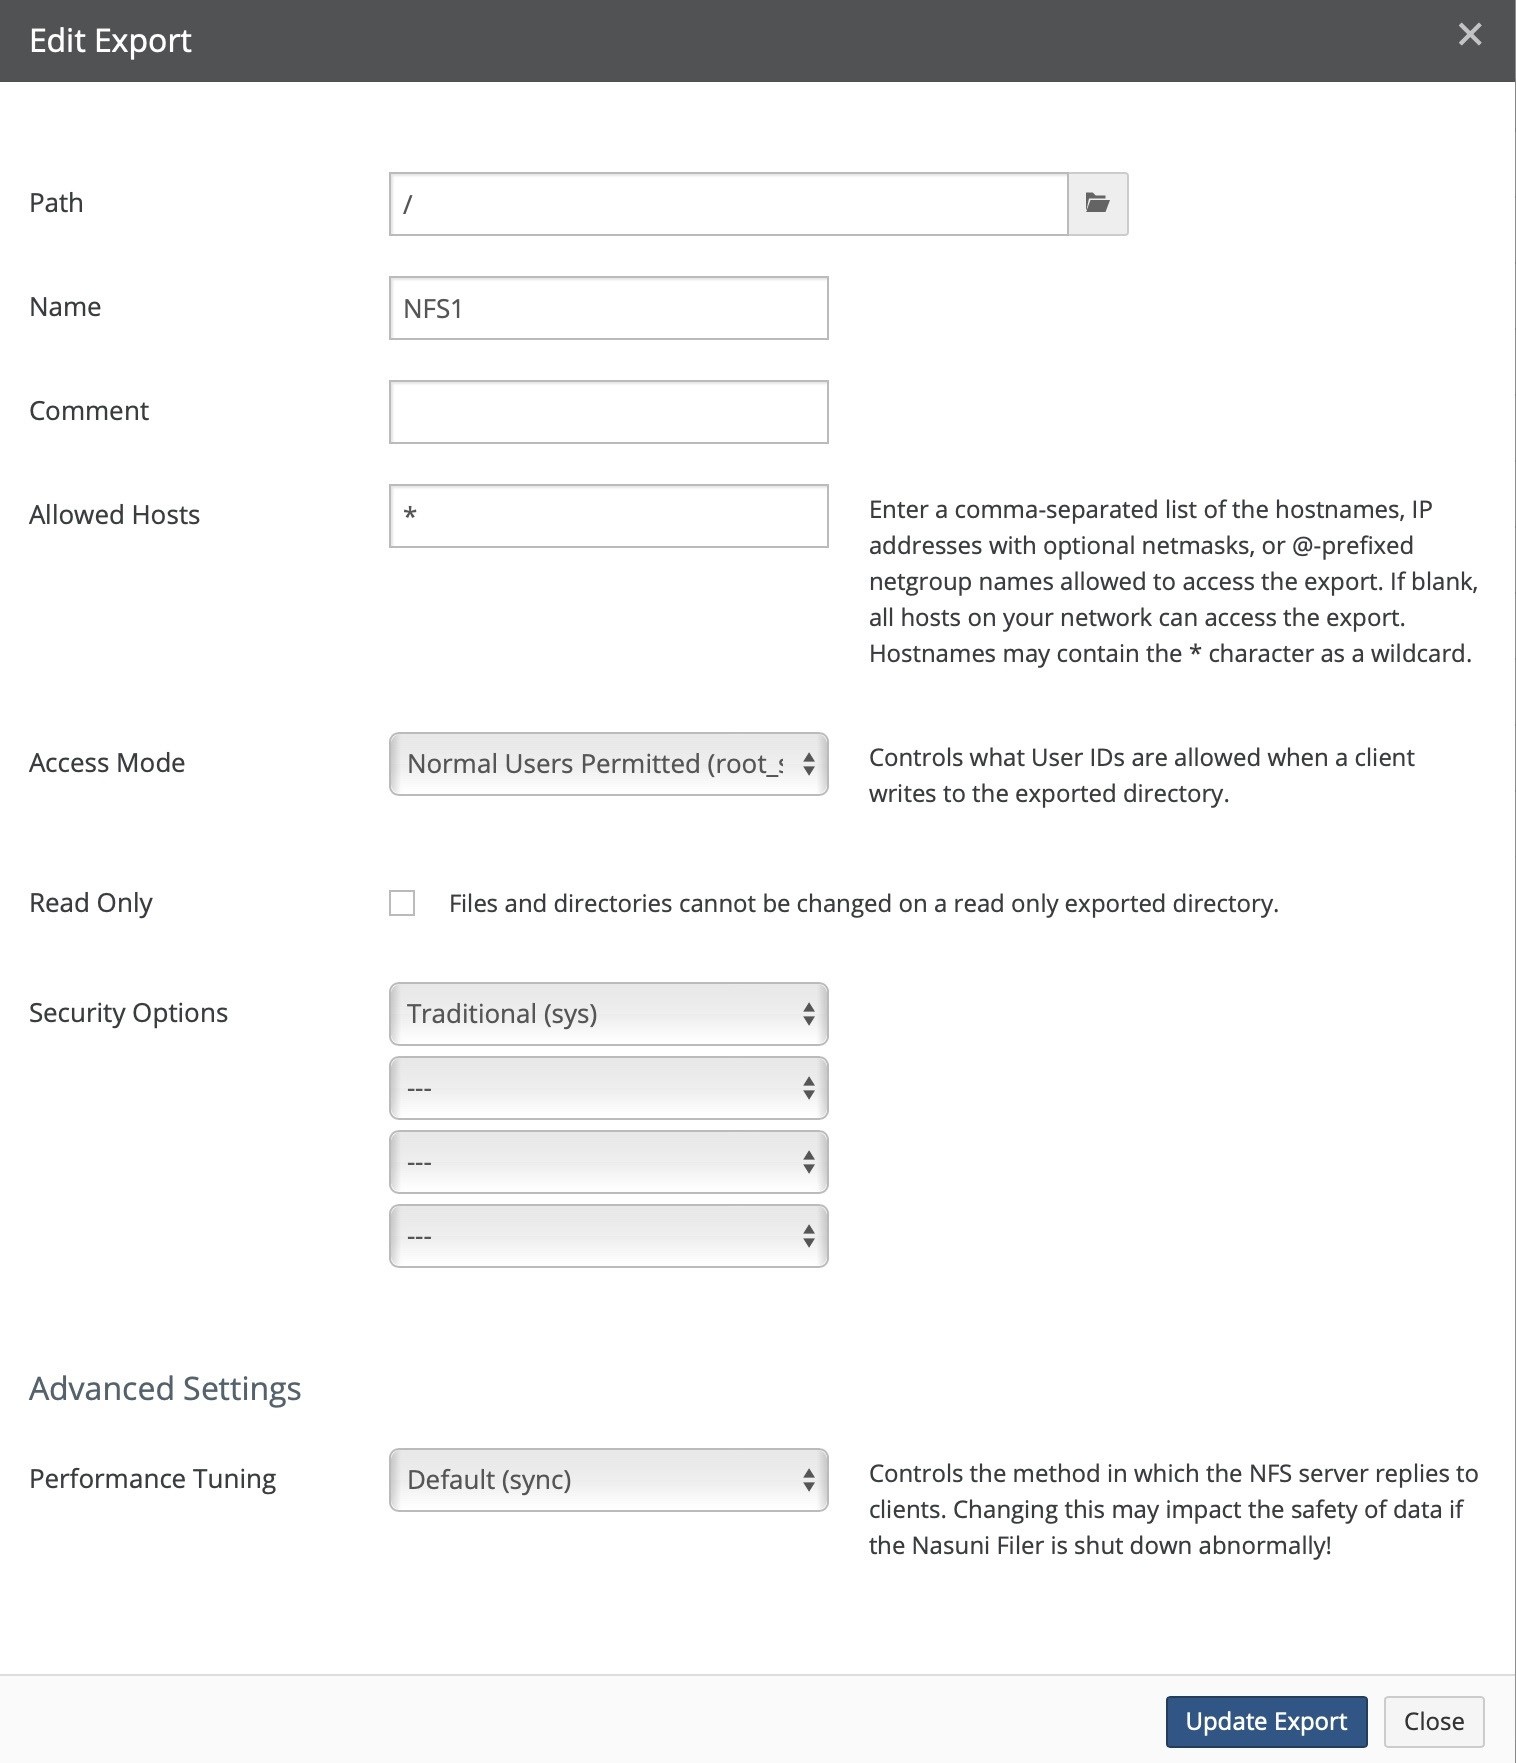
Figure 7-55: Edit Export dialog box.
Optionally, enter a descriptive comment in the Comment text box.
In the Allowed Hosts text box, enter the hosts that are allowed to access the NFS export. Enter a comma-separated list of the hostname, IP addresses with optional netmasks, or @- prefixed netgroup names. Use a single asterisk ( * ) to allow all hosts or within a hostname for a wildcard entry. The Allowed Hosts list is limited to 64 characters.
Tip: To define more than one host for an NFS export, see “Editing host options forexports”.
From the Access Mode drop-down list, select an access mode. Your choices are:
Normal Users Permitted (root_squash): All users who have User IDs (UIDs) greater than zero can map to the NFS export. (Typically, users with a UID of zero (root user) are forcibly mapped to the anonymous NFS UID.) This is the same as “root_squash” on UNIX systems: it reduces the access rights for a remote superuser (root).
All Users Permitted (no_root_squash): All users can map to the NFS export with their normal UID. This is the same as “no_root_squash” on UNIX systems: it allows remote root users to have root access.
Anonymize All Users (all_squash): All users are forcibly mapped to the anonymous NFS UID. This is the same as “all_squash” on UNIX systems: it converts all users to the anonymous UID and GID.
If you want the export folder to be read-only for users on the network, select the Read Only check box. This means that users can access the export, but only have read-only rights and therefore cannot make changes to any of the files in the exported folder.
From the four drop-down lists, select any or all of the NFS Security Options that you prefer. The options include the following:
Traditional (sys): Use AUTH_SYS authentication. The user's UNIX user-id and group-ids are passed in the clear on the network, unauthenticated by the NFS server. This is the default.
Authentication (krb5): krb5 uses Kerberos V5 instead of local UNIX UIDs and GIDs to authenticate users.
Integrity Protection (krb5i): krb5i uses Kerberos V5 for user authentication, and performs integrity checking of NFS operations using secure checksums to prevent data tampering.
Privacy Protection (krb5p): krb5p uses Kerberos V5 for user authentication and integrity checking, and encrypts NFS traffic to prevent traffic sniffing. This is the most secure setting, but it also involves the most performance overhead.
If you have provisioned an NTFS Multiprotocol volume, or are connecting to an NTFS Multiprotocol volume, NFS Advanced Settings options, including Performance Tuning, are not available and so are not displayed. For an NTFS Multiprotocol volume, the performance setting is automatically set to “sync”.
Otherwise, in the Advanced Settings area, from the Performance Tuning drop-down list, select the type of Performance Tuning. The choices include the following:Default (sync): Replies to each NFS request only after all data has been stored to disk. This is safer than async, but there is a delay between the store and the reply.
No Write Delay (no_wdelay / sync): If NFS deduces a likelihood of a related storage request arriving soon, then NFS’s optimization algorithm delays storage. This saves disk writes and can speed performance. However, if NFS deduces incorrectly, this behavior causes a delay in every request. The no_wdelay option eliminates the delay.
Asynchronous Replies (async): Replies to requests before the data is stored to disk. This improves performance, but results in lost data if the server goes down.
To accept your selections, click Update Export.
The export is changed and appears in the list of exports.
Alternatively, to exit this screen without changing the export, click Close.
Editing host options for exports
You can have multiple hosts for an export, each with different host options, including allowed hosts, access mode, read only, and performance tuning.
To edit the selected export, follow these steps:
On the Exports page, click Edit Host Options
 . The NFS Host Options dialog box appears.
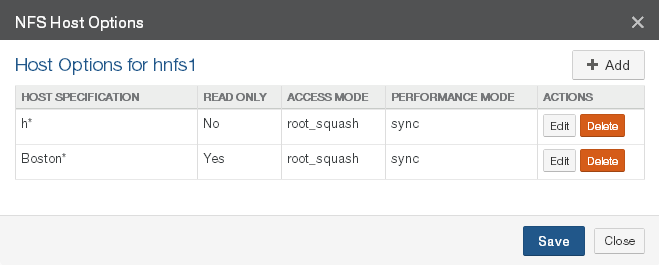
Figure 7-56: NFS Host Options dialog box.
The following information appears for each NFS export in the list:
Host Specification: The hostname, or IP address with optional netmask, allowed to access the NFS export.
Read Only: Indication of whether the files and directories on the exported folder are read- only (Yes) or not (No).
Access Mode: The access mode, of the following:
Normal Users Permitted (root_squash): All users who have User IDs (UIDs) greater than zero can map to the NFS export. (Typically, users with a UID of zero (root user) are forcibly mapped to the anonymous NFS UID.) This is the same as “root_squash” on UNIX systems: it reduces the access rights for a remote superuser (root).
All Users Permitted (no_root_squash): All users can map to the NFS export with their normal UID. This is the same as “no_root_squash” on UNIX systems: it allows remote root users to have root access.
Anonymize All Users (all_squash): All users are forcibly mapped to the anonymous NFS UID. This is the same as “all_squash” on UNIX systems: it converts all users to the anonymous UID and GID.
Performance Mode: If you have provisioned an NTFS Multiprotocol volume, or are connecting to an NTFS Multiprotocol volume, the Performance Mode column is not displayed. (For an NTFS Multiprotocol volume, the performance setting is automatically set to “sync”.)
Otherwise, the type of Performance Tuning is displayed, including the following:Default (sync): Replies to each NFS request only after all data has been stored to disk. This is safer than async, but there is a delay between the store and the reply.
No Write Delay (no_wdelay / sync): If NFS deduces a likelihood of a related storage request arriving soon, then NFS’s optimization algorithm delays storage. This saves disk writes and can speed performance. However, if NFS deduces incorrectly, this behavior causes a delay in every request. The no_wdelay option eliminates the delay.
Asynchronous Replies (async): Replies to requests before the data is stored to disk. This improves performance, but results in lost data if the server goes down.
Actions: Actions available for each NFS export.
To add a new set of host options, click Add. The NFS Export: Host Options dialog box appears.
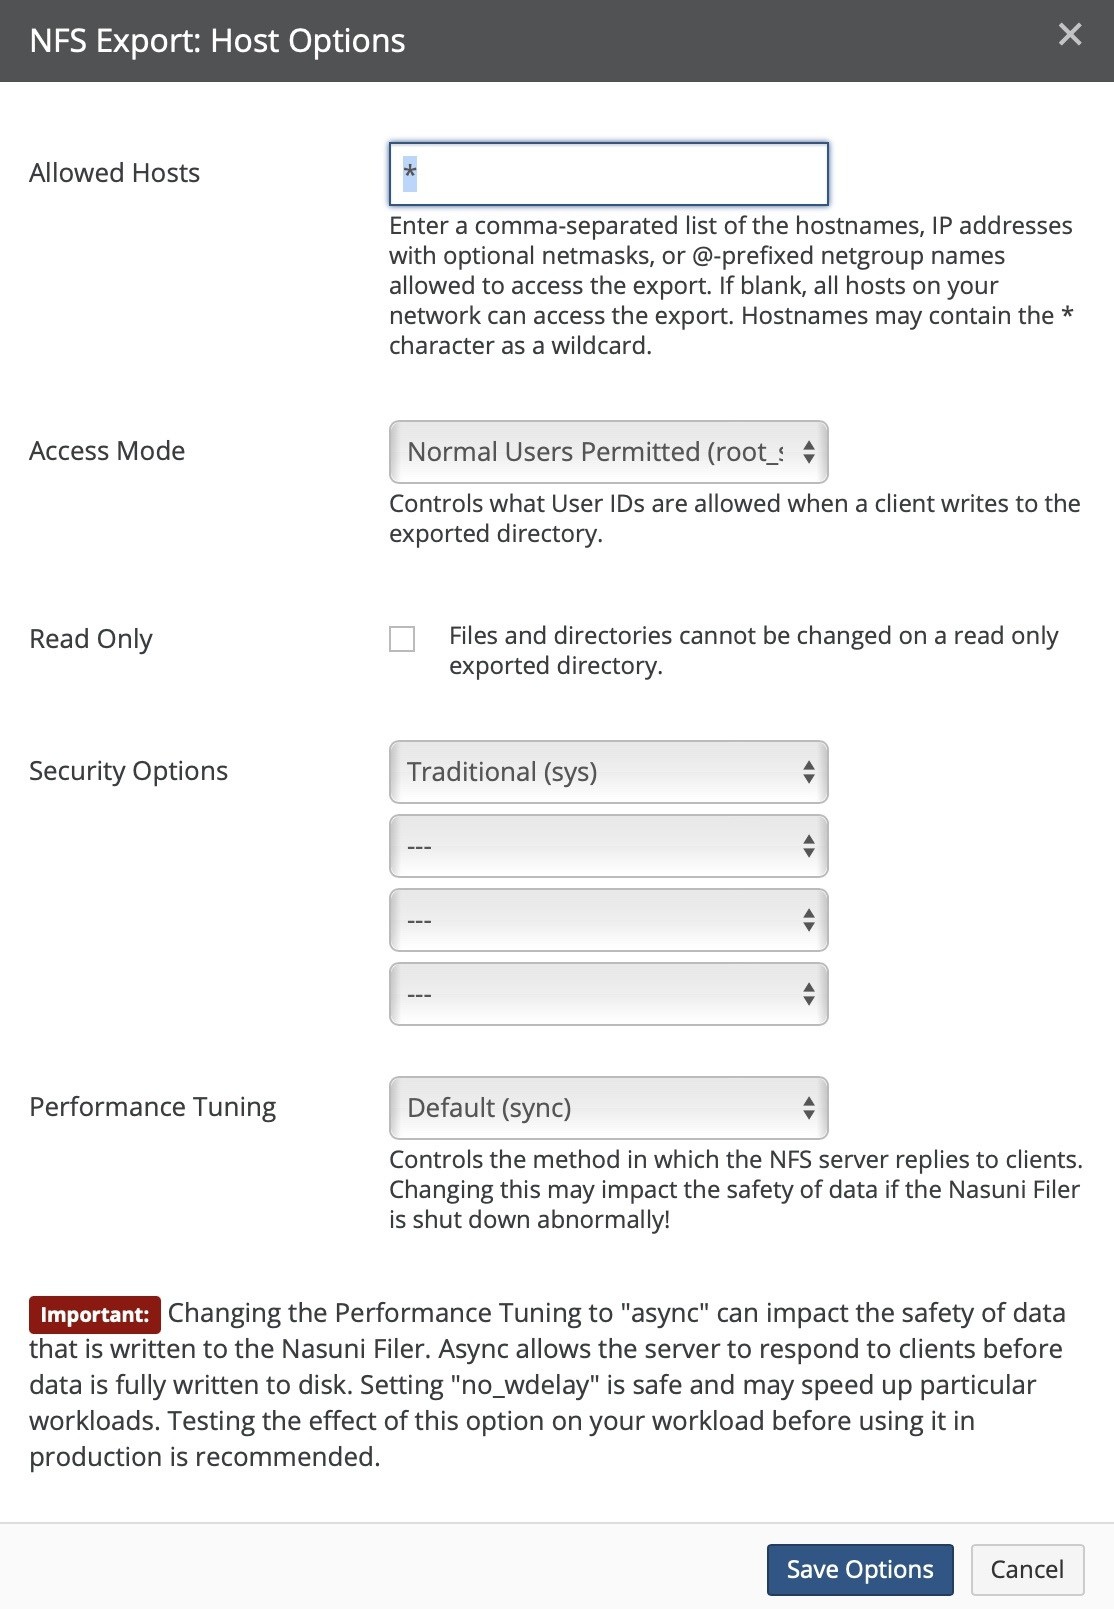
Figure 7-57: NFS Export: Host Options dialog box.
In the Allowed Hosts text box, enter the hosts that are allowed to access the NFS export. Enter a comma-separated list of the hostname, IP addresses with optional netmasks, or @- prefixed netgroup names. Use a single asterisk ( * ) to allow all hosts or within a hostname for a wildcard entry. The Allowed Hosts list is limited to 64 characters.
From the Access Mode drop-down list, select an access mode. Your choices are:
Normal Users Permitted (root_squash): All users who have User IDs (UIDs) greater than zero can map to the NFS export. (Typically, users with a UID of zero (root user) are forcibly mapped to the anonymous NFS UID.) This is the same as “root_squash” on UNIX systems: it reduces the access rights for a remote superuser (root).
All Users Permitted (no_root_squash): All users can map to the NFS export with their normal UID. This is the same as “no_root_squash” on UNIX systems: it allows remote root users to have root access.
Anonymize All Users (all_squash): All users are forcibly mapped to the anonymous NFS UID. This is the same as “all_squash” on UNIX systems: it converts all users to the anonymous UID and GID.
If you want the export folder to be read-only for users on the network, select the Read Only check box. This means that users can access the export, but only have read-only rights and therefore cannot make changes to any of the files in the exported folder.
From the four drop-down lists, select any or all of the NFS Security Options that you prefer. The options include the following:
Traditional (sys): Use AUTH_SYS authentication. The user's UNIX user-id and group-ids are passed in the clear on the network, unauthenticated by the NFS server. This is the default.
Authentication (krb5): krb5 uses Kerberos V5 instead of local UNIX UIDs and GIDs to authenticate users.
Integrity Protection (krb5i): krb5i uses Kerberos V5 for user authentication, and performs integrity checking of NFS operations using secure checksums to prevent data tampering.
Privacy Protection (krb5p): krb5p uses Kerberos V5 for user authentication and integrity checking, and encrypts NFS traffic to prevent traffic sniffing. This is the most secure setting, but it also involves the most performance overhead.
If you have provisioned an NTFS Multiprotocol volume, or are connecting to an NTFS Multiprotocol volume, the Performance Tuning option is not available and so is not displayed. For an NTFS Multiprotocol volume, the performance setting is automatically set to “sync”.
Otherwise, from the Performance Tuning drop-down list, select the type of Performance Tuning. The choices include the following:Default (sync): Replies to each NFS request only after all data has been stored to disk. This is safer than async, but there is a delay between the store and the reply.
No Write Delay (no_wdelay / sync): If NFS deduces a likelihood of a related storage request arriving soon, then NFS’s optimization algorithm delays storage. This saves disk writes and can speed performance. However, if NFS deduces incorrectly, this behavior causes a delay in every request. The no_wdelay option eliminates the delay.
Asynchronous Replies (async): Replies to requests before the data is stored to disk. This improves performance, but results in lost data if the server goes down.
To accept your selections, click Save Options. The export is changed and appears in the list of exports.
To edit an existing set of host options, click Edit for the host option. The NFS Export: Host Options dialog box appears. Follow the steps in step 2 above.
To delete a set of host options, click Delete. The “Remove NFS Host Option?” dialog box appears. Click Delete.
To save the complete list of host options, click Save. The host options for the export are changed.
Alternatively, to exit this screen without changing the export, click Close.
Deleting exports
Tip: You can create, update, and delete NFS exports using the NMC API.
To delete the selected export, follow these steps:
On the Exports page, click Delete
 . The Delete Export dialog box appears.
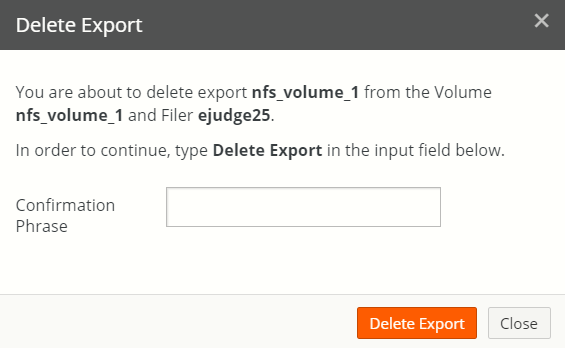
Figure 7-58: Delete Export dialog box.
Verify that the correct export, volume, and Nasuni Edge Appliance appear.
Type
Delete Exportin the Confirmation Phrase text field.Click Delete Export to delete the export.
Alternatively, to exit this screen without deleting the export, click Close.
FTP Directories
You can create, view, edit, and delete FTP/SFTP directories for volumes that have the FTP/SFTP protocol enabled. This enables you to allow FTP/SFTP access to directories and files without adding new users.
Important: The FTP/SFTP protocol is not supported with the NTFS Multiprotocol protocol. If you require the FTP/SFTP protocol for a volume, use the SMB (CIFS) or NFS protocol.
Note: Nasuni supports SFTP, the SSH File Transfer Protocol. This is not the same as FTPS, the File Transfer Protocol over SSL.
Tip: You can ensure that the SFTP (SSH File Transfer Protocol) protocol is used, rather than the FTP protocol, with the Firewall page in the Edge Appliance UI. For each Traffic Group, select SFTP and deselect FTP.
Tip: In order to access data using the FTP/SFTP protocol, the following steps are necessary:
Create an SMB (CIFS) or NFS volume. See “Create Volume”.
Enable the FTP protocol on the volume. See “Enabling multiple volume protocols”.
(Optional) Configure FTP/SFTP settings. See “Editing FTP settings”.
Add a new FTP/SFTP directory. See “Creating FTP directories”.
(Optional) Create a permission group that has storage access. See “Adding Permission Groups” in the Nasuni Edge Appliance Administration Guide.
(Optional) Create a user in a permission group that has storage access. See “Adding Users” in the Nasuni Edge Appliance Administration Guide. Active Directory and LDAP users can log in for FTP access just as they do for SMB (CIFS) access. Also, if anonymous access is enabled, you don't need a specific group or user.
Access files using the FTP/SFTP protocol.
Viewing FTP directories
Tip: This function can also be performed using the NMC API. For details, see NMC API.
To view FTP/SFTP directories, follow these steps:
Click Volumes, then click FTP Directories in the left-hand column. The FTP Directories page displays a list of FTP/SFTP directories for volumes that have the FTP protocol enabled on managed Nasuni Edge Appliances.

Figure 7-59: FTP Directories page.
The following information appears for each FTP/SFTP directory in the list:
Volume: The volume for the FTP/SFTP directory.
Filer: The name of the Nasuni Edge Appliance with volumes that have FTP/SFTP directories.
Name: The name of the FTP/SFTP directory.
Descriptive comment for the FTP/SFTP directory.
Path: The path to the FTP/SFTP directory.
Actions: Actions available for each FTP/SFTP directory.
Protocols: The supported versions of the FTP/SFTP protocol.
Filtering the Display
Using the Filter text box, you can limit the display to items that match the criteria that you enter. See “Filtering Displays” for details. On this screen, the following field names are available:
volume: Matches values in the Volume field.
filer: Matches values in the Filer field.
name: Matches values in the Name field.
path: Matches values in the Path field.
On this screen, the following conditions are available:
anonymous: Matches whether anonymous access is enabled.
readonly: Matches whether read-only access is enabled.
Creating FTP directories
Tip: You can only create FTP/SFTP directories for volumes that have the FTP protocol enabled.
To enable the FTP protocol for a volume, see “Enabling multiple volume protocols”. To configure FTP/SFTP settings for this Nasuni Edge Appliance, see “Editing FTP settings”.
Important: The FTP/SFTP protocol is not supported with the NTFS Multiprotocol protocol. If you require the FTP/SFTP protocol for a volume, use the SMB (CIFS) or NFS protocol.
Note: Nasuni supports SFTP, the SSH File Transfer Protocol. This is not the same as FTPS, the File Transfer Protocol over SSL.
Tip: Nasuni monitors platform-specific limits on the number of supported concurrent connections. When the number of concurrent connections reaches the “soft limit” for an Edge Appliance, you receive a notification of how many connections remain, and a suggestion to reduce the number of connections for that Edge Appliance, if possible. When the number of concurrent connections reaches the “hard limit” for an Edge Appliance, you receive a notification, and all new connections are denied for that Edge Appliance until the number of connections decreases below the “hard limit” again.
Platform | Soft Limit | Hard Limit |
|---|---|---|
N1040 | 3000 connections | 4000 connections |
N1050 | 3000 connections | 4000 connections |
N2040 | 5000 connections | 6000 connections |
N2050 | 5000 connections | 6000 connections |
N4040 | 8000 connections | 10000 connections |
N4050 | 8000 connections | 10000 connections |
To create a new FTP/SFTP directory on a volume that has the FTP protocol enabled, follow these steps:
On the FTP Directories page, click Create FTP Directory. The Create FTP Directory page appears.
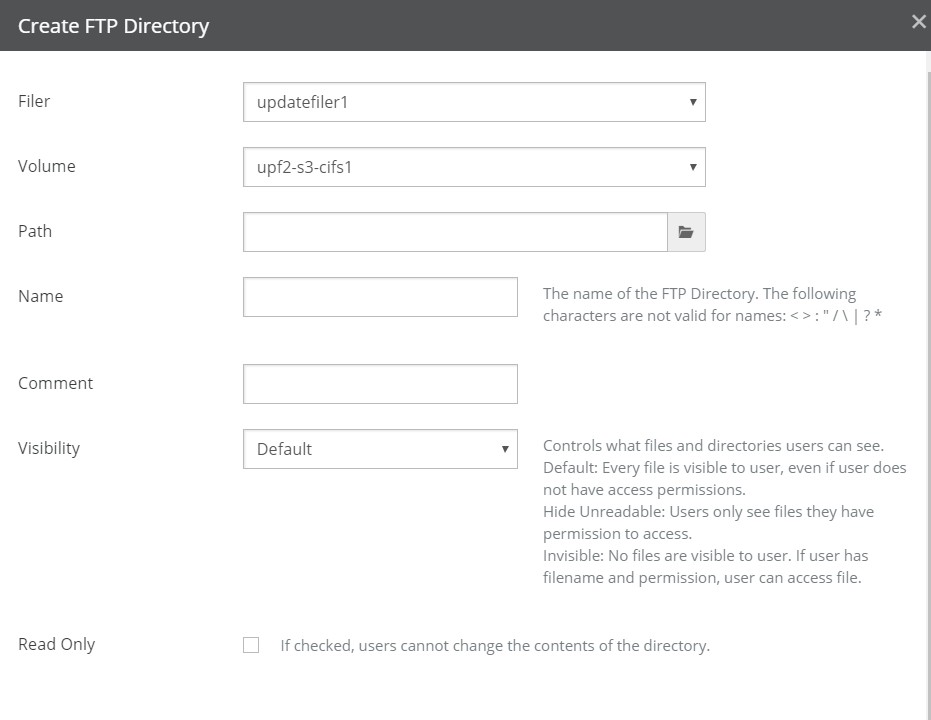
Figure 7-60: Create FTP Directory page.
From the Filer drop-down list, select the Nasuni Edge Appliance where you want to create the new FTP/SFTP directory.
From the Volume drop-down list, select the volume on the selected Nasuni Edge Appliance where you want to create the new FTP/SFTP directory.
Click the Path text box and navigate to the directory you want to access using FTP.
Caution: The maximum length of a file name is 255 bytes.
In addition, the length of a path, including the file name, must be less than 4,000 bytes.
Since the UTF-8 representation of characters from some character sets can occupy several bytes, the maximum number of characters that a file path or a file name might contain can vary.
If a particular client has other limits, the smaller of the two limits applies.
In the Name text box, enter a name for this FTP/SFTP directory. The following characters are not valid for FTP/SFTP directory names:
< > : " / \ | ? *
Tip: For Windows uses, see Naming Files, Paths, and Namespaces.
Optionally, enter a descriptive comment in the Comment text box.
From the Visibility drop-down list, select the visibility of the new FTP/SFTP directory. Your choices are:
Default: Every file is visible to the user. However, even if a file is visible to the user, the user might not be able to access the file because of permissions.
Hide Unreadable: Files that the user does not have permission to access are not visible to the user.
Note: Access-based enumeration (ABE) hides files and folders that users do not have permissions to access. In Nasuni, this is accomplished with the "Hide Unreadable" share setting.
Invisible: No files are visible to the user. However, if a user has the filename of a file, and the appropriate permission, the user can access the file.
If you want the FTP/SFTP directory to be read-only, select the Read Only check box. This means that users can access the FTP/SFTP directory, but only have read-only rights and therefore cannot make changes to any of the files or directories in the FTP/SFTP directory.
To control the permissions on new files in this FTP/SFTP directory, there are several choices, which use umask settings to represent read, write, and execute permissions for the user, the group, and others. Select one of the following choices from the Permissions on New Files drop-down menu:
No Extra Restrictions (Default): The owner, the group, and all others have all permissions for all files in this FTP/SFTP directory. This is a umask setting of 000, which, for a requested permission of 777, produces 777.
Read-Only Others: The owner and the group have all permissions for all files in this FTP/ SFTP directory. Others can only read all files in this FTP/SFTP directory. This is a umask setting of 002, which, for a requested permission of 777, produces 775.
Read-Only Groups and Others: The owner has all permissions for all files in this FTP/SFTP directory. The group and others can only read all files in this FTP/SFTP directory. This is a umask setting of 022, which, for a requested permission of 777, produces 755.
Restrict Others: The owner and the group have all permissions for all files in this FTP/SFTP directory. Others have no permissions for all files in this FTP/SFTP directory. This is a umask setting of 006, which, for a requested permission of 777, produces 771.
Restrict Groups and Others: The owner has all permissions for all files in this FTP/SFTP directory. The group and others have no permissions for all files in this FTP/SFTP directory. This is a umask setting of 066, which, for a requested permission of 777, produces 711.
Read-Only Groups, Restrict Others: The owner has all permissions for all files in this FTP/ SFTP directory. The group can only read all files in this FTP/SFTP directory. Others have no permissions for all files in this FTP/SFTP directory. This is a umask setting of 026, which, for a requested permission of 777, produces 751.
To control which hosts are allowed to connect to this FTP/SFTP directory, in the IP Restrictions text box, enter a comma-separated list of the IP addresses or subnet addresses of the hosts that are allowed to access this FTP/SFTP directory. If you leave this field blank, all hosts on your network have access to this FTP/SFTP directory without restrictions.
Note: You cannot use IP Restrictions in conjunction with Allowed Users/Groups in step 11.
To control the users and groups that have access to the FTP/SFTP directory, from the Allowed Users/Groups drop-down list, select one of the following choices.
Everyone: Allows all users and groups to access the FTP/SFTP directory.
Anonymous Only: Allows only the anonymous user to access the FTP/SFTP directory. This selection is only available if Anonymous is enabled, as in step 12.
Specific Users/Groups: Allows you to specify the users and groups that have access to this FTP/SFTP directory. The Allowed Groups and Allowed Users areas appear.
Note: You cannot use Allowed Users/Groups in conjunction with IP Restrictions in step 10.
Tip: A user can access the FTP/SFTP directory if the user is accessing the FTP/SFTP directory from one of the allowed hosts and is either one of the allowed users or a member of one of the allowed groups.
Tip: Tip: To specify native users or groups, the users or groups must have Storage Access enabled. See “Console Users and Groups”.
To add one group, follow these steps:
In the Allowed Groups area, click Add One. The Name search box appears.

Figure 7-61: Add One Name search box.
Enter a partial or complete group name, then click Search
 . The Select Group dialog box appears, containing the partial or complete group name.
Figure 7-62: Select Group dialog box.
To control the range of the search, select one of the following:
All: To search through all groups.
Domain only: To search though domain groups only.
Native only: To search through native groups only.
Click Search. A list of groups that match your search appears. Select the group to define access for, then click Add Selected Group. The selected group appears in the Allowed Groups area.

Figure 7-63: Allowed Groups area.
To add more than one group, follow these steps:
In the Allowed Groups area, click Add Many. The Select Groups dialog box appears.
In the Search text box, enter a partial or complete group name.
To control the range of the search, select one of the following:
All: To search through all groups.
Domain only: To search though domain groups only.
Native only: To search through native groups only.
Click Search. A list of groups that match your search appears.
Select the groups to define access for, then click Add Selected Groups. The selected groups appear in the Allowed Groups area.
To delete a group from the Allowed Groups list, click Delete next to the group name. The group is deleted from the list.
To add one user, follow these steps:
In the Allowed Users area, click Add One. The Name search box appears.
Figure 7-64: Add One Name search box.
Enter a partial or complete user name.
Tip: To specify a local user name (native to the Nasuni Edge Appliance), include the name of the local Nasuni Edge Appliance in the query string.
Click Search
 . The Select User dialog box appears, containing the partial or complete user name.
Figure 7-65: Select User dialog box.
To control the range of the search, select one of the following:
All: To search through all users.
Domain only: To search though domain users only.
Native only: To search through native users only.
Click Search. A list of users that match your search appears. Select the user to define access for, then click Add Selected User. The selected user appears in the Allowed Users area.

Figure 7-66: Allowed Users area.
To add more than one user, follow these steps:
In the Allowed Users area, click Add Many. The Select Users dialog box appears.
In the Search text box, enter a partial or complete user name.
Tip: To specify a local user name (native to the Nasuni Edge Appliance), include the name of the local Nasuni Edge Appliance in the query string.
To control the range of the search, select one of the following:
All: To search through all users.
Domain only: To search though domain users only.
Native only: To search through native users only.
Click Search. A list of users that match your search appears.
Select the users to define access for, then click Add Selected Users. The selected users appear in the Allowed Users area.
To delete a user from the Allowed Users list, click Delete next to the user name. The user is deleted from the list.
To allow anonymous FTP/SFTP access, select the Anonymous check box.
Tip: If anonymous FTP/SFTP access is enabled, any user can access the FTP/SFTP directory.
To enable uploads using temporary files, select Temporary-File Uploads. If selected, file uploads are performed in two steps, using a temporary file. This prevents issues such as incomplete uploads and attempted file use before the upload is complete. This feature is automatically enabled for anonymous uploads.
Since this feature prevents resuming failed uploads, deselect Temporary-File Uploads if you want to be able to resume failed uploads.
To hide the actual owner and group of files in directory listings, select Hide Ownership in Listings. If selected, all directory listings show “ftp” as the owner and the group.
This feature can enhance security. This feature might also be useful for clients that cannot parse standard FTP directory listings.
To accept your selections, click Create FTP Directory.
The FTP/SFTP directory is created and appears in the list of FTP directories. The FTP/SFTP directory is available to users.
Editing FTP directories
To edit the selected FTP/SFTP directory, follow these steps:
On the FTP Directories page, click Edit
 . The Edit FTP Directory dialog box appears.
Figure 7-67: Edit FTP Directory dialog box.
Continue with step 4. When finished, click Update FTP Directory.
The FTP/SFTP directory is changed and appears in the list of FTP directories. The FTP/SFTP directory is available to users.
Alternatively, to exit this screen without changing the FTP/SFTP directory, click Close.
Deleting FTP directories
To delete the selected FTP/SFTP directory, follow these steps:
On the FTP Directories page, click Delete
 . The Delete FTP Directory dialog box appears.
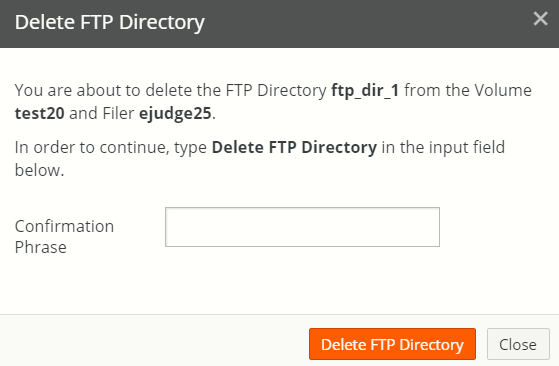
Figure 7-68: Delete FTP Directory dialog box.
Verify that the correct FTP/SFTP directory, volume, and Nasuni Edge Appliance appear.
Type
Delete FTP Directoryin the Confirmation Phrase text field.Click Delete FTP Directory to delete the FTP/SFTP directory.
Alternatively, to exit this screen without deleting the FTP/SFTP directory, click Close.
SMB (CIFS) Shares
You can create, view, edit, and delete SMB (CIFS) shares from SMB (CIFS) volumes.
Tip: You can obtain a list of the SMB (CIFS) shares using the NMC API. For details, see NMC API.
SMB (CIFS) protocol support
Nasuni supports the following releases of SMB (CIFS):
SMB protocol version | OS version when introduced | Support |
|---|---|---|
3.1.1 | Windows 10, Server 2016 | Yes: see features below |
3.0.2 | Windows 8.1, Server 2012 R2, macOS 10.10 (Yosemite) | Yes |
3.0 | Windows 8, Server 2012, macOS 10.10 (Yosemite) | Yes: see features below |
2.1 | Windows 7, Server 2008 R2 | Yes |
2.0 | Windows Vista | Yes: enabled by default |
1.0/CIFS/SMBv1 | Windows 3.1 | Yes: disabled by default, can be enabled in customer license by Support |
Supported SMB Features
The Nasuni version 10.0 and later supports the following SMB features:
Access-Based Enumeration (ABE): Access-based enumeration displays only the files and folders that a user has permission to access. If a user does not have Read (or equivalent) permissions for a folder, Windows hides the folder from the user’s view.
The NMC lists this feature as “Hide Unreadable Files” and you can control it at the share level.Authentication: Nasuni’s SMB authentication supports NTLMv2 and Kerberos. The appliance automatically registers the Kerberos Service Principal Name (SPN) with Active Directory during Active Directory joining in order to ensure SSO.
If multiple hostnames are required for an appliance, you can register additional SPNs in Active Directory for an NEA. For more information, see KB 11455.Change Notify: Change Notify is a function of CIFS/SMB, which sends any folder updates to the client. Example: If two users have the same folder open, and one user deletes a file, a Change Notify update is sent to the second user of the deleted file. Nasuni supports Change Notify for users connected to local and remote shares. (Suppose user A opens a share on NEA 1, and user B is connected to NEA 1 working on the same directories. Changes from user A are automatically visible to user B when sync runs on NEA 2, without requiring user B to refresh folder contents.)
Durable handles: Durable handles enable SMB 2.0 and higher clients to open a file and survive a temporary connection loss (60 seconds or less), such as is commonly experienced when using VPN connections or transitioning from wired to wireless networks. Durable handles are currently only supported for volumes with NTFS Exclusive Permissions Policy and cannot be used with Global File Lock. Support for durable handles was first added in version 9.3.
Note: When Global Locking is enabled, support for SMB durable handles (allowing clients to survive temporary connection loss) is disabled. Enabling Global Locking anywhere on the volume disables durable handles. If durable handles is disabled in this way, durable handles cannot be enabled again.
Hidden Shares ($): The "$" appended to the end of the share name means that it is a hidden share.
Leases: File, not directory. File leasing is an SMBv2/SMBv3-only feature that allows clients to aggressively cache files locally, in addition to the caching allowed by SMBv1 oplocks.
Large MTU/Jumbo Frames: Nasuni supports 9000-byte MTUs for the Edge Appliance, although it is not enabled by default. Customers can edit the MTU on the Network Configuration page.
Re-authentication: On the client side, re-authentication normally occurs on expired sessions, but implementations or applications may decide to re-authenticate Valid sessions if needed.
Secure dialect negotiation: Secure dialect negotiation is introduced in SMB3 to protect against man- in-the-middle attempt to downgrade dialect negotiation.
Server-Side Copy Offload (Copy-Chunk): Clients can offload copy operations to the server using Copy-Chunk requests. In processing such a request, the network roundtrip is avoided. Similar technology for server-side copy, ODX, is not supported by Samba. Server-side copies do not work across Nasuni volumes, SMB shares, or paths with Global File Lock.
Share Permissions: Nasuni (and Samba) supports share permissions (managed in the NMC share settings), but these share permissions are different from the Windows file server implementation. Nasuni supports the following for the specified users and groups:
read-only: When set, the share is presented as read-only to the specified users or groups, regardless of what NTFS permissions allow.
read-write: When set, users still need matching NTFS rights; Samba does not grant read-write access if the underlying ACL denies it.
deny: When set, the deny is processed before NTFS ACLs are even evaluated. If a user is denied here, they cannot mount the share at all, regardless of what NTFS permissions grant them.
SMB encryption: Supported with SMB protocol version 3.0 and higher: AES-128-GCM. SMB encryption can be set on the NMC and Edge Appliance to the following: Optional, Desired, Required.
Note: Windows 7 and older clients do not support SMB encryption and cannot connect to shares with SMB encryption set to Required.
SMB signing: Signing is supported, if the client negotiates it. There is no customer-facing setting to require SMB signing for the server or share. If SMB signing is required, contact Nasuni Support. The only way to disable signing is to select SMBv1.
SMBv1 Support: With version 9.0 and later, SMBv1 is off by default. Nasuni Support can enable SMBv1 on a per-NEA basis.
When using SMBv1, we recommend using the NMC’s Filers → CIFS Settings page to set a 1 MB allocation roundup for SMB shares. This improves performance for SMBv1 clients, and adds a slight performance overhead for SMBv3 clients.
Viewing shares
Tip: This function can also be performed using the NMC API. For details, see NMC API.
To view SMB (CIFS) shares from SMB (CIFS) volumes, follow these steps:
Click Volumes, then click Shares in the left-hand column. The Shares page displays a list of shares from SMB (CIFS) volumes on managed Nasuni Edge Appliances.
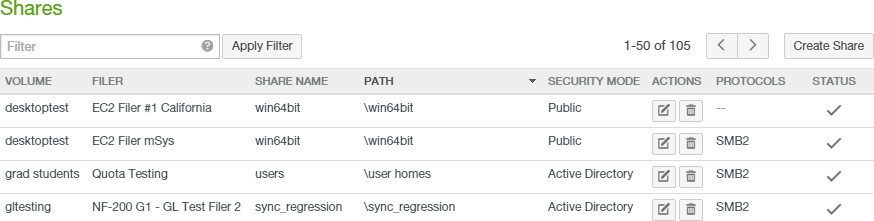
Figure 7-69: Shares page.
The following information appears for each SMB (CIFS) share in the list:
Volume: The SMB (CIFS) volume of the SMB (CIFS) share.
Filer: The name of the Nasuni Edge Appliance where an SMB (CIFS) share is located.
Share Name: The name of the SMB (CIFS) share.
Descriptive comment for the SMB (CIFS) share.
Path: The path to the SMB (CIFS) share.
Security Mode (SMB (CIFS) volumes only): The security mode of the SMB (CIFS) share: Active Directory, LDAP Directory Services, Publicly Available, or Unknown.
Note: If the permission of a remote volume is Disabled, the remote volume might not display the correct Security Mode for that volume.
Actions: Actions available for each SMB (CIFS) share.
Protocols: The supported versions of the SMB (CIFS) or SMB protocol.
Filtering the Display
Using the Filter text box, you can limit the display to items that match the criteria that you enter. See “Filtering Displays” for details. On this screen, the following field names are available:
volume: Matches values in the Volume field.
filer: Matches values in the Filer field.
name: Matches values in the Share Name field.
path: Matches values in the Path field.
On this screen, the following conditions are available:
aio: Matches whether Asynchronous I/O is enabled.
authall: Matches whether Authenticate all Users is enabled.
browsable: Matches whether Visible Share is enabled.
browser_access: Matches whether Web Access is enabled.
case_sensitive: Matches whether Case-Sensitive Paths is enabled.
hide_unreadable: Matches whether Hide Unreadable Files is enabled.
previous_versions: Matches whether Previous Versions is enabled.
readonly: Matches whether read-only access is enabled.
snapshot_dirs: Matches whether Snapshot Directory Access is enabled.
Creating shares
Caution: If you attempt to create a share on a directory on which Advanced Global File Lock is enabled, all SMB-connected users will be disconnected and might need to re-connect. Also, data reads and writes will be disrupted.
Tip: You can only add SMB (CIFS) shares to a volume that has the SMB (CIFS) protocol enabled.
To create an SMB (CIFS) volume, see “Create Volume”. To enable the SMB (CIFS) protocol for a volume, see Multiple Protocols.
Tip: Hard links, junctions, and symbolic links (including Windows junctions and hard links) are not supported with SMB (CIFS) shares.
Caution: You must specify the domain with the username in order to authenticate, such as DOMAIN\username or username@DOMAIN.
Durable handles allow SMB 2.0 and higher clients to open a file and survive a temporary connection loss (60 seconds or less). Durable handles are supported for volumes with NTFS Exclusive Permissions Policy and cannot be used with Global File Lock.
Note: When Global Locking is enabled, support for SMB durable handles (allowing clients to survive temporary connection loss) is disabled. Enabling Global Locking anywhere on the volume disables durable handles. If durable handles is disabled in this way, durable handles cannot be enabled again.
Tip: Windows share permissions are not Nasuni share permissions. Setting permissions using the “Share Permissions” tab in File Explorer or using the Shared Folders Microsoft Management Console (MMC) is not supported. To set share permissions, use the Authentication option in step 13 below.
Tip: This function can also be performed using the NMC API. For details, see NMC API.
Tip: Nasuni monitors platform-specific limits on the number of supported concurrent connections. When the number of concurrent connections reaches the “soft limit” for an Edge Appliance, you receive a notification of how many connections remain, and a suggestion to reduce the number of connections for that Edge Appliance, if possible. When the number of concurrent connections reaches the “hard limit” for an Edge Appliance, you receive a notification, and all new connections are denied for that Edge Appliance until the number of connections decreases below the “hard limit” again.
Platform | Soft Limit | Hard Limit |
|---|---|---|
N1040 | 3000 connections | 4000 connections |
N1050 | 3000 connections | 4000 connections |
N2040 | 5000 connections | 6000 connections |
N2050 | 5000 connections | 6000 connections |
N4040 | 8000 connections | 10000 connections |
N4050 | 8000 connections | 10000 connections |
To create a new SMB (CIFS) share, follow these steps:
On the Shares page, click Create Share. The Create Share page appears.
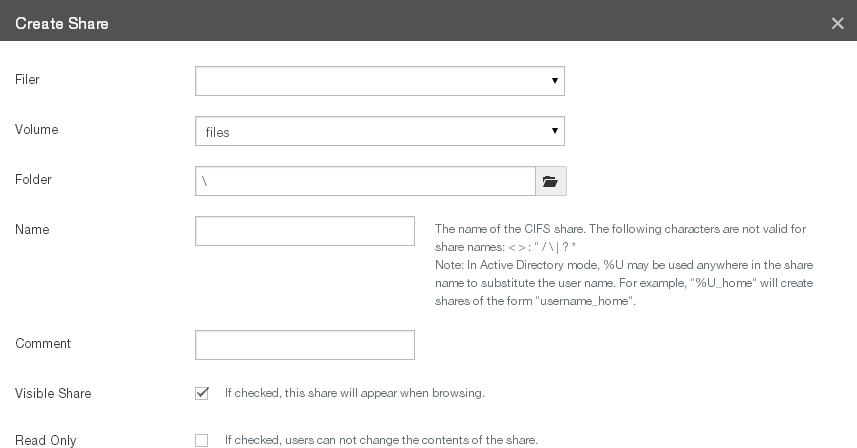
Figure 7-70: Create Share page (top part).
From the Filer drop-down list, select the Nasuni Edge Appliance where you want to create the new SMB (CIFS) share.
From the Volume drop-down list, select the SMB (CIFS) volume where you want to create the new SMB (CIFS) share.
Click the Folder text box and navigate to the folder you want to share.
Caution: The maximum length of a file name is 255 bytes.
In addition, the length of a path, including the file name, must be less than 4,000 bytes.
Since the UTF-8 representation of characters from some character sets can occupy several bytes, the maximum number of characters that a file path or a file name might contain can vary.
If a particular client has other limits, the smaller of the two limits applies.
In the Name text box, enter a name for this SMB (CIFS) share. Limitations on the SMB (CIFS) share name include the following:
Length limited to 32 bytes. Since the Unicode representation of a character can occupy several bytes, the maximum number of characters in an SMB (CIFS) share name can be less than 32.
The following characters are not valid for SMB (CIFS) share names:
< > : " / \ | ? *
Do not use . (period or dot) at the beginning of the name of the SMB (CIFS) share.
Do not use the $ character at the end of the name of the SMB (CIFS) share. Windows clients interpret these SMB (CIFS) shares as hidden.
Do not use “global”, "homes", or "printers" as an SMB (CIFS) share name. These are reserved names.
Caution: Each share name on an Edge Appliance must be unique. In particular, share names cannot differ only by case. When connecting remote volumes, each share name on all connecting Edge Appliances must be similarly unique. You can view all share names for an Edge Appliance on the CIFS Shares page, or on the Shares page on the NMC.
If the Security of this Nasuni Edge Appliance is Directory Services, and if User Folders Support is enabled, you can modify the name of the share to include the wildcard “%U” to represent the user name. (See step f.) For example, the wildcard share name:
%U_sharefor the user “paulm” becomes the share name:
paulm_shareIf the share “
%U_share” maps to the folder “/homes”, then, when the user maps “paulm_share”, the resulting location is “/homes/paulm”. This can simplify creating multiple shares for multiple users.Note: The %U wildcard only produces lower-case user names, regardless of the case of the actual original name.
Tip: You cannot create an internal link to folders created by using the "%U" wildcard in the SMB (CIFS) share name.
Important: If User Folders Support is enabled on a share, do not create a Shared Link Global User.
Tip: For Windows uses, see Naming Files, Paths, and Namespaces.
Caution: The maximum length of a file name is 255 bytes.
In addition, the length of a path, including the file name, must be less than 4,000 bytes.
Since the UTF-8 representation of characters from some character sets can occupy several bytes, the maximum number of characters that a file path or a file name might contain can vary.
If a particular client has other limits, the smaller of the two limits applies.
Optionally, enter a descriptive comment in the Comment text box.
If you want the share to be visible in the list of shares when users map the Nasuni Edge Appliance, select the Visible Share check box. If the share is not visible, it does not appear in the list of shares when users map the Nasuni Edge Appliance; however, if you know the share’s name, you can still map the share directly.
If you want the share folder to be read-only for users on the network, select the Read Only Share check box. This means that users can access the share, but only have read-only rights and, therefore, cannot make changes to any of the files in the shared folder.
Important: If you select “Read Only Share”, and then select “Read-Write” as either the group Access (step c) or the user Access (step g), then the actual access for the group or user is Read-Write. The Read-Write access of the group or user overrides the Read only setting of the share.
The Advanced Settings area contains additional settings.
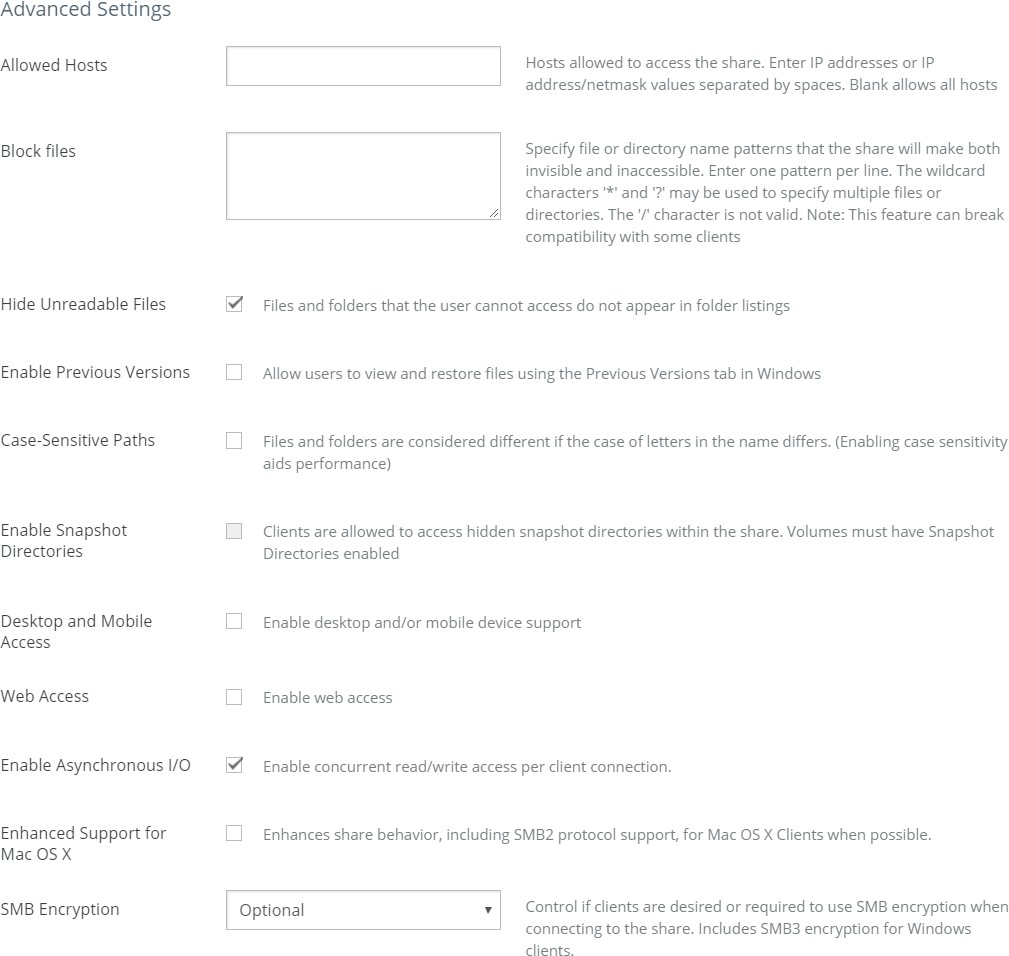
Figure 7-71: Advanced Settings area.
In the Allowed Hosts text box, enter the SMB client devices (hosts) that are permitted to access the SMB (CIFS) share folder. You can specify hosts on your internal network, and, if Web Access is enabled, external hosts as well.
Entries can be individual IP addresses (for example, 150.203.15.30) or subnets in either subnet mask format (150.203.15.0/255.255.255.0) or CIDR notation (150.203.15.0/24).
To allow access from any host, leave the field blank. If you leave this field blank, all users on your network have access to the SMB (CIFS) share without restrictions.
Separate entries with spaces.
The Allowed Hosts list is limited to 64 characters.In the Block files text box, enter the names of files or directories to make invisible and inaccessible in the share. Enter one name per line. You can use wildcard characters, such as “?” and “*”. Do not use the forward slash “/” character.
Note: Using this feature can break compatibility with some clients.
Tip: On a Nasuni Edge Appliance, non-empty directories that contain only blocked files appear empty to a client or CIFS local admin, and might lead to unexpected behavior when attempting to delete those directories. For example, if a directory contains only blocked files, and you try to delete that directory, the directory is removed from view temporarily, but is not deleted, and reappears upon refresh. In Windows, the Nasuni Edge Appliance sends the error STATUS_DIRECTORY_NOT_EMPTY to report that the delete failed, but Windows does not act on that error.
If the Security of this Nasuni Edge Appliance is Authenticated Access (meaning either Active Directory or LDAP Directory Services), the Authentication, Groups, Users, and Asynchronous I/O options appear. Otherwise, if the Security of this Nasuni Edge Appliance is Publicly Available, the Authentication, Groups, Users, and Asynchronous I/O options do not appear.
To authenticate all users, from the Authentication drop-down list, select Authenticate all Users.
Otherwise, to authenticate only specified groups and users, from the Authentication drop- down list, select Authenticate only specified Groups and Users. This enables the Groups and Users areas.
Tip: To specify native users or groups, the users or groups must have Storage Access enabled. See “Console Users and Groups”.
To add one group, follow these steps:
In the Groups area, click Add One. The Name search box appears.
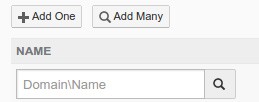
Figure 7-72: Add One Name search box.
Enter a partial or complete group name, then click Search
 . The Select Group dialog box appears, containing the partial or complete group name.
Figure 7-73: Select Group dialog box.
To control the range of the search, select one of the following:
All: To search through all groups.
Domain only: To search though domain groups only.
Native only: To search through native groups only.
Click Search. A list of groups that match your search appears. Select the group to define access for, then click Add Selected Group. The selected group appears in the Groups area.
Figure 7-74: Groups area
To add more than one group, follow these steps:
In the Groups area, click Add Many. The Select Groups dialog box appears.
In the Search text box, enter a partial or complete group name.
To control the range of the search, select one of the following:
All: To search through all groups.
Domain only: To search though domain groups only.
Native only: To search through native groups only.
Click Search. A list of groups that match your search appears.
Select the groups to define access for, then click Add Selected Groups. The selected groups appear in the Groups area.
For each group in the Groups list, from the Access drop-down list, select either Read-Write, Read-Only, or Deny.
Important: If you selected “Read Only Share” (step 8), and now select “Read-Write” as the group Access, then the actual access for the group is Read-Write. The Read-Write access of the group overrides the Read Only setting of the share.
To delete a group from the Groups list, click Delete next to the group name. The group is deleted from the list.
To add one user, follow these steps:
In the Users area, click Add One. The Name search box appears.

Figure 7-75: Add One Name search box.
Enter a partial or complete user name.
Tip: To specify a local user name (native to the Nasuni Edge Appliance), include the name of the local Nasuni Edge Appliance in the query string.
Click Search
 . The Select User dialog box appears, containing the partial or complete user name.
Figure 7-76: Select User dialog box.
To control the range of the search, select one of the following:
All: To search through all users.
Domain only: To search though domain users only.
Native only: To search through native users only.
Click Search. A list of users that match your search appears. Select the user to define access for, then click Add Selected User. The selected user appears in the Users area.
Figure 7-77: Users area.
To add more than one user, follow these steps:
In the Users area, click Add Many. The Select Users dialog box appears.
In the Search text box, enter a partial or complete user name.
Tip: To specify a local user name (native to the Nasuni Edge Appliance), include the name of the local Nasuni Edge Appliance in the query string.
To control the range of the search, select one of the following:
All: To search through all users.
Domain only: To search though domain users only.
Native only: To search through native users only.
Click Search. A list of users that match your search appears.
Select the users to define access for, then click Add Selected Users. The selected users appear in the Users area.
For each user in the Users list, from the Access drop-down list, select either Read-Write, Read-Only, or Deny.
Important: If you selected “Read Only Share” (step 8), and now select “Read-Write” as the user Access, then the actual access for the user is Read- Write. The Read-Write access of the user overrides the Read Only setting of the share.
To delete a user from the Users list, click Delete next to the user name. The user is deleted from the list.
To hide files and folders that a user cannot access, leave the Hide Unreadable Files check box selected. This option is selected by default.
Note: Access-based enumeration (ABE) hides files and folders that users do not have permissions to access. In Nasuni, this is accomplished with the "Hide Unreadable" share setting.
To allow clients to view or restore files using the Previous Versions tab in Windows, select the Enable Previous Versions check box. For details on using Windows Previous Versions, see your Microsoft Windows documentation.
Caution: When Previous Versions is enabled on a share, certain operations on that share can take longer than expected. Specifically, these operations include file upload to web-based applications, such as Salesforce, Microsoft Office 365, or Microsoft mail. Processing for these operations includes the following features:
When the Previous Versions dialog is selected, it enumerates snapshots.
If the required metadata is not present in the cache, it must be brought in from cloud object storage. This can make simple file access take longer than expected. Microsoft is currently investigating the behavior of their Previous Versions dialog.
To mitigate such performance issues, current best practice is to use separate shares for operations involving previous versions. This can be configured by following these steps:
On the Nasuni Edge Appliance or the NMC, disable Previous Versions for the original share.
Create a second share identical to the first (perhaps named “<ShareName>_Restore”).
If a user must use Windows Previous Versions, instruct them to use the second share.
(Available for case-sensitive volumes only.) To enable case sensitivity for file or folder names, select the Case-Sensitive Paths check box. For details on selecting case sensitivity, see “CaseSensitivity”.
Tip: For SMB (CIFS)-only volumes, certain processing is optimized for volumes that treat file names and directory names as case-insensitive (namely, volumes created with the “Case Sensitive” option unselected). See step 14.
However, for case-sensitive volumes, using case-sensitive paths on SMB (CIFS) shares improves performance for certain processing.
Important: Clients such as Windows can sometimes give inconsistent results when dealing with the case sensitivity of file names.
Note: Even if case-sensitivity is not enabled, non-Windows clients such as Linux might still treat the paths as case-sensitive.
To enable clients to access hidden snapshot directories within the share, select the Enable Snapshot Directories check box. The volume must have Snapshot Directory Access enabled. See “Snapshot Directory Access”.
Tip: If both the SMB (CIFS) protocol and the NFS protocol are enabled on a volume, then the
.snapshotdirectory is not available.Note: Snapshot directory access can add a significant load to the Nasuni Edge Appliance.
Note: When Enable Snapshot Directories is enabled on a share, you cannot delete directories from the client or change permissions to objects under the .snapshot directory.
Note: The setting of Windows Previous Versions is independent of the setting of Snapshot Directory Access.
Tip: If "Snapshot Directory Access" is enabled on a volume and “Enable Snapshot Directories” is enabled on an SMB (CIFS) share of that volume, then directories in that SMB (CIFS) share on that volume cannot be deleted.
If the Security of this Nasuni Edge Appliance is Directory Services, then User Folders Support is available.
If enabled, for each user, the target folder path for the SMB (CIFS) share is automatically appended with a folder named for the user. For example, the SMB (CIFS) share “
homes” that points to the folder “/homes” mounted by the user “paulm” results in a mapping to “/homes/ paulm”. This can simplify setting up multiple SMB (CIFS) shares for multiple users.Tip: If you use this option, disabling case sensitivity is recommended.
Important: If User Folders Support is enabled on a share, do not create a Shared Link Global User.
In addition, you can modify the name of the SMB (CIFS) share to include the wildcard “%U” to represent the user name. For example, the wildcard SMB (CIFS) share name:
%U_sharefor the user “
paulm” becomes the SMB (CIFS) share name:paulm_shareIf the SMB (CIFS) share “
%U_share” maps to the folder “/homes”, then, when the user maps “paulm_share”, the resulting location is “/homes/paulm”.Caution: The maximum length of a file name is 255 bytes.
In addition, the length of a path, including the file name, must be less than 4,000 bytes.
Since the UTF-8 representation of characters from some character sets can occupy several bytes, the maximum number of characters that a file path or a file name might contain can vary.
If a particular client has other limits, the smaller of the two limits applies.
Tip: You cannot create an internal link to folders created by using the "%U" wildcard in the SMB (CIFS) share name.
Note: Even if Case-Sensitive Paths is not enabled, UNC paths accessed via User Folders Support are case-sensitive.
To enable User Folders Support, follow these steps:
DO NOT enable User Folders Support when you first create a share. Create the share first.
After creating a share, mount the share on the client, such as Microsoft Windows.
On the client, such as Microsoft Windows, in the mounted share, create all the user folders.
Return to this screen for this share.
Edit the original share Name to include the wildcard “%U” to represent the user name.
Select Enabled from the User Folders Support drop-down list.
Each user then sees their login name as the share name, as a separate space from all other users.
Otherwise, select Disabled from the User Folders Support drop-down list.
To enable Web Access to files and folders, select the Web Access check box. The Web Access Settings pane appears. Continue with specific instructions at “Web Access Settings”.
Tip: “Mobile Access” must be enabled in the customer license before Web Access can be used with a Nasuni Edge Appliance.
Note: Web Access is not available with LDAP Directory Services security.
If the Security of this Nasuni Edge Appliance is Authenticated Access (meaning either Active Directory or LDAP Directory Services), then Asynchronous I/O is available. This enables concurrent read and write access to the share. To enable Asynchronous I/O, select Enable Asynchronous I/O. Asynchronous I/O is enabled by default.
To enable support for the SMB2 protocol for macOS clients, select Enhanced Support for Mac OS X. Enabling this speeds up directory listing and provides full metadata support for macOS clients, which can speed up performance.
To select handling of SMB encryption for SMB (CIFS) clients, from the SMB Encryption drop- down list, select one of the following options:
Optional: It is optional for clients to use SMB encryption when connecting to the share. SMB3 encryption is enabled if the client machine specifically requests it. This is the default.
Desired: It is desired that clients use SMB encryption when connecting to the share. The Nasuni Edge Appliance requests that the client machine use SMB3 encryption. If the client supports SMB3 encryption, the connection is encrypted.
Required: It is required that clients use SMB encryption when connecting to the share. All clients must use SMB3 encryption. If a client does not support SMB3 encryption, the client is not allowed to mount the SMB (CIFS) share on the Nasuni Edge Appliance.
Note: This includes SMB3 encryption for Windows clients.
Note: SMB signing is supported, if negotiated by the client. There is no customer-facing setting to require SMB signing for the server or share. If SMB signing is required, contact Nasuni Support.
The only way to disable signing is by selecting SMBv1.
Tip: SMB encryption enhances security and prevents snooping on client traffic. Windows clients should use SMB3 encryption if it is enabled on the SMB (CIFS) share that they are connecting to.
To create the share, click Create Share. The share is created and appears in the list of SMB (CIFS) shares.
Oplocks and Global File Lock Advanced mode
An oplock (opportunistic lock) is a lock placed by a client on a file residing on a server. Usually, a client requests an oplock so that the client can cache data locally.
Oplocks enable file server clients (such as those using the SMB2 and SMB3 protocols) to dynamically alter the buffering for a given file or stream in order to increase performance and to reduce network use. To increase the network performance for remote file operations, a client can buffer file data locally, which reduces or eliminates the need to send and receive network packets.
For details about oplocks, see Using oplocks for network redirector performance.
With the Advanced mode of Global File Lock, read and write oplocks are enabled for a share. Oplocks allow file server clients to increase performance and reduce network use. Oplocks are enabled by default with shares.
Important: Oplocks only apply to the Advanced mode of Global File Lock, not to the Optimized or Asynchronous modes of Global File Lock.
Tip: To use Global File Lock, Global Locking must be enabled in the customer license.
Web Access Settings
In the Web Access Settings pane, you can specify details about Shared Links.
A shared link is a secure, signed URL that points to a specific file or folder within Web Access. This can be useful for providing a trusted partner or contractor with secure access to a folder or file that they do not have credentials to access directly. For more details on shared links, see “Shared Links” in the Nasuni Edge Appliance Administration Guide. You can control how long until the shared link expires, whether a password is required, and who is allowed to create shared links.
Because shared links are associated with the credentials of the sharing user, if the sharing user’s password changes, the shared link might become invalid. In order to ensure that shared links remain valid regardless of changes to the sharing user’s credentials, you can create a special Shared Link Global User specifically to “own” shared links. This is especially useful in environments where users must change their passwords regularly for security purposes.
Tip: For Nasuni recommendations for volume configuration, see “Volume Configuration”.
Note: To access data in an NFS export, you must enable the SMB (CIFS) protocol for the NFS volume. See Multiple Protocols.
Note: You must enable Web Access for the SMB (CIFS) share that you want to access. For details, see “Creating shares” or “Editing shares”. Web Access is not available with LDAP Directory Services security.
Tip: The user must have Active Directory or Storage Access permissions. See “Users and Groups” in the Nasuni Edge Appliance Administration Guide.
Important: Existing shared links are not affected by changes to the shared link settings, or by changes to the permissions of the user who created the link. In particular, if a user creates a shared link, and later that user’s permissions change so that they can no longer create shared links, the shared link they created is not affected.
Important: If User Folders Support is enabled on a share, do not create a Shared Link Global User.
Note: The Shared Link Global User feature must be enabled in the customer license by Nasuni Support. After the Shared Link Global User feature is enabled in the customer license, the Edge Appliance license must be refreshed on the Edge Appliance: click
Account Status --> Refresh License. Then, if the Edge Appliance is managed by the NMC, click Filers --> Refresh Managed Filers.
Tip: After a recovery, if any of the original source Nasuni Edge Appliance’s SMB (CIFS) shares had Shared Links defined, these links must be regenerated. Use Web Access to view links that must be regenerated, and regenerate them.
Tip: Nasuni monitors platform-specific limits on the number of supported concurrent connections. When the number of concurrent connections reaches the “soft limit” for an Edge Appliance, you receive a notification of how many connections remain, and a suggestion to reduce the number of connections for that Edge Appliance, if possible. When the number of concurrent connections reaches the “hard limit” for an Edge Appliance, you receive a notification, and all new connections are denied for that Edge Appliance until the number of connections decreases below the “hard limit” again.
Platform | Soft Limit | Hard Limit |
|---|---|---|
N1040 | 3000 connections | 4000 connections |
N1050 | 3000 connections | 4000 connections |
N2040 | 5000 connections | 6000 connections |
N2050 | 5000 connections | 6000 connections |
N4040 | 8000 connections | 10000 connections |
N4050 | 8000 connections | 10000 connections |
If Web Access is enabled, the Web Access Settings pane appears.
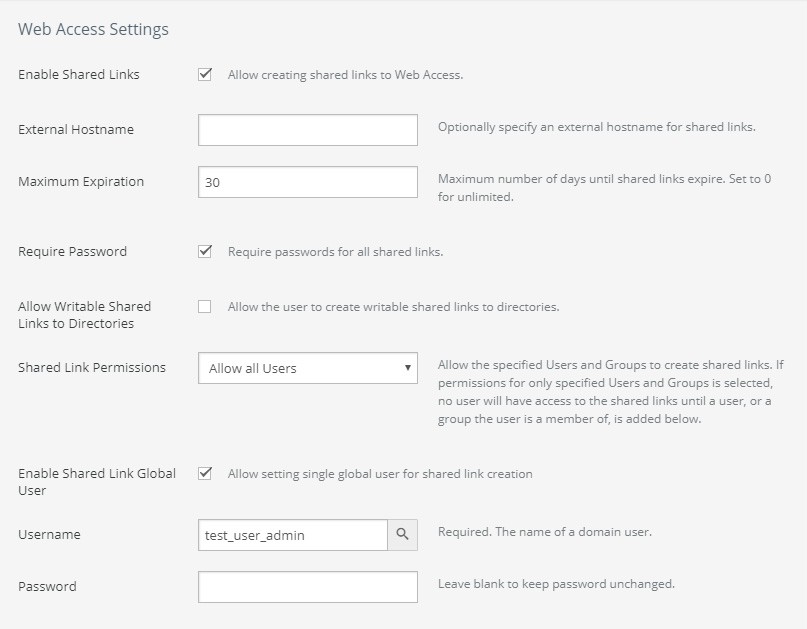
Figure 7-78: Web Access Settings pane.
To configure shared links, follow these steps:
To allow creating shared links, select Enable Shared Links.
If Shared Links are enabled, in the External Hostname text box, optionally enter an external hostname that users can access for the shared links.
Tip: Nasuni recommends configuring the "External Hostname". The Shared Link mechanism favors the "External Hostname" value over the Nasuni Edge Appliance's hostname.
Configuring the "External Hostname" field helps guarantee that publicly shared links are accessible by outside users.
If shared links are enabled, in the Maximum Expiration text box, enter the maximum number of days until a shared link expires. To specify that there is no limit to the time until expiration, enter
0(zero).Important: Existing shared links are not affected by changes to the shared link settings, or by changes to the permissions of the user who created the link. In particular, if a user creates a shared link, and later that user’s permissions change so that they can no longer create shared links, the shared link they created is not affected.
If shared links are enabled, to specify that any shared links must include a password, select Require Password.
Important: Existing shared links are not affected by changes to the shared link settings, or by changes to the permissions of the user who created the link. In particular, if a user creates a shared link, and later that user’s permissions change so that they can no longer create shared links, the shared link they created is not affected.
If shared links are enabled, to allow creating shared links that permit writing to directories, select Allow Writable Shared Links to Directories.
Important: Existing shared links are not affected by changes to the shared link settings, or by changes to the permissions of the user who created the link. In particular, if a user creates a shared link, and later that user’s permissions change so that they can no longer create shared links, the shared link they created is not affected.
If shared links are enabled, select either Allow all Users or Allow only specified Groups and Users from the Shared Link Permissions drop-down list.
If shared links are enabled, and you selected Allow only specified Groups and Users, you can specify the groups and users who can create shared links.
Note: If you specify groups and also specify users within the specified groups, the Access for the specified users is given by this table:
If the group Access is | and the user Access is: | then the user’s actual Access is: |
|---|---|---|
Deny | Deny | Deny |
Deny | Read-Write | Deny |
Deny | Read-Only | Deny |
Read-Write | Deny | Deny |
Read-Write | Read-Write | Read-Write |
Read-Write | Read-Only | Read-Write |
Read-Only | Deny | Deny |
Read-Only | Read-Write | Read-Write |
Read-Only | Read-Only | Read-Only |
If a user is not a member of a specified group, then the Access specification for the user is not affected by the Access specification for the specified group.
Follow these steps:
To add one group, follow these steps:
In the Groups area, click Add One. The Domain\Name search box appears.

Figure 7-79: Add One Name search box
Enter a partial or complete group name, then click Search
 . The Select Group dialog box appears, containing the partial or complete group name.
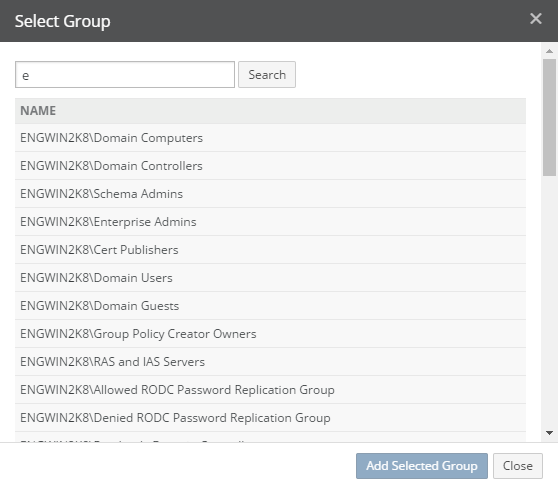
Figure 7-80: Select Group dialog box.
To control the range of the search, select one of the following:
All: To search through all groups.
Domain only: To search though domain groups only.
Native only: To search through native groups only.
Click Search. A list of groups that match your search appears.
Select the group, then click Add Selected Group. The selected group appears in the Groups area.

Figure 7-81: Groups area.
To add more than one group, follow these steps:
In the Groups area, click Add Many. The Select Groups dialog box appears.
In the Search text box, enter a partial or complete group name.
To control the range of the search, select one of the following:
All: To search through all groups.
Domain only: To search though domain groups only.
Native only: To search through native groups only.
Click Search. A list of groups that match your search appears.
Select the groups, then click Add Selected Groups. The selected groups appear in the Groups area.
For each group in the Groups list, from the Access drop-down list, select either Read-Write, Read-Only, or Deny.
To delete a group from the Groups list, click Delete next to the group name. The group is deleted from the list.
To add one user, follow these steps:
In the Users area, click Add One. The Name search box appears.

Figure 7-82: Add One Name search box.
Enter a partial or complete user name.
Include the Active Directory domain name, followed by a slash, followed by the user name.
Tip: To specify a local user name (native to the Nasuni Edge Appliance), include the name of the local Nasuni Edge Appliance in the query string.
Click Search
 . The Select User dialog box appears, containing the partial or complete user name.
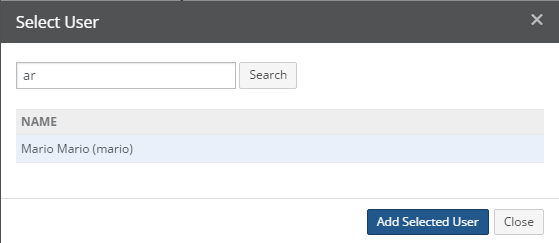
Figure 7-83: Select User dialog box.
To control the range of the search, select one of the following:
All: To search through all users.
Domain only: To search though domain users only.
Native only: To search through native users only.
Click Search. A list of users that match your search appears. Select the user, then click Add Selected User. The selected user appears in the Users area.

Figure 7-84: Users area.
To add more than one user, follow these steps:
In the Users area, click Add Many. The Select Users dialog box appears.
In the Search text box, enter a partial or complete user name.
Include the Active Directory domain name, followed by a slash, followed by the user name.
Tip: To specify a local user name (native to the Nasuni Edge Appliance), include the name of the local Nasuni Edge Appliance in the query string.
To control the range of the search, select one of the following:
All: To search through all users.
Domain only: To search though domain users only.
Native only: To search through native users only.
Click Search. A list of users that match your search appears.
Select the users, then click Add Selected Users. The selected users appear in the Users area.
For each user in the Users list, from the Access drop-down list, select either Read-Write, Read-Only, or Deny.
To delete a user from the Users list, click Delete next to the user name. The user is deleted from the list.
If shared links are enabled, to enable a Shared Link Global User, select “Enable Shared Link Global User”.
By enabling a Shared Link Global User, any shared links are associated with the Shared Link Global User, and not with a specific user. This helps ensure that shared links remain valid even when the credentials for a specific user change.
Important: If User Folders Support is enabled on a share, do not create a Shared Link Global User.
Note: The Shared Link Global User feature must be enabled in the customer license by Nasuni Support. After the Shared Link Global User feature is enabled in the customer license, the Edge Appliance license must be refreshed on the Edge Appliance: click Account Status --> Refresh License. Then, if the Edge Appliance is managed by the NMC, click Filers --> Refresh Managed Filers.
If you enable a Shared Link Global User, follow these steps:
In the Username text box, enter an NT-compatible name of a user in an Active Directory domain.
Include the Active Directory domain name, followed by a slash, followed by the user name.
Important: It is important that the password for this Shared Link Global User stay in sync with the Active Directory user account password. Therefore, you should use a dedicated service account for this Shared Link Global User, and this account should be configured with the “password never expires” option.
In the Password text box, enter the password for this user.
If you are editing the configuration of an existing share, and do not want this previously entered password to be changed, ensure that this text box is left blank.
Continue with the procedure at step 20.
Tip: You can change the logo and the primary and secondary colors of the Web Access display for branding purposes. See “Web Access Branding”.
Editing shares
Important: After you change any share setting, the currently connected CIFS/SMB clients do not observe the change until they disconnect and create new sessions. You can disconnect clients individually by clicking Disconnect for each one, or you can disconnect all clients by clicking "Reset All Clients".
To edit the selected share, follow these steps:
On the Shares page, for the selected share, click Edit
 . The Edit Share dialog box appears.
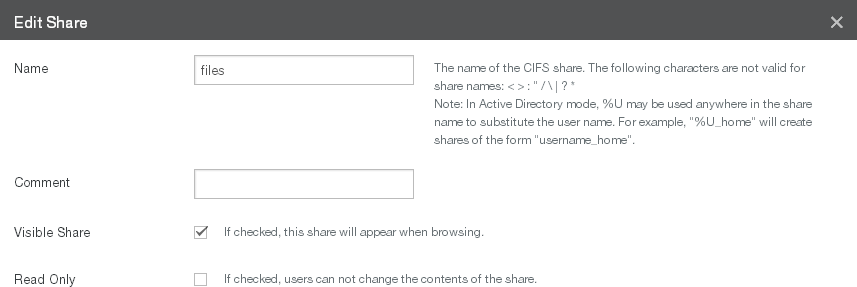
Figure 7-85: Edit Share dialog box.
Follow the procedure in “Creating shares”, starting with step 4.
To accept your selections, click Update Share.
The share is changed and appears in the list of shares.
Alternatively, to exit this screen without changing the share, click Close.
Important: After you change any share setting, the currently connected CIFS/SMB clients do not observe the change until they disconnect and create new sessions. You can disconnect clients individually by clicking Disconnect for each one, or you can disconnect all clients by clicking "Reset All Clients".
Deleting shares
Tip: This function can also be performed using the NMC API. For details, see NMC API.
To delete a selected share, follow these steps:
On the Shares page, click Delete
 . The Delete Share dialog box appears.
Figure 7-86: Delete Share dialog box.
The share name appears in the dialog box. Confirm that the correct share is about to be deleted.
Type
Delete Sharein the Confirmation Phrase text box.Click Delete Share to delete the share.
Alternatively, to exit this screen without deleting the share, click the Close button.
Auto Cached Folders
You can view folders that have Auto Cache enabled.
If you enable the “Auto Cache” option for a folder, new data in that folder is brought into the local cache immediately from other Nasuni Edge Appliances that are attached to this volume. Otherwise, new data is brought into the local cache from other Nasuni Edge Appliances when that data is accessed next.
Note: Before enabling Auto Cache for a folder, the folder’s volume must have Remote Access enabled and Auto Cache enabled. For details, see “Setting or editing remote access settings” and “Scheduling Syncs”.
Note: Auto Cache is only available for shared or remote volumes.
Note: You can also enable Auto Cache for volumes. See “Scheduling Syncs”.
Tip: To enable or disable Auto cache for a folder, see “Enabling Auto Cache for Folders”.
Tip: See Worksheet for a worksheet for planning configurations.
Viewing folders that have Auto Cache enabled
Tip: This function can also be performed using the NMC API. For details, see NMC API.
To view folders that have Auto Cache enabled, follow these steps:
Click Auto Cached Folders. The Auto Cached Folders page displays a list of folders that have Auto Cache enabled on managed Nasuni Edge Appliances.

Figure 7-87: Auto Cached Folders page.
Click the right-facing arrow beside each folder to reveal the folders that have Auto Cache enabled for each Nasuni Edge Appliance for that folder. To reveal the folders that have Auto Cache enabled of all Nasuni Edge Appliances, click Expand All. To collapse the display of the folders that have Auto Cache enabled of all Nasuni Edge Appliances, click Collapse All.
The following information appears for each folder that has Auto Cache enabled in the list:
Name: The name of the folder that has Auto Cache enabled.
Filer: The names or number of Nasuni Edge Appliances that access the folder that has Auto Cache enabled.
Volume Auto Cache: Indicates whether Auto Cache is enabled or disabled for the volume: Enabled or Disabled.
Path: The path to the folder that has Auto Cache enabled.
Disabling Auto Cache
Tip: This function can also be performed using the NMC API. For details, see NMC API.
To disable Auto Cache for a folder, follow these steps:
Click Auto Cached Folders. The Auto Cached Folders page displays a list of folders that have Auto Cache enabled on managed Nasuni Edge Appliances.
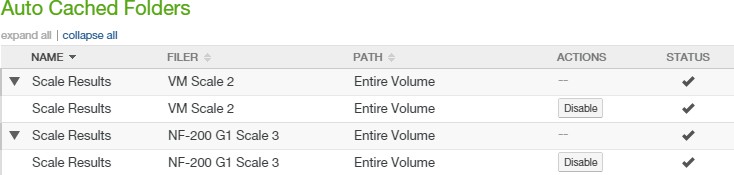
Figure 7-88: Auto Cached Folders page.
Click the right-facing arrow beside each folder to reveal the folders that have Auto Cache enabled for each Nasuni Edge Appliance for that folder. To reveal the folders that have Auto Cache enabled for all Nasuni Edge Appliances, click Expand All. To collapse the display of the folders that have Auto Cache enabled for all Nasuni Edge Appliances, click Collapse All.
For the folder where you want to disable Auto Cache, click Disable. The Disable Folder Setting dialog box appears.
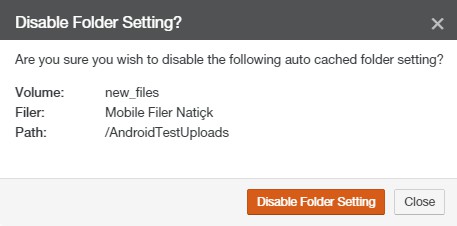
Figure 7-89: Disable Folder Setting page.
Verify that the information is correct, then click Disable Folder Setting. Auto Cache is disabled for the folder.
Cloud I/O
If the Cloud Provider is a customer-provided cloud provider, the Volume Cloud I/O page is available.
Before sending data to the cloud, Nasuni breaks files into optimally-sized pieces for transport between the on-premises cache and cloud object storage. This not only disguises the actual sizes of files, but also improves performance. These chunks are then compressed and encrypted.
If the file is smaller than 1 GiB, the default chunk size is 1 MiB. If the file is 1 GiB or larger, the default chunk size is 10 MiB.
For customer-provided clouds, if directed by Nasuni Support, you can adjust the chunk size, or enable or disable Nasuni's compression, using the Cloud I/O area of the Volume Overview page (Nasuni Edge Appliance) or the Volume Cloud I/O page (NMC). If you do manually change the chunk size, the variable chunk size mentioned above no longer operates. You can restore the variable chunk size mentioned above by leaving the Chunk Size field blank and then clicking Save.
To enable or disable Nasuni's compression, or to adjust the chunk size, follow these steps:
Click Volumes, then click Cloud I/O in the left-hand column. The Volume Cloud I/O page displays a list of volumes on managed Nasuni Edge Appliances on customer-provided cloud providers.
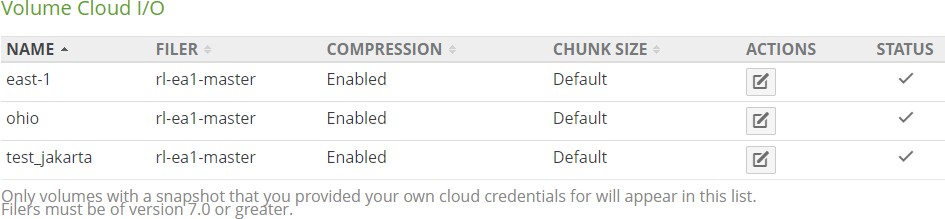
Figure 7-90: Volume Cloud I/O page.
The following information appears for each volume in the list:
Name: The name of the volume.
Filer: The name of the Nasuni Edge Appliance where this volume is located.
Compression: The status for compression: Enabled or Disabled.
Chunk Size: The size of the chunks.
Actions: Actions available for each volume.
To enable or disable compression, or change the chunk size, click Edit
 . The Change Volume Cloud I/O dialog box appears.
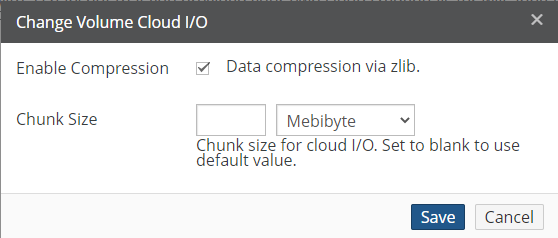
Figure 7-91: Change Volume Cloud I/O dialog box.
Select or deselect compression.
Enter the chunk size, and select the units from the drop-down menu. To use the default chunk size, leave the text box blank.
Warning: Contact Nasuni Support before changing the chunk size.
Click Save to save your settings.
Encryption Keys
Note: For details of encryption key management, see Encryption Key Best Practices.
You can view, add, enable, and disable volume encryption keys on the Volume Encryption Keys page. You can view, upload, send, escrow, and delete encryption keys on the “Filer Encryption Keys” page. You can view, upload, escrow, and delete encryption keys on the Console Settings Encryption Keys page.
Note: You can upload OpenPGP-compatible encryption keys to the Nasuni Management Console. (For security reasons, encryption keys that you upload cannot be downloaded from the system.) See “Uploading (importing or adding) encryption keys to the NMC”.
Note: If an uploaded encryption key has an associated passphrase, that passphrase is removed from the encryption key when it is uploaded. The Edge Appliance does not need the passphrase in order to use the encryption key. However, if you do not escrow this encryption key, if you ever perform a recovery procedure on the Edge Appliance, you must provide that passphrase when you upload that encryption key during the recovery procedure.
Note: You can send encryption keys from the Nasuni Management Console to Nasuni Edge Appliances. See “Sending encryption keys to Nasuni Edge Appliances”.
Warning: Do NOT save encryption key files to a volume on a Nasuni Edge Appliance. You will NOT be able to use these to recover data. This is NOT how to upload encryption keys to a Nasuni Edge Appliance.
Tip: You can also upload encryption keys using the NMC API. This can be useful for automating tasks and for enhancing security. For more details, see Nasuni API Documentation.
All data on a volume is encrypted using one or more OpenPGP-compatible encryption keys before being sent to cloud object storage. Volumes may be encrypted with one or more encryption keys, and encryption keys may be used for any number of volumes.
There are several actions you can perform on encryption keys, including adding new encryption keys, enabling or disabling encryption keys, escrowing encryption keys with Nasuni, and, under certain circumstances, deleting encryption keys.
All uploaded encryption keys must be at least 2048 bits long.
Warning: Do NOT save encryption key files to a volume on a Nasuni Edge Appliance. You will NOT be able to use these to recover data. This is NOT how to upload encryption keys to a Nasuni Edge Appliance. To upload encryption keys to a Nasuni Edge Appliance, use the Encryption Keys page.
At least one encryption key must be enabled for a volume, but several encryption keys can be enabled at the same time. When multiple encryption keys are enabled, all of the encryption keys enabled at the time are used to encrypt the data. Any of the encryption keys enabled at the time a piece of data is encrypted can be used to later decrypt the data. Only the encryption keys enabled when the data was written can decrypt that data. An encryption key that was enabled after the data was written cannot decrypt any data that was written before that key was enabled.
There are several reasons you might want to disable an encryption key, such as, when someone with access to the encryption key leaves the company, or if your enterprise has a policy of rotating encryption keys periodically. When you disable an encryption key, no future data is encrypted with that encryption key. However, all data previously encrypted by that disabled encryption key remains encrypted by that disabled encryption key. For this reason, before you disable an encryption key, you should consider establishing a snapshot retention policy that removes the data that was encrypted with the disabled encryption key. Because volumes must have at least one encryption key associated with them, in practice you add a new encryption key to a volume first, and then disable the existing encryption key.
You can delete encryption keys, but only in the case where they are not being used by any volumes.
You cannot modify encryption keys stored on the system. For security reasons, encryption keys that you upload cannot be downloaded from the system. You can only download encryption keys that the Nasuni Edge Appliance has generated internally.
You can escrow your encryption keys with Nasuni (or a trusted third party), or store your own encryption keys. Before you can escrow your encryption keys with Nasuni, you must create an escrow passphrase, in case you need these escrowed encryption keys when you perform a recovery procedure.
You can specify that you do not want Nasuni to generate any of your encryption keys. This ensures that your data is encrypted only with encryption keys that you upload. If you specify this, you must upload all the encryption keys used. Specifically, when creating a volume, you cannot select Create New Key as the source of the volume encryption key. For security reasons, encryption keys that you upload cannot be downloaded from the system. If you want to specify that Nasuni not generate encryption keys, request Nasuni Support to disable key generation in your license.
Similarly, you can specify that you do not want Nasuni to escrow encryption keys. If you specify this, you must manage your own encryption keys, because Nasuni does not manage them. If you specify this, you can still have Nasuni generate encryption keys, and those generated encryption keys are still automatically escrowed, because all generated encryption keys are automatically escrowed. If you want to specify that Nasuni not escrow encryption keys, request Nasuni Support to disable key escrow in your license.
To ensure that none of your encrypted keys is escrowed with Nasuni, you must specify BOTH that Nasuni not generate encryption keys AND that Nasuni not escrow encryption keys.
Viewing encryption keys
Note: The list of encryption keys on the Volumes page only shows encryption keys that are in use by a volume. If you upload encryption keys to a Nasuni Edge Appliance, but do not use the encryption keys on a volume, the encryption keys do not appear on this page. However, such encryption keys do appear on the list of encryption keys on the Filers page. See “Viewing encryption keys on Nasuni Edge Appliances”.
Tip: This function can also be performed using the NMC API. For details, see NMC API.
To view encryption keys, follow these steps:
Click Volumes, then click Encryption Keys in the left-hand column. The Volume Encryption Keys page displays a list of volume encryption keys on managed Nasuni Edge Appliances.

Figure 7-92: Volume Encryption Keys page.
The following information appears for each encryption key in the list:
Name: The name of the volume with the encryption key.
Filer: The name of the Nasuni Edge Appliance where this volume is located.
Encryption Keys: The names of the encryption keys for this volume.
Fingerprint: The fingerprint is a cryptographic hash of the encryption key.
State: The state of this encryption key: Enabled or Disabled.
Actions: Actions available for each volume.
Adding encryption keys to a volume
Tip: You can also upload encryption keys using the NMC API. This can be useful for automating tasks and for enhancing security. For more details, see Nasuni API Documentation.
To add encryption keys to a volume, follow these steps:
On the Volume Encryption Keys page, for the selected volume, click Edit
 . The Edit Encryption Keys dialog box appears.
Figure 7-93: Edit Encryption Keys dialog box.
To add an existing encryption key to this volume, click Add Keys. The Add Encryption Keys dialog box appears
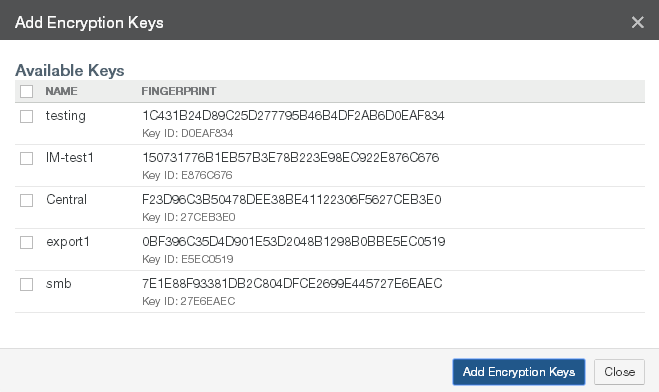
Figure 7-94: Add Encryption Keys dialog box.
In this dialog box, you can view information about each of the encryption keys currently available to use, including the encryption key Name, Fingerprint, and Key ID. The fingerprint is a cryptographic hash of the encryption key. The key ID is a shorter version of the fingerprint of the encryption key, generally including just the last 8 digits.
Select the encryption keys to add to this volume.
Click Add Encryption Keys. The selected encryption keys are added to this volume. The encryption keys appear in the list of encryption keys on the Volume Encryption Keys page.
Enabling encryption keys for a volume
To enable encryption keys for a volume, follow these steps:
On the Volume Encryption Keys page, for the selected volume, click Edit
 . The Edit Encryption Keys dialog box appears.
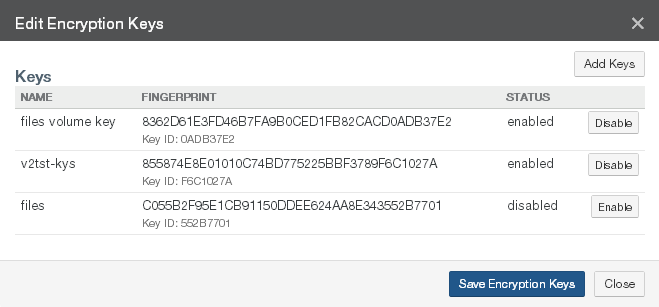
Figure 7-95: Edit Encryption Keys dialog box.
To enable an encryption key for this volume, click Enable.
Click Save Encryption Keys. The selected encryption key is enabled for this volume. The encryption key appears in the list of encryption keys on the Volume Encryption Keys page with the state Enabled.
Alternatively, to exit the dialog box without enabling the selected encryption key, click Close.
Disabling encryption keys for a volume
To disable encryption keys for a volume, follow these steps:
On the Volume Encryption Keys page, for the selected volume, click Edit
 . The Edit Encryption Keys dialog box appears.
Figure 7-96: Edit Encryption Keys dialog box.
To disable an encryption key for this volume, click Disable.
Click Save Encryption Keys. The selected encryption key is disabled for this volume. The encryption key appears in the list of encryption keys on the Volume Encryption Keys page with the state Disabled.
Alternatively, to exit the dialog box without disabling the selected encryption key, click Close.
“Rotating” (or rolling over) encryption keys for a volume
For details about “rotating” or rolling over encryption keys, see “Rotating” (or rolling over) encryption keys for a volume.
Name of volume
You can view or change the name of a volume.
Note: If a snapshot is in progress when you attempt to rename a volume, you receive a message to retry after the snapshot is complete.
To verify that a snapshot has been completed (both data phase and metadata phase), see Appendix E, “Verifying Snapshots,”.
Tip: See Worksheet for a worksheet for planning configurations.
Viewing volume names
Tip: This function can also be performed using the NMC API. For details, see NMC API.
To view volume names, follow these steps:
Click Name. The Volume Name page displays a list of volume names.
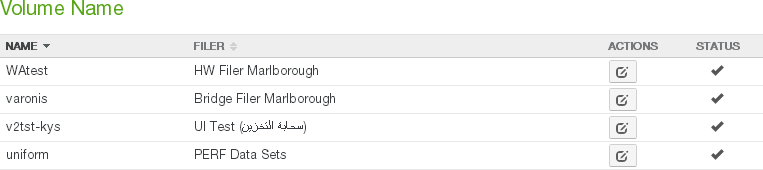
Figure 7-97: Volume Name page.
The following information appears for each volume name in the list:
Name: The name of the volume.
Filer: The name of the Nasuni Edge Appliance where this volume is located.
Actions: Actions available for each volume.
Changing volume name
To rename a volume, follow these steps:
On the Volume Name page, select a volume, then click Edit
 . The Volume Name Settings dialog box appears.
.png?sv=2026-02-06&spr=https&st=2026-06-23T01%3A33%3A15Z&se=2026-06-23T06%3A20%3A15Z&sr=c&sp=r&sig=vKO79dhJjd7AXHPIvrY%2FCSv8uS9voFkXgJeBHNEZTWM%3D)
Figure 7-98: Volume Name Settings dialog box.
Enter the new name for the volume in the Volume Name text box.
Click Save Name. The volume name is changed. The volume appears in the list on the Volume Name page.
Alternatively, to exit the dialog box without changing the volume name, click Close.
Pinned Folders
Pinning a folder ensures that a folder's contents must remain in the local cache at all times. This can improve performance and reduce the time necessary to return accessed data to clients.
Note: Enabling this feature means that the entire folder remains resident in the cache at all times. This reduces the available cache by the size of the folder. If too much cache space is taken up by pinned folders, an Alert notification is given.
Note: Pinning a folder does not bring the folder’s data into the cache. If the folder’s data is not already present in the cache, you must specifically bring that data to the cache. You can use the File Browser to bring data to the cache. See “Bringing Data into Cache of the Nasuni Edge Appliance”.
Note: To enable or disabling pinning for a folder, see “Pinning Folders in the Cache”.
Important: The NMC API can be used to pin metadata in the cache, or to enable Auto Cache for metadata.
Pinning metadata in the cache and enabling Auto Cache for metadata can affect the amount of data in the cache, and the display of data in the cache. Also, bringing all metadata into the cache adds time to the sync process and might affect user performance. With no users on a dedicated appliance (for example, to change permissions or perform searches), the effect on sync times due to syncing the entire metadata tree would not affect any user-related snapshot or sync changes.
The NMC API can also be used to verify that these features have been configured for a directory.
Because metadata-only pinning and Auto Cache pinning are currently possible only with the NMC API, directories with such pinning enabled are not displayed in the File Browser of the NMC and the Edge Appliance, nor on the NMC Pinned Folders and NMC Auto Cached Folders pages.
To view unprotected files in the cache, see ““Unprotected Files””.
Viewing and disabling pinned folders
Tip: This function can also be performed using the NMC API. For details, see NMC API.
To view or disable pinned folders, follow these steps:
Click Pinned Folders. The Pinned Folders page displays a list of pinned folders on managed Nasuni Edge Appliances.

Figure 7-99: Pinned Folders page.
Click the right-facing arrow beside each folder to reveal the pinned folders for each Nasuni Edge Appliance for that folder. To reveal the pinned folders of all Nasuni Edge Appliances, click Expand All. To collapse the display of the pinned folders of all Nasuni Edge Appliances, click Collapse All.
The following information appears for each pinned folder in the list:
Name: The name of the pinned folder.
Filer: The names or number of Nasuni Edge Appliances that access the pinned folder.
Path: The path to the pinned folder, or “Entire Volume” if the entire volume is pinned.
To disable pinning for a folder, click Disable for that folder. The folder is no longer pinned.
Multiple Protocols
You can assign SMB (CIFS), NFS, and FTP/SFTP protocols to existing SMB (CIFS) and NFS volumes. This enables you to allow access to data using multiple protocols. This might be helpful for simplifying access by users or applications.
Tip: If you plan to enable both SMB (CIFS) and NFS protocols for this volume, Nasuni recommends using the NTFS Multiprotocol protocol. If you prefer to configure multiple protocols manually, enable the NFS protocol first, then add the SMB (CIFS) protocol. Then select POSIX Mixed Mode as the permissions policy. See Multiple Protocols.
Tip: For Nasuni recommendations for volume configuration, see “Volume Configuration”.
Tip: If you plan to enable both SMB (CIFS) and NFS protocols for this volume, enable the NFS protocol first, then add the SMB (CIFS) protocol. Then select POSIX Mixed Mode as the permissions policy.
Note: Multiple protocol (SMB (CIFS) and NFS) volumes and NTFS Multiprotocol volumes only support the Optimized mode of Global File Lock.
Note: If a volume has Remote Access enabled and other Edge Appliances connect to this volume, the connected volumes inherit the same protocols as this volume. If these protocols change, the connected volumes inherit the changed protocols. This can take some time. You can refresh the connections in order to inherit the changed protocols immediately.
Tip: In order to access data using the FTP/SFTP protocol, the following steps are necessary:
Create an SMB (CIFS) or NFS volume. See “Create Volume”.
Enable the FTP protocol on the volume. See “Enabling multiple volume protocols”.
(Optional) Configure FTP/SFTP settings. See “Editing FTP settings”.
Add a new FTP/SFTP directory. See “Creating FTP directories”.
(Optional) Create a permission group that has storage access. See “Adding Permission Groups” in the Nasuni Edge Appliance Administration Guide.
(Optional) Create a user in a permission group that has storage access. See “Adding Users” in the Nasuni Edge Appliance Administration Guide. Active Directory and LDAP users can log in for FTP access just as they do for SMB (CIFS) access. Also, if anonymous access is enabled, you don't need a specific group or user.
Access files using the FTP/SFTP protocol.
Specifying multiple protocol access
For single protocol access, Nasuni supports Kerberos and NTLMv2 over SMB protocol for appliances bound to Microsoft Windows Active Directory. Nasuni also supports Kerberos over NFSv4 for appliances bound to a supported LDAP Directory, including FreeIPA, Oracle Directory Services, and Apple Open Directory.
For multiple protocol access using both NFSv4 and SMB protocol to access the same data, the SMB protocol is authenticated using Kerberos or NTLMv2 by Active Directory. However, Nasuni multiple protocol access with NFSv4 only supports NFS basic authentication (AUTH_SYS). AUTH_SYS does not use tokens or passwords for authentication or access control, relying on the client to provide an ID validated on the server side to limit and control access.
In multiple protocol use cases, Nasuni recommends using network segmentation, and using the Allowed Hosts list to specify NFS client IP addresses, in order to restrict the endpoints that can access NFS exports.
Viewing volume protocols
To view the protocols that are enabled for volumes, follow these steps:
Click Protocols. The Volume Protocols page displays a list of volume names.

The following information appears for each volume name in the list:
Name: The name of the volume.
Filer: The name of the Nasuni Edge Appliance where this volume is located.
Protocols: The protocols enabled for the volume.
Permissions Policy: The permissions policy for the selected protocols, out of the following:
NTFS Multiprotocol Mode:
New mode for CIFS (SMB) and NFS (NFSv4 clients only) volumes on Nasuni Edge Appliances joined to Active Directory.
Produces full NTFS permissions support for CIFS (SMB) shares and NFS exports.
Recommended for CIFS (SMB) volumes that also require NTFS permissions for NFS.
Not supported: FTP, LDAP authentication.
Allows durable handles with SMB 2.0 and higher clients, which can then open a file and survive a temporary connection loss (60 seconds or less).
NTFS Exclusive Mode:
Default mode for CIFS (SMB) volumes on Nasuni Edge Appliances joined to Active Directory.
Produces full NTFS permissions support for CIFS (SMB) shares. This volume permissions policy offers the greatest Windows and Mac client compatibility.
Recommended for CIFS (SMB) volumes that do not require multiple protocols.
Not Supported: NFS, FTP, LDAP authentication.
Allows durable handles with SMB 2.0 and higher clients, which can then open a file and survive a temporary connection loss (60 seconds or less).
Note: When Global Locking is enabled, support for SMB durable handles (allowing clients to survive temporary connection loss) is disabled. Enabling Global Locking anywhere on the volume disables durable handles. If durable handles is disabled in this way, durable handles cannot be enabled again.
Caution: A CIFS NTFS Exclusive Mode volume cannot have multiple volume protocols. If this CIFS volume must support multiple protocols, select NTFS Compatible Mode.
Important: You cannot switch from NTFS Exclusive Mode to NTFS Compatible Mode.
NTFS Compatible Mode:
Optional mode for CIFS (SMB) volumes on Nasuni Edge Appliances joined to Active Directory.
Provides a high level of Windows and Mac compatibility through the CIFS (SMB) protocol, with some limitations.
This mode is required for multiple protocol support that does NOT involve NFS, such as CIFS (SMB) with FTP/SFTP, as well as CIFS (SMB).
NFS and FTP/SFTP protocols cannot see all NTFS permissions and do not obey all access rules in NTFS permissions. NFS and FTP/SFTP protocols obey only the POSIX access control list (ACL) component of inheritance rules.
All of the settings available in POSIX Mixed Mode are available.
File attributes are available.
In Unix/Linux, the
attrcommand is available.In Windows, the attributes are used to store extended Windows rights.
Not supported: NFS-only volumes, LDAP authentication.
POSIX Mixed Mode:
Default mode for CIFS (SMB) volumes on Nasuni Edge Appliances joined to LDAP. Also available for Nasuni Appliances joined to Active Directory.
Recommended for combined NFS and CIFS (SMB) volumes, and for combined CIFS (SMB) and FTP/SFTP volumes. Also recommended for LDAP-authenticated CIFS (SMB)-only volumes with Linux or Mac clients, with UNIX extensions enabled.
The settings available in UNIX/NFS Permissions Only Mode are available.
ACLs are available.
In Unix/Linux, the
setfaclandgetfaclcommands are available to set and get ACLs.In Windows, multiple users and groups are represented on the ACLs.
Inheritance is represented as default ACLs.
More information:
Access control lists (ACLs) are supported entirely through POSIX ACLs. Windows clients receive mapping of POSIX ACLs to NTFS ACLs. However, the mappings are not as complete as mappings done for NTFS Compatible Mode. NFS clients cannot view the ACLs.
The NFSv4 protocol automatically translates the underlying ACLs to NFSv4 ACLs. The common tools for managing POSIX ACLs are not supported on NFSv4. To manage ACLs using NFSv4, you must use the NFSv4 ACL tools.
UNIX/NFS Permissions Only Mode:
Default mode for NFS volumes.
Recommended for primary or heavy NFS use.
Not available for CIFS (SMB) volumes. Not recommended for Windows users.
All permissions are set using the standard User, Group, and Other settings.
ACLs and attributes are not available. Attempting to set ACLs or attributes returns "Operation not supported".
If CIFS is used with this mode, only one user, one group, and Everyone can be set. Attempting to set other values returns "Access is denied".
More information:
Only supports traditional UNIX mode bits to control permissions (chmod).
Windows can view permissions as access control lists (ACLs), but cannot add or remove access control entries (ACEs).
Unauthenticated Access Mode:
Default mode for CIFS (SMB) volumes on Nasuni Edge Appliances that are not joined to Active Directory or to LDAP. Also available for Nasuni Edge Appliances joined to Active Directory or LDAP, if the client (such as Windows) is joined to the same domain.
Recommended for CIFS (SMB) Public-mode volumes. For CIFS (SMB) clients, this mode acts as an open share. For all other protocols, this mode acts identically to POSIX Mixed Mode.
Actions: Actions available for each volume.
Enabling multiple volume protocols
Tip: For Nasuni recommendations for volume configuration, see “Volume Configuration”.
Tip: SMB (CIFS) volumes that have the Advanced mode of Global File Lock enabled cannot enable the NFS protocol.
Tip: If you plan to enable both SMB (CIFS) and NFS protocols for this volume, Nasuni recommends using the NTFS Multiprotocol protocol.
If you prefer to configure multiple protocols manually, enable the NFS protocol first, then add the SMB (CIFS) protocol. Then select POSIX Mixed Mode as the permissions policy.
To enable SMB (CIFS), NFS, or FTP/SFTP protocols for an SMB (CIFS) or NFS volume, follow these steps:
Click Protocols. The Volume Protocols page displays a list of volume names.
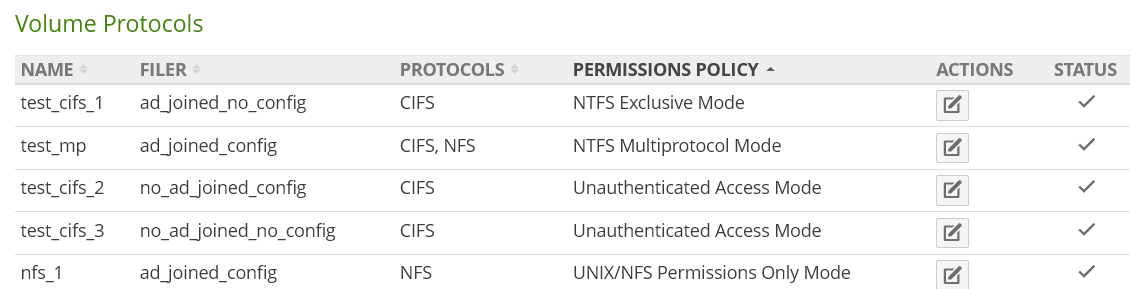
For the selected volume, click Edit
 . The Volume Protocol Settings dialog box appears.
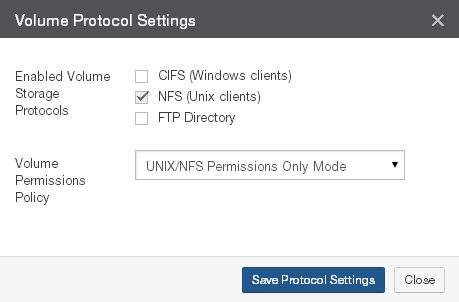
Figure 7-102: Volume Protocol Settings dialog box.
The currently enabled protocols for the volume are selected.
To enable another protocol, select that protocol also from among the Enabled Volume Storage Protocols.
Important: If the Permissions Policy is “NTFS Multiprotocol Mode”, the “Enabled Volume Storage Protocols” cannot be changed. Also, if the Permissions Policy is “NTFS Multiprotocol Mode”, you cannot add “FTP/SFTP” as one of the “Enabled Volume Storage Protocols”.
Tip: SMB (CIFS) volumes that have the Advanced mode of Global File Lock enabled cannot enable the NFS protocol.
Tip: If you plan to enable both SMB (CIFS) and NFS protocols for this volume, enable the NFS protocol first, then add the SMB (CIFS) protocol. Then select POSIX Mixed Mode as the permissions policy.
Warning: After enabling a protocol, you cannot disable that protocol.
From the Volume Permissions Policy drop-down list, select one of the following.
Important: If the Permissions Policy is “NTFS Multiprotocol Mode”, the “Volume Permissions Policy” cannot be changed.
NTFS Multiprotocol Mode:
New mode for CIFS (SMB) and NFS (NFSv4 clients only) volumes on Nasuni Edge Appliances joined to Active Directory.
Produces full NTFS permissions support for CIFS (SMB) shares and NFS exports.
Recommended for CIFS (SMB) volumes that also require NTFS permissions for NFS.
Not supported: FTP, LDAP authentication.
Allows durable handles with SMB 2.0 and higher clients, which can then open a file and survive a temporary connection loss (60 seconds or less).
NTFS Exclusive Mode:
Default mode for CIFS (SMB) volumes on Nasuni Edge Appliances joined to Active Directory.
Produces full NTFS permissions support for CIFS (SMB) shares. This volume permissions policy offers the greatest Windows and Mac client compatibility.
Recommended for CIFS (SMB) volumes that do not require multiple protocols.
Not Supported: NFS, FTP, LDAP authentication.
Allows durable handles with SMB 2.0 and higher clients, which can then open a file and survive a temporary connection loss (60 seconds or less).
Note: When Global Locking is enabled, support for SMB durable handles (allowing clients to survive temporary connection loss) is disabled. Enabling Global Locking anywhere on the volume disables durable handles. If durable handles is disabled in this way, durable handles cannot be enabled again.
Caution: A CIFS NTFS Exclusive Mode volume cannot have multiple volume protocols. If this CIFS volume must support multiple protocols, select NTFS Compatible Mode.
Important: You cannot switch from NTFS Exclusive Mode to NTFS Compatible Mode.
NTFS Compatible Mode:
Optional mode for CIFS (SMB) volumes on Nasuni Edge Appliances joined to Active Directory.
Provides a high level of Windows and Mac compatibility through the CIFS (SMB) protocol, with some limitations.
This mode is required for multiple protocol support that does NOT involve NFS, such as CIFS (SMB) with FTP/SFTP, as well as CIFS (SMB).
NFS and FTP/SFTP protocols cannot see all NTFS permissions and do not obey all access rules in NTFS permissions. NFS and FTP/SFTP protocols obey only the POSIX access control list (ACL) component of inheritance rules.
All of the settings available in POSIX Mixed Mode are available.
File attributes are available.
In Unix/Linux, the
attrcommand is available.In Windows, the attributes are used to store extended Windows rights.
Not supported: NFS-only volumes, LDAP authentication.
POSIX Mixed Mode:
Default mode for CIFS (SMB) volumes on Nasuni Edge Appliances joined to LDAP. Also available for Nasuni Appliances joined to Active Directory.
Recommended for combined NFS and CIFS (SMB) volumes, and for combined CIFS (SMB) and FTP/SFTP volumes. Also recommended for LDAP-authenticated CIFS (SMB)-only volumes with Linux or Mac clients, with UNIX extensions enabled.
The settings available in UNIX/NFS Permissions Only Mode are available.
ACLs are available.
In Unix/Linux, the
setfaclandgetfaclcommands are available to set and get ACLs.In Windows, multiple users and groups are represented on the ACLs.
Inheritance is represented as default ACLs.
More information:
Access control lists (ACLs) are supported entirely through POSIX ACLs. Windows clients receive mapping of POSIX ACLs to NTFS ACLs. However, the mappings are not as complete as mappings done for NTFS Compatible Mode. NFS clients cannot view the ACLs.
The NFSv4 protocol automatically translates the underlying ACLs to NFSv4 ACLs. The common tools for managing POSIX ACLs are not supported on NFSv4. To manage ACLs using NFSv4, you must use the NFSv4 ACL tools.
UNIX/NFS Permissions Only Mode:
Default mode for NFS volumes.
Recommended for primary or heavy NFS use.
Not available for CIFS (SMB) volumes. Not recommended for Windows users.
All permissions are set using the standard User, Group, and Other settings.
ACLs and attributes are not available. Attempting to set ACLs or attributes returns "Operation not supported".
If CIFS is used with this mode, only one user, one group, and Everyone can be set. Attempting to set other values returns "Access is denied".
More information:
Only supports traditional UNIX mode bits to control permissions (
chmod).Windows can view permissions as access control lists (ACLs), but cannot add or remove access control entries (ACEs).
Unauthenticated Access Mode:
Default mode for CIFS (SMB) volumes on Nasuni Edge Appliances that are not joined to Active Directory or to LDAP. Also available for Nasuni Edge Appliances joined to Active Directory or LDAP, if the client (such as Windows) is joined to the same domain.
Recommended for CIFS (SMB) Public-mode volumes. For CIFS (SMB) clients, this mode acts as an open share. For all other protocols, this mode acts identically to POSIX Mixed Mode.
Click Save Protocol Settings. The Confirm Volume Protocols Update dialog box appears.
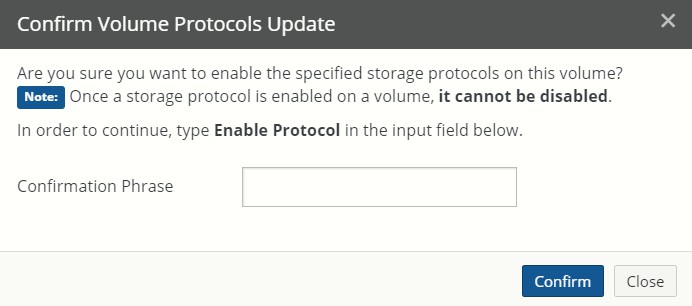
Figure 7-103: Confirm Volume Protocols Update dialog box.
Type
Enable Protocolin the Confirmation Phrase text field.Click Confirm.
The selected protocol is enabled, and the selected volume permissions policy is enabled. Alternatively, to exit the dialog box without changing the volume protocol settings, click Close.
Tip: To add an SMB (CIFS) share to a volume, see “Creating shares”. To add an NFS export to a volume, see “Creating exports”. To add an FTP/SFTP directory to a volume, see “Creating FTP directories”.
Changing Permissions Policy from NTFS Compatible to NTFS Exclusive
Note: You cannot convert multiple-protocol volumes from NTFS Compatible mode to NTFS Exclusive mode. For example, if NFS protocol or FTP/SFTP protocol is enabled for a volume, converting the volume from NTFS Compatible mode to NTFS Exclusive mode is not possible.
Note: Converting a volume from NTFS Compatible mode to NTFS Exclusive mode is only possible on Edge Appliances running version 8.5 or higher.
Tip: When converting a volume from NTFS Compatible mode to NTFS Exclusive mode, SMB (CIFS) connections are interrupted and must be reconnected.
To change Permissions Policy from NTFS Compatible to NTFS Exclusive, follow these steps:
Click Protocols. The Volume Protocols page displays a list of volume names.

Figure 7-104: Volume Protocols page.
For the selected volume with NTFS Compatible Mode for its Permissions Policy, click Edit
 . The Volume Protocol Settings dialog box appears.
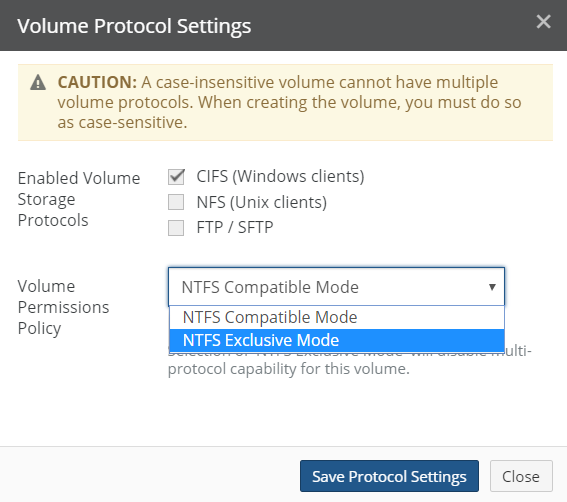
Figure 7-105: Volume Protocol Settings dialog box.
The currently enabled protocols for the volume are selected.
From the Volume Permissions Policy drop-down list, select NTFS Exclusive Mode.
Click Save Protocol Settings. The Confirm Volume Protocols Update dialog box appears.
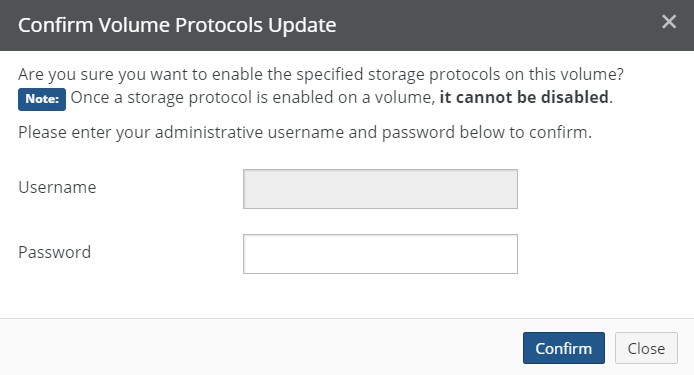
Figure 7-106: Confirm Volume Protocols Update dialog box.
Enter the Username and Password for a user who has the credentials for this operation.
Click Confirm.
The selected volume permissions policy is enabled.
Alternatively, to exit the dialog box without changing the volume protocol settings, click Close.
Quota
You can view or change the quota (maximum capacity) of volumes. You can also view or change quota rules and quotas for folders.
When a directory exceeds its quota limit, no further data writes to the relevant directory are permitted. If the size of the relevant directory is reduced, or the size of the quota limit is increased, then data writes to the relevant directory are permitted once more.
Important: If the size of the directory is larger than the quota limit when the quota is defined, data writes to the relevant directory are halted immediately. Data writes are not permitted until the size of the relevant directory is reduced, or the size of the quota limit is increased.
For SMB (CIFS) and NFS volumes and FTP/SFTP directories, the volume quota (maximum capacity) enables you to limit the amount of storage space for a volume, including snapshots, which helps you to control your storage costs. Unlimited storage space is available. However, the volume is limited to your licensed capacity. Nasuni recommends that you only increase volume quotas rather than decrease them.
Note: A notification occurs when the volume reaches 90 percent of the volume quota. Another notification occurs when the volume reaches the volume quota. If the volume is shared, then the volume quota is compared to the sum of all Nasuni Edge Appliances connected to the volume.
Note: You can also set Directory Quotas on folders. See “Setting Quota or Rule”.
You can schedule the resulting quota reports here: “Quota Reports”.
Tip: See Worksheet for a worksheet for planning configurations.
Viewing volume quota setting
To view the volume quota settings, follow these steps:
Click Quota. The Volume Quota page displays a list of volumes on managed Nasuni Edge Appliances.

Figure 7-107: Volume Quota page.
The following information appears for each volume in the list:
Name: The name of the volume.
Filer: The Nasuni Edge Appliance that owns the volume.
Quota: The volume quota setting in GB, or “Unlimited” to the limit of licensed capacity.
Editing volume quota
Tip: This function can also be performed using the NMC API. For details, see NMC API.
To edit volume quota, follow these steps:
On the Volume Quota page, select the volumes in the list whose volume quota setting you want to edit.
Click Edit Volumes. The Volume Quota Settings dialog box appears.
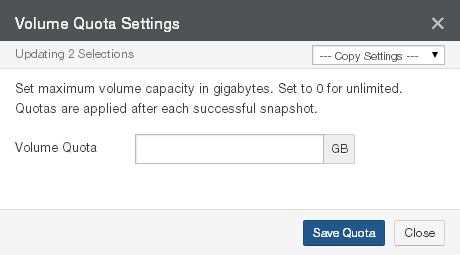
Figure 7-108: Volume Quota Settings dialog box.
To copy settings from another volume, select the volume from the Copy Settings drop-down list. The settings from that volume appear in the dialog box.
In the Volume Quota text box, enter the volume quota for the selected volumes (in gigabytes). “0 GB” means unlimited, to the limit of licensed capacity.
Click Save Quota. The volume quota settings are changed. The volume appears in the list on the Volume Quota page.
Alternatively, to exit the dialog box without changing the volume quota settings, click Close.
Viewing and editing folder quotas
A folder quota applies the specified limit only to the selected folder.
Tip: This function can also be performed using the NMC API. For details, see NMC API.
To view the folder quota rules, follow these steps:
Click Quota Folders. The Volume Quota Folders page displays a list of volumes on managed Nasuni Edge Appliances.

Figure 7-109: Volume Quota Folders page
The following information appears for each volume in the list:
Volume: The name of the volume.
Filer: The Nasuni Edge Appliance that owns the volume.
Path: The full path to the folder with the quota.
Email: The email address to use for alerts for this quota.
Limit: The limit for the quota.
Usage: The current storage usage for the folder, and the percentage of the quota.
To edit a folder quota, click Edit. The Edit Quota Settings dialog box appears.
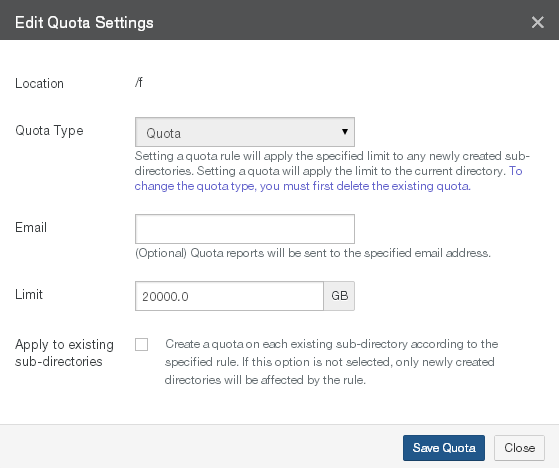
Figure 7-110: Edit Quota Settings dialog box.
From the Quota Type drop-down list, select one of the following choices:
Tip: To change the quota type, you must first delete the existing quota.
Rule: Applies the specified Limit to any newly created subdirectories of the selected volume or folder. To apply the specified Limit to existing subdirectories, see step 6 below.
Important: Quotas cannot be nested. Quotas cannot be created anywhere in a directory tree that already has a quota set in one of the parents. Quotas also cannot be created on any parent directory when any of the subdirectories has a quota already.
Quota: Applies the specified Limit only to the selected volume or folder.
(Optional) To receive reports when the selected volume or folder is near or over its Limit, in the Email text box, enter an email address.
Tip: If User Folders Support is enabled for the SMB (CIFS) share that the directory is in, then the email address of the directory owner is used automatically. This prevents the necessity of manually entering hundreds of email addresses for multi-user systems. See step f. However, if the email address is entered here, the entered email address overrides looking up an email address from Directory Services.
Tip: This function can also be performed using the NMC API. For details, see NMC API.
In the Limit text box, enter or select the quota limit (in gigabytes or fractions of a gigabyte, such as 6.8). The content size of uncompressed data is displayed to help you decide on a quota limit.
When a directory exceeds its quota limit, no further data writes to the relevant directory are permitted. If the size of the relevant directory is reduced, or the size of the quota limit is increased, then data writes to the relevant directory are permitted once more.
Important: If the size of the directory is larger than the quota limit when the quota is defined, data writes to the relevant directory are halted immediately. Data writes are not permitted until the size of the relevant directory is reduced, or the size of the quota limit is increased.
Tip: For a summary of available data metrics, see “Data Metrics”.
Note: Nasuni’s display of size might differ from other indications of size, such as Windows Explorer and other utilities. Typically, such utilities display only the size of the data currently present in the local cache, while Nasuni displays the full size, regardless of where the data is.
Tip: This function can also be performed using the NMC API. For details, see NMC API.
For the Rule quota type, to apply the same Limit to the data in any existing sub-directories of the selected directory, select the Apply to existing sub-directories check box.
Click Save Quota. The volume quota settings are changed. The volume appears in the list on the Volume Quota page.
Deleting folder quotas
Tip: This function can also be performed using the NMC API. For details, see NMC API.
To delete a folder quota, follow these steps:
Click Quota Folders. The Volume Quota Folders page displays a list of volumes on managed Nasuni Edge Appliances.

Figure 7-111: Volume Quota Folders page.
The following information appears for each volume in the list:
Volume: The name of the volume.
Filer: The Nasuni Edge Appliance that owns the volume.
Path: The full path to the folder with the quota.
Email: The email address to use for alerts for this quota.
Limit: The limit for the quota.
Usage: The current storage usage for the folder, and the percentage of the quota.
For the folder quota that you want to delete, click Delete
 . The Delete Quota Settings dialog box appears. Click Delete Quota. The quota is deleted.
Viewing folder quota rules
A folder quota rule applies the specified limit to any newly created subdirectories of the selected volume or folder.
To view the folder quota rules, follow these steps:
Click Quota Rules. The Volume Quota Rules page displays a list of volumes on managed Nasuni Edge Appliances.

Figure 7-112: Volume Quota Rules page.
The following information appears for each volume in the list:
Volume: The name of the volume.
Filer: The Nasuni Edge Appliance that owns the volume.
Path: The full path to the folder with the quota rule.
Email: The email address to use for alerts for this quota rule.
Limit: The limit for the quota rule.
Filtering the Display
Using the Filter text box, you can limit the display to items that match the criteria that you enter. See “Filtering Displays” for details. On this screen, the following field names are available:
volume: Matches values in the Volume field.
filer: Matches values in the Filer field.
path: Matches values in the Path field.
Editing folder quota rules
To edit a folder quota rule, follow these steps:
Click Quota Rules. The Volume Quota Rules page displays a list of volumes on managed Nasuni Edge Appliances.

Figure 7-113: Volume Quota Rules page.
The following information appears for each volume in the list:
Volume: The name of the volume.
Filer: The Nasuni Edge Appliance that owns the volume.
Path: The full path to the folder with the quota rule.
Email: The email address to use for alerts for this quota rule.
Limit: The limit for the quota rule.
For the rule to edit, click Edit. The Edit Quota Settings dialog box appears.

Figure 7-114: Edit Quota Settings dialog box.
From the Quota Type drop-down list, select one of the following choices:
Tip: To change the quota type, you must first delete the existing quota.
Rule: Applies the specified Limit to any newly created subdirectories of the selected volume or folder. To apply the specified Limit to existing subdirectories, see step 6 below.
Important: Quotas cannot be nested. Quotas cannot be created anywhere in a directory tree that already has a quota set in one of the parents. Quotas also cannot be created on any parent directory when any of the subdirectories has a quota already.
Quota: Applies the specified Limit only to the selected volume or folder.
(Optional) To receive reports when the selected volume or folder is near or over its Limit, in the Email text box, enter an email address.
Tip: If User Folders Support is enabled for the SMB (CIFS) share that the directory is in, then the email address of the directory owner is used automatically. This prevents the necessity of manually entering hundreds of email addresses for multi-user systems. See step f. However, if the email address is entered here, the entered email address overrides looking up an email address from Directory Services.
In the Limit text box, enter or select the quota limit (in gigabytes or fractions of a gigabyte, such as 6.8). The content size of uncompressed data is displayed to help you decide on a quota limit.
When a directory exceeds its quota limit, no further data writes to the relevant directory are permitted. If the size of the relevant directory is reduced, or the size of the quota limit is increased, then data writes to the relevant directory are permitted once more.
Important: If the size of the directory is larger than the quota limit when the quota is defined, data writes to the relevant directory are halted immediately. Data writes are not permitted until the size of the relevant directory is reduced, or the size of the quota limit is increased.
Tip: For a summary of available data metrics, see “Data Metrics”.
Note: Nasuni’s display of size might differ from other indications of size, such as Windows Explorer and other utilities. Typically, such utilities display only the size of the data currently present in the local cache, while Nasuni displays the full size, regardless of where the data is.
Click Save Rule. The volume quota rule settings are changed. The volume appears in the list on the Volume Quota page.
Alternatively, to exit the dialog box without changing the settings, click Close.
Deleting folder quota rules
To delete a folder quota rule, follow these steps:
Click Quota Rules. The Volume Quota Rules page displays a list of volumes on managed Nasuni Edge Appliances.

Figure 7-115: Volume Quota Rules page.
The following information appears for each volume in the list:
Volume: The name of the volume.
Filer: The Nasuni Edge Appliance that owns the volume.
Path: The full path to the folder with the quota rule.
Email: The email address to use for alerts for this quota rule.
Limit: The limit for the quota rule.
For the quota rule that you want to delete, click Delete
 . The Delete Quota Rule dialog box appears. Click Delete Rule. The quota rule is deleted.
Remote Access
You can enable or disable access to an SMB (CIFS) or NFS volume or FTP/SFTP directory by your remote offices attached to your Nasuni.com account. If remote access to a volume or FTP/SFTP directory is enabled, you can select permissions for remote access to this volume.
Important: A volume created on an NEA running version 10.2 or later cannot be shared with NEAs running a version earlier than 10.2. However, a volume created on an NEA running a version earlier than 10.2 can be shared with an NEA running version 10.2 or later. After all of the NEAs sharing a given volume have been updated to 10.2 or later, the volume version is incremented so that the volume can no longer be shared with any NEAs running earlier versions.
Tip: See Worksheet for a worksheet for planning configurations.
Tip: Perform any necessary data ingestions to the volume before enabling Remote Access.
Otherwise, data ingestion processing can impact the synchronization of remote volumes.
Important: You cannot enable, disable, or change Remote Access settings while the metadata push phase of a snapshot is in progress. For details on verifying when snapshots are complete, see Snapshot Processing.
Tip: When you create a volume on an Edge Appliance, it is a best practice to create and configure as many shares as possible before connecting other Edge Appliances to that volume.
Then, when other Edge Appliances connect to that volume, they automatically inherit all of the share definitions that were specified on the original volume. This only happens the first time that remote Edge Appliances connect to the volume, so it is important to perform as much share creation and configuration as possible before connecting to the volume.
Tip: For an Edge Appliance with new or changed volume configurations for remote volumes with Read/Write permissions, it can initially take up to 20 minutes before these remote volumes appear in the list of volumes. It takes time to fetch the necessary information for the remote volumes.
Caution: Edge Appliances joined to LDAP cannot share volumes with Edge Appliances joined to Active Directory. Similarly, Edge Appliances joined to Active Directory cannot share volumes with Edge Appliances joined to LDAP. If you want Edge Appliances to share volumes, ensure that they are joined to the same directory service.
Caution: If a file or directory is renamed (and its data and permissions remain unchanged) on two different Edge Appliances that share the item’s volume, and both renames occur before the snapshots on the two Edge Appliances, then only one of the renames is effective, namely, the one with the latest snapshot.
This is not considered a merge conflict.
Viewing remote access settings
To view the remote access settings, follow these steps:
Click Remote Access. The Volume Remote Access Setting page displays a list of SMB (CIFS) and NFS volumes on managed Nasuni Edge Appliances.

Important: If an Edge Appliance running version 9.12 or later creates a volume in a region not available to an Edge Appliance running a version before 9.12, the volume does not appear in the list, even if the volume is enabled for Remote Access.
The following information appears for each volume in the list:
Name: The name of the volume.
Filer: The Nasuni Edge Appliance that owns the volume.
Protocol: The protocol of the volume: SMB (CIFS), NFS, or FTP.
Security Mode (SMB (CIFS) volumes only): The security mode of the SMB (CIFS) volume: Active Directory, LDAP Directory Services, Publicly Available, or Unknown.
Note: If the permission of a remote volume is Disabled, the remote volume might not display the correct Security Mode for that volume.
Permissions (if currently remotely accessible): The current permissions for the remotely accessible volume: Read-Only, Read/Write, or Custom.
Remote Access: The remote access setting of the volume: Enabled (remotely accessible) or Disabled (not remotely accessible).
Setting or editing remote access settings
Important: A volume created on an NEA running version 10.2 or later cannot be shared with NEAs running a version earlier than 10.2. However, a volume created on an NEA running a version earlier than 10.2 can be shared with an NEA running version 10.2 or later. After all of the NEAs sharing a given volume have been updated to 10.2 or later, the volume version is incremented so that the volume can no longer be shared with any NEAs running earlier versions.
Tip: If a volume has remote access Enabled with “Read Only” as its Remote Access Permission, and if this volume is connected to other NEAs, then the audit logs for that volume do not get written on the other connected NEAs.
To ensure that audit logs are written for such a volume, do the following:
Enable remote access for the volume with “Read/Write” as its Remote Access Permission.
Create a share or an export or an FTP directory as Read Only.
Important: You cannot enable, disable, or change Remote Access settings while the metadata push phase of a snapshot is in progress. For details on verifying when snapshots are complete, see Snapshot Processing.
Tip: This function can also be performed using the NMC API. For details, see NMC API.
To set or edit remote access settings, follow these steps:
On the Volume Remote Access Setting page, select the volumes in the list whose remote access settings you want to edit.
Click Edit Volumes. The Edit Volume Remote Access Settings dialog box appears.

Figure 7-117: Edit Volume Remote Access Settings dialog box.
Note: If you attempt to modify Remote Access settings on a volume that has GFA enabled, a warning appears. This only appears when the NMC UI has multiple-volume GFA enabled.

Figure 7-118: Warning about disabling Remote Access for GFA-enabled volume.
To copy settings from another volume, select the volume from the Copy Settings drop-down list. The settings from that volume appear in the dialog box.
Click Enabled to set On (selected volumes are remotely accessible) or Off (selected volumes are not remotely accessible).
Note: If any NEAs are remotely connected, you cannot set the Enabled button to Off. To set the Enabled button to Off, first disconnect all NEAs from the selected volumes using the Connect Volume page. This disconnection can take 10 minutes to resolve. Using Refresh Connections can reduce that time.
If access to the selected volumes is Enabled, from the Remote Access Permissions drop- down list, select either Read Only, Read/Write, or Custom.
Read Only: All other Nasuni Edge Appliances on this account can view the data on the selected volumes, but cannot change that data.
Note: If you attempt to change from “Read/Write” to “Read Only”, a warning appears to remind you to take a snapshot before performing the change. This helps to prevent the possibility of leaving data unprotected.

Figure 7-119: Reminder to take snapshot before changing from “Read/Write” to “Read Only”.
Read/Write: All other Nasuni Edge Appliances on this account can view the data on the selected volumes, and can also change that data.
Custom: You specify the access for each other Nasuni Edge Appliance on this account separately.
Note: If you choose Custom, new Nasuni Edge Appliances on this account cannot access the selected volumes until you explicitly provide the type of access.
If you select Custom remote access permissions, then you use the Custom Remote Access Permissions list of other Nasuni Edge Appliances on your account.
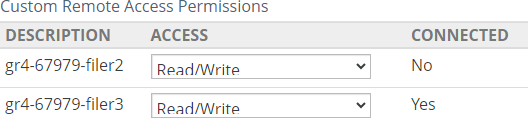
In the Custom Remote Access Permissions list, the following information appears for each NEA in the list:
Description: The description of the NEA.
Access: The current custom remote access permission for the selected volumes on the NEA.
Connected: An indication of whether the NEA is currently connected (Yes) or not connected (No) to the selected volumes.
For each other Nasuni Edge Appliance on this account, select the drop-down list beside the name (Description) of the Nasuni Edge Appliance and select either Read/Write, Read Only, or Disabled.
Read/Write: This Nasuni Edge Appliance can view the data on the selected volumes, and can also change that data.
Read Only: This Nasuni Edge Appliance can view the data on the selected volumes, but cannot change that data.
Note: If you attempt to change from “Read/Write” to “Read Only”, a warning appears to remind you to take a snapshot before performing the change. This helps to prevent the possibility of leaving data unprotected.

Figure 7-120: Reminder to take snapshot before changing from “Read/Write” to “Read Only”.
Disabled: The specified Edge Appliance (“Filer”) is not allowed to make new connections to the selected volumes. The Disabled setting does not disconnect the selected volumes from any Edge Appliance that has already been connected.
Note: If this NEA is remotely connected, you cannot select Disabled. To select Disabled, first disconnect this NEA from the volume using the Connect Volume page. This disconnection can take 10 minutes to resolve. Using Refresh Connections can reduce that time.
Note: If the Permission is Disabled, the remote volume might not display the correct Security for that volume.
If the Edge Appliance had been connected to the selected volumes before the permission was set to Disabled, users are still able to read from the selected volumes and write to the selected volumes. However, unprotected data of an Edge Appliance with remote access permission of Disabled is never included in snapshots to the selected volumes.
Important: Do not change the Disabled remote access permission for an Edge Appliance that is currently connected. Disconnect the Edge Appliance before setting the remote access permission to Disabled.
Click Save Remote Access Settings. The volume remote access settings are changed. The selected volumes appears in the list on the Volume Remote Access Setting page.
Alternatively, to exit the dialog box without changing the volume remote access settings, click Close.
Snapshot Directory Access
You can enable access to the .snapshot directory to permit browsing the snapshot history and viewing the files and directories for NFS exports, SMB (CIFS) shares, and FTP/SFTP directories. The .snapshot directory is located inside the .nasuni directory. To view the .snapshot directory, the following must all be true:
The NFS protocol is not enabled on the volume.
Snapshot Directory Access is enabled on the volume. See “Editing snapshot directory access settings”.
Snapshot Directory Access is enabled on the share that points to the root of the volume. See step 17.
The user of the primary domain is an Administrative User.
On the Edge Appliance UI, click Configuration, then click General Settings, then include the user in the list of Administrative Users.
In Windows, “Show Hidden Files, folders, and drives” is enabled.
In Windows, “Hide protected operating system files” is disabled.
When all of the above are true, disconnect your CIFS connection and then reconnect. See “Disconnecting clients from a share”.
Note: Snapshot directory access can add a significant load to the Nasuni Edge Appliance.
Note: To monitor snapshots, see “Monitoring snapshot processing”.
Tip: If the NFS protocol is enabled on a volume, or both the SMB (CIFS) protocol and the NFS protocol are enabled on a volume, then the
.snapshotdirectory is not available.
Tip: If "Snapshot Directory Access" is enabled on a volume and “Enable Snapshot Directories” is enabled on an SMB (CIFS) share of that volume, then directories in that SMB (CIFS) share on that volume cannot be deleted.
Viewing snapshot directory access settings
To view the snapshot directory access settings, follow these steps:
Click Snapshot Access. The Volume Snapshot Directory Access page displays a list of volumes on managed Nasuni Edge Appliances.
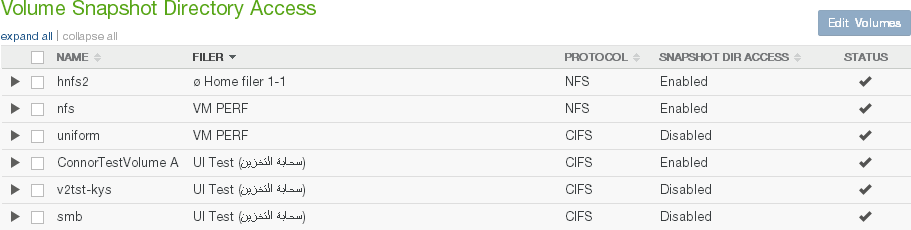
Figure 7-121: Volume Snapshot Directory Access page
Click the right-facing arrow beside each volume to reveal the snapshot directory access setting for each Nasuni Edge Appliance for that volume. To reveal the settings for all volumes of all Nasuni Edge Appliances, click Expand All. To collapse the display of the settings for all volumes of all Nasuni Edge Appliances, click Collapse All.
The following information appears for each volume in the list:
Name: The name of the volume.
Filer: The Nasuni Edge Appliance that owns the volume.
Protocol: The protocol of the volume: SMB (CIFS), NFS, or FTP.
Snapshot Directory Access: The snapshot directory access setting: Enabled or Disabled.
Editing snapshot directory access settings
To enable access to the snapshot directory for a volume, follow these steps:
On the Volume Snapshot Directory Access page, select the volumes in the list whose snapshot directory access settings you want to edit.
Click Edit Volumes. The Edit Snapshot Directory Access dialog box appears.
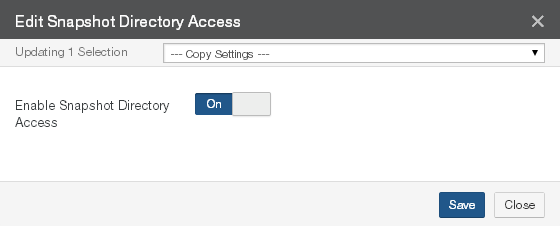
Figure 7-122: Edit Snapshot Directory Access dialog box.
To copy settings from another volume, select the volume from the Copy Settings drop-down list. The settings from that volume appear in the dialog box.
To enable access to the snapshot directory, set Enable Snapshot Directory Access to On.
Tip: If both the SMB (CIFS) protocol and the NFS protocol are enabled on a volume, then the
.snapshotdirectory is not available.Click Save. The snapshot directory access settings are changed. The volume appears in the list on the Volume Snapshot Directory Access page.
Alternatively, to exit the dialog box without changing the snapshot directory access settings, click Close.
Snapshots within .snapshot directories
The previous versions that are available for Windows Previous Versions depend on the snapshots within the .sn apshot directories.
By default, the snapshots available include the following 35 snapshots, if they exist:
The 4 most recent snapshots, 15 minutes apart.
The 10 most recent hourly snapshots, by hour.
The 7 most recent daily snapshots, by day.
The 4 most recent weekly snapshots, by week.
The 10 most recent monthly snapshots, by month.
Alternatively, the snapshots available can include the following 45 snapshots, if they exist:
The most recent 10 snapshots.
The most recent 12 hourly snapshots, by hour.
The most recent 7 daily snapshots, by day.
The most recent 4 weekly snapshots, by week.
The most recent 12 monthly snapshots, by month.
To use this alternative arrangement of snapshots, request Nasuni Support to configure the sampling policy feature.
Snapshot Retention
You can view or change the snapshot retention setting of volumes.
Note: To monitor snapshots, see “Monitoring snapshot processing”.
By default, all snapshots are retained. However, for compliance purposes or your own best practices, you can specify to delete older snapshots from cloud object storage.
Caution: For security purposes, when a snapshot is removed, it is permanently deleted from cloud object storage and cannot be recovered.
You can specify to delete older snapshots from cloud object storage, based on a configured policy for a specific "owned" local volume. Snapshot retention policies are configured on the volume level.
Snapshot retention policies also work on shared volumes.
Important: By default, the snapshot retention process runs on the volume-owning Edge Appliance only. Performing the snapshot retention process can potentially affect user activity performance on the appliance, so the process has a lower priority than other Nasuni Edge Appliance processes. For this reason, the execution of the snapshot retention policy can be potentially slowed.
Tip: Snapshot Retention can remove previous snapshots only if snapshots are currently occurring regularly.
Important: As long as a file is included in any snapshot within your snapshot retention policy, that file is not removed. However, if you delete a file, and none of the retained snapshots includes that file, the file is removed.
Tip: Changes to the Snapshot Retention setting go into effect when the next snapshot occurs. It is normal to temporarily see more snapshots than the Snapshot Retention setting would suggest.
Tip: Set a snapshot retention policy for any volumes used for backup.
Important: For the purposes of time-based snapshot retention:
One day is defined as 86,400 seconds.
One month is defined as 2,629,743 seconds.
One year is defined as 31,556,926 seconds. For details about Snapshot Retention, see Snapshot Retention.
Tip: See Worksheet for a worksheet for planning configurations.
Selecting the Snapshot Retention service
By default, the snapshot retention process runs on the volume-owning Edge Appliance only. Performing the snapshot retention process can potentially affect user activity performance on the
appliance, so the process has a lower priority than other Nasuni Edge Appliance processes. For this reason, the execution of the snapshot retention policy can be potentially slowed.
However, Nasuni provides you with the option to run the snapshot retention policy as a service in the cloud, so that there is no impact on user activity on Nasuni Edge Appliances.
You can specify that Snapshot Retention runs as a Cloud Service using the Snapshot Retention dialog box.
Important: Access to the Snapshot Retention service in the cloud requires the appropriate license. If you do not see the settings for the cloud service in the NMC, contact Nasuni.
Changing Snapshot Retention time interval
If you are retaining snapshots for a given time, you can change the time interval that you are retaining the snapshots for.
Changing from longer interval to shorter interval
When changing from a longer retention time interval (such as 1 year) to a shorter retention time interval (such as 1 month), snapshots that are between 1 month and 1 year become eligible for removal after 1 month.
Changing from shorter interval to longer interval
Similarly, when changing from a shorter retention time interval (such as 1 month) to a longer retention time interval (such as 1 year), snapshots that are between 1 month and 1 year become eligible for removal after 1 year.
Time boundary frequency
If you are retaining snapshots for a given time, the default configuration is for the period between time boundaries to be a specified fraction of the snapshot retention time that you specify on the Snapshot Retention page. The default factor is 5. Therefore, if you chose a snapshot retention time of 10 months, the period between time boundaries would be only 2 months ( = 10 months / 5).
It is possible to change this factor. For example, if you choose a factor of 2, the period between time boundaries would be 5 months ( = 10 months / 2).
Note: To configure the factor for time boundaries, contact Nasuni Support.
The advantage of a shorter period between time boundaries is that you do not have to wait so long for unwanted data to first become eligible for deletion.
In most cases, a fast restore is possible, even if the data to be restored is behind a time boundary. However, in certain situations, if the data to be restored is behind a time boundary, it might be necessary to remove the time boundary before performing a fast restore.
The pros and cons of more frequent time boundaries can be summarized as follows:
Pros
You do not have to wait so long for unwanted data to first become eligible for deletion.
This reduces the amount of data under protection, which reduces costs.
Cons
Should you need to restore data, in certain situations, if the data to be restored is behind a time boundary, it might be necessary to remove the time boundary before performing a fast restore.
If you decide to configure the factor for time boundaries, contact Nasuni Support.
Restoring data protected by snapshot retention
Two types of data restore are possible: a “slow” data restore and a “fast” data restore. The differences between the two types of restore include the following:
“Fast restore”: A fast restore only needs to restore the metadata at the top level of the directory structure. Any required data or metadata is brought into the cache only when actually accessed. A fast restore can be extremely fast (a matter of minutes) for multiple TBs of data.
An Edge Appliance can generally perform a fast restore unless, for safety reasons, it must perform a slow restore (see below).
For data safety reasons, a few features prevent performing a fast restore:
Global File Lock: If Global File Lock is enabled on the data set being restored, the system must perform a slow restore on the data protected by Global File Lock. You can disable Global File Lock in order to perform a fast restore. For details, see “Global File Lock”.
Snapshot Retention: If Snapshot Retention is enabled, and versions are marked as time boundaries, a fast restore cannot happen across these time boundaries, so that older directories and files might require slow restore. You can disable Snapshot Retention in order to perform a fast restore. For details, see “Editing snapshot directory access settings”.
“Slow restore”: If a fast restore is not possible, you can perform a “slow restore”. A slow restore must download from cloud object storage the full metadata and data for the version that you are restoring. This can take a significant amount of time (possibly days or weeks) in order to restore larger data sets. For this reason, if you need larger restores, try to do everything possible in order to perform a fast restore.
If you intend to perform a slow restore, it is not necessary to disable Global File Lock or Snapshot Retention.
Viewing snapshot retention settings
To view the snapshot retention settings, follow these steps:
Click Snapshot Retention. The Volume Snapshot Retention page displays a list of volumes on managed Nasuni Edge Appliances.

Figure 7-123: Volume Snapshot Retention page.
The following information appears for each volume in the list:
Name: The name of the volume.
Filer: The Nasuni Edge Appliance that owns the volume.
Version: The software version that the owning appliance is running.
Retention: The snapshot retention setting, such as the following:
All Snapshots: Retains all snapshots indefinitely.
[a set number of] snapshots: A specific number of snapshots to retain.
Snapshots within [a given time]: The number of Years, Months, or Days for which you want to retain snapshots.
Region: The region of the volume.
Important: The cloud services should be deployed in the same region as the volume, in order to avoid egress fees associated with transferring data across regions. If there is a region mismatch when configuring a volume to use the cloud services, the NMC warns you.
Retention Provider: Where the Snapshot Retention service is running: Filer (on the volume- owning Edge Appliance) or Cloud (in the cloud).
Cloud Service Details: If the Snapshot Retention service is running in the cloud, includes the Name and Region of the Cloud Service (or cloud stack). If there are multiple instances, this column shows which instance is being used with the volume.
If the Snapshot Retention service is running on the volume-owning Edge Appliance, displays “--”.
Deploying a Snapshot Retention Cloud Service
Before specifying that the snapshot retention process should run as a Cloud Service, you must deploy that Cloud Service.
UniFS as a Service (UaaS) is a Nasuni platform that can perform operations directly on the UniFS file system hosted in a public cloud. UaaS provides a set of scalable, portable cloud services, deployed within a customer’s cloud tenancy, that interact with UniFS volumes.
Any Nasuni volume backed by Amazon S3 or Microsoft Azure Blob Storage object storage is available to be registered with UaaS. To register a volume, a customer needs a few pieces of information available from the Nasuni Management Console (NMC), and either an AWS or Azure account.
Processing can be run in a different cloud than the backing data store. (Egress fees might apply when operating across providers.)
To deploy the Snapshot Retention Cloud Service, follow these steps:
On the Volume Snapshot Retention page, click “Deploy Cloud Service”.
The “UniFS™ as a Service” web site appears.
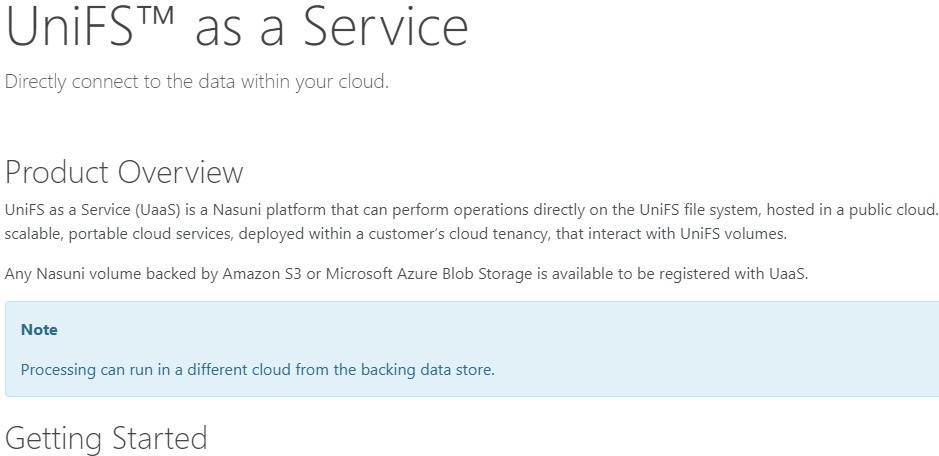
Figure 7-124: “UniFS™ as a Service” web site.
Address the prerequisites listed on Installation Prerequisites.
UaaS License Key: A UaaS License Key is needed for both the deploy and execution of UaaS. This can be obtained from the Nasuni Account Dashboard.
Enable UaaS in License: UaaS must also be enabled within your Nasuni license. To enable this, contact Nasuni Sales, Nasuni Support, or your Nasuni authorized reseller.
Select the cloud platform to deploy the Snapshot Retention Cloud Service to. The current choices include AWS and Azure.
Complete the deployment process for the selected platform.
When the deployment process is done, obtain the URL of the Cloud Service. This URL is used when configuring the service for Snapshot Retention.
Setting or editing snapshot retention settings
Tip: Snapshot retention can remove previous snapshots only if snapshots are currently occurring regularly.
To set or edit snapshot retention settings, follow these steps:
On the Volume Snapshot Retention page, select the volumes in the list whose snapshot retention settings you want to edit.
Click Edit Volumes. The Snapshot Retention dialog box appears.
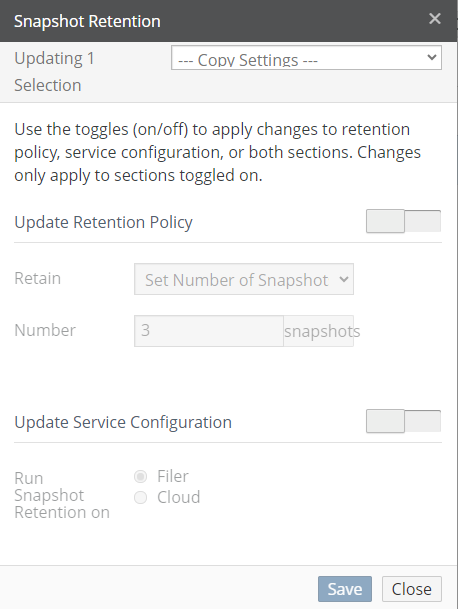
Figure 7-125: Snapshot Retention dialog box.
To copy settings from another volume, select the volume from the Copy Settings drop-down list. The settings from that volume appear in the dialog box.
To update the retention policy, select Update Retention Policy.
Tip: You can update the retention policy independently of updating the service configuration.
From the Retain drop-down list, select a retention policy option:
All Snapshots: (This is the default setting.) Retains all snapshots indefinitely.
If you require deleting older snapshots for compliance or other reasons, do not select this option.
Set Number of Snapshots: (This option is not available if the selected volume has Remote Access enabled.) Enter the Number of the most recent snapshots to retain, from 1 snapshot to 1 billion (1,000,000,000) snapshots.
For example, if you choose to keep 100 snapshots, then the 100 most recent snapshots are retained, and the rest are deleted automatically.

Figure 7-126: Snapshot Retention by number.
Warning: You cannot select “set number of snapshots” if the volume has Remote Access enabled.
Snapshots Within a Range: Enter the number of Years, Months, and Days for which you want to retain snapshots.
For example, if you choose to keep two months’ worth of snapshots, then snapshots that were taken before then are deleted automatically.
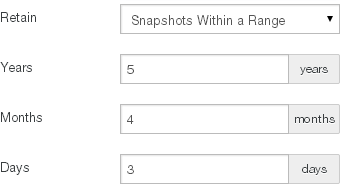
Figure 7-127: Snapshot Retention by time.
Important: For the purposes of time-based snapshot retention:
One year is defined as 31,556,926 seconds.
One month is defined as 2,629,743 seconds.
One day is defined as 86,400 seconds.
To update the snapshot retention service configuration, select Update Retention Policy. The Update Service Configuration dialog box appears.
Figure 7-128: Update Service Configuration dialog box.
Tip: You can update the service configuration independently of updating the retention policy.
To run the snapshot retention service on the volume-owning Edge Appliance, for “Run Snapshot Retention on” select Filer.
To run the snapshot retention service on a cloud platform, for “Run Snapshot Retention on” select Cloud. Then follow these steps:
Before completing the configuration, deploy a Snapshot Retention Cloud Service. For details, see “Deploying a Snapshot Retention Cloud Service”.
Enter the URL of the Cloud Service in the URL field.
The Cloud Provider, Name, and Region fields are populated automatically.
Important: The cloud services should be deployed in the same region as the volume, in order to avoid egress fees associated with transferring data across regions. If there is a region mismatch when configuring a volume to use the cloud services, the NMC warns you.
Click Save Retention. The snapshot retention settings are changed. The volume appears in the list on the Volume Snapshot Retention page.
Alternatively, to exit the dialog box without changing the settings, click Close.
Snapshot Schedule
You can view or change the Snapshot Schedule of volumes.
Note: Because multiple Edge Appliances can share multiple volumes, snapshot handling simplifies processing in these ways:
On a given Edge Appliance, only one volume can perform a snapshot at a time.
A volume that is shared on multiple Edge Appliances can only perform the metadata push phase of a snapshot on one of the Edge Appliances at a time.
To verify that a snapshot has been completed (both data phase and metadata phase), see Appendix E, “Verifying Snapshots,”.
Note: To monitor snapshots, see “Monitoring snapshot processing”.
Note: With each Nasuni snapshot, configuration information is included, in case it is necessary to recover the Edge Appliance. The configuration information includes volume name, volume GUID, share type, software version, last pushed version, retention type, and permissions policy. The configuration bundle is encrypted in the same way that all customer data is encrypted.
If you receive an alert that such backup configurations have failed, this might be due to intermittent network issues, or possibly due to DNS issues. If you see notifications that the Edge Appliance has successfully completed a snapshot after the backup alert, then you can safely ignore the alert.
Tip: If you receive a message of the type “
Unable to inherit all folder settings on volume: settings could not be applied during the mount operation.”, verify your folder settings to determine if they should be recreated, updated, or deleted.
With snapshots, you can find, view, and restore past versions of your files quickly. You can restore a single file, a directory, or an entire volume.
The Nasuni Edge Appliance captures complete snapshots of files at regular intervals and stores all snapshots in cloud object storage to protect your files.
You can select which days of the week on which to perform snapshots.
You can also select at what time of day to start and stop creating snapshots.
You can also set the frequency for creating snapshots. If the volume does not have Remote Access enabled, your choices are 1, 2, 4, 8, 12, or 24 hours between snapshots. If the volume does have
Remote Access enabled, your choices are 1, 5, 10, 15, 25, or 30 minutes, or 1, 2, 4, 8, 12, or 24 hours between snapshots. For example, you can configure snapshots to not occur during the day and only push new and changed data at night when network usage is low.
Warning: Frequent snapshots increase the system load significantly.
Tip: On volumes with Global File Lock enabled, we recommend increasing the snapshot frequency and the synchronization frequency of the volume.
If the normal snapshot and synchronization frequency of the volume are decreased, new files take longer to propagate, because new files depend on snapshot and synchronization to propagate.
Nasuni Global File Acceleration (GFA) can automatically accelerate file synchronization, helping customers to improve file sharing collaboration and optimize workforce productivity. You can configure Global File Acceleration with the NMC. See “Global File Acceleration (GFA)”.
If all Edge Appliances, including Edge Appliances in the account that are not managed by the NMC, are running version 9.12 or later, you can configure Global File Acceleration (GFA) for multiple volumes using the NMC. This feature must be enabled in your customer license. Consult with Nasuni Account Management to enable this feature.
Tip: If the “Global File Acceleration” button is not visible, that is an indication that the NMC is 23.2 or later, and all managed Edge Appliances are 9.12 or later.
If you have any Edge Appliances running versions before 9.12, including Edge Appliances in the account that are not managed by the NMC, your options include:
To configure GFA for a single volume, you can use the NMC.
To configure GFA for multiple volumes, you must request assistance from Nasuni Support. You cannot configure GFA for multiple volumes using the NMC.
See “Quality of Service (Bandwidth) Settings” to configure outbound bandwidth limits.
Tip: See Worksheet for a worksheet for planning configurations.
Viewing Snapshot Schedules
To view the Snapshot Schedules, follow these steps:
Click Snapshot Schedule. The Volume Snapshot Schedule page displays a list of volumes on managed Nasuni Edge Appliances.

Figure 7-129: Volume Snapshot Schedule page.
Note: If one or more Edge Appliances is running versions before 9.12, including Edge Appliances in the account that are not managed by the NMC, the Global File Acceleration button is available in order to configure a single volume only.
Tip: If the “Global File Acceleration” button is not visible, that is an indication that the NMC is 23.2 or later, and all managed Edge Appliances are 9.12 or later.
Click the right-facing arrow beside each volume to reveal the Snapshot Schedule setting for each Nasuni Edge Appliance for that volume. To reveal the settings for all volumes of all Nasuni Edge Appliances, click Expand All. To collapse the display of the settings for all volumes of all Nasuni Edge Appliances, click Collapse All.
The following information appears for each volume in the list:
Name: The name of the volume.
Filer: The names or number of Nasuni Edge Appliances that access the volume.
GFA (if GFA enabled in license): An indicator of whether Global File Acceleration (GFA) is Enabled or Disabled or Observation Only for the volume. For details, see “Global FileAcceleration (GFA)”.
If settings are updating, displays Pending.
If GFA has been configured by Nasuni Support, displays Nasuni Managed.
Note: Observation mode is deprecated, meaning that you can no longer enable Observation mode, but, if previously enabled, Observation mode continues to function.
Schedule: If snapshots are enabled, the days of the week on which snapshots are scheduled. Otherwise, “Disabled”.
Time: If snapshots are enabled, the time during which snapshots are scheduled. Otherwise, blank.
Frequency: If snapshots are enabled, the frequency of performing snapshots during the scheduled time. Otherwise, “--”.
If a volume has Global File Acceleration set as Enabled, and not as Observation, the Frequency for the volume displays “--”. For details, see “Global File Acceleration (GFA)”.
Editing Snapshot Schedules
You can edit Snapshot Schedules. You can also configure Global File Acceleration on this page.
Tip: You can edit Snapshot Schedules even if volumes have Global File Acceleration set as Enabled. If the Edge Appliance cannot communicate with the GFA Cloud Service, the Edge Appliance falls back to the original time-based snapshot/sync schedule. The specified days and hours are used. The frequency becomes once per hour. For details, see “Global File Acceleration (GFA)”.
Tip: You can configure Global File Acceleration with the NMC.
If all Edge Appliances, including Edge Appliances in the account that are not managed by the NMC, are running version 9.12 or later, you can configure Global File Acceleration for multiple volumes using the NMC. This feature must be enabled in your customer license. Consult with Nasuni Account Management to enable this feature.
There are three use cases, depending on your installed releases of the NMC and the Edge Appliances:
If you have not updated the NMC to version 23.2 yet, perform the procedure at “NMC not yet updated to version 23.2”.
If you have updated the NMC to version 23.2, but have not yet updated all of the Edge Appliances (including Edge Appliances not managed by the NMC) to version 9.12, perform the procedure at “NMC updated to version 23.2, but not all Edge Appliances updated to 9.12 yet”.
If you have updated the NMC to version 23.2 and have updated all of the Edge Appliances (including Edge Appliances not managed by the NMC) to version 9.12, perform the procedure at “NMC updated to version 23.2 and all Edge Appliances updated to 9.12”.
NMC not yet updated to version 23.2
Important: Nasuni recommends updating the NMC to version 23.2 or later.
For details, see Global File Acceleration.
To edit Snapshot Schedules, follow these steps:
Click Snapshot Schedule. The Volume Snapshot Schedule page displays a list of volumes on managed Nasuni Edge Appliances.
The display reflects the Snapshot Schedule and Global File Acceleration features available for the current versions of the NMC and the account’s Edge Appliances. If the NMC has not yet been updated to version 23.2 or later, the Global File Acceleration button appears so that you can configure Global File Acceleration, and the Edit Volumes button appears so that you can configure Snapshot Schedules.

Figure 7-130: Volume Snapshot Schedule page, NMC not updated.
To configure Global File Acceleration, click Global File Acceleration. The GFA Configurations dialog box appears.
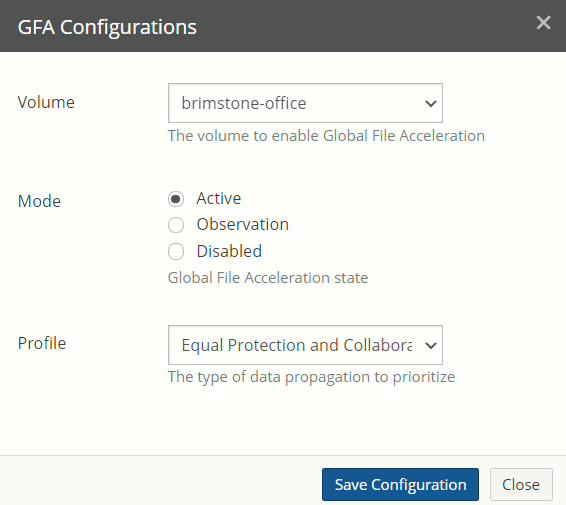
Figure 7-131: GFA Configurations dialog box.
From the Volume drop-down list, select the volume to configure Global File Acceleration for.
Tip: Customers can only configure volumes for Global File Acceleration if the volume’s owning Edge Appliance is running version 9.5 or later. Also, any Edge Appliance accessing such volumes must also be running version 9.5 or later.
Global File Acceleration is only available for remotely shared volumes.
Select the Mode of Global File Acceleration from the following:
Active: Activates Global File Acceleration for the selected volume. Global File Acceleration manages the volume’s Snapshot Schedule.
Observation Only: Enables Global File Acceleration in observation mode, but still uses the selected volume’s Snapshot Schedule.
Note: Observation mode is deprecated, meaning that you can no longer enable Observation mode, but, if previously enabled, Observation mode continues to function.
Disabled: Disables Global File Acceleration for the selected volume.
From the Profile drop-down list, select the type of data propagation that you want to prioritize, from the following choices:
Protection Only: Assign all weight to write activity and no weight at all to reads.
Favor Protection: Assign a positive weight to writes and a negative weight to reads.
Equal Protection and Collaboration: Assign equal weight to writes and reads.
Favor Collaboration: Assign a negative weight to writes and a positive weight to reads.
Collaboration Only: Assign no weight to write activity and all weight to reads. where:
“Protection” refers to Write activity such as creating, writing, and deleting files and directories.
“Collaboration” refers to Write activity that has subsequent Read activity (namely, reading files and directories) on other appliances.
A positive weight is a multiplier greater than 1.0.
A negative weight is a multiplier less than 1.0. There is no weight or multiplier equal to 0.
To save this configuration, click Save Configuration. The configuration is saved.
If a volume has been set as Active, Global File Acceleration begins managing the selected volume’s Snapshot Schedule. Also, the Schedule for the volume displays “GFA Active”.
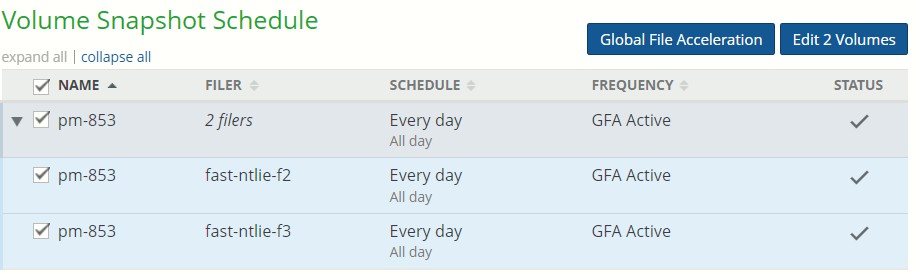
Figure 7-132: Schedule for volume managed by Global File Acceleration.
If a volume has been set as Observation Only, Global File Acceleration begins observation mode. Also, the Schedule for the volume displays “GFA Observation”.
Note: Observation mode is deprecated, meaning that you can no longer enable Observation mode, but, if previously enabled, Observation mode continues to function.
Select the volume and Nasuni Edge Appliance combinations in the list whose Snapshot Schedules you want to edit.
Click Edit Volumes.
Tip: If you see an alert such as this:

Figure 7-133: Alert for incompatible volumes.
the reason might be one of the following:
One or more of the selected volumes might not have Remote Access enabled. See “Remote Access”.
One or more of the selected volumes might be from Edge Appliances running versions before 9.12. To configure Global File Acceleration for multiple volumes on these Edge Appliances, update these Edge Appliances to version 9.12 or later.
If Global File Acceleration is not Active, the Snapshot Schedule dialog box appears.

Figure 7-134: Snapshot Schedule dialog box.
If Global File Acceleration is Active, the Global File Acceleration Enablement Window dialog box appears.
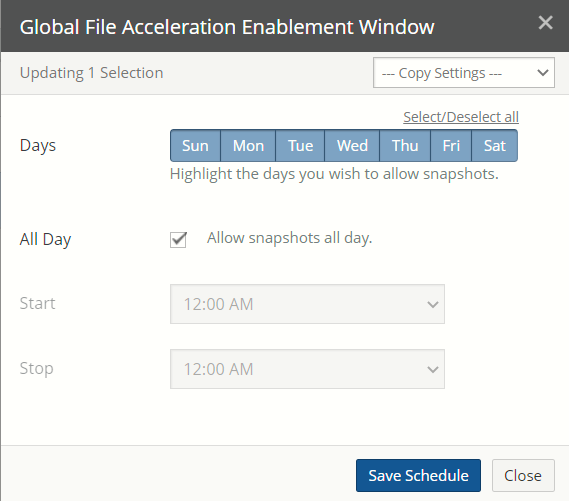
Figure 7-135: Global File Acceleration Enablement Window dialog box.
To copy settings from another volume, select the volume from the Copy Settings drop- down list. The settings from that volume appear in the dialog box.
To select or deselect all days for snapshots to occur, click Select/Deselect All.
Select the Days for snapshots to occur (for example, Sunday, Wednesday, and Saturday).
To specify snapshots 24 hours a day, select the All Day check box.
If you do not select All Day, select the time to start initiating snapshots from the Start drop-down list.
If you do not select All Day, select the time to stop initiating snapshots from the Stop drop-down list.
The Stop time indicates the time after which snapshots are no longer scheduled, not the time at which all snapshots stop running. If a snapshot is already running when the Stop time is reached, the snapshot continues. Also, if there are any snapshots in the queue behind the currently running snapshot, those snapshots also run.
Click Save Schedule. The Snapshot Schedule is changed for the selected volumes. Alternatively, to exit the dialog box without changing the Snapshot Schedule settings, click Close.
The GFA configuration and any Snapshot Schedules are changed. The volume appears in the list on the Volume Snapshot Schedule page.
NMC updated to version 23.2, but not all Edge Appliances updated to 9.12 yet
Important: Nasuni recommends updating all Edge Appliances to version 9.12 or later.
Tip: If the “Global File Acceleration” button is visible, that is an indication that not all managed Edge Appliances are 9.12 or later.
For details, see Global File Acceleration.
To edit Snapshot Schedules, follow these steps:
Click Snapshot Schedule. The Volume Snapshot Schedule page displays a list of volumes on managed Nasuni Edge Appliances.
The display reflects the Snapshot Schedule and Global File Acceleration features available for the current versions of the NMC and the account’s Edge Appliances. If the NMC has been updated to version 23.2 or later, but your account has at least one Edge Appliance (including Edge Appliances not managed by the NMC) that has not yet been updated to version 9.12 or later, the Global File Acceleration button appears so that you can configure Global File Acceleration, and the Edit Volumes button appears so that you can configure Snapshot Schedules.
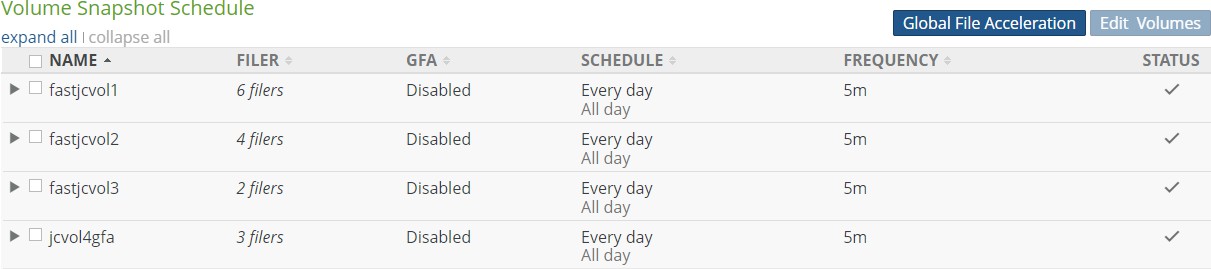
Figure 7-136: Volume Snapshot Schedule page, NMC updated, not all Edge Appliances updated.
Select the volume and Nasuni Edge Appliance combinations in the list whose Snapshot Schedules you want to edit.
Click Edit Volumes.
Tip: If you see an alert such as this:

Figure 7-137: Alert for incompatible volumes.
the reason might be one of the following:
One or more of the selected volumes might not have Remote Access enabled. See “Remote Access”.
One or more of the selected volumes might be from Edge Appliances running versions before 9.12. To configure Global File Acceleration for multiple volumes on these Edge Appliances, update these Edge Appliances to version 9.12 or later.
The displayed dialog box reflects the Snapshot Schedule and Global File Acceleration features available for the current versions of the NMC and the account’s Edge Appliances.
If Global File Acceleration is not Active (your account has at least one Edge Appliance not yet updated to version 9.12 or later), the Snapshot Schedule dialog box appears.
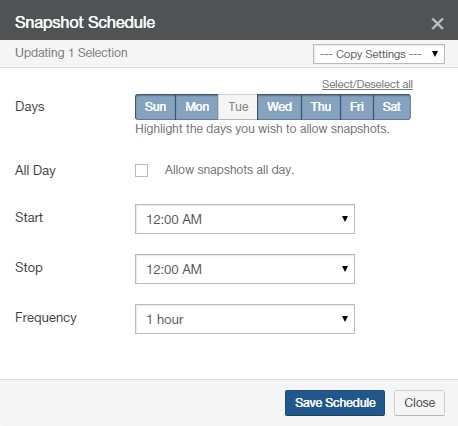
Figure 7-138: Snapshot Schedule dialog box.
If Global File Acceleration is Active, the Global File Acceleration Enablement Window dialog box appears.

Figure 7-139: Global File Acceleration Enablement Window dialog box.
To copy settings from another volume, select the volume from the Copy Settings drop- down list. The settings from that volume appear in the dialog box.
To select or deselect all days for snapshots to occur, click Select/Deselect All.
Select the Days for snapshots to occur (for example, Sunday, Wednesday, and Saturday).
To specify snapshots 24 hours a day, select the All Day check box.
If you do not select All Day, select the time to start initiating snapshots from the Start drop-down list.
If you do not select All Day, select the time to stop initiating snapshots from the Stop drop-down list.
The Stop time indicates the time after which snapshots are no longer scheduled, not the time at which all snapshots stop running. If a snapshot is already running when the Stop time is reached, the snapshot continues. Also, if there are any snapshots in the queue behind the currently running snapshot, those snapshots also run.
Click Save Schedule. The Snapshot Schedule is changed for the selected volumes. Alternatively, to exit the dialog box without changing the Snapshot Schedule settings, click Close.
Because it might take time for changes to propagate, an alert appears.
Figure 7-140: Alert for possible delay.
The Snapshot Schedules are changed. The volume appears in the list on the Volume Snapshot Schedule page.
NMC updated to version 23.2 and all Edge Appliances updated to 9.12
Tip: If the “Global File Acceleration” button is not visible, that is an indication that the NMC is 23.2 or later, and all managed Edge Appliances are 9.12 or later.
For details, see Global File Acceleration.
To edit Snapshot Schedules, follow these steps:
Click Snapshot Schedule. The Volume Snapshot Schedule page displays a list of volumes on managed Nasuni Edge Appliances.
The display reflects the Snapshot Schedule and Global File Acceleration features available for the current versions of the NMC and the account’s Edge Appliances.
If the NMC has been updated to version 23.2 or later, and every Edge Appliance (including Edge Appliances not managed by the NMC) has been updated to version 9.12 or later, the Edit Volumes button appears so that you can configure both Global File Acceleration and Snapshot Schedules.
Multiple volumes can be configured for Global File Acceleration at a time using the NMC.
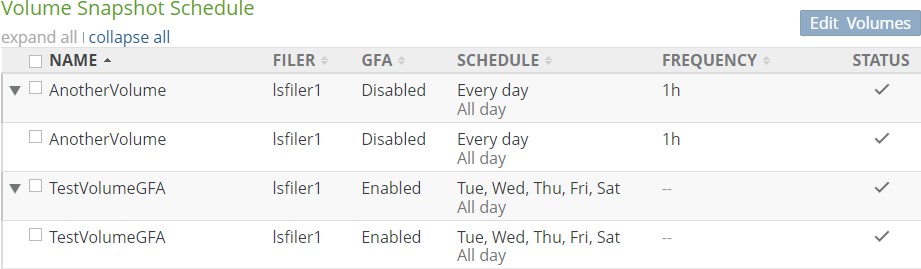
Figure 7-141: Volume Snapshot Schedule page, NMC updated, all Edge Appliances updated.
Select the volume and Nasuni Edge Appliance combinations in the list whose Snapshot Schedules you want to edit.
Click Edit Volumes.
Tip: If you see an alert such as this:
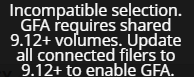
Figure 7-142: Alert for incompatible volumes.
the reason might be one of the following:
One or more of the selected volumes might not have Remote Access enabled. See “Remote Access”.
One or more of the selected volumes might be from Edge Appliances running versions before 9.12. To configure Global File Acceleration for multiple volumes on these Edge Appliances, update these Edge Appliances to version 9.12 or later.
The displayed dialog box reflects the Snapshot Schedule and Global File Acceleration features available for the current versions of the NMC and the account’s Edge Appliances.
If the NMC has been updated to version 23.2 or later, and every Edge Appliance (including Edge Appliances not managed by the NMC) has been updated to version 9.12 or later, you can configure both Global File Acceleration and Snapshot Schedules.
Multiple volumes can be configured for Global File Acceleration at a time using the NMC. The Snapshot Schedule dialog box appears.

Figure 7-143: Snapshot Schedule dialog box.
To copy settings from another volume, select the volume from the Copy Settings drop- down list. The settings from that volume appear in the dialog box.
From the GFA mode drop-down list, select the mode from the following:
Enabled: Activates Global File Acceleration for the selected volumes. Global File Acceleration manages the Snapshot Schedule for the volumes.
Observation Only: Enables Global File Acceleration in observation mode, but still uses the Snapshot Schedule for the selected volumes.
Note: Observation mode is deprecated, meaning that you can no longer enable Observation mode, but, if previously enabled, Observation mode continues to function.
Disabled: Disables Global File Acceleration for the selected volumes.
If the GFA mode is Enabled, the Profile drop-down list is available. From the Profile drop-down list, select the type of data propagation that you want to prioritize, from the following choices:
Protection Only: Assign all weight to write activity and no weight at all to reads.
Favor Protection: Assign a positive weight to writes and a negative weight to reads.
Equal Protection and Collaboration: Assign equal weight to writes and reads.
Favor Collaboration: Assign a negative weight to writes and a positive weight to reads.
Collaboration Only: Assign no weight to write activity and all weight to reads. where:
“Protection” refers to Write activity such as creating, writing, and deleting files and directories.
“Collaboration” refers to Write activity that has subsequent Read activity (namely, reading files and directories) on other appliances.
A positive weight is a multiplier greater than 1.0.
A negative weight is a multiplier less than 1.0. There is no weight or multiplier equal to 0.
If the GFA mode is Enabled, the Priority drop-down list is available.
From the Priority drop-down list, select the priority of performing snapshots for this Edge Appliance, from the following choices:
High: The NEA performs snapshots more frequently.
Normal: No priority is assigned.
Low: The NEA performs snapshots less frequently.
If the Priority is High or Low, it is displayed in the Frequency column of the Volume Snapshot Schedule.

Figure 7-144: Priority displayed in Frequency column.
If the GFA mode is Enabled, the Enablement Window drop-down list is available. From the Enablement Window drop-down list, select whether you want to display the Enablement Window (On) or not (Off).
The Enablement Window enables you to specify when GFA is enabled.
If the GFA mode is Enabled, and if the Enablement Window drop-down choice is On, then the Enablement Window appears.
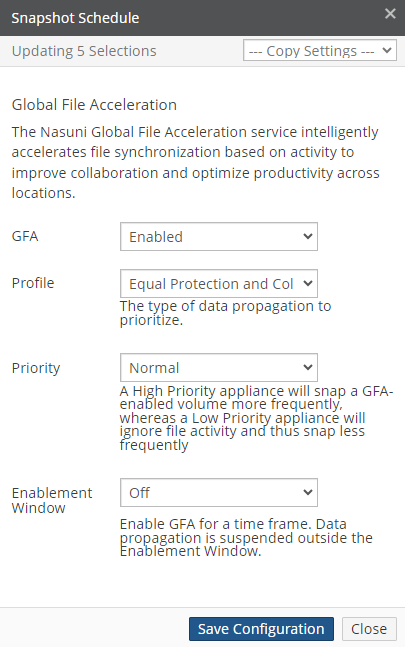
Figure 7-145: Enablement Window.
You can specify when GFA is enabled:
To select or deselect all days for GFA to be enabled, click Select/Deselect All.
Select the Days for GFA to be enabled (for example, Sunday, Wednesday, and Saturday).
To specify GFA to be enabled 24 hours a day, select the All Day check box.
If you do not select All Day, select the time to start GFA to be enabled from the Start drop-down list.
If you do not select All Day, select the time to stop GFA from the Stop drop-down list. The Stop time indicates the time after which GFA control is no longer scheduled, not the time at which all snapshots stop running. If a snapshot is already running when the Stop time is reached, the snapshot continues. Also, if there are any snapshots in the queue behind the currently running snapshot, those snapshots also run.
If Global File Acceleration is Enabled, then it is not necessary to specify the frequency of snapshots. Global File Acceleration manages the frequency of snapshots.
To save this configuration, click Save Configuration. The configuration is saved.
Alternatively, to exit the dialog box without changing the Global File Acceleration or Snapshot Schedule settings, click Close.
If a volume has been set as Active, Global File Acceleration begins managing the selected volume’s Snapshot Schedule. Also, the Schedule for the volume displays “GFA Active”.
If a volume has been set as Observation Only, Global File Acceleration begins observation mode. Also, the Schedule for the volume displays “GFA Observation”.
Note: Observation mode is deprecated, meaning that you can no longer enable Observation mode, but, if previously enabled, Observation mode continues to function.
If the GFA mode is Observation Only or Disabled, then the Snapshot Schedule appears.

Figure 7-146: Snapshot Schedule dialog box.
To copy settings from another volume, select the volume from the Copy Settings drop- down list. The settings from that volume appear in the dialog box.
To select or deselect all days for snapshots to occur, click Select/Deselect All.
Select the Days for snapshots to occur (for example, Sunday, Wednesday, and Saturday).
To specify snapshots 24 hours a day, select the All Day check box.
If you do not select All Day, select the time to start initiating snapshots from the Start drop-down list.
If you do not select All Day, select the time to stop initiating snapshots from the Stop drop-down list. The Stop time indicates the time after which snapshots are no longer scheduled, not the time at which all snapshots stop running. If a snapshot is already running when the Stop time is reached, the snapshot continues. Also, if there are any snapshots in the queue behind the currently running snapshot, those snapshots also run.
Select the frequency for snapshots from the Frequency drop-down list. If the volume does not have Remote Access enabled, your choices are 1, 2, 4, 8, 12, or 24 hours. If the volume does have Remote Access enabled, your choices are 1, 5, 10, 15, 25, or 30 minutes, or 1, 2, 4, 8, 12, or 24 hours.
Note: Volumes that do not have remote access enabled only have Frequency options of hours, not minutes. For snapshots more frequent than 1 per hour, enable remote access for the volume.
Click Save Schedule. The Snapshot Schedule is changed for the selected volumes. Alternatively, to exit the dialog box without changing the Snapshot Schedule settings, click Close.
Because it might take time for changes to propagate, an alert appears.

Figure 7-147: Alert for possible delay.
The GFA configuration and any Snapshot Schedules are changed. The volume appears in the list on the Volume Snapshot Schedule page.
Global File Acceleration (GFA)
Nasuni Global File Acceleration (GFA), a component of the Nasuni® cloud file storage platform, accelerates file synchronization across cloud regions or on-premises locations, helping customers to improve file sharing collaboration and optimize workforce productivity.
Global File Acceleration delivers more intelligent multi-site file synchronization that is based on real- time user activity to prioritize when data gets propagated to Nasuni Edge Appliances at other sites, so that users gain faster access to their shared data. This intelligence ensures that customers benefit from consistent file synchronization speeds, even in large-scale, multi-site deployments. The GFA service is available to Nasuni customers who have the Multisite Collaboration feature enabled.
For details, see Global File Acceleration.
Note: You can view the Health Status of the Nasuni Orchestration Center (NOC), Global File Acceleration (GFA), and Global File Lock (GFL) at portal.nasuni.com, under System Health.
To configure Global File Acceleration for a volume using the NMC, see “Editing Snapshot Schedules”. The following considerations are important:
Global File Acceleration must be enabled in the customer license.
Only NMC super-users (Manage all aspects of NMC) can configure Global File Acceleration.
Customers can only configure volumes for Global File Acceleration if the volume’s owning Edge Appliance is running version 9.5 or later. Also, any Edge Appliance accessing such volumes must also be running version 9.5 or later.
Important: In order to configure multiple volumes for GFA using the NMC UI, all Edge Appliances on the customer account must be updated to version 9.12 or above, including Edge Appliances in the account that are not managed by the NMC.
If not all Edge Appliances on the customer account are using version 9.12 or above, only one volume can be configured for Global File Acceleration using the NMC UI.
Global File Acceleration is only available for shared volumes (namely, volumes that have Remote Access enabled).
If all Edge Appliances, including Edge Appliances in the account that are not managed by the NMC, are running version 9.12 or later, you can use the NMC to configure Global File Acceleration for multiple volumes at a time.
Tip: If the “Global File Acceleration” button is not visible, that is an indication that the NMC is 23.2 or later, and all managed Edge Appliances are 9.12 or later.
If one or more Edge Appliances, including Edge Appliances in the account that are not managed by the NMC, are running versions before 9.12, you can use the NMC to configure Global File Acceleration for only one volume at a time.
Important: Nasuni recommends updating all Edge Appliances to version 9.12 or later.
You can edit the Snapshot Schedules of volumes that have Global File Acceleration set as Active. If the Edge Appliance cannot communicate with the GFA Cloud Service, the Edge Appliance falls back to the original time-based snapshot/sync schedule. Fallback uses the specified days and hours. The frequency becomes once per hour.
In NMC version 24.1 and later, you can set a Priority for GFA volumes by NEA, so that one NEA can perform snapshots more or less frequently than other NEAs. This feature can help improve workflow and optimize data transfer.
This works with any NEAs running version 9.7.x and later.
Important: The Edge Appliance that “owns” a volume (which is the Edge Appliance that created the volume) is called the “owning Appliance” or the “volume owner”. The volume owner has certain special features with respect to its owned volume. In particular, the following functions are not available if the volume owning Appliance is offline:
Creating volume.
Global File Acceleration: enabling or disabling.
Global File Lock: enabling or disabling.
Health check for volume.
Protocol: changing or adding.
on Remote Access: enabling and disabling settings.
Safe Delete: enabling or disabling.
Shared volume: connecting and disconnecting.
Snapshot Directory Access: enabling or disabling.
Snapshot Retention: enabling, disabling, or changing.
Volume Quota and Volume Quota Rules.
Cloud I/O.
Important: If a customer removes from NMC management an Edge Appliance that owns a volume that Global File Acceleration (GFA) is active on, the following processing occurs:
The Global File Acceleration configuration for any volume owned by that Edge Appliance is deleted from the NMC.
When the Edge Appliances check in with the NMC, as they do on a periodic basis, they sync to the NMC’s GFA configuration, of which there is now nothing (GFA disabled) for that volume.
The volume owned by that Edge Appliance reverts to the Snapshot Schedule and sync schedule that have been set for that volume on all Edge Appliances.
If the Edge Appliance that owns the volume is once again placed under the management of the NMC, Global File Acceleration must be reconfigured for the volume owned by that Edge Appliance.
GFA Telemetry API
The GFA Telemetry API enables you to obtain metrics about GFA performance. For more details of the GFA Telemetry API, see GFA Telemetry API.
The GFA Telemetry API returns four different types of metrics:
Volume Information: GFA information about the volume, including the GFA mode (“active”, “observation”, or “off”), the GFA scoring profile, and the time-to-protect value (in minutes). Output to the client once every 15 minutes.
Note: Observation mode is deprecated, meaning that you can no longer enable Observation mode, but, if previously enabled, Observation mode continues to function.
Example:
{ "metric_type": "volume_info", "mode": "Active", "profile": "collaboration-moderate", "time_to_protect": "33", "timestamp": "2022-03-08T03:43:43Z", "version": 1, "volume_guid": "e1486b21-cdab-4136-aca6-31901cf594bd_3", "volume_title": "Marketing-F1" }
Edge Appliance Information: GFA information about the Edge Appliance (aka “Filer”), including the last time it checked into GFA, the last read and write events reported, and the oldest unprotected data. Reported to the client every 15 minutes for each Edge Appliance for the volume.
Example:
{ "filer_guid": "0dd5244f-6a9e-4acb-a85d-9ed994baf5b0", "filer_title": "cor-nasuni-005-DFS-W-IN", "last_checkin": 2, "metric_type": "filer_info", "oldest_unprotected_data": 2083, "timestamp": "2022-03-08T03:43:43Z", "version": 1, "volume_guid": "e1486b21-cdab-4136-aca6-31901cf594bd_3", "volume_title": "Active" "volume_title": "Marketing-F1" }
Propagation Information: Information about each GFA propagation value calculated for the volume, including the type of propagation (“collab” or “protect”), the amount of time in seconds the propagation took, and how much data was protected. Reported to the client with every request, if there is new propagation data since the last request.
Example:
{ "data_protected": 195, "filer_guid": "8722ce0e-04f5-42b2-8c3f-f90b1381248a", "filer_title": "cor-nasuni-028-DFS-SC-US", "kind": "protect", "metric_type": "propagation", "prop_seconds": 516, "timestamp": "2022-03-08T03:29:55Z", "version": 1, "volume_guid": "e1486b21-cdab-4136-aca6-31901cf594bd_3", "volume_title": "Marketing-F1" }
Lock Information: Information about volume lock acquisitions and releases by an Edge Appliance in the volume. Reported to the client with every request, if there are new lock events since the last request.
Example:
{ "filer_guid": "210be74a-1f29-486c-ae27-39baf114b9d1", "filer_title": "cil-nasu-003", "lock_phase": "P2", "lock_state": "REJECTED", "metric_type": "lock_event", "timestamp": "2022-03-08T03:28:54Z", "version": 1, "volume_guid": "e1486b21-cdab-4136-aca6-31901cf594bd_3", "volume_title": "Marketing-F1" }
Not every metric type is returned with each request. Multiple metrics of the same type might be returned from a single request. Likewise, the order of the metrics returned is not guaranteed; in particular, there is no guarantee that they are ordered by time.
Sync Schedule
You can schedule when, and with what frequency, the selected volumes synchronize data (“syncs”) from Nasuni, merging local data with any new or changed data from other Nasuni Edge Appliances connected to the selected volumes. This helps to ensure that everyone in your organization is using the most current data.
If you enable the “Auto Cache” option, data from other Nasuni Edge Appliances that are attached to the selected volumes is brought into the local caches of the selected volumes immediately. Otherwise, data from other Nasuni Edge Appliances that are attached to the selected volumes is brought into their local caches when that data is accessed next.
Note: Because Auto Cache is not enabled by default, new data in the selected volumes comes into their local caches only when requested. If you plan on enabling Auto Cache, ensure that all of the following apply to your deployment:
All the Nasuni Edge Appliances in your organization have caches large enough to contain data from the other Nasuni Edge Appliances.
All the data in the volume is relevant and appropriate for all other sites that access the volume.
Network access at each site is not adversely affected by automatically moving large quantities of data.
Auto Cache should not be used during the initial transfer of data into a Nasuni Edge Appliance, or during other large transfers of data.
You can select which days of the week on which to sync data. You can also select at what time of day to start and stop syncing data. You can set the frequency for syncing data to be every 1, 5, 10, 25, or 30 minutes, or every 1, 2, 4, 8, 12, or 24 hours for each volume. For example, you can configure syncs to not occur during the day and only sync data at night when network usage is low.
Warning: If you have directories with tens of thousands of files but few changes during each snapshot, or large files that require multiple snapshots, frequent syncs can increase the system load significantly.
Tip: If Global File Acceleration is Active for any volume, this message appears: Volume is under Global File Acceleration control. Schedules are only used as a backup to the GFA service.
Tip: On volumes with Global File Lock enabled, we recommend increasing the snapshot frequency and the synchronization frequency of the volume.
If the normal snapshot and synchronization frequency of the volume are decreased, new files take longer to propagate, because new files depend on snapshot and synchronization to propagate.
Tip: If you receive a message of the type “
Unable to inherit all folder settings on volume: settings could not be applied during the mount operation.”, verify your folder settings to determine if they should be recreated, updated, or deleted.
See “Quality of Service (Bandwidth) Settings” to configure outbound bandwidth limits.
Tip: See Worksheet for a worksheet for planning configurations.
Scheduling Syncs
To schedule syncs, follow these steps:
Click Volumes, then select Sync Schedule from the menu in the left column. The Volume Sync Schedule page displays a list of volumes on managed Nasuni Edge Appliances.

Figure 7-148: Volume Sync Schedule page.
The following information appears for each volume in the list:
Name: The name of the volume.
Filer: The name or number of Nasuni Edge Appliances that contain the volume.
GFA (if GFA enabled in license): An indicator of whether Global File Acceleration (GFA) is Enabled or Disabled or Observation Only for the volume. For details, see “Global FileAcceleration (GFA)”.
If settings are updating, displays Pending.
If GFA has been configured by Nasuni Support, displays Nasuni Managed.
Note: Observation mode is deprecated, meaning that you can no longer enable Observation mode, but, if previously enabled, Observation mode continues to function.
Schedule: If syncs are enabled, the days and times that syncs are scheduled. If syncs are disabled, the label Disabled.
If a volume has Global File Acceleration set as Active, and not as Observation, the Schedule for the volume displays “--”. See “Global File Acceleration (GFA)”.

Figure 7-149: Schedule for volume managed by Global File Acceleration.
Frequency: If syncs are enabled, the frequency of syncs appears. If syncs are disabled, the symbol “--” appears.
Auto Cache: Whether Auto Cache is allowed or disabled: Allowed or Disabled. If Auto Cache is allowed, the Minimum File Size is displayed, if specified.
Select the volumes whose sync schedules you want to change.
Click Edit Volumes. The Sync Schedule dialog box appears.
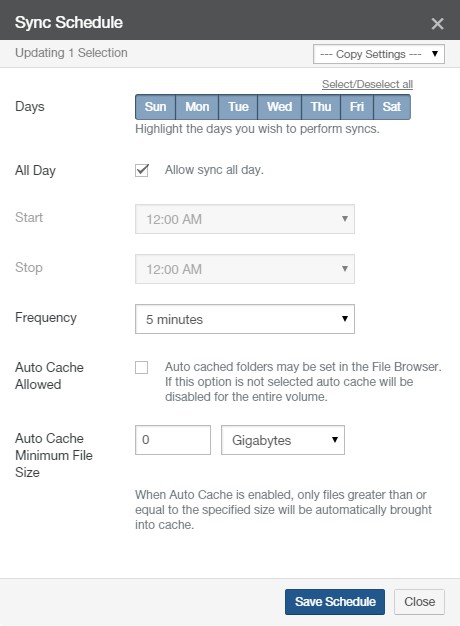
Figure 7-150: Sync Schedule dialog box.
Tip: If Global File Acceleration is Active for the selected volume, this message appears: Volume is under Global File Acceleration control. Schedules are only used as a backup to the GFA service.
To copy settings from another volume, select the volume from the Copy Settings drop-down list. The settings from that volume appear in the dialog box.
To select or deselect all days for syncs to occur, click Select/Deselect All.
Select the days for syncs to occur (for example, Sunday to Saturday).
To specify syncs all day, select the All Day check box.
Alternatively, select the time to start syncs from the Start drop-down list. Select the time to stop syncs from the Stop drop-down list.
Select the frequency for syncs to occur from the Frequency drop-down list. Your choices are 1, 5, 10, 25, 30 minutes, or 1, 2, 4, 8, 12, or 24 hours.
To enable Auto Cache (automatically bringing data from other Nasuni Edge Appliances into the local cache immediately), select the Auto Cache check box. Alternatively, to disable Auto Cache, clear the Auto Cache check box.
Note: If Auto Cache is enabled and you disable Auto Cache, any process bringing data into the cache continues until complete.
If Auto Cache is enabled, you can specify bringing only files greater than or equal to a specified size into the cache automatically. Enter the minimum size (in whole numbers) in the Auto Cache Minimum File Size text box, then select the correct units from the drop-down list.
Click Save Schedule. The sync schedule is changed for the selected volumes.
Alternatively, to exit the dialog box without changing the sync schedule settings, click Close.
Antivirus Protection
Antivirus Protection protects against viruses and other malware by scanning every new or modified file. For details, see “Antivirus Services Page”.
Ransomware Detection
The Ransomware Detection settings implement Nasuni Ransomware Detection. You can view or change the Ransomware Detection setting of volumes. For details, see “Ransomware: Detection & Mitigation Page”.
File System Auditing
You can configure extensive file system auditing and logging of operations for volumes.
As an alternative to Nasuni’s own auditing options, Nasuni also supports auditing by Varonis and other external auditing services. For Varonis versions before 8.5, to complete configuration of the Varonis application to use Nasuni auditing events, you must provide a Nasuni API access key. Events created by the Nasuni Edge Appliance propagate to the Varonis monitoring infrastructure. For details of the Varonis configuration, see “Varonis Configuration”. For more details on specifying audit destinations, see “Audit Destinations Status”.
As an alternative to Nasuni’s own auditing options, Nasuni also supports output to an Advanced Message Queuing Protocol (AMQP) server of an external auditing service.
Important: If using external auditing (such as Varonis), open port 5671 outbound from the Edge Appliance to the configured audit endpoint.
Port 5671 is used for AMQP with SSL. Nasuni does not support AMQP without SSL. For details about ports and firewalls, see Firewall and Port Requirements.
Syslog Export enables you to direct Nasuni notifications and file auditing messages to your syslog server. For more details, see “Syslog Export”.
Tip: The NMC API can be used to configure auditing, including configuring AMQP destinations for audit messages (such as for Varonis or RabbitMQ).
Tip: Auditing volume events such as Create, Delete, Rename, and Security can aid in recovering from ransomware attacks.
Note: Enabling file system auditing generally affects performance less than 5–10 percent. The effect is greater if auditing writes. The effect is less if using solid-state drives (SSD), rather than hard disk drives (HDD). We do not recommend auditing additional events for these purposes, because that can consume system resources unnecessarily.
Note: It is possible that occasionally a specified operation might not be audited and logged, such as when a Nasuni Edge Appliance reboots or restarts. Also, if events occur faster than the auditing, a “Lost Events” entry is made in the log file.
Note: If you remove a destination that a volume is using for Varonis or AMQP auditing, auditing becomes disabled for that volume.
Tip: Log files take up space. To reduce the amount of space necessary for log files, you can: limit the number of event categories to audit, limit which volumes to audit, use filters to reduce the directories or files to audit, and limit the log file retention period.
To configure file system auditing for a volume, follow these steps:
Click Volumes, then click Auditing. The Volume Auditing Settings page appears.

Figure 7-151: Volume Auditing Settings page.
A list of volumes appears. Each volume is on a Nasuni Edge Appliance that has the file system auditing feature.
Click the right-facing arrow beside each volume to reveal the file system auditing setting for each Nasuni Edge Appliance for that volume. To reveal the settings for all volumes of all Nasuni Edge Appliances, click Expand All. To collapse the display of the settings for all volumes of all Nasuni Edge Appliances, click Collapse All.
The following information appears for each volume and Nasuni Edge Appliance combination in the list:
Name: The name of the volume.
Filer: The names or number of Nasuni Edge Appliances that access the volume.
Protocol: The protocol of the volume: SMB (CIFS), NFS, or FTP.
Output Type: The type of output for the auditing information, which can be one of the following.
Tip: To set or obtain the value of Output Type, you can use the NMC API, including “Update the settings for a volume on a specific Filer”, using the
auditingsettings.CSV: For output to local auditing log files. Auditing log files are written to the
.nasuni\audit\<filerdescription>\<yyyymmdd>directory, where filerdescription is the description of the Nasuni Edge Appliance and yyyymmdd is the date of the log file.Tip: To access the hidden
.nasunidirectory on an SMB share, you must be an SMB (CIFS) administrative user. To specify an SMB (CIFS) administrative user, on the Nasuni Edge Appliance, select General Settings from the Configuration menu, then specify an Administrative User.Because the
.nasunidirectory is located in the root directory of the volume, in order to access the.nasunidirectory, you must create a share to the root directory of the volume.In addition, this hidden directory must be visible on the client machine. For example, in Windows, “Show Hidden Files, folders, and drives” must be enabled, and “Hide protected operating system files” must be disabled.
Alternatively, you can use the File System Browser to view the .nasuni directory and its contents. On the File System Browser page, select the volume, click the gear icon
.png?sv=2026-02-06&spr=https&st=2026-06-23T01%3A33%3A15Z&se=2026-06-23T06%3A20%3A15Z&sr=c&sp=r&sig=vKO79dhJjd7AXHPIvrY%2FCSv8uS9voFkXgJeBHNEZTWM%3D) , then select “Show Hidden Files”.
, then select “Show Hidden Files”.AMQP: For output for an Advanced Message Queuing Protocol (AMQP) server of an external auditing service.
Varonis: For external auditing by Varonis.
Enabled: The auditing setting of the volume: Yes (auditing enabled) or No (auditing not enabled).
To change the settings for file auditing, on the Volume Auditing Settings page, select the volumes in the list whose file system auditing setting you want to edit, then click Edit Volumes. The Edit Volume Auditing Settings dialog box appears.
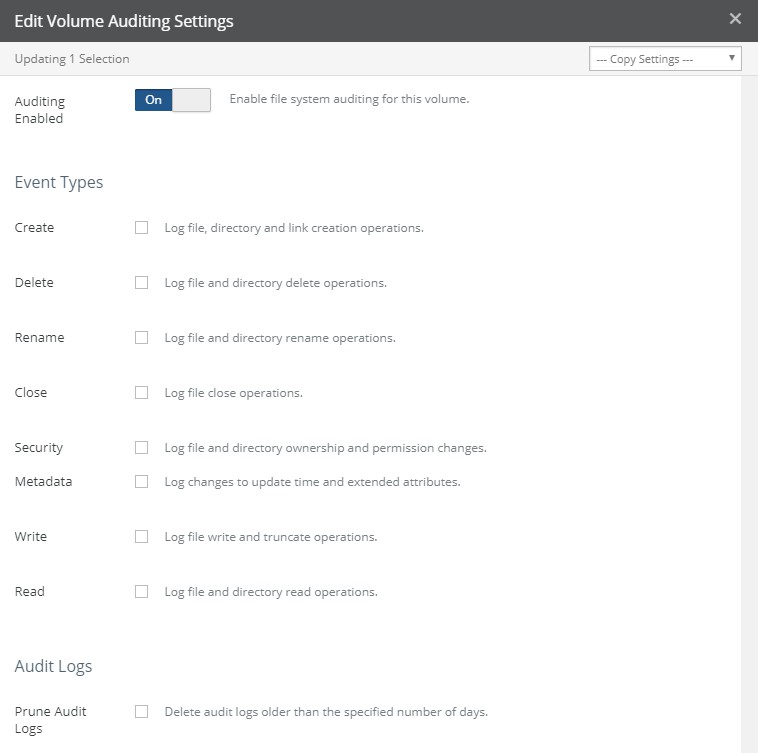
Figure 7-152: Top portion of Edit Volume Auditing Settings dialog box.
Tip: No changes on this page are saved until you click Save Auditing Settings.
To copy settings from another volume, select the volume from the Copy Settings drop-down list. The settings from that volume appear in the dialog box.
If this volume has Varonis auditing selected, the content on this page is unavailable, except for the “Revert control to NMC” button. To revert control of auditing to the NMC, click “Revert control to NMC”.
To enable file system auditing for this volume, select Auditing Enabled.
Important: When you enable file system auditing for this volume, auditing log files are written to the
.nasuni\audit\<filerdescription>\<yyyymmdd>directory, wherefilerdescriptionis the description of the Nasuni Edge Appliance and yyyymmdd is the date of the log file. For details on log files, see “File AlertService”.Tip: To access the hidden
.nasunidirectory on an SMB share, you must be an SMB (CIFS) administrative user. To specify an SMB (CIFS) administrative user, on the Nasuni Edge Appliance, select General Settings from the Configuration menu, then specify anAdministrative User.
Because the
.nasunidirectory is located in the root directory of the volume, in order to access the.nasunidirectory, you must create a share to the root directory of the volume.In addition, this hidden directory must be visible on the client machine. For example, in Windows, “Show Hidden Files, folders, and drives” must be enabled, and “Hide protected operating system files” must be disabled.
Alternatively, you can use the File System Browser to view the
.nasunidirectory and its contents. On the File System Browser page, select the volume, click the gear icon.png?sv=2026-02-06&spr=https&st=2026-06-23T01%3A33%3A15Z&se=2026-06-23T06%3A20%3A15Z&sr=c&sp=r&sig=vKO79dhJjd7AXHPIvrY%2FCSv8uS9voFkXgJeBHNEZTWM%3D) , then select “Show Hidden Files”.
, then select “Show Hidden Files”.In the Event Types area, select the operations to include in file system auditing, from these choices:
Create: Operations that create files, directories, or links.
Delete: Operations that delete files or directories.
Rename: Operations that rename files or directories.
Close: Operations that close files.
Security: Changes to file or directory ownership or permission.
Metadata: Changes to update time and extended attributes.
Write: Operations that write or truncate files.
Read: Operations that read files or directories.
Note: Some event types generate a greater load and result in greater traffic.
To delete log files older than a specified number of days, select Prune Audit Logs and enter a number greater than zero in Days to Keep. The default is 90 days. If Prune Audit Logs is not selected, or if Days to Keep is zero, audit logs are not deleted.
Note: Audit logs are retained for 90 days by default. Customers can decide how long to keep the audit logs, based on their specific requirements or compliance considerations.
Also, audit logs are included in snapshots, so that, if an older audit log is needed that has already been pruned, the audit log can be restored from snapshots, like any other user file.
The Filtering area is available.
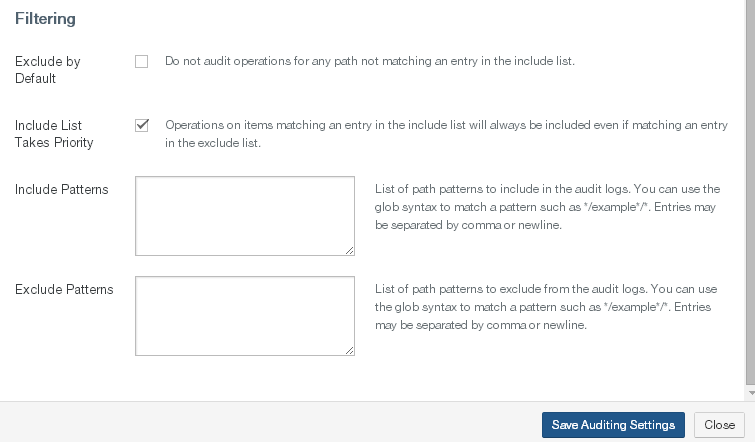
Figure 7-153: Bottom por tion of Edit Volume Auditing Settings dialog box.
In the Filtering area, to audit operations only for specified directories or files, select Exclude by Default and enter the specific directories or files to include in the Include Patterns text box.
Separate the patterns with a comma or by placing a pattern on a new line. You can use glob syntax wildcards when you specify each pattern, such as the following:
Wildcard | Meaning | Example |
|---|---|---|
| Matches any number of any character. | *. means any file name that ends with “mp3”. |
| Matches any one character. |
means file names like “test.mp3” or “test.mp4”. |
| Matches any character in the specified sequence. |
means file names that start with an upper-case letter. |
| Matches any character NOT in the specified sequence. |
means file names that do not start with an upper- case letter. |
To audit operations for directories or files in the Include Patterns text box, even if those directories or files are logically part of the entries in the Exclude Patterns text box, select Include List Takes Priority.
To include specified directories or files in audit operations, such as
*.tmpfiles, enter the specific directories or files to include in the Include Patterns text box. Separate the patterns with a comma or by placing a pattern on a new line. You can use glob syntax wildcards when you specify each pattern, as described in step 10.To exclude specified directories or files from audit operations, such as
*.tmpfiles, enter the specific directories or files to exclude in the Exclude Patterns text box. Separate the patterns with a comma or by placing a pattern on a new line. You can use glob syntax wildcards when you specify each pattern, as described in step 10.The “Syslog Export for Audit Events” area appears near the bottom of the page.

Figure 7-154: “Syslog Export for Audit Events” area.
To send Auditing messages for this volume to syslog, as well as to the specified output, select “Send Audit messages to syslog”. For more details, see “Syslog Export”.
Click Save Auditing Patterns.
The specified operations for the specified directories and files are audited and written in log files for later use.
Log file location and format
Log files are written to the .nasuni\audit\<description>\<yyyymmdd> directory, where description is the description of a Nasuni Edge Appliance and yyyymmdd is the date of the log file.
Note: If this is a shared volume, entries from multiple Nasuni Edge Appliances may appear in the same
<description>directory.
Tip: To access the hidden .
nasunidirectory on an SMB share, you must be an administrative user.Because the
.nasunidirectory is located in the root directory of the volume, in order to access the.nasunidirectory, you must create a share to the root directory of the volume. In addition, this hidden directory must be visible on the client machine. For example, in Windows, “Show Hidden Files, folders, and drives” must be enabled, and “Hide protected operating system files” must be disabled.Alternatively, you can use the File System Browser to view the
.nasunidirectory and its contents. On the File System Browser page, select the volume, click the gear icon, then select “Show Hidden Files”.
Log file names are in the format audit-<timestamp>.csv, where timestamp is the local hours, minutes, seconds, and microseconds of the log file. A sample log file name is audit-10-07-57- 494069.csv, which indicates a time of 10:07:57.494069.
Note: You cannot access the log files from the Nasuni Management Console or from a Nasuni Edge Appliance. You must mount the volume and access the appropriate directory.
Each line of the log file is a record for a single audited operation. Each record includes the following information, if available, separated by commas.
Here is a sample log file record:
2023-09-19 22:48:39.697221,Read,Read Directory,/.snapshot,,FOREST1\ jjones,FOREST1\domain users,S-1-5-21-4239937795-3974351056- 921346076-1113,files,CIFS,10.10.10.10,
Timestamp (UTC) of the audited operation, such as “
2023-09-19 22:48:39.697221” in the example above.Category of the operation, from the Event Types above, such as “
Read” in the example above.Event type as a subtype of the category, such as the following:
Create: Create Directory or Create File.
Delete: Delete Directory or Delete File.
Read: Read Directory or Read File, such as “
Read Directory” in the example above.Security: Change Owner, Change Permissions, Set ACL, or Set DOS Attribute.
Write: Truncate File or Write to File.
Path/from of the item, such as “
/.snapshot” in the example above.New path/to of the item (if appropriate), such as “” in the example above.
User of the item (if appropriate), such as “
FOREST1\jjones” in the example above.Group of the user (if appropriate), such as “
FOREST1\domain users” in the example above.SID (for Active Directory) of the CIFS (SMB) item (if appropriate), such as “
S-1-5-21- 4239937795-3974351056-921346076-1113” in the example above.Share name for the item (for CIFS (SMB) volumes only, if appropriate), such as “
files” in the example above.Volume type of the item: CIFS (SMB), NFS, FTP, or Internal, such as “CIFS” in the example above. Internal refers to events that are generated by internal processes that don’t use the external protocols.
Client IP address that caused the event (for CIFS (SMB) volumes only, if appropriate), such as “
10.10.10.10” in the example above.Snapshot timestamp (UTC), if event occurred on an item in a snapshot, such as “” in the example above.
Each log file contains at most 100,000 records. For additional records, a new log file is created.
Note: It is possible that occasionally a specified operation might not be audited and logged, such as when a Nasuni Edge Appliance reboots or restarts. Also, if events occur faster than the auditing, a “Lost Events” entry is made in the log file.
Varonis Configuration
Nasuni can use an external auditing service, such as Varonis.
Important: If using external auditing (such as Varonis), open port 5671 outbound from the Edge Appliance to the configured audit endpoint.
Port 5671 is used for AMQP with SSL. Nasuni does not support AMQP without SSL. For details about ports and firewalls, see Firewall and Port Requirements.
The NMC API can be used to configure auditing, including configuring AMQP destinations for audit messages (such as for Varonis or RabbitMQ).
Important: After initially configuring Varonis to monitor your volumes, if you connect a monitored volume to a new Edge Appliance, you must configure the new Edge Appliance to send audit events to Varonis. For assistance with updating the configuration, contact Varonis Support.
Tip: For Varonis versions before 8.5, to complete configuration of the Varonis application to use Nasuni auditing events, you must provide a Nasuni API access key.
For Varonis versions after 8.5, the configuration of the AMQP destination and audit policy is managed using the NMC API.
When specifying a file server on the File Server Wizard of the Varonis Management Console, for example:
Select Common from the left-hand menu.
Enter the name or IP address of the Nasuni Edge Appliance as the “File server name”.
Select Nasuni from the “File server type” drop-down list. Alternatively, if you click “Detect File Server Type”, Nasuni is chosen.
After selecting Nasuni as the “File server type”, the “Nasuni Management API Settings” pane appears.
Enter the Nasuni API Access Key Name (from the Filers → API Keys page) as the “Access key name”. For details about the Nasuni access key, see “API Access key for external auditing using Varonis”.
Enter the Nasuni API Access Key Passcode (from the Filers → API Keys page) as the “Access key passcode”. For details about the Nasuni access key, see “API Access key for external auditing using Varonis”.
When specifying shares on the File Server Wizard of the Varonis Management Console, for example:
Select Shares from the left-hand menu.
The unhidden SMB (CIFS) shares of the Nasuni Edge Appliance appear in the “Available Shares” area.
To move a share to the “Registered Shares” area, select the share, then click the down arrow.
In the “Registered Shares” area, you can perform the following:
Enable whether to collect Events on the share.
Enable whether to crawl/monitor the share.
In the Automatic Detection area, you can perform the following:
Specify what to do with new shares, by selecting “Automatically detect shares” to be either Never, “Detect and notify”, “Detect and Monitor”, or “Detect, Monitor, and Notify”.
Specify the frequency of notification by selecting Notify to be Always or Once.
File Alert Service
You can view or change the File Alert Service setting of volumes.
The File Alert Service monitors the names of files and directories that are written to the Nasuni Edge Appliance, looking for names that match patterns that you specify. This can be valuable in tracking certain special files, such as files or directories whose names contain text like “HIPAA”.
You can use wildcards to specify each pattern. For example, if you specify *.mp3, the File Alert Service monitors whenever any files whose names end in .mp3 are written to the Nasuni Edge Appliance.
Note: File alerts configured here apply only to the local Nasuni Edge Appliance, and not to any other Nasuni Edge Appliance. To enable file alerts on other Nasuni Edge Appliances in a multi-site configuration, you must configure the other Nasuni Edge Appliances individually. To administer file alerts consistently on multiple Nasuni Edge Appliances, use the Nasuni Management Console.
Tip: PST files: Microsoft Outlook Personal Storage (.pst) files are used to store information for Microsoft Outlook email systems. These files contain a large quantity of different types of information, and can grow very large: multi-GB .pst files are common.
Nasuni recommends that customers NOT store active Outlook .pst files with the Nasuni Edge Appliance, for a number of reasons:
Whenever a new email arrives, the entire .pst file is marked as unprotected, and the entire very large file must then be uploaded to the cloud again with the next snapshot. This can interfere with the handling of other files, and with data propagation.
The multiple versions of .pst files can increase the cloud usage of such files for a volume.
Microsoft also recommends NOT storing .pst files on networks: https:// docs.microsoft.com/en-US/outlook/troubleshoot/data-files/limits-using-pst-files-over- lan-wan
To help ensure that .pst files are not stored with the Nasuni Edge Appliance, Nasuni recommends that customers enable the File Alert Service and include patterns such as *.pst.
When enabled, each time that a snapshot completes, the File Alert Service runs. If the names of any files or directories match any of the specified patterns, the result is recorded in the file alert logs in the .nasuni/file_alerts directory. It might take 1-2 hours for the result to appear in the file alert logs.
Tip: To access the hidden
.nasunidirectory on an SMB share, you must be an SMB (CIFS) administrative user. To specify an SMB (CIFS) administrative user, on the Nasuni Edge Appliance, select General Settings from the Configuration menu, then specify an Administrative User.Because the
.nasunidirectory is located in the root directory of the volume, in order to access the.nasunidirectory, you must create a share to the root directory of the volume. In addition, this hidden directory must be visible on the client machine. For example, in Windows, “Show Hidden Files, folders, and drives” must be enabled, and “Hide protected operating system files” must be disabled.Alternatively, you can use the File System Browser to view the
.nasunidirectory and its contents. On the File System Browser page, select the volume, click the gear icon, then select “Show Hidden Files”.
In addition, if the names of any files or directories match any of the specified patterns, an alert (no more than one per day) is generated in the Notifications system. If you have configured email settings, you receive an email (no more than one per day) when names of files or directories match one of the patterns. To configure email settings, see “Email Settings”. It might take 24-48 hours for the alert to be sent.
Note: If a match is detected, you receive no more than one alert per day. The alert contains the path to a complete log file containing all detected matches.
Tip: Alerts do not occur for empty files.
Tip: Receiving the results of the File Alert Service involves several features:
Enable the Alerts permission for a group: Console Settings → Users/Groups → Manage Groups → Edit → Violation Alerts. See “Console Users and Groups”.
Enable File Alerts on the volume: Described below.
To receive emails, configure email for user: Console Settings → Users/Groups → Manage Users → Edit → Email. See “Console Users and Groups”.
Caution: While individual file alerts do not require significant processing, specifying hundreds or thousands of file alert patterns can have consequences, including the following:
Matching file or directory names are recorded in log files in the
.nasuni/ file_alertsdirectory. For large numbers of file alert patterns, the processing necessary to match patterns and update log files can affect the resources available for other tasks.Conflicts can occur on the log files themselves, because multiple Edge Appliances might register near-simultaneous file alerts.
Log files must be manually deleted from the
file_alertsdirectory. This is not an automated process.A large number of files in a directory can cause delays in snapshots each time new files are added that must be checked.
Matching file or directory names can trigger alerts in the Notifications system, and emails. For large numbers of file alert patterns, this process can affect processing.
These effects are exacerbated when ingesting large amounts of data.
Tip: See Worksheet for a worksheet for planning configurations.
Viewing File Alert Service settings
To view the File Alert Service settings, follow these steps:
Click File Alert Service. The Volume File Alert Service page displays a list of volumes on managed Nasuni Edge Appliances.

Figure 7-155: Volume File Alert Service page.
Click the right-facing arrow beside each volume to reveal the File Alert Service setting for each Nasuni Edge Appliance for that volume. To reveal the settings for all volumes of all Nasuni Edge Appliances, click Expand All. To collapse the display of the settings for all volumes of all Nasuni Edge Appliances, click Collapse All.
The following information appears for each volume in the list:
Name: The name of the volume.
Filer: The names or number of Nasuni Edge Appliances that access the volume.
Enabled: The File Alert Service setting: Enabled (File Alert Service running) or Disabled (File Alert Service not running).
File/Directory Patterns: The specific patterns of file names or directory names that the File Alert Service is looking for.
Editing File Alert Service settings
To edit File Alert Service settings, follow these steps:
On the Volume File Alert Service page, select the volume and Nasuni Edge Appliance combinations in the list whose File Alert Service settings you want to edit.
Click Edit Volumes. The Edit File Alert Service dialog box appears.
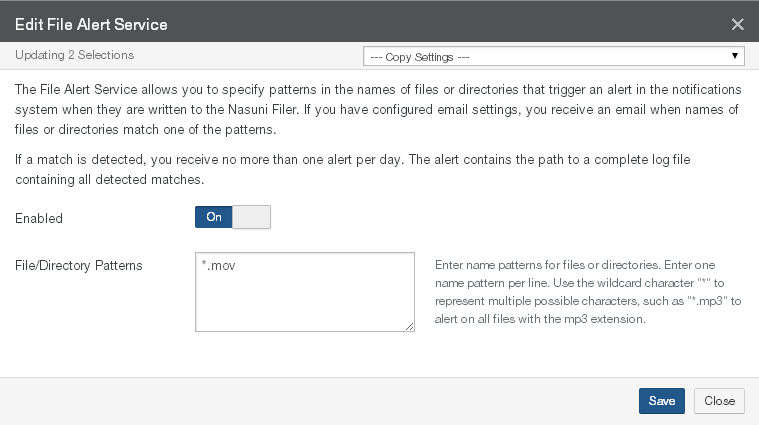
Figure 7-156: Edit File Alert Service dialog box.
To copy settings from another volume, select the volume from the Copy Settings drop-down list. The settings from that volume appear in the dialog box.
To enable the File Alert Service, set the Enabled setting to On. To disable the File Alert Service, set the Enabled setting to Off.
If the File Alert Service is enabled, enter name patterns in the File/Directory Patterns text box. Enter one name pattern per line. You can use wildcards when you specify each pattern:
Wildcard | Meaning | Example |
|---|---|---|
| Matching any number of any character. |
means any file name that ends with “mp3”. |
| Matching any one character. |
means file names like “test.mp3” or “test.mp4”. |
| Matching any character in the specified sequence. |
means file names that start with an upper-case letter. |
| Matching any character not in the specified sequence. |
means file names that do not start with an upper- case letter. |
Click Save. The File Alert Service settings are changed. The volume appears in the list on the
Volume File Alert Service page.
Alternatively, to exit the dialog box without changing the File Alert Service settings, click Close.
Data Propagation
Data propagation requires one Edge Appliance (the source) to push data to cloud storage and another Edge Appliance (the destination) to pull that data from cloud storage.
You can view a chart of how long it takes data in shared volumes to propagate from the source Nasuni Edge Appliance to any remote Nasuni Edge Appliances. You can also view a chart of the age of the oldest data or metadata in the cache. Two charts are available:
Data Propagation Time (DPT) chart: The Data Propagation Time chart shows the time taken for a version of a file or folder to propagate on the vertical axis, and the time span on the horizontal axis.
The time to propagate is measured from the start of the snapshot on the source Nasuni Edge Appliance to the completion of synchronization on destination Nasuni Edge Appliances.
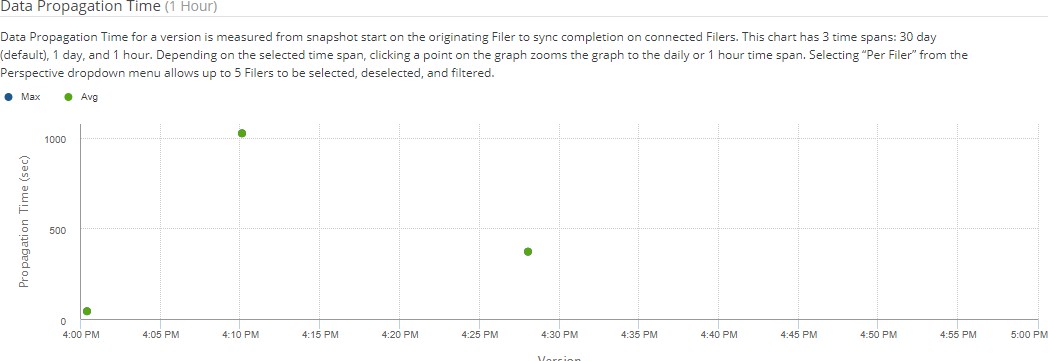
Figure 7-157: Data Propagation Time (DPT) chart.
This chart can be useful to investigate how long it takes data to propagate from a source Edge Appliance to destination Edge Appliances. You can use this to get a general idea about how long it takes data to propagate, or to investigate specific situations involving data propagation.
By adjusting the time scale, you can examine the time to propagate on specific dates (within the last 30 days) or at specific times.
Using the “Max and Avg” perspective, you can see cumulative data propagation times across all Edge Appliances. Using the “Per Filer” perspective, you can see data propagation times to the specified destination Edge Appliances.
The time span and resolution on the horizontal axis is one of the following:
30 days of data, at once-per-day resolution (default);
1 day, at once-per-hour resolution;
1 hour, showing every snapshot.
Tip: The Data Propagation Time chart is only available for volumes that are shared by two or more Nasuni Edge Appliances that are running version 8.4 or later.
The Data Propagation Time chart is available in two perspectives:
Max and Avg (default): Displays the maximum time (and the average time) taken for any snapshot of a file or folder completed during a given day or hour to be synced to other
Nasuni Edge Appliances on the vertical axis, and the time span on the horizontal axis. For the 1-hour time span, the chart shows the maximum time (and the average time) taken for a particular version of a file or folder to be synced to other Nasuni Edge Appliances on the vertical axis, and the time span on the horizontal axis.
With the Max and Avg perspective, you can select and deselect the display of the maximum value by clicking the Max chart legend. Similarly, you can select and deselect the display of the average value by clicking the Avg chart legend.
Per Filer: Displays the maximum value for any selected Nasuni Edge Appliances connected to the selected volume, as well as the average value for any selected Nasuni Edge Appliances connected to the selected volume.
With the Per Filer perspective, you can select which Nasuni Edge Appliances to display data for from the Filers drop-down list.
With the Per Filer perspective, you can select and deselect the display of the maximum and average value for each Nasuni Edge Appliance by clicking the appropriate chart legend.
Age of Oldest Unprotected Data (OUD) chart: The Age of Oldest Unprotected Data chart displays on the vertical axis the age of the oldest unprotected data or metadata in the cache, and the time of observation on the horizontal axis.
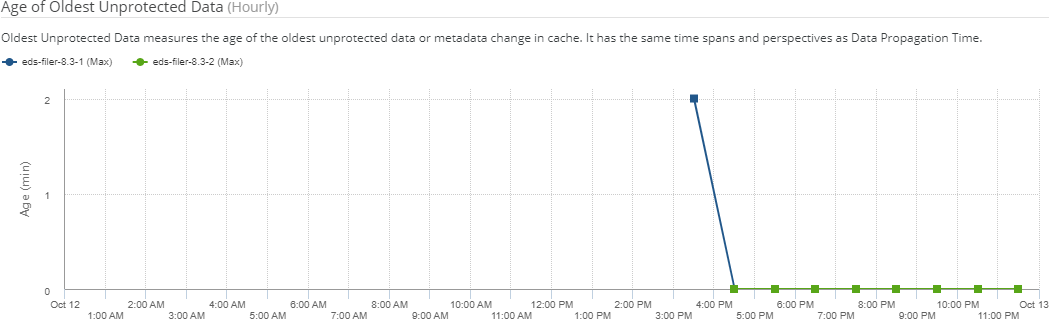
Figure 7-158: Age of Oldest Unprotected Data (OUD) chart.
This chart can be useful to examine how unprotected data moves from the cache to cloud object storage. You can use this to get a general idea about how long data remains in the cache before moving to cloud object storage, or to investigate specific situations involving data moving to cloud object storage.
By adjusting the time scale, you can examine the oldest data on specific dates (within the last 30 days) or at specific times.
Using the “Max and Avg” perspective, you can see the oldest unprotected data in the cache for all Nasuni Edge Appliances connected to the selected volume. Using the “Per Filer” perspective, you can see the oldest unprotected data in the cache for specified Edge Appliances connected to the selected volume.
The time of observation and resolution on the horizontal axis is one of the following:
30 days of data, at once-per-day resolution (default);
1 day, at once-per-hour resolution;
for Per Filer perspective, 1 hour, showing every OUD observation.
The Age of Oldest Unprotected Data chart is available in two perspectives:
Max and Avg (default): Displays the age of the oldest unprotected data or metadata in the cache for all the Nasuni Edge Appliances connected to the selected volume.
With the Max and Avg perspective, you can select and deselect the display of the value by clicking the Max chart legend.
Per Filer: Displays the age of the oldest unprotected data or metadata in the cache for any selected Nasuni Edge Appliances connected to the selected volume.
With the Per Filer perspective, you can select which Nasuni Edge Appliances to display data for from the Filers drop-down list.
With the Per Filer perspective, you can select and deselect the display of the value for each Nasuni Edge Appliance by clicking the appropriate chart legend.
Tip: Square points represent the age of the oldest unprotected data just before a snapshot is taken. Triangular points represent the age of the oldest unprotected data just after a snapshot. Circular points represent a periodic report of the age of the oldest unprotected data.
To change from one time span to the next finer time span, click any point on either chart. To change from one time span to the next less fine time span, click Zoom Out.
To view data propagation displays, follow these steps:
Click Data Propagation. The Data Propagation page displays the Data Propagation Time chart and the Age of Oldest Unprotected Data chart.
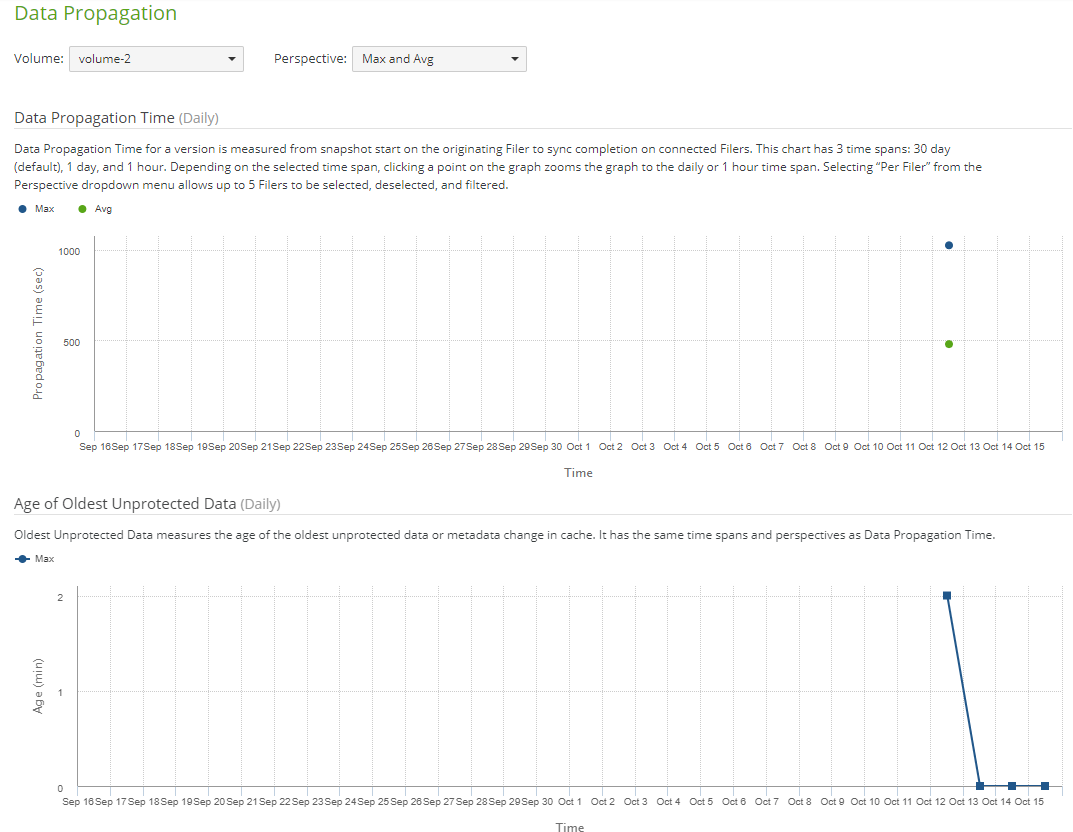
Figure 7-159: Data Propagation page.
From the Volume drop-down list, select the volume whose data propagation display you want to see. The charts reflect the selected volume.
From the Perspective drop-down list, select the perspective of the display you want to see, from the following:
Max and Avg, as described above.
Per Filer, as described above.
If the Per Filer perspective is selected, select which Nasuni Edge Appliances to display data for from the Filers drop-down list. You can select up to 5 Nasuni Edge Appliances.
To change from one time span to the next finer time span, click any point on either chart. To change from one time span to the next less fine time span, click Zoom Out.
You can display different combinations of Nasuni Edge Appliances and maximum and average values by clicking the appropriate chart legends.